


SharedPreferences
SharedPreferences是一种轻型的数据存储方式,它的本质是基于XML文件存储Key-Value键值对数据,通常用来存储一次而简单的配置信息。其存储位置在/data/data/<包名>/shared_prefs目录下。SharedPreferences对象本身只能获取数据,而不支持存储和修改,存储修改通过Editor对象来实现。
SharedPreferences支持以下数据类型:boolean,int,String,float,long
实现SharedPreferences存储的步骤如下:
**1.根据Context获得SharedPreferences对象
2、利用edit()方法获取Editor对象。
3、通过Editor对象存储key-value键值对数据。
4、通过commit()方法提交数据。**
下面用一个简单的登录实例进行演示SharedPreferences的使用
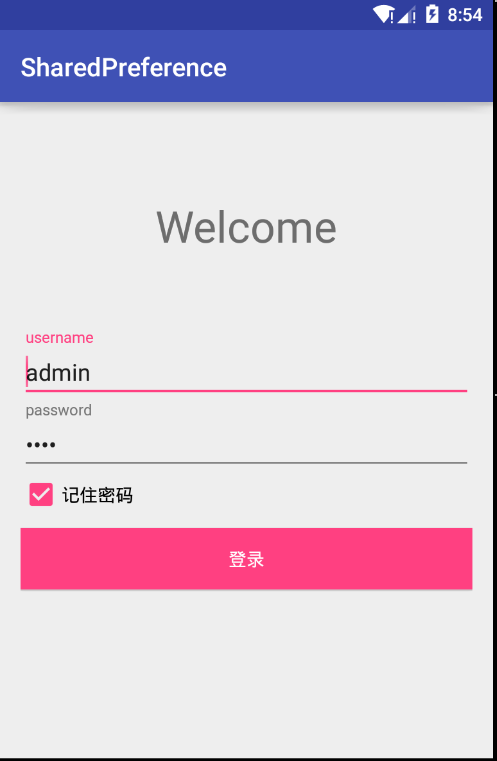
实现后的界面如下:
代码如下:
private EditText et_username,et_password;
    private Button btn_login;//登录按钮
    private CheckBox cb;//勾选框
    SharedPreferences preferences;
    SharedPreferences.Editor editor;
    @Override
    protected void onCreate(Bundle savedInstanceState) {
        super.onCreate(savedInstanceState);
        setContentView(R.layout.activity_main);

        initView();
        btn_login.setOnClickListener(new View.OnClickListener() {
            @Override
            public void onClick(View v) {
                String username = et_username.getText().toString().trim();
                String password = et_password.getText().toString().trim();
                if ("admin".equals(username)&&"root".equals(password)){
                    editor.putString("username",username);//默认储存用户名
                    if (cb.isChecked()){
                        editor.putString("password",password);//储存密码
                    }else {
                        if (preferences.contains("password")){
                            editor.remove("password");//移除之前储存的密码
                        }
                    }
                    editor.commit();//提交操作一定不能省
                    Toast.makeText(MainActivity.this, "登陆成功",
                    Toast.LENGTH_SHORT).show();
                }else {
                    Toast.makeText(MainActivity.this, "用户名或密码错误",
                    Toast.LENGTH_SHORT).show();
                }
            }
        });
    }

    private void initView() {
        et_username = (EditText) findViewById(R.id.et_username);
        et_password = (EditText) findViewById(R.id.et_password);
        btn_login = (Button) findViewById(R.id.btn_login);
        cb = (CheckBox) findViewById(R.id.cb_remember_password);
        preferences = getSharedPreferences("user",MODE_PRIVATE);
        editor = preferences.edit();
        String username = preferences.getString("username","");
        //取键为password的值,如果没有就设为空
        String password = preferences.getString("password","");
        if (!TextUtils.isEmpty(username)){
            et_username.setText(username);
            if (TextUtils.isEmpty(password)){//密码为空
                cb.setChecked(false);//勾选框为未勾选状态
            }else {
                cb.setChecked(true);//勾选框为勾选状态
                et_password.setText(password);
            }
        }
    }
布局文件如下:
<?xml version="1.0" encoding="utf-8"?>
<LinearLayout xmlns:android="http://schemas.android.com/apk/res/android"
    xmlns:tools="http://schemas.android.com/tools"
    android:layout_width="match_parent"
    android:layout_height="match_parent"
    android:orientation="vertical"
    android:padding="@dimen/activity_horizontal_margin"
    tools:context="com.learn.sharedpreference.MainActivity">

    <RelativeLayout
        android:layout_width="match_parent"
        android:layout_height="wrap_content"
        android:layout_weight="1">

        <TextView
            android:layout_width="wrap_content"
            android:layout_height="wrap_content"
            android:layout_centerInParent="true"
            android:text="Welcome"
            android:textSize="34sp" />
    </RelativeLayout>

    <LinearLayout
        android:layout_width="match_parent"
        android:layout_height="wrap_content"
        android:layout_weight="1"
        android:orientation="vertical">

        <android.support.design.widget.TextInputLayout
            android:layout_width="match_parent"
            android:layout_height="wrap_content">

            <EditText
                android:id="@+id/et_username"
                android:layout_width="match_parent"
                android:layout_height="wrap_content"
                android:hint="username">

                <requestFocus />
            </EditText>
        </android.support.design.widget.TextInputLayout>

        <android.support.design.widget.TextInputLayout
            android:layout_width="match_parent"
            android:layout_height="wrap_content">

            <EditText
                android:id="@+id/et_password"
                android:layout_width="match_parent"
                android:layout_height="wrap_content"
                android:hint="password"
                android:inputType="textPassword"
                ></EditText>
        </android.support.design.widget.TextInputLayout>
        <CheckBox
            android:id="@+id/cb_remember_password"
            android:layout_width="wrap_content"
            android:layout_height="wrap_content"
            android:text="记住密码"
            />
        <Button
            android:id="@+id/btn_login"
            android:layout_width="match_parent"
            android:layout_height="wrap_content"
            android:layout_marginTop="10dp"
            android:background="@color/colorAccent"
            android:text="登录"
            android:textColor="@android:color/white" />
    </LinearLayout>
</LinearLayout>
由于使用了TextInputLayout,需要在Gradle配置 build.gradle,添加下面一行
compile 'com.android.support:design:23.3.0'SharedPreferences 使用时需要注意的有
1.获得SharedPreferences对象
preferences = getSharedPreferences("user",MODE_PRIVATE);这里在/data/data/<包名>/shared_prefs目录下创建了一个名为user的xml文件,并设置其访问权限为MODE_PRIVATE
这里介绍了几种操作模式,通常采用默认模式MODE_PRIVATE
MODE_PRIVATE:为默认操作模式,代表该文件是私有数据,只能被应用本身访问,在该模式下,写入的内容会覆盖原文件的内容,如果想把新写入的内容追加到原文件中。可以使用Context.MODE_APPEND
MODE_APPEND:模式会检查文件是否存在,存在就往文件追加内容,否则就创建新文件。
Context.MODE_WORLD_READABLE和Context.MODE_WORLD_WRITEABLE用来控制其他应用是否有权限读写该文件。
MODE_WORLD_READABLE:表示当前文件可以被其他应用读取;
MODE_WORLD_WRITEABLE:表示当前文件可以被其他应用写入。
2、利用edit()方法获取Editor对象,通过Editor对象来实现存储修改
editor = preferences.edit();3、通过Editor对象存储key-value键值对数据。
editor.putString("username",username);``
editor.putString("password",password);
4、通过commit()方法提交数据。
editor.commit();通过 editor.remove("password");移除数据
当需要取出存储的值时
String username = preferences.getString("username","");
String password = preferences.getString("password","");
有则取出,无则置空
好了,这样就通过使用SharedPrefrences实现了一个记住密码的登陆界面小demo


 1514
1514

 被折叠的 条评论
为什么被折叠?
被折叠的 条评论
为什么被折叠?
 到【灌水乐园】发言


