


Spring Security这块有很多新的概念和类,这些成为了初学者理解最大的困难。看了很多视频,感觉这一块比较混乱,给我一种云里雾里的感觉。花了很长时间整理出了这篇文章。他将从各个新出现的类出发,先将这些类的意思和作用说清楚,再去代码中看他的使用,最后将这些综合起来,给出这些类在开发中的使用,给出最终代码。文字内容比较多,大家可以先看看先看代码再看对应的文字,便于理解。
- 认证(Authentication)
解决你是谁的问题,具体表现为注册与登录
- 授权(Authorization)
解决你能干什么的问题,你登录后有哪些权限。
Spring Security授权流程
一共五张表 用户,角色,权限,用户角色关系,角色权限关系(前三者都是多对多,五张表的创建最后会给出)
(权限其实就是字符串,给每个接口设置一个权限,当前用户之后拥有此权限,才能访问此接口)
@PreAuthorize("@ss.hasPermi('contract:contractVehicle:export')")
写在方法上面,意思是只有contract:contractVehicle:export这个权限的用户才可以访问。
注意权限(permissions)表在实际开发中往往被称为菜单(Menu)!!!
这里简单介绍下权限是因为登录认证期间就需要将权限设置好,为了方便理解,提前说下。
登陆认证
原理
如果现在让你写一个登录功能(Authentication)你怎么写?很自然的思路是不是把用户提交的信息和我们保存的信息做个比较,如果对上了就登录成功。其实spring security整体也是这样的,只是流程化后,兼顾扩展导致搞的很复杂。这篇文章我会从原程序出发,解释其如何对源程序进行流程化,并为此设计了哪些类,这些类是干嘛的,对应原来的哪一部分。
Spring Security的整体原理为:
- 当http请求进来时,使用severlet的Filter来拦截。
- 提取http请求中的认证信息,例如username和password,或者Token。
- 从数据库(或者其他地方,例如Redis)中查询用户注册时的信息,然后进行比对,相同则认证成功,反之失败。
主体就是这么简单,然后只有抓住这个主体思路才不容易被Spring Security绕晕...
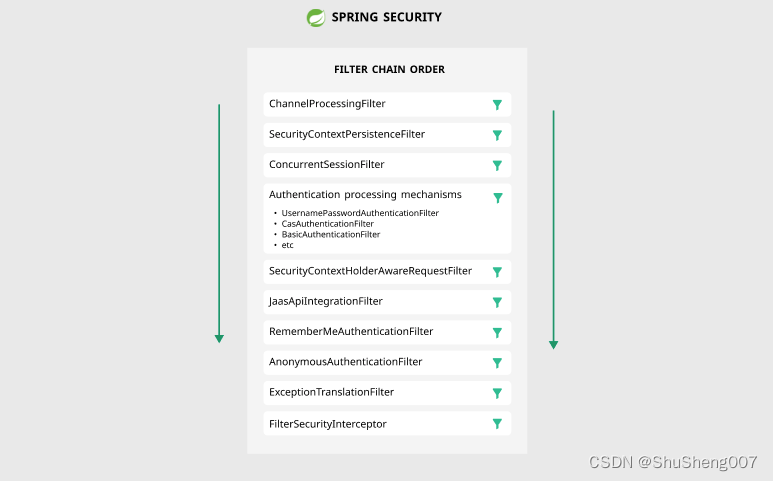
下图展示了Spring Security的一些Filter,其中UsernamePasswordAuthenticationFilter很重要,它是Authentication的开始。
UserDetails
这是一个接口,分装了User对象以及权限列表。他是框架提供给我们的登陆用户实体的规范。
理解
我们可能会好奇,为什么不直接使用User实体对象呢,反而是创建一个LoginUser类分装User,并让其实现UserDetails?
其实很简单,LoginUser就是Spring Security中的User实体对象(从数据库查询的数据),框架是别人写的,我们需要按照别人提供给我们的规范进行开发,框架并不知道我们会创建什么类作为用户,他只会将实现了UserDetails的类作为登陆用户,并且我们需要实现相关的方法。
代码
@Data
@NoArgsConstructor
public class LoginUser implements UserDetails {
    private User user;
    private List<SysMenu> permissions;
    public LoginUser(User user, List<SysMenu> permissions){ this.user=user;this.permissions=permissions}
    //获取权限列表
    @Override
    public Collection<? extends GrantedAuthority> getAuthorities() {
        //返回当前用户的权限
        return permissions.stream().filter(permission -> permission != null && StrUtil.isNotEmpty(permission.getValue()))
                .map(permission -> new SimpleGrantedAuthority(permission.getValue()))
                .collect(Collectors.toList());
    }
    //获取密码
    @Override
    public String getPassword() { return user.getPassword(); }
    //获取用户名
    @Override
    public String getUsername() { return user.getUserName(); }
    //判断账号是否未过期
    @Override
    public boolean isAccountNonExpired() { return true; }
    //判断账号是否没有锁定
    @Override
    public boolean isAccountNonLocked() { return true; }
    //判断账号是否没有超时
    @Override
    public boolean isCredentialsNonExpired() { return true; }
    //判断是否可用(“1”:代表可用  0:“不可用”)
    @Override
    public boolean isEnabled() { return "1".equals(user.getStatus()); }
}
SecurityContextHolder(Authentication)
Spring Security 的认证模型的核心是 SecurityContextHolder。它包含了SecurityContext。而他的核心是Authentication。
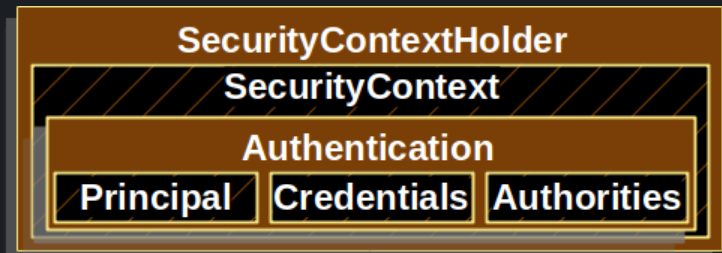
Principal(主体): 识别用户。当用用户名/密码进行认证时,这通常是 UserDetails 的一个实例。
Credentials(证书):密码
Authorities(授权):权限
Principal中会保存一个密码,和Credentials这个密码有什么区别?
事实上,Principal中一般不会保存密码,即使保存也是保存在 UserDetails 的一个实例中,是加密后的密码,然后将这个实例封装在Principal中。
而Credentials的密码:
- Credentials(凭证)中的密码通常指的是用户在登录时提供的原始密码。
- 在认证过程中,这个密码会被用来与存储在系统中的加密密码进行比对。
- 出于安全考虑,一旦认证完成,这个原始密码通常会被立即从Authentication对象中清除。
理解
SecurityContextHolder按照字面意思“安全上下文的管理器”,由于我们将 原本的认证流程化,导致多个流程之间数据传递变得比较繁琐,所以将认证的核心数据(用户名,密码,权限 )封装成一个Authentication。看到Context有没有感觉很熟悉,没错就是ThreadLocal,事实上SecurityContext就被存储在ThreadLocal中,是单线程共享的!!!
说白了就是 Spring Security 存储用户 认证 细节的地方。Spring Security 并不关心 SecurityContextHolder 是如何被填充的。如果它包含一个值,它就被用作当前认证的用户。
最简单的方法是直接设置 SecurityContextHolder 来表明用户已被认证。
注意:所有的authentication有两种状态,他会维护一个变量,
如果是false,意味着此authentication中只设置了用户名,密码,没有设置权限信息,意味着是不能被认证,也就是不完整,不完整意味着无法进行授权,这个后面会讲到。
而如果是true,意味着他是完整的,可以用于授权。
我相信这个时候再来看以下代码,将会非常简单
使用
设置SecurityContextHolder
SecurityContext context = SecurityContextHolder.createEmptyContext();
Authentication authentication =
    new TestingAuthenticationToken("username", "password", "ROLE_USER");
context.setAuthentication(authentication);

SecurityContextHolder.setContext(context);
我们从创建一个空的 SecurityContext 开始。你应该创建一个新的 SecurityContext 实例,而不是使用 SecurityContextHolder.getContext().setAuthentication(authentication),以避免多线程之间的竞争。
❓线程和请求,为什么会有多线程竞争,多个线程不应该就是多个请求吗,难道所有请求共用一个SecurityContextHolder,那么这个应不应该多个线程公用一个?而且在后面jwt校验不是同样设置了authentication吗?
在典型的web应用中,每个请求通常由一个独立的线程处理。
但是,这并不总是一对一的关系。有些情况下,一个请求可能开启多个线程,或者一个线程可能处理多个请求(如在使用异步处理或线程池的情况下)。
接下来,我们创建一个新的 Authentication 对象。Spring Security 并不关心在 SecurityContext 上设置了什么类型的 Authentication 实现。这里,我们使用 TestingAuthenticationToken,因为它非常简单。一个更常见的生产场景是 UsernamePasswordAuthenticationToken(userDetails, password, authorities)。
最后,我们在 SecurityContextHolder 上设置 SecurityContext。Spring Security 使用这些信息进行 授权。
访问 SecurityContextHolder
SecurityContext context = SecurityContextHolder.getContext();
Authentication authentication = context.getAuthentication();
String username = authentication.getName();
Object principal = authentication.getPrincipal();
Collection<? extends GrantedAuthority> authorities = authentication.getAuthorities();
默认情况下,SecurityContextHolder 使用 ThreadLocal 来存储这些细节,这意味着 SecurityContext 对同一线程中的方法总是可用的,即使 SecurityContext 没有被明确地作为参数传递给这些方法。如果你注意在处理完当前委托人的请求后清除该线程,以这种方式使用 ThreadLocal 是相当安全的。 Spring Security 的 FilterChainProxy 确保 SecurityContext 总是被清空。
有些应用程序并不完全适合使用 ThreadLocal,因为它们与线程的工作方式很特殊。例如,一个Swing客户端可能希望Java虚拟机中的所有线程都使用同一个安全上下文。你可以在启动时用一个策略来配置 SecurityContextHolder,以指定你希望如何存储上下文。对于一个独立的应用程序,你会使用 SecurityContextHolder.MODE_GLOBAL 策略。其他应用程序可能想让安全线程所产生的线程也承担相同的 security 身份。你可以通过使用 SecurityContextHolder.MODE_INHERITABLETHREADLOCAL 来实现。你可以通过两种方式改变默认的 SecurityContextHolder.MODE_THREADLOCAL 的模式。第一个是设置一个系统属性。第二种是调用 SecurityContextHolder 的一个静态方法。大多数应用程序不需要改变默认值。但是,如果你需要,请看一下 SecurityContextHolder 的 JavaDoc 以了解更多。
默认实现
咱先从最简单的开始,使用Spring Security保护一个使用Spring Boot开发的web程序。
只要在pom.xml中引入依赖Spring Security的依赖即可。
<dependencies>
    <dependency>
        <groupId>org.springframework.boot</groupId>
        <artifactId>spring-boot-starter-web</artifactId>
    </dependency>
    <dependency>
        <groupId>org.springframework.boot</groupId>
        <artifactId>spring-boot-starter-security</artifactId>
    </dependency>
</dependencies>
然后我们写一个测试用的controller。
@RestController
@RequestMapping("/auth")
public class TestController {

    @GetMapping("/hello")
    public String sayHello(){
        return "hello security";
    }
}使用浏览器访问localhost:8080/auth/hello,你就会发现弹出一个登录页面让你登录
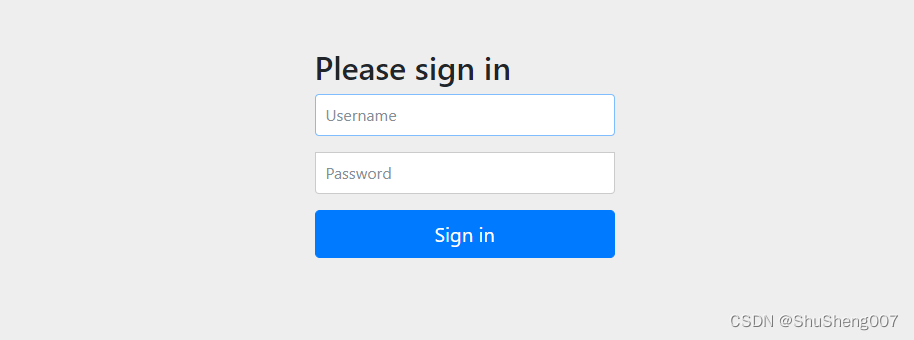
我们没有写一行代码就实现了一个登录功能,酷不酷?不过用户名和秘密是啥呢?别着急这个Spring Security已经给我们生成了。
username:user
password:随机生成,会打印在你的控制台日志上。
日志:
Using generated security password: 3f5acb10-1390-4474-8892-71e7562d47ce当然了,我们可以在application.yml中配置用户名和秘密
spring:
  security:
    user:
      name: shusheng007
      password: ss007
那这一切都是怎么发生的呢?这才是我们要关注的重点。
一个请求过来Spring Security会按照下图的步骤处理:

接下来就是整个Spring Security的难点:流程。
注意:各个流程之间是上下级关系,上级调用下级!!!
同时这四个流程其实都有默认实现,往往我们只需要写最后一个流程!!!
❓权限检查是在那个流程完成的?为什么登陆认证处理时会涉及权限的处理呢?
这里的四个流程只是登陆认证的四个流程,权限校验是在其之后执行的。而之所以登陆认证流程中会将用户权限保存到SecurityContext中,是因为这个会放入ThreadLocal,后面的授权会根据其中保存的权限来处理,所以登录认证阶段必须将权限数据保存进去(具体见后)
Filter:UsernamePasswordAuthenticationFilter
拦截Http请求,获取用户名和秘密等认证信息(用户填写的,而非后端保存的)
这个拦截器只在未登录时生效,登录之后会“失活”!!!(具体见后)
关键方法:
public abstract Authentication attemptAuthentication(HttpServletRequest request, HttpServletResponse response)
throws AuthenticationException, IOException, ServletException;AuthenticationManager:ProviderManager
他接收的往往是一个不完整的authentication而返回一个完整的authenticate。(完整意味着设置了权限信息)
从filter中获取认证信息,然后调用合适的AuthenticationProvider来发起认证流程
同时AuthenticationManager也可以单独注入,比如在Controller中可以注入此Bean,自己传入认证信息来进行比较,他会自动调用下面的AuthenticationProvider来进行比较。
关键方法:
Authentication authenticate(Authentication authentication) throws AuthenticationException;AuthenticationProvider:DaoAuthenticationProvider
确定比较规则,实现比较功能,同时将不完整的authentication变得完整。
调用UserDetailsService来查询已经保存的用户信息并与从http请求中获取的认证信息比对。如果成功则返回,否则则抛出异常。
注意:他接收的往往是不完整的authentication返回完整的authentication!!!
你可以在 ProviderManager 中注入多个 AuthenticationProvider 实例。每个 AuthenticationProvider 都执行一种特定类型的 认证。例如, DaoAuthenticationProvider 支持基于用户名/密码的 认证,而 JwtAuthenticationProvider 支持认证JWT令牌。
❓既然AuthenticationProvider有多个实现,那么AuthenticationManager如何调用,同时在ProviderManager中注入多个实例,但是这个不是实现的认证规则吗,AuthenticationManager有多个规则,又要如何比较呢?
当ProviderManager收到一个认证请求时,它会依次遍历其管理的所有AuthenticationProvider。
对于每个AuthenticationProvider,ProviderManager会先检查它是否支持当前的认证类型。
AuthenticationProvider的选择:
每个AuthenticationProvider都有一个supports(Class<?> authentication)方法。
ProviderManager使用这个方法来确定某个provider是否能处理当前的认证请求。
认证过程:
ProviderManager按顺序尝试每个支持当前认证类型的AuthenticationProvider。
如果一个AuthenticationProvider成功认证,ProviderManager立即返回结果,不再尝试其他provider。
如果所有的AuthenticationProvider都失败,ProviderManager会抛出一个综合的认证异常。
关键方法:
注意:这个的实现方式有很多,我这里只是举个例子,同时如果不写,会使用默认。如果自定义,需要修改配置,这个后面会说。
public class JwtAuthenticationProvider implements AuthenticationProvider {

    @Autowired
    private  PasswordEncoder passwordEncoder;
    @Autowired
    private UserDetailsService userDetailsService;

    @Override
    public Authentication authenticate(Authentication authentication) throws AuthenticationException {
        //传入的authentication是浏览器传过来的信息
        String username = String.valueOf(authentication.getPrincipal());
        String password = String.valueOf(authentication.getCredentials());

        //后端根据用户名查询到的userDetails
        UserDetails userDetails = userDetailsService.loadUserByUsername(username);
        if(passwordEncoder.matches(password,userDetails.getPassword())){
           return new UsernamePasswordAuthenticationToken(username, password,
                                            userDetails.getAuthorities());
        }

        throw new BadCredentialsException("Error!!");
    }

    @Override
    public boolean supports(Class<?> authentication) {
        return UsernamePasswordAuthenticationToken.class.equals(authentication);
    }
}UserDetailsService:InMemoryUserDetailsManager
负责获取用户保存的认证信息,接收用户名,返回对应的用户实体,例如查询数据库。
接收userName,通过userName查询到用户数据user和权限信息,将其分装为LoginUser(框架中的实体对象)。
这里是为了方便大家理解,事实上,在开发中,可以直接查LoginUser并用UserDetails接收;
关键方法:
@Service
public class UserDetailsServiceImpl implements UserDetailsService {

    @Resource
    private UserMapper userMapper;

    @Override
    public UserDetails loadUserByUsername(String userName) throws UsernameNotFoundException {
        QueryWrapper<Object> queryWrapper = new QueryWrapper<>();
        queryWrapper.eq("user_name",userName);
        User user = userMapper.selectOne(queryWrapper);
        if(Objects.isNull(user)){
            throw  new RuntimeException("不存在此用户");
        }
        //2.赋权操作
        List<SysMenu> permissions = sysMenuService.selectMenuList(user.getId());
        List<SysRole> userRoleList = sysRoleService.getUserRoleList(user.getId());
        user.setRoles(userRoleList);
        return new SysUserDetails(user, permissions);
    }
}
这些组件都是抽象的,每个都可以有不同的实现,换句话说都是可以定制,特别灵活,所以就特别复杂。具体到我们这个默认的例子中,使用的都是默认实现:
- Filter: UsernamePasswordAuthenticationFilter
- AuthenticationManager: ProviderManager
- AuthenticationProvider: DaoAuthenticationProvider
- UserDetailsService: InMemoryUserDetailsManager
业务流程是不是很清晰,之所以感觉复杂是因为经过框架的一顿设计,拉长了调用链。虽然设计上复杂了,但是如果理解了这套设计流程,终端用户使用就会简单很多,不理解的话,感觉特别复杂。
使用Token认证方案
上面那套默认实现几乎是不能用在生产环境的,我们日常也不这么用,生产环境中我们一般会结合Token来做认证。
JWT
比较流行的就是使用JWT(JSON Web Tokens),其是一个开放的工业标准。
JSON Web Tokens are an open, industry standard RFC 7519 method for representing claims securely between two parties.
有关于它的介绍可以直接点击上面的网站去查看,这里做个简单的介绍。其一共有三部分
- Header
- Payload
- Signature
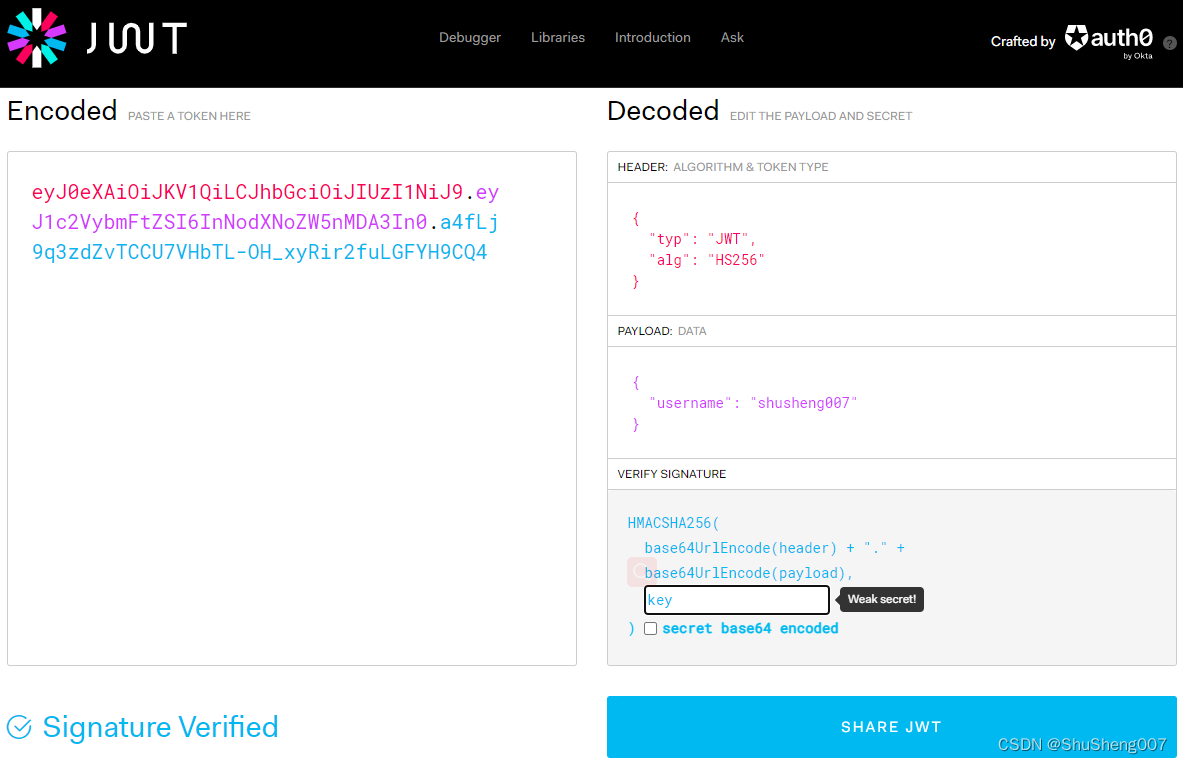
这三部分base64后采用.连接,例如下面就是我生成的一个jwt
eyJ0eXAiOiJKV1QiLCJhbGciOiJIUzI1NiJ9
.
eyJ1c2VybmFtZSI6InNodXNoZW5nMDA3In0
.
a4fLj9q3zdZvTCCU7VHbTL-OH_xyRir2fuLGFYH9CQ4前两部分是base64,最后一部分是前面两部分使用SHA256的签名。你可以使用JWT(JSON Web Tokens)这个网站提供的工具来解码JWT。下图是上面那个jwt的解码结果。
操作JWT的库非常多,我们这里使用一个强悍的国产工具Hutool里的关于JWT的: hutool-jwt
认证流程
认证的底层逻辑仍然是一样的,就是将用户提交的凭证与我们保存的凭证对比。
- 登录
用户使用用户名与秘密登录我们的系统,登录成功后颁发JWT给用户
- 发起请求
用户发起请求时在Header中携带JWT,程序拦截并检查这个token是否合法,合法则放行,不合法则提示从新登录。
下面我们实现一下这个过程:
第一步: 引入依赖
 <dependencies>
     <dependency>
         <groupId>org.springframework.boot</groupId>
         <artifactId>spring-boot-starter-web</artifactId>
     </dependency>

     <dependency>
         <groupId>org.springframework.boot</groupId>
         <artifactId>spring-boot-starter-security</artifactId>
     </dependency>

     <dependency>
         <groupId>cn.hutool</groupId>
         <artifactId>hutool-jwt</artifactId>
         <version>${hutool-jwt.version}</version>
     </dependency>
 </dependencies>
第二步: 登录
AuthController
由于登陆没有被拦截,所以我们需要自己导入authenticationManager来进行比较。
@RestController
@RequestMapping("/user")
public class AuthController {

    @Autowired
    AuthenticationManager authenticationManager;

...

    @PostMapping("/login")
    public String login(@RequestBody SignInReq req) {

        UsernamePasswordAuthenticationToken authenticationToken =
                new UsernamePasswordAuthenticationToken(req.getUsername(), req.getPassword());
        authenticationManager.authenticate(authenticationToken);

         //上一步没有抛出异常说明认证成功,我们向用户颁发jwt令牌
        String token = JWT.create()
                .setPayload("username", req.getUsername())
                .setKey(MyConstant.JWT_SIGN_KEY.getBytes(StandardCharsets.UTF_8))
                .sign();

        return token;
    }
}这里的AuthenticationManager注入的是默认实现AuthenticationManager实例。AuthenticationManager是一个Authentication,我们构建一个Authentication然后交给AuthenticationManager去校验。一定要注意这里使用的是两个参数的构造方法,它将认证状态设置为了false,接着就需要让AuthenticationManager去校验用户名和秘密。
❓为什么是false,这个false是什么意思?
答:意味着只设置了用户名,密码,没有设置权限信息,意味着他是不完整的,authenticationManager.authenticate(authenticationToken);当我们调用这个方法,他不仅会对传入的authentication进行校验,同时还会返回一个完整的authentication。如果整个过程中出现错误,就会抛出异常。
    public UsernamePasswordAuthenticationToken(Object principal, Object credentials) {
        ...
        this.setAuthenticated(false);
    }
第三步: 拦截请求,校验token
JwtAuthenticationTokenFilter OncePerRequestFilter
做拦截,用于校验token
@Slf4j
public class JwtAuthenticationTokenFilter extends OncePerRequestFilter {
    private final static String AUTH_HEADER = "Authorization";
    private final static String AUTH_HEADER_TYPE = "Bearer";

    @Autowired
    private UserDetailsService userDetailsService;

    @Override
    protected void doFilterInternal(HttpServletRequest request, HttpServletResponse response, FilterChain filterChain) throws ServletException, IOException {
        // get token from header:  Authorization: Bearer <token>
        String authHeader = request.getHeader(AUTH_HEADER);
        if (Objects.isNull(authHeader) || !authHeader.startsWith(AUTH_HEADER_TYPE)){
            filterChain.doFilter(request,response);
            return;
        }

        String authToken = authHeader.split(" ")[1];
        log.info("authToken:{}" , authToken);
        //verify token
        if (!JWTUtil.verify(authToken, MyConstant.JWT_SIGN_KEY.getBytes(StandardCharsets.UTF_8))) {
            log.info("invalid token");
            filterChain.doFilter(request,response);
            return;
        }

        final String userName = (String) JWTUtil.parseToken(authToken).getPayload("username");
        UserDetails userDetails = userDetailsService.loadUserByUsername(userName);

        // 注意,这里使用的是3个参数的构造方法,此构造方法将认证状态设置为true
        UsernamePasswordAuthenticationToken authentication =
                new UsernamePasswordAuthenticationToken(userDetails.getUsername(), userDetails.getPassword(), userDetails.getAuthorities());
        authentication.setDetails(new WebAuthenticationDetailsSource().buildDetails(request));

        //将认证过了凭证保存到security的上下文中以便于在程序中使用
        SecurityContextHolder.getContext().setAuthentication(authentication);

        filterChain.doFilter(request, response);
    }若以
}❓为什么new这么多次authentication,这个不是保存在上下文中的吗,不应该只创建一次吗?
jwt拦截器是登陆之后做的操作,主要是对jwt的解析,而登录认证拦截器是登陆拦截器,也就是说,他在为登陆时生效,登录之后,这个拦截器会直接放行,所以不存在多个authentication。
单独的authentication并不会保存在上下文中,只有将其设置到SecurityContext中,才会保存在上下文中。而这里其实是核心,只有将完整的authentication保存在上下文中,认证后的授权操作才能再次进行!!!
❓这里已经将authentication保存到上下文,但是UsernamePasswordAuthenticationFilter中也同样创建了authentication,会不会冲突,而去有必要吗?
并不会,登陆认证拦截器是在未登录时生效,登录之后,主要是jwt拦截器起作用。
JwtAuthenticationTokenFilter继承 OncePerRequestFilter,其会拦截http请求,然后检查其header: Authorization携带的 jwt。如果通过了就从jwt中获取用户名,然后到数据库(或者redis)里查询用户信息,然后生成验证通过的UsernamePasswordAuthenticationToken。一定要注意这次使用的是3个参数的构造函数,其将认证状态设置为了true。
❓整个认证过程中,都没有创建用户,也就是只是登陆校验,如果是用户注册呢?是否·需要放行?
当然,再未登录时,是需要放行注册接口的,这样才能在未登录时,访问注册接口,实现注册。
    public UsernamePasswordAuthenticationToken(Object principal, Object credentials,
            Collection<? extends GrantedAuthority> authorities) {
          ...
        super.setAuthenticated(true); // must use super, as we override
    }
认证通过使用3个参数的构造函数,需要用它进行接下来的认证,则使用2个参数的构造函数。
第四步: 配置security
WebSecurityConfig
由于springboot 2.7.0以后弃用了WebSecurityConfigurerAdapter,所以我们直接采用最新的写法,网上教程很多都是老的写法。
@Configuration
@EnableWebSecurity
public class WebSecurityConfig {
    ...
    //注入密码加密方式
    @Bean
    public PasswordEncoder passwordEncoder(){return new BCryptPasswordEncoder();}
    //注入AuthenticationManager
    @Bean
    public AuthenticationManager authenticationManager(AuthenticationConfiguration authConfig) throws Exception {
        return authConfig.getAuthenticationManager();
    }

    //我们自定义的拦截器
    @Bean
    public JwtAuthenticationTokenFilter jwtAuthenticationTokenFilter() {
        return new JwtAuthenticationTokenFilter();
    }

...
    //对整个拦截器链进行配置
    @Bean
    public SecurityFilterChain filterChain(HttpSecurity httpSecurity) throws Exception {
        //基于token,所以不需要csrf防护
        httpSecurity.csrf().disable()
                //基于token,所以不需要session
                .sessionManagement().sessionCreationPolicy(SessionCreationPolicy.STATELESS)
                .and()
                //配置请求的拦截方式
                .authorizeRequests()
                //登录注册不需要认证,随便访问
                .antMatchers("/user/login", "/user/register").permitAll()
                //除上面的所有请求全部需要鉴权认证
                .anyRequest()
                .authenticated();
        //禁用缓存
        httpSecurity.headers().cacheControl();
        //将我们的JWT filter添加到UsernamePasswordAuthenticationFilter前面,因为这个Filter是authentication开始的filter,我们要早于它
        httpSecurity.addFilterBefore(jwtAuthenticationTokenFilter(), UsernamePasswordAuthenticationFilter.class);

        ...

        return httpSecurity.build();
    }
}
理解
❓为什么将接口放行了,就不会跳转了呢?
原本,当我们访问一个接口,拦截器拦截,会走默认的认证,如果发现未登陆,就会拦截,并返回数据,使其跳转到默认的登陆页面,让你登陆。而当我们放行了自己的登陆接口,当我们访问登陆接口,就不会拦截,当我们登陆之后,此拦截器拦截之后不会做任何处理,直接放行。
❓这里放行了/user/login,也就是说拦截器并不好拦截,登陆之后的拦截主要又是通过JwtAuthenticationTokenFilter拦截,他已经完成了校验和对SecurityContext的填充,那么登陆认证拦截器又是干了什么呢?
UsernamePasswordAuthenticationFilter拦截认证是默认的认证,但是事实上,我们并没有使用这个默认的认证方式,它处在一个“失活”的状态。
登陆时,我们跳过了这个拦截器,自己完成了登陆。登陆之后的认证jwt的拦截器就已经完成了,而之所以要写他,其实主要是为了使用其中的AuthenticationManager,来认证比较方便。
这里的配置信息其实基本都是固定模板
passwordEncoder()
密码编码器,这个是对
jwtAuthenticationTokenFilter()
jwt认证拦截器,作用是拦截请求,判断请求头中是否有jwt,并对其做校验,如果正确,则放行,否则拦截。
❓jwt拦截器和登录认证拦截器的联系,属不属于拦截器链?如果不属于,是在拦截器链之前还是之后?
jwt的拦截器会在登录认证拦截器之前执行,主要是完成登陆之后对jwt的校验。只要登录之后,登录认证拦截器就直接放行,不会再做处理。
authenticationManager()
❓authenticationManager这个也是拦截器,属于拦截器链中,为什么还需要注入?
因为除了拦截器链中调用了这个他,其实在Controller中也可以调用他进行比较两个authentication,因为其功能比较强大,所以将其以注入的方式注入程序中,这样方便使用。
filterChain()
,对过滤器链进行配置,对于Spring Security,安全保护是默认开启的,并且所有接口都需要权限验证,否则都无法访问,都会走默认的登陆(包括我们自定义的登陆接口)。
综上所述,我们发现,实际上登陆认证拦截器压根就没用!登陆时直接走Controller来登陆,登陆后主要通过jwt拦截器对令牌进行校验,并对SecurityContext初始化!是不是感觉很神奇,其实那四个流程只不过是官方给我们的一个示范!事实上此框架下几乎所有东西我们都可以重写(设置包括SecurityContext我们也可以不使用)!!!
自定义Authentication Provider
还记得Authentication Provider是干什么的吗?具体的认证过程就发生在provider中,就是那个比较用户提交的凭证和程序保存凭证的过程。默认使用的是DaoAuthenticationProvider,一般情况都够用了。
自定义Provider
下面我们自定义一个provider,我们自己获取保存的用户凭证,自己比较。
public class JwtAuthenticationProvider implements AuthenticationProvider {

    @Autowired
    private  PasswordEncoder passwordEncoder;
    @Autowired
    private UserDetailsService userDetailsService;

    @Override
    public Authentication authenticate(Authentication authentication) throws AuthenticationException {
        String username = String.valueOf(authentication.getPrincipal());
        String password = String.valueOf(authentication.getCredentials());

        UserDetails userDetails = userDetailsService.loadUserByUsername(username);
        if(passwordEncoder.matches(password,userDetails.getPassword())){
           return new UsernamePasswordAuthenticationToken(username, password, userDetails.getAuthorities());
        }

        throw new BadCredentialsException("Error!!");
    }

    @Override
    public boolean supports(Class<?> authentication) {
        return UsernamePasswordAuthenticationToken.class.equals(authentication);
    }
}值的注意的是我这里仍然使用了UserDetailsService 这个Spring Security提供的接口来获取程序保存的用户凭证。我们这里也可以不使用它,而直接使用我们自己定义的类,例如自己写个查询用户信息的service即可。
修改配置
@Configuration
@EnableWebSecurity
public class WebSecurityConfig {

    @Bean
    public AuthenticationManager authenticationManager(AuthenticationConfiguration authConfig) throws Exception {
        return authConfig.getAuthenticationManager();
    }

    @Bean
    public PasswordEncoder passwordEncoder() {
        return new BCryptPasswordEncoder();
    }

    @Bean
    public JwtAuthenticationTokenFilter jwtAuthenticationTokenFilter() {
        return new JwtAuthenticationTokenFilter();
    }

    @Bean
    public JwtAuthenticationProvider jwtAuthenticationProvider(){
        return new JwtAuthenticationProvider();
    }

    @Bean
    public SecurityFilterChain filterChain(HttpSecurity httpSecurity) throws Exception {
        //由于使用的是JWT,这里不需要csrf防护
        httpSecurity.csrf().disable()
                //基于token,所以不需要session
                .sessionManagement().sessionCreationPolicy(SessionCreationPolicy.STATELESS)
                .and()
                .authorizeRequests()
                //对登录注册允许匿名访问
                .antMatchers("/user/login", "/user/register").permitAll()
                .anyRequest()// 除上面外的所有请求全部需要鉴权认证
                .authenticated();
        //禁用缓存
        httpSecurity.headers().cacheControl();
        //使用自定义provider
        httpSecurity.authenticationProvider(jwtAuthenticationProvider());
        //添加JWT filter
        httpSecurity.addFilterBefore(jwtAuthenticationTokenFilter(), UsernamePasswordAuthenticationFilter.class);
        ...

        return httpSecurity.build();
    }
}
我们使用
httpSecurity.authenticationProvider(jwtAuthenticationProvider());将自定义的provider交给AuthenticationManager使其生效。
认证失败与授权失败处理
当认证失败或者授权失败时我们怎么处理呢?
认证失败处理
首先我们提供一个AuthenticationEntryPoint接口的实现,response的内容根据你的需求修改
@Component
public class MyUnauthorizedHandler implements AuthenticationEntryPoint {
    @Override
    public void commence(HttpServletRequest request, HttpServletResponse response, AuthenticationException authException) throws IOException, ServletException {
        response.setCharacterEncoding("UTF-8");
        response.setContentType("application/json");
        response.getWriter().println("认证失败");
        response.getWriter().flush();
    }
}
将其配置到config中
...
public class WebSecurityConfig {

    @Autowired
    private MyUnauthorizedHandler unauthorizedHandler;
    ...

    @Bean
    public SecurityFilterChain filterChain(HttpSecurity httpSecurity) throws Exception {
        ...
        httpSecurity.exceptionHandling()
                .authenticationEntryPoint(unauthorizedHandler);

        return httpSecurity.build();
    }
}
授权失败处理
与认证失败处理方法类似。
首先我们提供一个AccessDeniedHandler 接口的实现,response的内容根据你的需求修改
@Component
public class MyAccessDeniedHandler implements AccessDeniedHandler {
    @Override
    public void handle(HttpServletRequest request, HttpServletResponse response, AccessDeniedException accessDeniedException) throws IOException, ServletException {
        response.setCharacterEncoding("UTF-8");
        response.setContentType("application/json");
        response.getWriter().println("禁止访问");
        response.getWriter().flush();
    }
}
将其配置到WebSecurityConfig 中
...
public class WebSecurityConfig {

    @Autowired
    private MyAccessDeniedHandler accessDeniedHandler;

    ...

    @Bean
    public SecurityFilterChain filterChain(HttpSecurity httpSecurity) throws Exception {
        ...
        httpSecurity.exceptionHandling()
                .accessDeniedHandler(accessDeniedHandler);

        return httpSecurity.build();
    }
}
支持方法级别的授权
原理
Spring Security授权流程
一共五张表 用户,角色,权限,用户角色关系,角色权限关系(前三者都是多对多)
(权限其实就是字符串,给每个接口设置一个权限,当前用户之后拥有此权限,才能访问此接口)
@PreAuthorize("@ss.hasPermi('contract:contractVehicle:export')")
写在方法上面,意思是只有contract:contractVehicle:export这个权限的用户才可以访问。
在方法运行前,会自动查询当前用户的权限,判断其权限是否有此权限。
Spring Security支持方法级别的授权。什么意思呢,例如你有一个API只能是admin调用,其他角色不允许。
我们在web配置类添加一个注解,如下所示。
@EnableGlobalMethodSecurity(prePostEnabled = true)
public class WebSecurityConfig {
    ...
}
然后在controller里使用@PreAuthorize注解,里面使用spring表达式(SpEL)来设置条件,例如下面的api只允许admin角色方法。
@PreAuthorize("hasRole('admin')")
@GetMapping("/users/{id}")
public String getUserDetail(@PathVariable String id){
    return "用户详情:" + id;
}
那怎么判断当前请求用户是什么角色呢?还记得我们在认证通过时传入UsernamePasswordAuthenticationToken构造函数的第三个参数吗?它是一个Collection<? extends GrantedAuthority> authorities,里面保存的就是此用户的角色。
 UsernamePasswordAuthenticationToken authentication =
         new UsernamePasswordAuthenticationToken(userDetails.getUsername(), userDetails.getPassword(), userDetails.getAuthorities());
顺便在此强调一下:UsernamePasswordAuthenticationToken 仅仅是一个凭证,里面保存了用户的信息,例如username,password,权限等。
同时授权的过程是在登陆认证之后,Controller执行之前完成的。
同样被拆分成三个流程,
- MethodSecurityInterceptor:这是处理方法级安全性的主要组件,包括
@PreAuthorize注解。 - AccessDecisionManager:负责做出授权决定。默认实现是
AffirmativeBased。 - SecurityExpressionHandler:解析和评估安全表达式,如"hasRole('admin')"。
由于其一般都是用默认,不做修改,这里就不再过多介绍。只大致介绍一下流程。
自定义授权规则
@Service("ss")
public class PermissionService {
    /** 所有权限标识 */
    private static final String ALL_PERMISSION = "*:*:*";

    public Boolean hasPermi(String... permissions) {
        if (StringUtils.isEmpty(permissions)) {
            return false;
        }
        // 获取当前用户的所有权限
        List<String> permissionsList = SecurityUtils.getUserDetails()
                                        .getAuthorities()
                                        .stream()
                                        .map(GrantedAuthority::getAuthority)
                                        .collect(Collectors.toList());
        // 判断当前用户的所有权限是否包含接口上定义的权限
        return permissionsList.contains(ALL_PERMISSION) || Arrays.stream(permissions).anyMatch(permissionsList::contains);
    }
}❓那么这个拦截是怎么完成的,如果是通过拦截器,那么拦截器不应该是在进入Controller之前吗,那么他是怎么知道Controller设置的权限是什么呢?
授权检查通常发生在Controller方法被调用之前。
Spring AOP会在方法调用时拦截请求,并触发MethodSecurityInterceptor。
授权检查的过程:
a. 当一个带有@PreAuthorize注解的方法被调用时,MethodSecurityInterceptor会拦截该调用。
b. SecurityExpressionHandler解析@PreAuthorize中的表达式。
c. AccessDecisionManager使用当前认证的用户信息(存储在SecurityContextHolder中)和解析后的表达式来做出授权决定。
d. 如果授权成功,方法调用继续;如果失败,抛出AccessDeniedException。
重要说明:
认证信息(包括用户的角色和权限)存储在SecurityContext中,这是之前认证阶段设置的。
@PreAuthorize等注解使用这些存储的信息来进行授权决策。
授权检查依赖于正确的认证信息,因此必须在认证之后进行。
❓登陆认证拦截器只在登陆时有效,登陆之后处在“失活”状态,又是如何实现授权的呢?
事实上,当运行到Controller上面的@PreAuthorize("hasRole('admin')")时,会触发权限检查。
表建立
sys_user用户表
create table toms_dev.sys_user
(
    id               bigint auto_increment   primary key,
    username         varchar(64)                 null comment '用户名',
    password         varchar(64)                 null comment '密码',
    category         tinyint      default 0      not null comment '用户类型(0:平台用户,1:采购商用户,2:供应商用户)',
    org_id           bigint                       null comment '所属组织ID',
    org_name         varchar(255)                 null comment '组织机构名称',
    dept_id          bigint                       null comment '所属部门ID',
    dept_name        varchar(255)                 null comment '所属部门名称',
    icon             varchar(500) default ''      null comment '头像',
    email            varchar(100)                 null comment '邮箱',
    phone            varchar(11)                  null comment '手机号',
    real_name        varchar(200)                 null comment '姓名',
    sex              tinyint                      null comment '性别(0 男,1 女,2 未知)',
    note             varchar(500)                 null comment '备注信息',
    status           tinyint      default 1       null comment '帐号启用状态:0->禁用;1->启用',
    login_time       datetime                     null comment '最后登录时间',
    login_ip         varchar(64)                  null comment '最后登陆IP',
    create_time      datetime     default CURRENT_TIMESTAMP null comment '创建时间',
    create_user      bigint                      null comment '创建人',
    create_user_name varchar(255)                null comment '创建人名称',
    modify_time      datetime     default CURRENT_TIMESTAMP null comment '修改时间',
    modify_user      bigint                      null comment '修改人',
    modify_user_name varchar(255)                null comment '修改人名称'
)
    comment '后台用户表' engine = InnoDB
                    collate = utf8mb4_unicode_ci;
sys_user_role用户角色表
create table toms_dev.sys_user_role
(
    id      bigint auto_increment
        primary key,
    user_id bigint null,
    role_id bigint null
)
    comment '后台用户和角色关系表' engine = InnoDB
                         collate = utf8mb4_unicode_ci;
sys_role角色表
create table toms_dev.sys_role
(
    id          bigint auto_increment
        primary key,
    name        varchar(100)                       null comment '名称',
    org_id      bigint                             null comment '所属组织ID',
    role_key    varchar(100)                       null comment '角色权限字符',
    type        tinyint  default 0                 null comment '角色类型(0:系统角色,1:自定义角色)',
    category    tinyint                            null comment '角色类别(0:平台,1:采购商,2:供应商)',
    data_scope  tinyint  default 1                 null comment '数据范围(1:全部数据权限 2:自定数据权限 3:本部门数据权限 )',
    description varchar(500)                       null comment '描述',
    admin_count int                                null comment '后台用户数量',
    create_time datetime default CURRENT_TIMESTAMP null comment '创建时间',
    status      tinyint  default 1                 null comment '启用状态:0->禁用;1->启用',
    sort        int      default 0                 null comment '排序'
)
    comment '后台用户角色表' engine = InnoDB
                      collate = utf8mb4_unicode_ci;
sys_role_menu角色权限表
create table toms_dev.sys_role_menu
(
    id      bigint auto_increment
        primary key,
    role_id bigint null,
    menu_id bigint null
)
    comment '后台用户角色和权限关系表' engine = InnoDB
                           collate = utf8mb4_unicode_ci;
sys_menu权限表
create table toms_dev.sys_menu
(
    id          bigint auto_increment   primary key   comment '主键id',
    pid         bigint                               null comment '父级权限id',
    name        varchar(100)                         null comment '名称',
    value       varchar(200)                         null comment '权限值',
    icon        varchar(500)                         null comment '图标',
    type        tinyint(1)                           null comment '权限类型:0->目录;1->菜单;2->按钮(接口绑定权限)',
    uri         varchar(200)                         null comment '前端资源路径',
    sort        int                                  null comment '排序',
    outer_link  int        default 0                 null comment '是否为外链(1 是 0否)',
    path        varchar(255)                         null comment '路由地址',
    status      tinyint(1) default 1                 null comment '启用状态;0->禁用;1->启用',
    create_time datetime   default CURRENT_TIMESTAMP null comment '创建时间'
)
    comment '后台用户权限表' engine = InnoDB
                      collate = utf8mb4_unicode_ci;
总结
Spring Security总的来说很难上手,初学者一定要抓大放小,抓住主要流程,其他的就比较容易理解了。
源码
一如既往,你可以从Github上获取到源码:spring-security-mvc


 977
977

 被折叠的 条评论
为什么被折叠?
被折叠的 条评论
为什么被折叠?
 到【灌水乐园】发言


