基於區域的圖像分割-----------區域分裂合並

http://blog.csdn.net/cay22/article/details/5666109 

2. 區域分裂合並

區域分裂合並算法的基本思想是先確定一個分裂合並的准則,即區域特征一致性的測度,當圖像中某個區域的特征不一致時就將該區域分裂成4 個相等的子區域,當相鄰的子區域滿足一致性特征時則將它們合成一個大區域,直至所有區域不再滿足分裂合並的條件為止.   當分裂到不能再分的情況時,分裂結束,然後它將查找相鄰區域有沒有相似的特征,如果有就將相似區域進行合並,最後達到分割的作用。   在一定程度上區域生長和區域分裂合並算法有異曲同工之妙,互相促進相輔相成的,區域分裂到極致就是分割成單一像素點,然後按照一定的測量准則進行合並,在一定程度上可以認為是單一像素點的區域生長方法。   區域生長比區域分裂合並的方法節省了分裂的過程,而區域分裂合並的方法可以在較大的一個相似區域基礎上再進行相似合並,而區域生長只能從單一像素點出發進行生長(合並)。


反復進行拆分和聚合以滿足限制條件的算法。

令R表示整幅圖像區域並選擇一個謂詞P。對R進行分割的一種方法是反復將分割得到的結果圖像再次分為四個區域,直到對任何區域Ri,有P(Ri)=TRUE。這裡是從整幅圖像開始。如果P(R)=FALSE,就將圖像分割為4個區域。對任何區域如果P的值是FALSE.就將這4個區域的每個區域再次分別分為4個區域,如此不斷繼續下去。這種特殊的分割技術用所謂的四叉樹形式表示最為方便(就是說,每個非葉子節點正好有4個子樹),這正如圖10.42中說明的樹那樣。注意,樹的根對應於整幅圖像,每個節點對應於劃分的子部分。此時,只有R4進行了進一步的再細分。

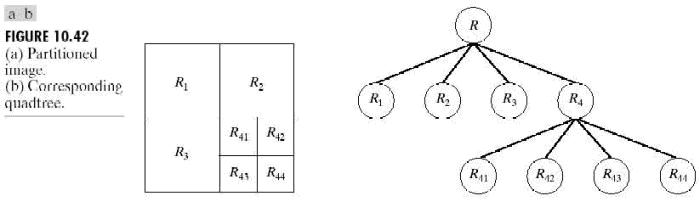
如果只使用拆分,最後的分區可能會包含具有相同性質的相鄰區域。這種缺陷可以通過進行拆分的同時也允許進行區域聚合來得到矯正。就是說,只有在P(Rj∪Rk)=TRUE時,兩個相鄰的區域Rj和Rk才能聚合。

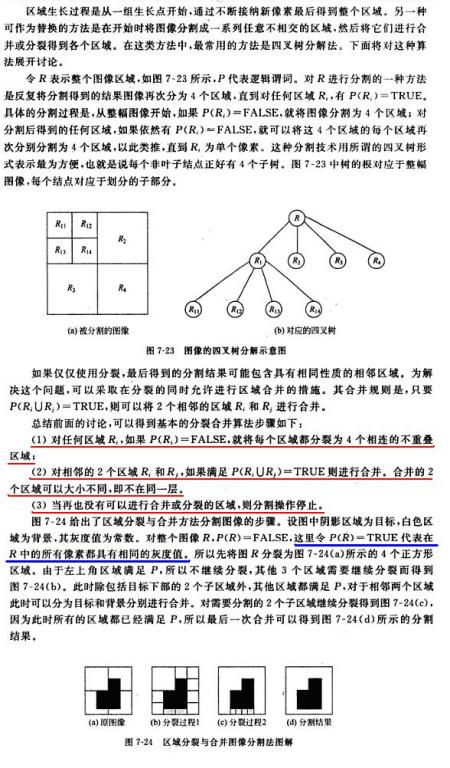
前面的討論可以總結為如下過程。在反復操作的每一步,我們需要做:

l.對於任何區域Ri,如果P(Ri)=FALSE,就將每個區域都拆分為4個相連的象限區域。

2.將P(Rj∪Rk)=TRUE的任意兩個相鄰區域Rj和Rk進行聚合。

3.當再無法進行聚合或拆分時操作停止。

可以對前面講述的基本思想進行幾種變化。例如,一種可能的變化是開始時將圖像拆分為一組圖象塊。然後對每個塊進一步進行上述拆分,但聚合操作開始時受只能將4個塊並為一組的限制。這4個塊是四叉樹表示法中節點的後代且都滿足謂詞P。當不能再進行此類聚合時,這個過程終止於滿足步驟2的最後的區域聚合。在這種情況下,聚合的區域可能會大小不同。這種方法的主要優點是對於拆分和聚合都使用同樣的四叉樹,直到聚合的最後一步。

例10.17 拆分和聚合

圖10.43(a)顯示了一幅簡單的圖像。如果在區域Ri內至少
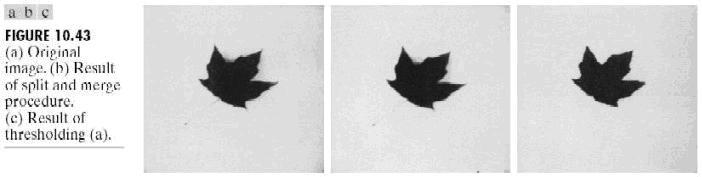
有80%的像素具有zj-mi≦2σi的性質,就定義P(Ri)=TRUE,這裡zj是Ri內第j個像素的灰度級,mi是區域Ri的灰度級均值,σi是區域Ri內的灰度級的標准差。如果在此條件下,P(Ri)=TRUE,則設置Ri內的所有像素的值等於mi。拆分和聚合使用前速算法的要點完成。將這種技術應用於圖10.43(a)所得結果示於圖10.43(b)。請注意,圖像分割效果相當好。示於圖10.43(c)中的圖像是通過對圖10.43(a)進行門限處理得到的,門限值選在直方圖中兩個主要的尖峰之間的中點。經過門限處理,圖像中生成的陰影(和葉子的莖)被錯誤地消除了。


如前面的例子中所使用的屬性那樣,我們試圖使用基於區域中像素的均值和標准差的某些特性對區域的紋理進行量化(見11.3.3節中關於紋理的討論)。紋理分割的概念是以在謂詞P(Ri)中使用有關紋理的量度為基礎的。就是說,通過指定基於紋理內容的謂詞,我們可以使用本節中討論的任何方法進行紋理分割。


1.       把一幅圖像分成4份,計算每一份圖像的最大灰度值與最小灰度值的差, 如果差在誤差范圍值外,則該份圖像繼續分裂。

2.       對於那些不需要分裂的那些份圖像可以對其進行閾值切割了,例如某一塊圖像的最大灰度大於某個值,則該塊圖像變成255,否則變為0。


// 代碼

// 區域分裂合並的圖像分割

// nOffSetLne是行偏移量


// 由於分裂的層數太多了, 使用遞歸將使內存空間堆棧溢出

// 解決方法是使用一個堆棧對要分裂的塊入棧

// 使用堆棧的方法類似在"區域生長"的實現方法

#include <stack>

struct SplitStruct

{

     unsigned int nWidth;                 // 這一塊圖像的寬度

     unsigned int nHeigh;                 // 這一塊圖像的高度

     unsigned int nOffSetWidth;           // 相對源圖像數據的偏移寬度

     unsigned int nOffSetHeigh;           // 相對源圖像數據的偏移高度

};

void AreaSplitCombineEx(BYTE* image0,              // 源圖像數據

                         unsigned int nAllWidth,        // 源圖像的寬度

                         unsigned int nAllHeigh,        // 源圖像的高度

                         unsigned int w,                // 這一塊圖像的寬度

                         unsigned int h,                // 這一塊圖像的高度

                         unsigned int nOffSetWidth,     // 相對源圖像數據的偏移寬度

                         unsigned int nOffSetHeigh)     // 相對源圖像數據的偏移高度

{


     std::stack<SplitStruct> nMyStack;


     SplitStruct splitStruct, splitStructTemp;

     splitStruct.nWidth          = w;

     splitStruct.nHeigh          = h;

     splitStruct.nOffSetWidth    = nOffSetWidth;

     splitStruct.nOffSetHeigh    = nOffSetHeigh;


     nMyStack.push(splitStruct);


     int i, j;

     int nValueS[2][2];     // 用於存儲塊圖像的屬性值(該屬性值= 該塊圖像的所有像素灰度值之和除以該塊圖像所有像素點的數量)

     int nAV;

     int nWidthTemp[3], nHeightTemp[3], nTemp;

     int nWidth, nHeigh;

     int n, m, l;

     double dOver;


     while(!nMyStack.empty())

     {

         splitStruct = nMyStack.top();

         nMyStack.pop();


         n = (splitStruct.nOffSetHeigh * nAllWidth + splitStruct.nOffSetWidth);     // 該塊圖像的左上角

         // 1. 把圖像分成2 * 2 塊,

         nWidthTemp[0] = 0;

         nWidthTemp[2] = (splitStruct.nWidth + 1) / 2;

         nWidthTemp[1] = splitStruct.nWidth - nWidthTemp[2];


         nHeightTemp[0] = 0;

         nHeightTemp[2] = (splitStruct.nHeigh + 1) / 2;

         nHeightTemp[1] = splitStruct.nHeigh - nHeightTemp[2];


         // 計算每一塊圖像的屬性值

         int nValue;

         int nValueTemp;

         nAV = 0;

         for(i = 1; i < 3; ++i)

         {

              for(j = 1; j < 3; ++j)

              {

                   nValue = 0;

                   m = (n + nAllWidth * nHeightTemp[i - 1] + nWidthTemp[j - 1]);

                   for(nHeigh = 0; nHeigh < nHeightTemp[i]; ++nHeigh)

                   {

                       for(nWidth = 0; nWidth < nWidthTemp[j]; ++nWidth)

                       {

                            l = (m + nAllWidth * nHeigh + nWidth) * 4;

                            nValueTemp = (0.299 * image0[l] + 0.587 * image0[l + 1] + 0.114 * image0[l + 2]);

                            // 灰度值之和

                            nValue += nValueTemp;

                       }

                   }


                   if(nHeightTemp[i] * nWidthTemp[j] == 0)

                   {

                       continue;

                   }

                   if(nHeightTemp[i] * nWidthTemp[j] == 1)

                   {

                       l = m * 4;

                       if((0.299 * image0[l] + 0.587 * image0[l + 1] + 0.114 * image0[l + 2]) < 125)

// 這個值可以動態設定

                       {

                            image0[l] = image0[l + 1] = image0[l + 2] = 0;

                            image0[l + 3] = 255;

                       }

                       else

                       {

                            image0[l] = image0[l + 1] = image0[l + 2] = 255;

                            image0[l + 3] = 255;

                       }

                       continue;

                   }


                   // 各塊圖像的灰度平均值(每一塊圖像的屬性值)

                   nValueS[i - 1][j - 1] = nValue / (nHeightTemp[i] * nWidthTemp[j]);

                   // 2. 對每一塊進行判斷是否繼續分裂(注意分裂的原則)

                   // 我這裡的分裂原則是: 圖像的屬性值在屬性值平均值的誤差范圍之內就不分裂

                   if(nValueS[i - 1][j - 1]  < 220)     // 灰度平均值少於200 需要繼續分裂 // 這裡就是分裂准則了

                   {

                       splitStructTemp.nWidth           = nWidthTemp[j];

                       splitStructTemp.nHeigh           = nHeightTemp[i];

                       splitStructTemp.nOffSetWidth     = splitStruct.nOffSetWidth + nWidthTemp[j - 1];

                       splitStructTemp.nOffSetHeigh     = splitStruct.nOffSetHeigh + nHeightTemp[i - 1];

                       nMyStack.push(splitStructTemp);

                   }

                   else                                      // 合並(直接填充該塊圖像為黑色)

                   {

                       // 3. 如果不需要分裂, 則進行合並

                       for(nHeigh = 0; nHeigh < nHeightTemp[i]; ++nHeigh)

                       {

                            for(nWidth = 0; nWidth < nWidthTemp[j]; ++nWidth)

                            {

                                 l = (m + nAllWidth * nHeigh + nWidth) * 4;

                                 image0[l] = image0[l + 1] = image0[l + 2] = 255;

                                 image0[l + 3] = 255;

                            }

                       }

                   }

              }

         }

     }


     return;

}


該代碼的效果也不是太好,主要是分裂准則不好確定


區域分裂合並中 最初使用每塊圖像區域中極大與極小灰度值之差是否在允許的偏差范圍來作為均勻性測試准則。 後來均勻性測試准則又被不斷的發展。目前,統計檢驗,如均方誤差最小, F檢測等都是最常用的均勻性測試准側方法。


看均方誤差最小的情況


其中C是區域R中N個點的平均值。


相對於區域生長而言,區域分割於合並技術不再依賴於種子點的選擇與生長順序。但選用合適的均勻性測試准則P對於提高圖像分割質量十分重要,當均勻性測試准則P選擇不當時,很容易會引起「方塊效應」

  • 0
    点赞
  • 0
    收藏
    觉得还不错? 一键收藏
  • 0
    评论
由于于PIE-engine的ISODATA算法需要结合具体的图像分割任务进行实现,因此无法提供通用的代码。不过,以下是一个于Python的ISODATA算法实现示例,你可以根据具体需求进行修改和优化。 ```python import numpy as np def isodata_segmentation(image, K, min_size, max_iterations): # 对图像进行初步分割,得到初步区域 regions = pie_engine_segmentation(image) # 对每个区域进行像素点的采样,得到每个区域的样本数据 samples = [] for region in regions: mask = region.mask samples.append(image[mask]) # 初始化类别中心和方差 centers = np.zeros((K, image.shape[-1])) variances = np.zeros((K, image.shape[-1])) for k in range(K): centers[k] = np.mean(samples[k], axis=0) variances[k] = np.var(samples[k], axis=0) + 1e-10 # 迭代优化 for i in range(max_iterations): # 对样本数据进行分类,得到类别标签 labels = np.zeros(len(samples), dtype=int) for j, sample in enumerate(samples): distances = np.linalg.norm(sample - centers, axis=1) labels[j] = np.argmin(distances) # 计算每个类别的均值和方差 for k in range(K): mask = (labels == k) if np.sum(mask) > 0: centers[k] = np.mean(samples[mask], axis=0) variances[k] = np.var(samples[mask], axis=0) + 1e-10 # 合并方差较小的类别 merge_indices = [] for k in range(K): for l in range(K): if k != l and np.linalg.norm(centers[k] - centers[l]) < np.sqrt(variances[k] + variances[l]): merge_indices.append((k, l)) for indices in merge_indices: k, l = indices mask = (labels == l) centers[k] = (centers[k] * np.sum(labels == k) + np.mean(samples[mask], axis=0) * np.sum(mask)) / (np.sum(labels == k) + np.sum(mask)) variances[k] = (variances[k] * np.sum(labels == k) + np.var(samples[mask], axis=0) * np.sum(mask)) / (np.sum(labels == k) + np.sum(mask)) + 1e-10 centers = np.delete(centers, l, axis=0) variances = np.delete(variances, l, axis=0) labels[labels == l] = k # 分裂方差较大的类别 split_indices = [] for k in range(K): if np.max(variances[k]) > 0.5 * np.mean(variances): split_indices.append(k) for k in split_indices: new_center = centers[k] + np.random.normal(scale=np.sqrt(variances[k]), size=(1, image.shape[-1])) new_center = np.clip(new_center, 0, 255) centers[k] = (centers[k] + new_center) / 2 new_variance = np.var(samples[labels == k], axis=0) + 1e-10 variances[k] = (variances[k] + new_variance) / 2 new_center = centers[k] + np.random.normal(scale=np.sqrt(variances[k]), size=(1, image.shape[-1])) new_center = np.clip(new_center, 0, 255) centers = np.vstack((centers, new_center)) variances = np.vstack((variances, new_variance)) # 如果类别数量过多或过少,则重新初始化 if len(centers) > K * 2 or len(centers) < K: centers = np.zeros((K, image.shape[-1])) variances = np.zeros((K, image.shape[-1])) for k in range(K): centers[k] = np.mean(samples[k], axis=0) variances[k] = np.var(samples[k], axis=0) + 1e-10 # 如果每个类别的样本数量小于最小值,则合并到最近的类别中 for k in range(K): if np.sum(labels == k) < min_size: distances = np.linalg.norm(centers - centers[k], axis=1) distances[k] = np.inf nearest_index = np.argmin(distances) mask = (labels == k) centers[nearest_index] = (centers[nearest_index] * np.sum(labels == nearest_index) + centers[k] * np.sum(mask)) / (np.sum(labels == nearest_index) + np.sum(mask)) variances[nearest_index] = (variances[nearest_index] * np.sum(labels == nearest_index) + variances[k] * np.sum(mask)) / (np.sum(labels == nearest_index) + np.sum(mask)) + 1e-10 centers = np.delete(centers, k, axis=0) variances = np.delete(variances, k, axis=0) labels[labels == k] = nearest_index # 根据类别标签重新进行分割,得到最终结果 segmentation = np.zeros(image.shape[:2], dtype=int) for j, region in enumerate(regions): segmentation[region.mask] = labels[j] return segmentation ``` 需要注意的是,上述代码中用到的`pie_engine_segmentation`函数需要根据具体情况进行实现和调整。该函数的作用是对图像进行初步分割,得到初步的区域。
评论
添加红包

请填写红包祝福语或标题

红包个数最小为10个

红包金额最低5元

当前余额3.43前往充值 >
需支付:10.00
成就一亿技术人!
领取后你会自动成为博主和红包主的粉丝 规则
hope_wisdom
发出的红包
实付
使用余额支付
点击重新获取
扫码支付
钱包余额 0

抵扣说明:

1.余额是钱包充值的虚拟货币,按照1:1的比例进行支付金额的抵扣。
2.余额无法直接购买下载,可以购买VIP、付费专栏及课程。

余额充值