


分享一下我老师大神的人工智能教程!零基础,通俗易懂!http://blog.csdn.net/jiangjunshow
也欢迎大家转载本篇文章。分享知识,造福人民,实现我们中华民族伟大复兴!
笔者介绍:姜雪伟,IT公司技术合伙人,IT高级讲师,CSDN社区专家,特邀编辑,畅销书作者,国家专利发明人,已出版书籍:《手把手教你架构3D游戏引擎》电子工业出版社 和《Unity3D实战核心技术详解》电子工业出版社等书籍
在游戏开发中尤其对于角色的材质渲染一直是被游戏开发者所看重,也成为衡量游戏品质的一个指标,关于渲染就需要考虑到Shader编程,Shader主要是对模型的顶点和模型的材质图片做处理,下面告诉读者如何去编写Shader。
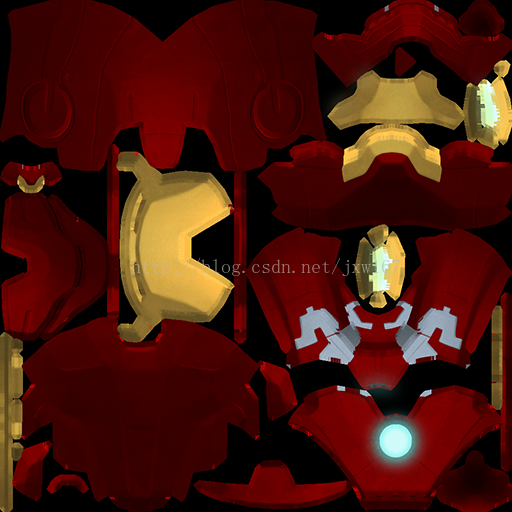
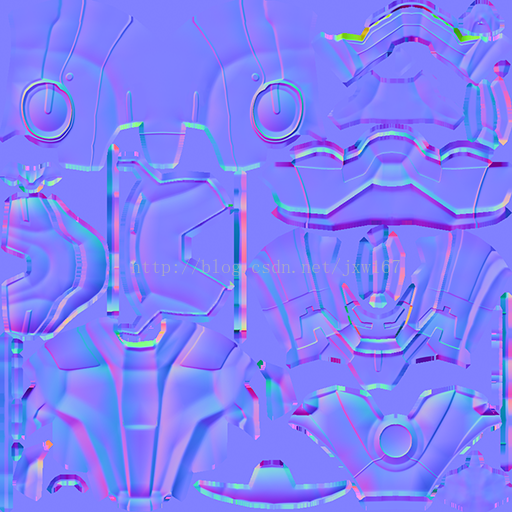
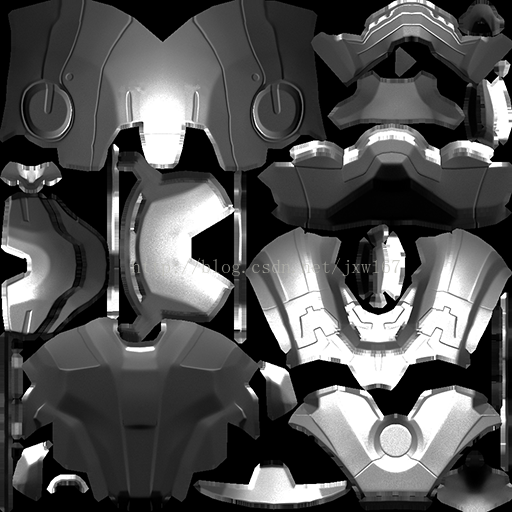
在公司,策划需求提出用Unity3D引擎实现角色材质高光、法线效果。策划需求提出后,美术首先用PS和MAX工具将模型制作出来,MAX中有自身带的Shader,它可以完整的实现高光、法线效果,这也是程序编写和调试Shader时的参照依据,程序是参照MAX中的效果去调试,程序实现的效果只能无限接近MAX工具制作的效果。Unity5.4以上版本也有自己的高光法线Shader,但是在使用时效果并不理想,不如自己去实现一下。在这里首先需要提供三张贴图:Diffuse(原图),Specular(高光),Normal(法线)。
接下来就需要对其进行Shader编程实现,为了让美术调试方便,在这里我们使用了控制面板。首先实现一个继承于Materal类的编辑器脚本,将其放到Editor文件夹下面,内容如下所示:
using System.Collections.Generic;using UnityEngine;using UnityEditor;using System.Linq;using System.Text.RegularExpressions;public abstract class CustomMaterialEditor : MaterialEditor{ public class FeatureEditor { // The name the toggle will have in the inspector. public string InspectorName; // We will look for properties that contain this word, and hide them if we're not enabled. public string InspectorPropertyHideTag; // The keyword that the shader uses when this feature is enabled or disabled. public string ShaderKeywordEnabled; public string ShaderKeywordDisabled; // The current state of this feature. public bool Enabled; public FeatureEditor(string InspectorName, string InspectorPropertyHideTag, string ShaderKeywordEnabled, string ShaderKeywordDisabled) { this.InspectorName = InspectorName; this.InspectorPropertyHideTag = InspectorPropertyHideTag; this.ShaderKeywordEnabled = ShaderKeywordEnabled; this.ShaderKeywordDisabled = ShaderKeywordDisabled; this.Enabled = false; } } // A list of all the toggles that we have in this material editor. protected List<FeatureEditor> Toggles = new List<FeatureEditor>(); // This function will be implemented in derived classes, and used to populate the list of toggles. protected abstract void CreateToggleList(); public override void OnInspectorGUI () { // if we are not visible... return if (!isVisible) return; // Get the current keywords from the material Material targetMat = target as Material; string[] oldKeyWords = targetMat.shaderKeywords; // Populate our list of toggles //Toggles.Clear(); Toggles = new List<FeatureEditor>(); CreateToggleList(); // Update each toggle to enabled if it's enabled keyword is present. If it's enabled keyword is missing, we assume it's disabled. for(int i = 0; i < Toggles.Count; i++) { Toggles[i].Enabled = oldKeyWords.Contains (Toggles[i].ShaderKeywordEnabled); } // Begin listening for changes in GUI, so we don't waste time re-applying settings that haven't changed. EditorGUI.BeginChangeCheck(); serializedObject.Update (); var theShader = serializedObject.FindProperty ("m_Shader"); if (isVisible && !theShader.hasMultipleDifferentValues && theShader.objectReferenceValue != null) { float controlSize = 64; EditorGUIUtility.labelWidth = Screen.width - controlSize - 20; EditorGUIUtility.fieldWidth = controlSize; Shader shader = theShader.objectReferenceValue as Shader; EditorGUI.BeginChangeCheck(); // Draw Non-toggleable values for (int i = 0; i < ShaderUtil.GetPropertyCount(shader); i++) { ShaderPropertyImpl(shader, i, null); } // Draw toggles, then their values. for (int s = 0; s < Toggles.Count; s++) { EditorGUILayout.Separator(); Toggles[s].Enabled = EditorGUILayout.BeginToggleGroup(Toggles[s].InspectorName, Toggles[s].Enabled); if (Toggles[s].Enabled) { for (int i = 0; i < ShaderUtil.GetPropertyCount(shader); i++) { ShaderPropertyImpl(shader, i, Toggles[s]); } } EditorGUILayout.EndToggleGroup(); } if (EditorGUI.EndChangeCheck()) PropertiesChanged (); } // If changes have been made, then apply them. if (EditorGUI.EndChangeCheck()) { // New list of key words. List<string> newKeyWords = new List<string>(); // If true, add the enabled keyword (ending with _ON), if false, add the disabled keyword(ending with _OFF). for(int i = 0; i < Toggles.Count; i++) { newKeyWords.Add(Toggles[i].Enabled ? Toggles[i].ShaderKeywordEnabled : Toggles[i].ShaderKeywordDisabled); } // Send the new list of keywords to the material, this will define what version of the shader to use. targetMat.shaderKeywords = newKeyWords.ToArray (); EditorUtility.SetDirty (targetMat); } } // This runs once for every property in our shader. private void ShaderPropertyImpl(Shader shader, int propertyIndex, FeatureEditor currentToggle) { string propertyDescription = ShaderUtil.GetPropertyDescription(shader, propertyIndex); // If current toggle is null, we only want to show properties that aren't already "owned" by a toggle, // so if it is owned by another toggle, then return. if (currentToggle == null) { for (int i = 0; i < Toggles.Count; i++) { if (Regex.IsMatch(propertyDescription, Toggles[i].InspectorPropertyHideTag , RegexOptions.IgnoreCase)) { return; } } } // Only draw if we the current property is owned by the current toggle. else if (!Regex.IsMatch(propertyDescription, currentToggle.InspectorPropertyHideTag , RegexOptions.IgnoreCase)) { return; } // If we've gotten to this point, draw the shader property regulairly. ShaderProperty(shader,propertyIndex); }}上面是我们自己实现的可以作为父类使用,其实就是做了一个接口封装,下面代码是自己定义的为我们自己的Shader脚本操作写的几个开关。如下所示:
using System.Collections.Generic;using UnityEngine;using UnityEditor; public class EditorInspector : CustomMaterialEditor{ protected override void CreateToggleList() { Toggles.Add(new FeatureEditor("Normal Enabled","normal","NORMALMAP_ON","NORMALMAP_OFF")); Toggles.Add(new FeatureEditor("Specular Enabled","specular","SPECULAR_ON","SPECULAR_OFF")); Toggles.Add(new FeatureEditor("Fresnel Enabled","fresnel","FRESNEL_ON","FRESNEL_OFF")); Toggles.Add(new FeatureEditor("Rim Light Enabled","rim","RIMLIGHT_ON","RIMLIGHT_OFF")); }} 相对来说比较简单,它只是做了几个Toggle作为Shader脚本中的控制。将上述两个文件拖放到Editor文件夹下面。
下面才开始真正的Shader编写工作,在这里我们使用了SurfaceOutput作为我们的输出结构体,SurfaceOutput简单地描述了surface的属性( properties of the surface ),如反射率颜色(albedo color)、法线(normal)、散射(emission)、镜面反射(specularity )等。首先定义一个输入结构体如下所示:
struct Input { float2 uv_DiffuseMap; #if SPECULAR_ON float2 uv_SpecMap; #endif #if NORMALMAP_ON float2 uv_NormalMap; #endif #if FRESNEL_ON || RIMLIGHT_ON float3 viewDir; #endif }; 结构体中包含 Diffuse贴图的uv坐标uv_DiffuseMap,高光的uv坐标uv_SpecMap,法线的uv坐标uv_NormalMap,另外还定义了一个方向值viewDir。接下来就是实现主函数surf了,对于高光法线的渲染就在这里面了,它调用了大量的CG库函数,如下所示:
void surf (Input IN, inout SurfaceOutput o) { float3 TexData = tex2D(_DiffuseMap, IN.uv_DiffuseMap); float3 _BlendColor = _TintColor.rgb * _TintColorMultiply; o.Albedo.rgb = _Brightness * lerp(TexData, _TintColor.rgb, _TintColorMultiply) ; #if SPECULAR_ON o.Specular = _Gloss; o.Gloss = max(_SpecAdd + _SpecularMultiply, 1.0) * tex2D (_SpecMap, IN.uv_SpecMap); //o.Emission = _Gloss * tex2D (_SpecMap, IN.uv_SpecMap); #endif #if NORMALMAP_ON o.Normal = UnpackNormal(tex2D(_NormalMap, IN.uv_NormalMap)); #endif #if FRESNEL_ON && SPECULAR_ON || RIMLIGHT_ON float facing = saturate(1.0 - max(dot(normalize(IN.viewDir), normalize(o.Normal)), 0.0)); #if FRESNEL_ON && SPECULAR_ON float fresnel = max(_FresnelBias + (1.0-_FresnelBias) * pow(facing, _FresnelPower), 0); fresnel = fresnel * o.Specular * _FresnelMultiply; o.Gloss *= 1+fresnel; #endif #if RIMLIGHT_ON float rim = max(_RimBias + (1.0-_RimBias) * pow(facing, _RimPower), 0); rim = rim * o.Specular * _RimMultiply; o.Albedo *= 1+rim; #endif #endif } 下面将Shader的完整代码展示如下:
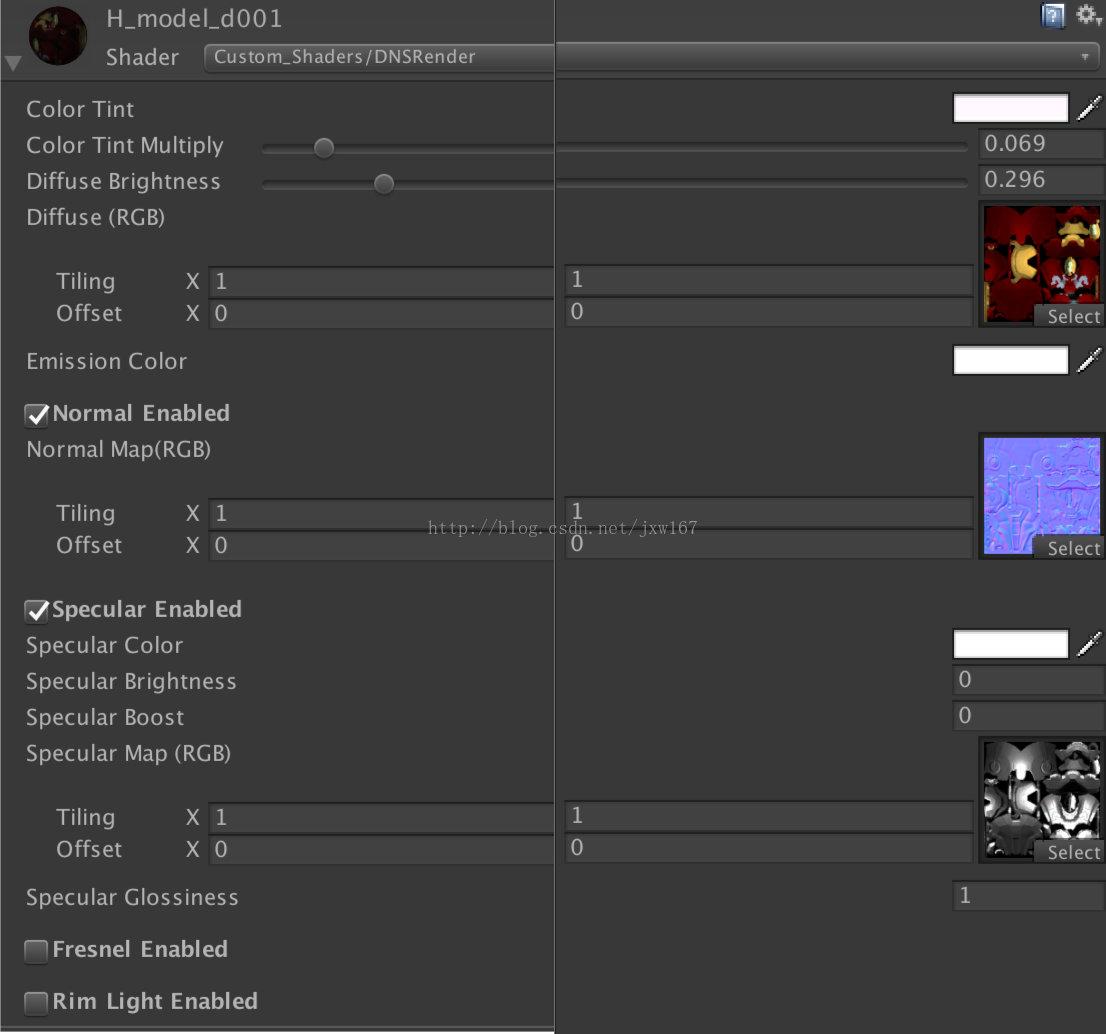
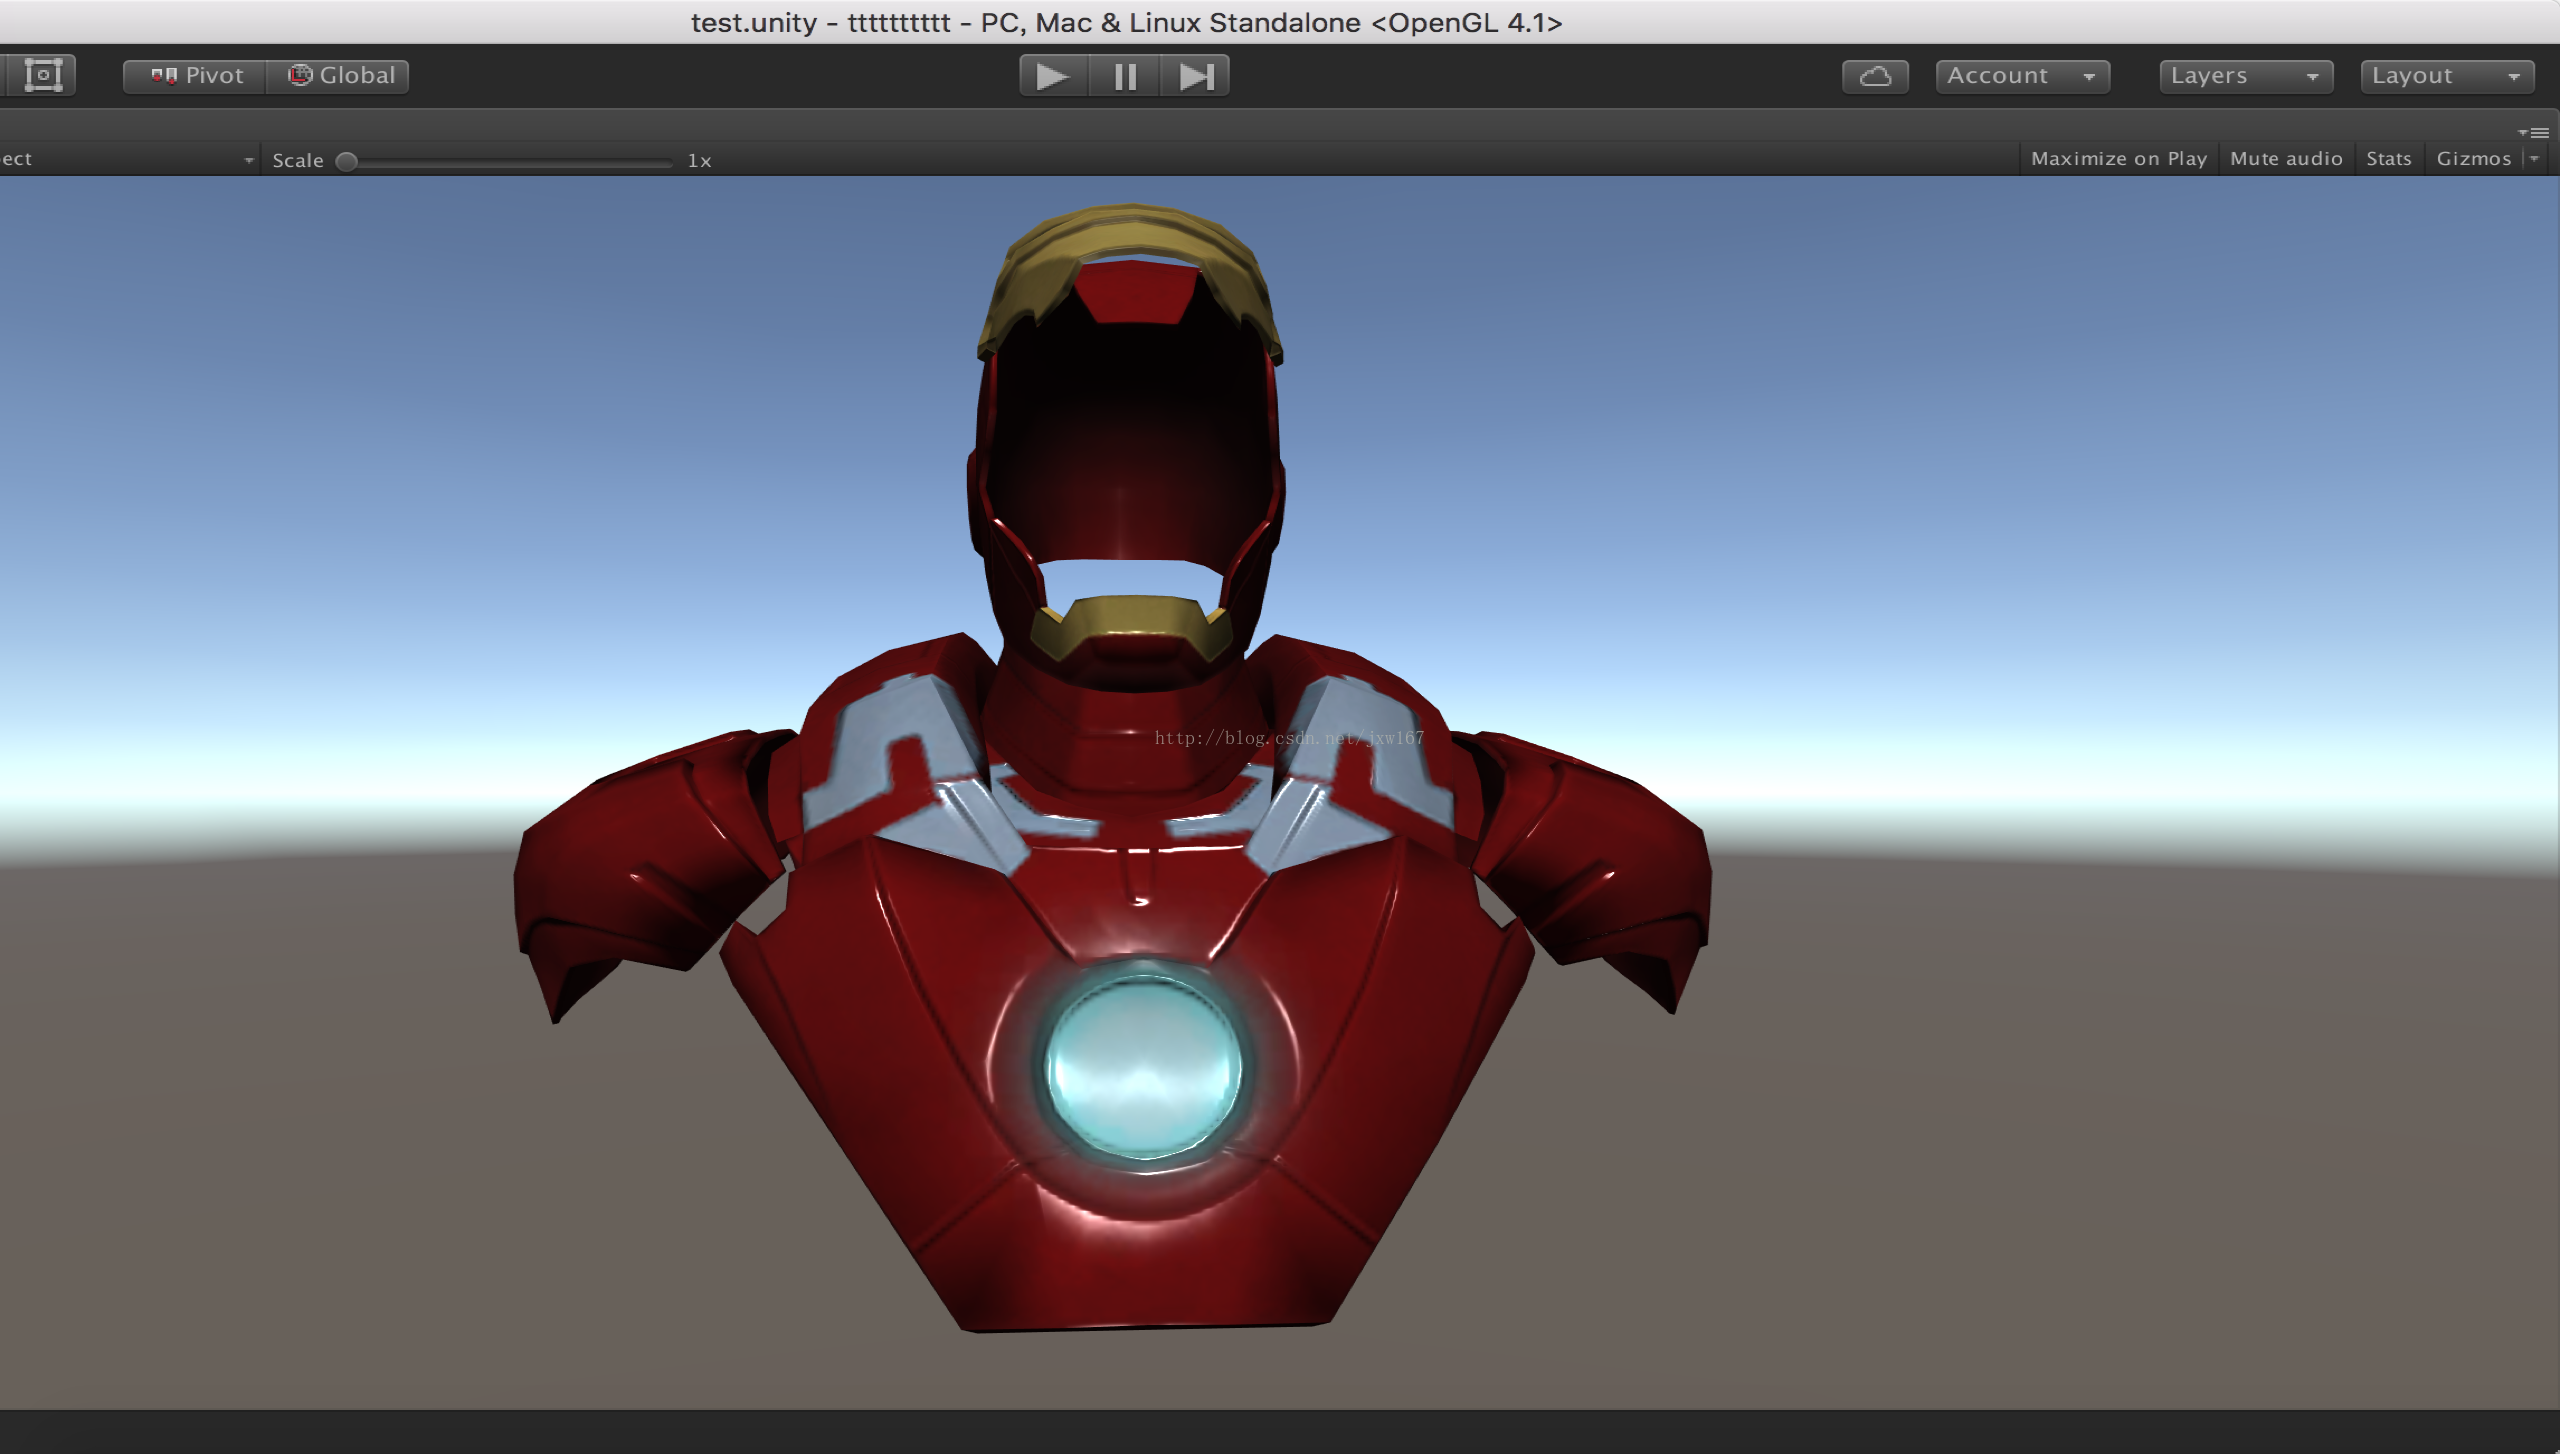
Shader "Custom_Shaders/DNSRender"{ Properties { _TintColor ("Color Tint",color) = (1.0,1.0,1.0,1.0) //Diffuse Sliders _TintColorMultiply("Color Tint Multiply", Range(0.0, 1.0)) = 0.0 _Brightness ("Diffuse Brightness", Range(0.0, 2.0)) = 1.0 _DiffuseMap ("Diffuse (RGB)", 2D) = "white" {} _NormalMap ("Normal Map(RGB)", 2D) = "bump" {} _SpecColor ("Specular Color", Color) = (0.5, 0.5, 0.5, 1) _SpecularMultiply ("Specular Brightness",float) = 1.0 _SpecAdd ("Specular Boost", float) = 0 _SpecMap ("Specular Map (RGB)", 2D) = "grey" {} _Gloss ("Specular Glossiness", float) = 0.5 _FresnelPower ("Fresnel Power",float) = 1.0 _FresnelMultiply ("Fresnel Multiply", float) = 0.2 _FresnelBias ("Fresnel Bias", float) = -0.1 _RimPower ("RimLight Power",float) = 1.0 _RimMultiply ("RimLight Multiply", float) = 0.2 _RimBias ("RimLight Bias", float) = 0 _EmissionColor("Emission Color", color) = (1.0,1.0,1.0,1.0) } SubShader { Tags { "RenderType"="Opaque" } LOD 300 CGPROGRAM #pragma surface surf BlinnPhong #pragma target 3.0 #pragma shader_feature NORMALMAP_ON NORMALMAP_OFF #pragma shader_feature SPECULAR_ON SPECULAR_OFF #pragma shader_feature FRESNEL_ON FRESNEL_OFF #pragma shader_feature RIMLIGHT_ON RIMLIGHT_OFF float3 _TintColor; float _TintColorMultiply; float _Brightness; sampler2D _DiffuseMap; sampler2D _NormalMap; sampler2D _SpecMap; float _SpecularMultiply; float _SpecAdd; float _Gloss; float _FresnelPower; float _FresnelMultiply; float _FresnelBias; float _RimPower; float _RimMultiply; float _RimBias; float3 _EmissionColor; struct Input { float2 uv_DiffuseMap; #if SPECULAR_ON float2 uv_SpecMap; #endif #if NORMALMAP_ON float2 uv_NormalMap; #endif #if FRESNEL_ON || RIMLIGHT_ON float3 viewDir; #endif }; void surf (Input IN, inout SurfaceOutput o) { float3 TexData = tex2D(_DiffuseMap, IN.uv_DiffuseMap); float3 _BlendColor = _TintColor.rgb * _TintColorMultiply; o.Albedo.rgb = _Brightness * lerp(TexData, _TintColor.rgb, _TintColorMultiply) ; #if SPECULAR_ON o.Specular = _Gloss; o.Gloss = max(_SpecAdd + _SpecularMultiply, 1.0) * tex2D (_SpecMap, IN.uv_SpecMap); //o.Emission = _Gloss * tex2D (_SpecMap, IN.uv_SpecMap); #endif #if NORMALMAP_ON o.Normal = UnpackNormal(tex2D(_NormalMap, IN.uv_NormalMap)); #endif #if FRESNEL_ON && SPECULAR_ON || RIMLIGHT_ON float facing = saturate(1.0 - max(dot(normalize(IN.viewDir), normalize(o.Normal)), 0.0)); #if FRESNEL_ON && SPECULAR_ON float fresnel = max(_FresnelBias + (1.0-_FresnelBias) * pow(facing, _FresnelPower), 0); fresnel = fresnel * o.Specular * _FresnelMultiply; o.Gloss *= 1+fresnel; #endif #if RIMLIGHT_ON float rim = max(_RimBias + (1.0-_RimBias) * pow(facing, _RimPower), 0); rim = rim * o.Specular * _RimMultiply; o.Albedo *= 1+rim; #endif #endif } ENDCG } CustomEditor "EditorInspector"} 将Shader挂接到材质球上效果如下:
最终展示效果如下所示:
给我老师的人工智能教程打call!http://blog.csdn.net/jiangjunshow


 317
317


 被折叠的 条评论
为什么被折叠?
被折叠的 条评论
为什么被折叠?
 到【灌水乐园】发言


