三分钟帮你完全搞懂数字孪生

什么是数字孪生?

也许你最近才听说过这个词,但它其实并非一个新概念。早在1991 年,David Gelernter 出版的《镜像世界》便首次提出数字孪生技术的想法。 后来,Michael Grieves 博士(后来在密歇根大学任教)于 2002 年第一次将数字孪生概念应用于制造业,正式宣布数字孪生软件概念的诞生。 最终,美国宇航局的John Vickers在 2010 年引入了这个新名词“数字孪生”。

数字孪生指的是通过在信息化平台构建一个现实物理场景的虚拟数字化场景,这个虚拟场景可以将现实场景通过传感器等收集到的数据信息集中处理并进行实时反馈,还能通过虚拟场景直接操控现实场景。

数字孪生的应用价值

我们为什么需要数字孪生技术?本质上来说,数字孪生是一项借助虚拟数字孪生模型,对现实物理设备进行模拟的技术。之所以要对现实物理设备进行模拟,是因为复制一个真实物理设备成本非常高昂,但很多时候这种复制品又同时是试验性的消耗品,试错成本高昂。因此使用数字孪生技术后便可以直接通过虚拟数字孪生模型进行试验,极大降低了试错成本,缩短了研发周期。

如何实现数字孪生

想要实现数字孪生,最好的方式是使用数字孪生软件。虽然也可以通过编写代码来实现,但是这样不仅效率较低,而且在项目过程中也不容易修改。

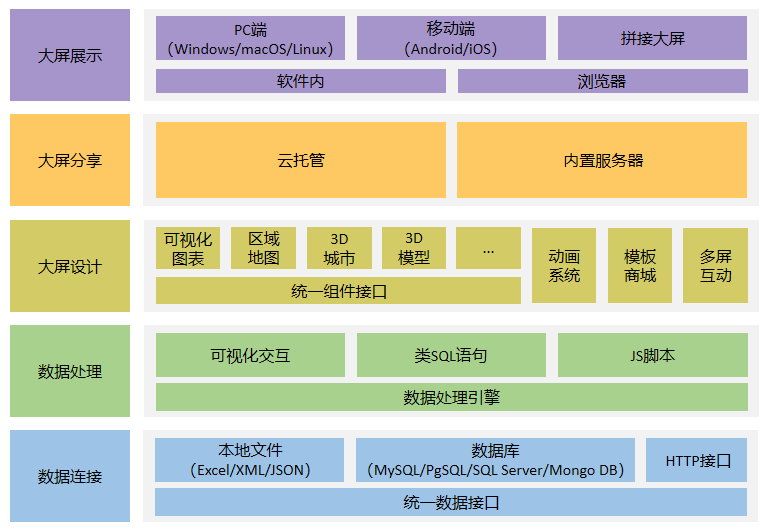
这里推荐一款非常优秀的数字孪生软件——山海鲸可视化。

山海鲸可视化拥有国产自研3D引擎。与目前其他数字孪生软件常用的游戏引擎相比,该引擎专为数字孪生打造,

不仅在3D场景和数据的交互上更加优秀,而且3D渲染质量也与游戏引擎相当。

在数据接入方面,山海鲸可视化免费附送数据接入工具——山海鲸数据管家。

通过山海鲸数据管家,可以实现无代码API接入,轻松完成数据接入。同时用户还可以将这这款软件用于任何其他需要进行数据接入的场景,帮助用户进行数据的管理和转发。

同时山海鲸可视化自研的CSaaS架构结合了CS模式和BS模式的特点,CS模式特点让用户所有数据和操作都保存在本地,无需私有化部署也能保障数据安全,其BS模式特点又让软件拥有丰富的云服务功能以及便捷的Web分享功能,满足用户的各种需求。

  • 0
    点赞
  • 4
    收藏
    觉得还不错? 一键收藏
  • 0
    评论
好的,@Mapper注解是Mybatis框架中用于标识数据访问层接口的注解,用于告诉Spring容器将该接口类实例化并注入到其他Bean中。其使用步骤如下: 1. 在Spring Boot项目中引入Mybatis和Mybatis-Spring的依赖 2. 在配置文件中配置数据源和Mybatis的相关属性 3. 创建一个数据访问层接口,使用@Mapper注解标识该接口 4. 在该数据访问层接口中定义需要操作的数据库方法 5. 在Service或Controller中注入该数据访问层接口的实例,并调用其中的方法 下面是一个示例: 1. 在pom.xml中添加Mybatis和Mybatis-Spring的依赖: ```xml <dependency> <groupId>org.mybatis</groupId> <artifactId>mybatis</artifactId> <version>3.4.6</version> </dependency> <dependency> <groupId>org.mybatis.spring.boot</groupId> <artifactId>mybatis-spring-boot-starter</artifactId> <version>2.1.1</version> </dependency> ``` 2. 在application.properties中配置数据源和Mybatis的相关属性: ```properties spring.datasource.url=jdbc:mysql://localhost:3306/test spring.datasource.username=root spring.datasource.password=123456 mybatis.type-aliases-package=com.example.demo.entity mybatis.mapper-locations=classpath:mapper/*.xml ``` 3. 创建一个数据访问层接口UserMapper,使用@Mapper注解标识该接口: ```java @Mapper public interface UserMapper { User selectByPrimaryKey(Integer id); int insert(User record); int updateByPrimaryKey(User record); int deleteByPrimaryKey(Integer id); } ``` 4. 在mapper目录下创建UserMapper.xml,定义需要操作的数据库方法: ```xml <mapper namespace="com.example.demo.mapper.UserMapper"> <resultMap id="BaseResultMap" type="com.example.demo.entity.User"> <id column="id" property="id" jdbcType="INTEGER"/> <result column="username" property="username" jdbcType="VARCHAR"/> <result column="password" property="password" jdbcType="VARCHAR"/> </resultMap> <select id="selectByPrimaryKey" resultMap="BaseResultMap" parameterType="java.lang.Integer"> select * from user where id = #{id,jdbcType=INTEGER} </select> <insert id="insert" parameterType="com.example.demo.entity.User" useGeneratedKeys="true" keyProperty="id"> insert into user (username, password) values (#{username,jdbcType=VARCHAR}, #{password,jdbcType=VARCHAR}) </insert> <update id="updateByPrimaryKey" parameterType="com.example.demo.entity.User"> update user set username = #{username,jdbcType=VARCHAR}, password = #{password,jdbcType=VARCHAR} where id = #{id,jdbcType=INTEGER} </update> <delete id="deleteByPrimaryKey" parameterType="java.lang.Integer"> delete from user where id = #{id,jdbcType=INTEGER} </delete> </mapper> ``` 5. 在Service或Controller中注入UserMapper的实例,并调用其中的方法: ```java @Service public class UserServiceImpl implements UserService { @Autowired private UserMapper userMapper; @Override public User selectByPrimaryKey(Integer id) { return userMapper.selectByPrimaryKey(id); } @Override public int insert(User user) { return userMapper.insert(user); } @Override public int updateByPrimaryKey(User user) { return userMapper.updateByPrimaryKey(user); } @Override public int deleteByPrimaryKey(Integer id) { return userMapper.deleteByPrimaryKey(id); } } ``` 这就是使用@Mapper注解的基本步骤,希望对你有所助。

“相关推荐”对你有帮助么?

  • 非常没帮助
  • 没帮助
  • 一般
  • 有帮助
  • 非常有帮助
提交
评论
添加红包

请填写红包祝福语或标题

红包个数最小为10个

红包金额最低5元

当前余额3.43前往充值 >
需支付:10.00
成就一亿技术人!
领取后你会自动成为博主和红包主的粉丝 规则
hope_wisdom
发出的红包
实付
使用余额支付
点击重新获取
扫码支付
钱包余额 0

抵扣说明:

1.余额是钱包充值的虚拟货币,按照1:1的比例进行支付金额的抵扣。
2.余额无法直接购买下载,可以购买VIP、付费专栏及课程。

余额充值