


目录
前言
使用C#制作一个图片查看器,具有滚轮放大缩小,鼠标拖动,图像像素化,显示颜色RGB信息功能。
一、界面设计
窗体中需要添加panel,statusStrip,contextMenuStrip,timer等控件,如图所示。

二、关键技术
1.把图片拖入到窗体并显示
代码如下:
  private void Form1_DragEnter(object sender, DragEventArgs e)
  {
            SetDragImageToFrm(this, e);
  }

  Point imagePoint = new Point();
  Bitmap bkImage;//定义Bitmap变量
  /// <summary>
  /// 在窗体背景中显示被拖放的图片
  /// </summary>
  public void SetDragImageToFrm(Form form, DragEventArgs e)
  {

   e.Effect = DragDropEffects.Copy;//设置拖放操作中目标放置类型为复制

   //检索数据格式相关联的数据
   String[] str_Drop = (String[])e.Data.GetData(DataFormats.FileDrop, true);
   string strPath;
   strPath = str_Drop[0];//获取拖放文件的目录
   try
   {
     bkImage = new Bitmap(strPath);//存储拖放的图片
     pictureBox1.Image = bkImage;//在pictureBox上显示图片
   }
   catch { }
   }
效果展示如下: 更详细的介绍请参考以下文章:
2.实现图像缩放的功能
需要把pictureBox的SizeMode属性设为Zoom,如图所示:
![]()
需要在Form.Designer.cs界面中添加MouseWheel事件,如图所示:
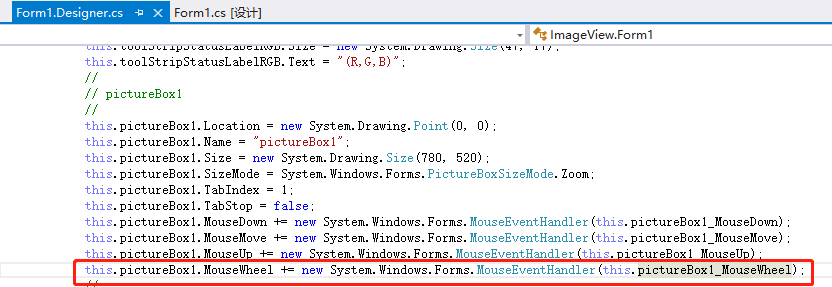
然后添加pictureBox1_MouseWheel函数,代码如下:
 public void pictureBox1_MouseWheel(object sender, MouseEventArgs e)
        {
            int x = e.Location.X;
            int y = e.Location.Y;
            int ow = pictureBox1.Width;
            int oh = pictureBox1.Height;
            int VX, VY;  //因缩放产生的位移矢量
            if (e.Delta > 0) //放大
            {

                int width = Convert.ToInt32(pictureBox1.Width * 1.5);
                int height = Convert.ToInt32(pictureBox1.Height * 1.5);
                if (width * height > 45800000)
                    return;
                pictureBox1.Width = width;
                    pictureBox1.Height = height;
                PropertyInfo pInfo = pictureBox1.GetType().GetProperty("ImageRectangle", BindingFlags.Instance |
                 BindingFlags.NonPublic);
                Rectangle rect = (Rectangle)pInfo.GetValue(pictureBox1, null);

                pictureBox1.Width = rect.Width;
                pictureBox1.Height = rect.Height;
            }
            if (e.Delta < 0) //缩小
            {
                //防止一直缩成负值
                if (pictureBox1.Width < 100 || pictureBox1.Height < 100)
                    return;
                    pictureBox1.Width = pictureBox1.Width / 2;
                    pictureBox1.Height = pictureBox1.Height / 2;
                PropertyInfo pInfo = pictureBox1.GetType().GetProperty("ImageRectangle", BindingFlags.Instance |
                 BindingFlags.NonPublic);
                Rectangle rect = (Rectangle)pInfo.GetValue(pictureBox1, null);
                pictureBox1.Width = rect.Width;
                pictureBox1.Height = rect.Height;
            }
            //求因缩放产生的位移,进行补偿,实现锚点缩放的效果
            VX = (int)((double)x * (ow - pictureBox1.Width) / ow);
            VY = (int)((double)y * (oh - pictureBox1.Height) / oh);
            pictureBox1.Location = new Point(pictureBox1.Location.X + VX, pictureBox1.Location.Y + VY);
        }
3.实现图像的移动效果
需要把pictureBox的事件栏中添加MouseDown,MouseMove,MouseUp事件,如图所示:

事件代码如下:
Point mouseDownPoint = new Point();
bool flagIsMove = false;
private void pictureBox1_MouseDown(object sender, MouseEventArgs e)
{
if(e.Button==MouseButtons.Left)
{
mouseDownPoint.X = Cursor.Position.X; //记录鼠标左键按下时位置
mouseDownPoint.Y = Cursor.Position.Y;
flagIsMove = true;
pictureBox1.Focus(); //鼠标滚轮事件(缩放时)需要picturebox有焦点
}
}
private void pictureBox1_MouseMove(object sender, MouseEventArgs e)
{
pictureBox1.Focus(); //鼠标在picturebox上时才有焦点,此时可以缩放
if (flagIsMove)
{
int x, y; //新的pictureBox1.Location(x,y)
int moveX, moveY; //X方向,Y方向移动大小。
moveX = Cursor.Position.X - mouseDownPoint.X;
moveY = Cursor.Position.Y - mouseDownPoint.Y;
x = pictureBox1.Location.X + moveX;
y = pictureBox1.Location.Y + moveY;
pictureBox1.Location = new Point(x, y);
mouseDownPoint.X = Cursor.Position.X;
mouseDownPoint.Y = Cursor.Position.Y;
}
}
private void pictureBox1_MouseUp(object sender, MouseEventArgs e)
{
if (e.Button == MouseButtons.Left)
{
flagIsMove = false;
}
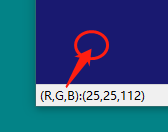
}4.实时显示当前鼠标处的RGB值
添加一个timer工具,并添加代码如下:
  private void timer1_Tick(object sender, EventArgs e)
        {
            Point pt = new Point(Control.MousePosition.X, Control.MousePosition.Y);//获取鼠标的点位信息
            Color cl = GetColor(pt);//获取鼠标在当前位置的颜色
            toolStripStatusLabelRGB.Text = "(R,G,B):(" + cl.R + "," + cl.G + "," + cl.B + ")";//获取当前颜色的RGB值
        }
        [DllImport("gdi32.dll")]
        static public extern uint GetPixel(IntPtr hDC, int XPos, int YPos);
        [DllImport("gdi32.dll")]
        static public extern IntPtr CreateDC(string driverName, string deviceName, string output, IntPtr lpinitData);
        public Color GetColor(Point screenPoint)
        {
            IntPtr displayDC = CreateDC("DISPLAY", null, null, IntPtr.Zero);
            uint colorref = GetPixel(displayDC, screenPoint.X, screenPoint.Y);
            byte Red = GetRValue(colorref);
            byte Green = GetGValue(colorref);
            byte Blue = GetBValue(colorref);
            return Color.FromArgb(Red, Green, Blue);
        }
        static public byte GetRValue(uint color)
        {
            return (byte)color;
        }
        static public byte GetGValue(uint color)
        {
            return ((byte)(((short)(color)) >> 8));
        }
        static public byte GetBValue(uint color)
        {
            return ((byte)((color) >> 16));
        }
        static public byte GetAValue(uint color)
        {
            return ((byte)((color) >> 24));
        }
5. 右击功能的实现
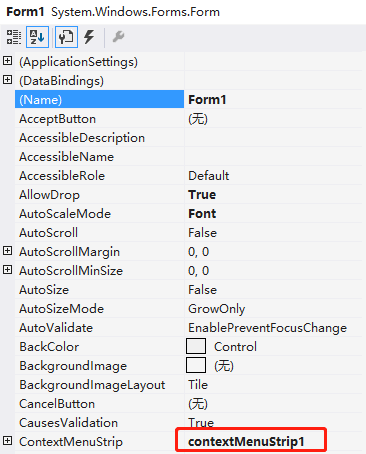
添加一个contextMenuStrip工具,并在Form1属性栏中ContextMenuStrip中添加ContextMenuStrip1,如下图所示:
添加像素化和图像自适应功能,如下图所示:

并添加相应代码,如下:
   private void 像素化ToolStripMenuItem_Click(object sender, EventArgs e)
        {
            Bitmap bitmap;
            bitmap = Magnifier(bkImage, 2);
            pictureBox1.Image = bitmap;
        }
        /// <summary>
        /// 放大图片,使图片像素化
        /// </summary>
        /// <param name="srcbitmap"></param>
        /// <param name="multiple"></param>
        /// <returns></returns>
        public Bitmap Magnifier(Bitmap srcbitmap, int multiple)
        {
            if (multiple <= 0) { multiple = 0; return srcbitmap; }
            Bitmap bitmap = new Bitmap(srcbitmap.Size.Width * multiple, srcbitmap.Size.Height * multiple);
            BitmapData srcbitmapdata = srcbitmap.LockBits(new Rectangle(new Point(0, 0), srcbitmap.Size), ImageLockMode.ReadOnly, PixelFormat.Format32bppArgb);
            BitmapData bitmapdata = bitmap.LockBits(new Rectangle(new Point(0, 0), bitmap.Size), ImageLockMode.ReadWrite, PixelFormat.Format32bppArgb);
            unsafe
            {
                byte* srcbyte = (byte*)(srcbitmapdata.Scan0.ToPointer());
                byte* sourcebyte = (byte*)(bitmapdata.Scan0.ToPointer());
                for (int y = 0; y < bitmapdata.Height; y++)
                {
                    for (int x = 0; x < bitmapdata.Width; x++)
                    {
                        long index = (x / multiple) * 4 + (y / multiple) * srcbitmapdata.Stride;
                        sourcebyte[0] = srcbyte[index];
                        sourcebyte[1] = srcbyte[index + 1];
                        sourcebyte[2] = srcbyte[index + 2];
                        sourcebyte[3] = srcbyte[index + 3];
                        sourcebyte += 4;
                    }
                }
            }
            srcbitmap.UnlockBits(srcbitmapdata);
            bitmap.UnlockBits(bitmapdata);
            return bitmap;
        }

        private void 图像自适应ToolStripMenuItem_Click(object sender, EventArgs e)
        {
            pictureBox1.Location = panel1.Location;
            pictureBox1.Width = panel1.Width;
            pictureBox1.Height = panel1.Height;
            pictureBox1.Image = bkImage;//在pictureBox上显示图片
        }
6.效果展示

总结
成功制作了一个功能丰富的图片查看器。


 1832
1832


 被折叠的 条评论
为什么被折叠?
被折叠的 条评论
为什么被折叠?
 到【灌水乐园】发言


