


1.简介
文章来源:CVPR2024
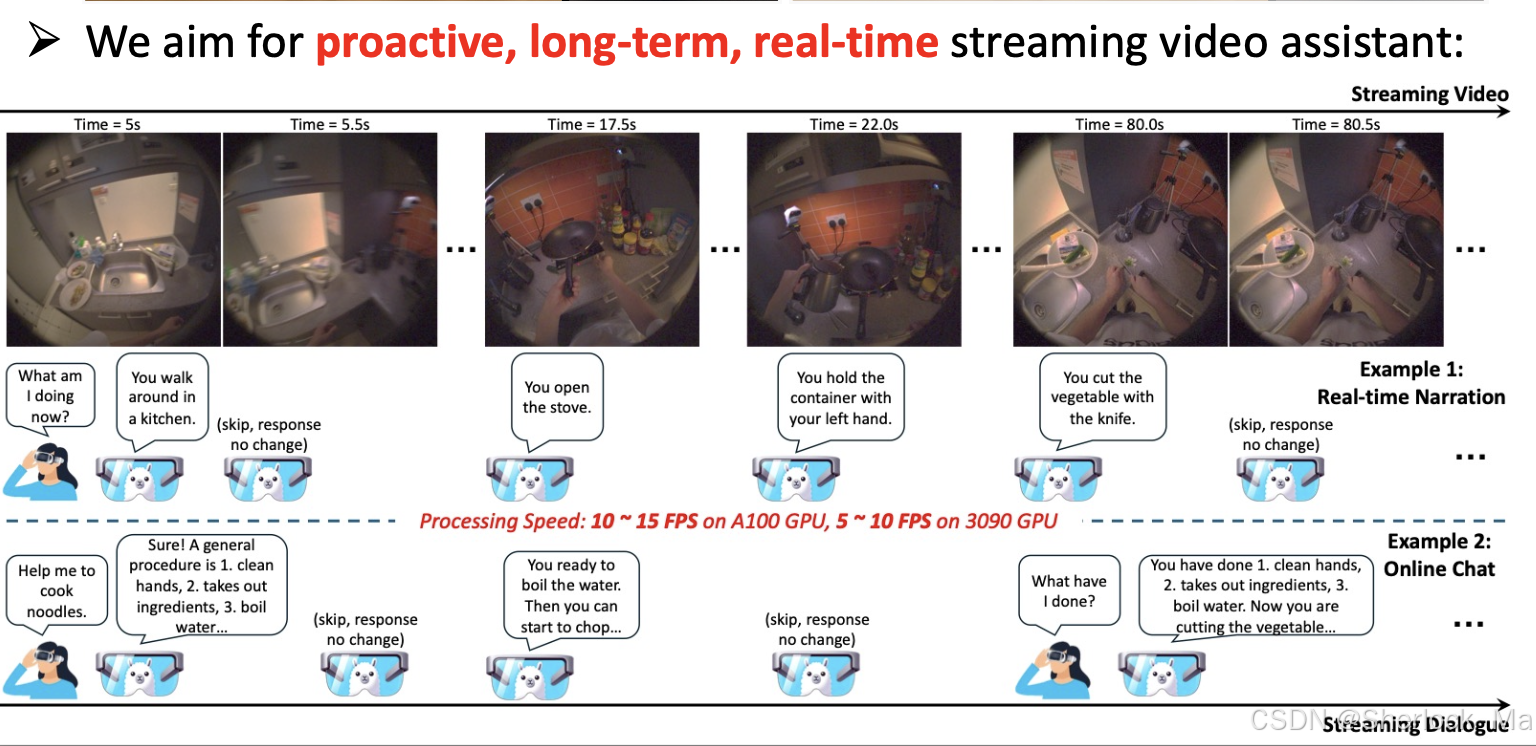
内容简介:这篇文章介绍了一个名为VideoLLM-online的创新模型,它是为了在流媒体视频中实现实时对话而设计的。VideoLLM-online模型能够实时生成视频内容的叙述,可以识别视频中的人物正在进行的活动,并回答与视频内容相关的问题。此外,VideoLLM-online模型还可以作为智能助手,与用户进行交互,回答用户关于视频内容的问题,提供实时反馈,在。
VideoLLM-online模型在处理流媒体视频方面展现出显著优势,例如在A100 GPU上对Ego4D叙述的5分钟视频片段能够以超过10 FPS的速度运行,同时在公共离线视频基准测试中也展现出了最先进的性能,如识别、描述和预测等任务。此外,该模型在速度和内存效率方面也表现出色,为未来实际应用中连续视频叙述铺平了道路。总的来说,这项研究为构建一个始终在线的、上下文相关的AI助手提供了一个重要的步骤,这种助手能够及时回答任何人类问题,将输入数字化为情景记忆,并根据任何查询预测未来计划。
代码地址:https://github.com/showlab/videollm-online
项目地址:VideoLLM-online
权重文件地址:https://huggingface.co/chenjoya/videollm-online-8b-v1plus
推理效果:
可以看到模型知道什么时候该回答,什么时候不该回答。并且模型知道你当前在干什么,还能根据上下文做推理。
(Video Time = 0.0s) User: Please narrate the video in real time.
(Video Time = 0.0s) Assistant: You walk around the room.
(Video Time = 3.0s) Assistant: You pick up a wooden spoon.
(Video Time = 4.5s) Assistant: You stir the food.
(Video Time = 17.5s) Assistant: You walk around the room.
(Video Time = 19.0s) Assistant: You open the tap.

 ......

(Video Time = 104.0s) Assistant: You pick a bowl.
(Video Time = 104.5s) Assistant: You put the bowl in the drawer.
(Video Time = 105.0s) Assistant: You pick a bowl.
(Video Time = 105.5s) Assistant: You put the bowl in the drawer.
(Video Time = 106.0s) Assistant: You pick a bowl.
(Video Time = 106.5s) Assistant: You put the bowl in the drawer.
(Video Time = 107.0s) Assistant: You pick a bowl.
2.论文解析
问题定义
简单来说,作者想要训练一个实时对话模型,这个模型知道什么时候该闭嘴,什么时候该回答。比如炒菜的时候,你问它怎么做某道菜,他会告诉你先洗菜,期间它会闭嘴,洗完之后它会直接回答“再切菜”,等你切完菜之后,它才指导你做下一步动作。
数据
离线注释
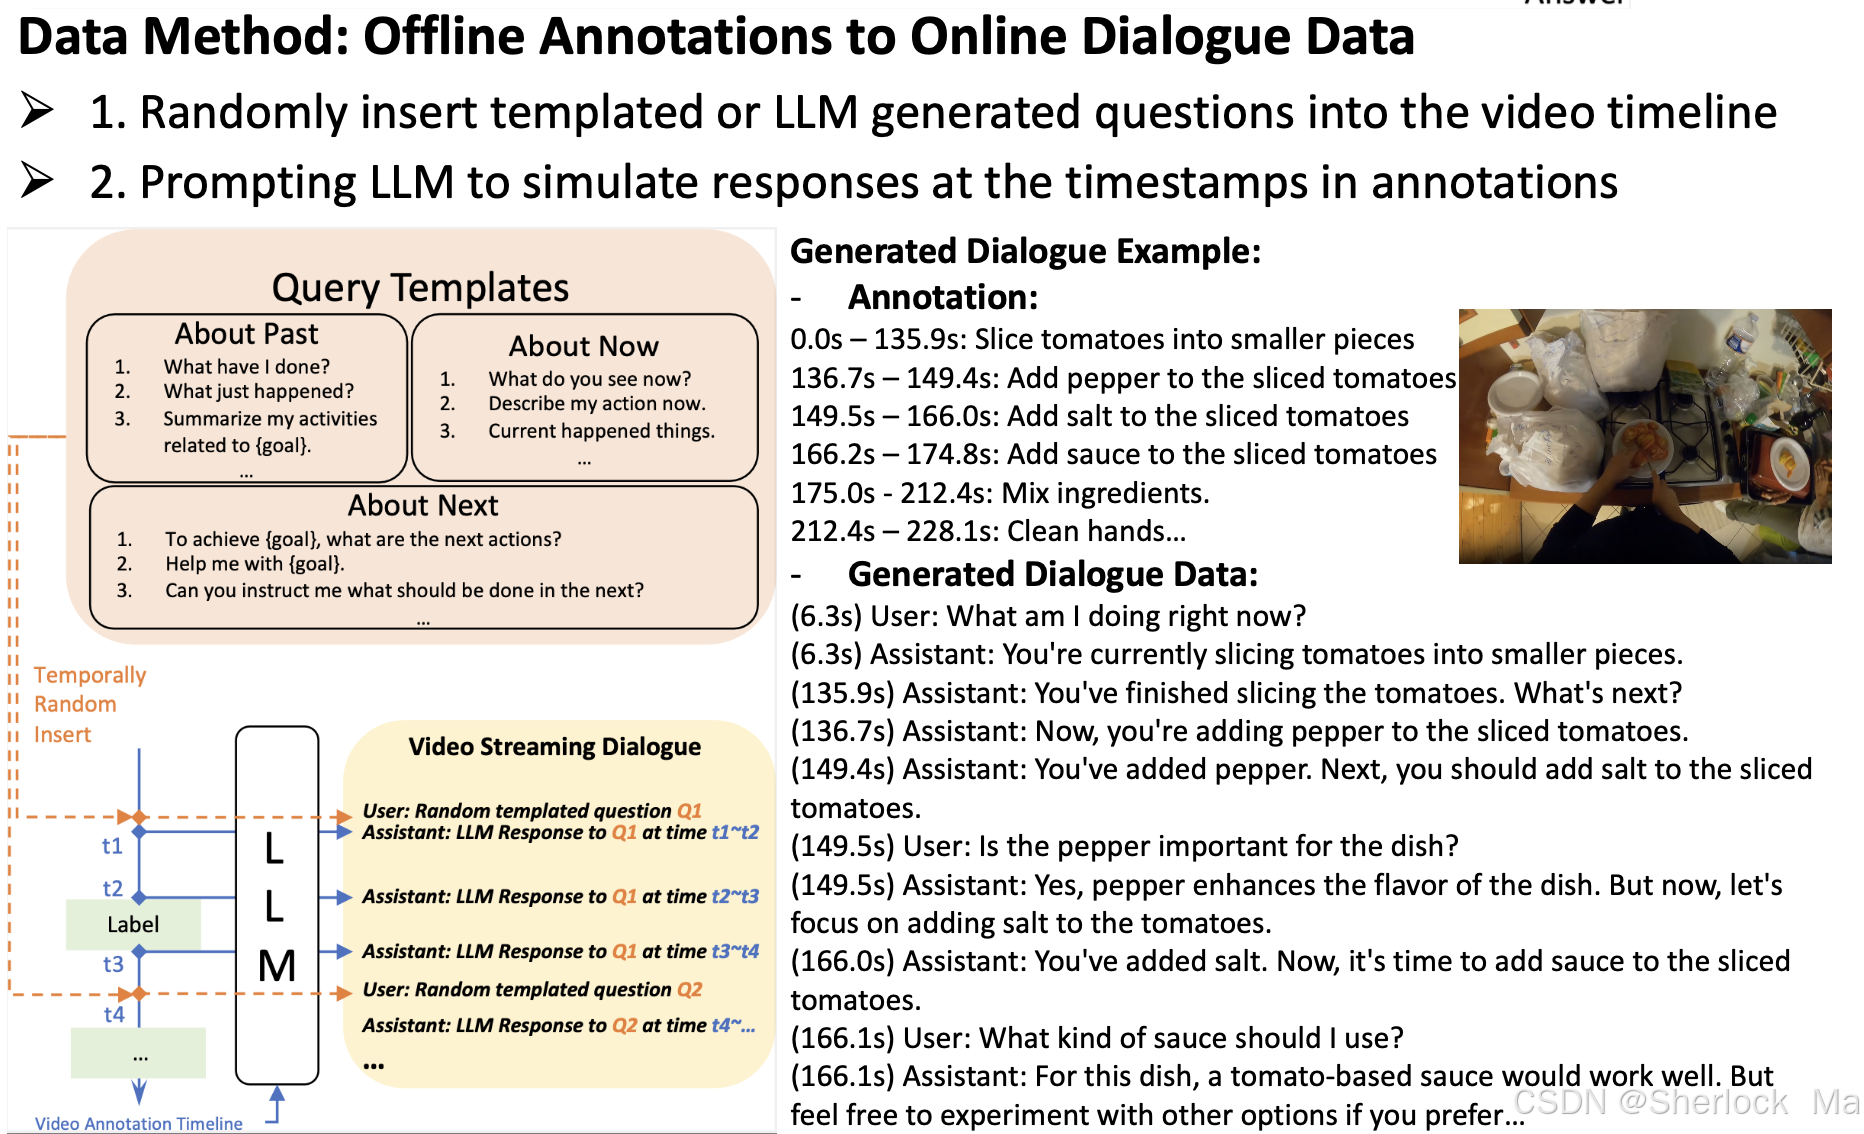
大多数流行的视频数据集用于训练离线模型,并且仅具有与基本语言描述配对的时间片段注释(例如,活动、解说)。为了弥合这一差距,作者提出了一种方法,从这些来源的对话数据合成新数据。作者的关键思想是使用LLM基于视频注释生成用户辅助对话,涉及以下步骤:
- 首先,作者准备了一个问题模板库,包含关于视频的过去式、现在式和将来式的各种query,总共N个query。我们从库中随机抽取一个问题,记为Qi。
- 然后,我们从离线数据集获得视频注释时间轴。这通常包括带时间戳的语言描述,我们将其组织到语言提示中,例如,“time ta~tb:烧水;time tc~td:切菜。",表示为A。我们认为所有的状态变化的关键时间戳作为理想的响应时间。对于本例,ta、tb、tc和td都被视为响应时间。
- 第三,我们提示大型语言模型在每个关键时间戳生成响应,例如,ta,tb,tc,td,根据Qi和A.我们可以对每个Qi重复这个过程,直到所有查询都被处理完。响应被保存以在训练期间加载。
- 最后,在训练过程中,我们(1)随机采样查询并在关键时间戳加载其响应,(2)将查询随机插入到视频时间戳tr中,(3)丢弃tr之前出现的响应,并在tr处添加响应。这里,不同的查询可以被插入到一个视频中,这只需要在新的查询插入时间戳之后丢弃先前查询的响应。
简单来说,就是随机随时插入问题库中的问题,然后用已有的视频理解大模型根据数据集里的时间戳和当前问题生成对应的答案。这个过程中只会回答最新的问题,如果没有新问题就会循环回答最近一次的问题。
如下图所示:作者将模板化的问题随机插入视频时间轴,并将真实视频注释(沿着其时间戳)“提供”给LLM,提示他们在一段时间内回答查询。
模型架构
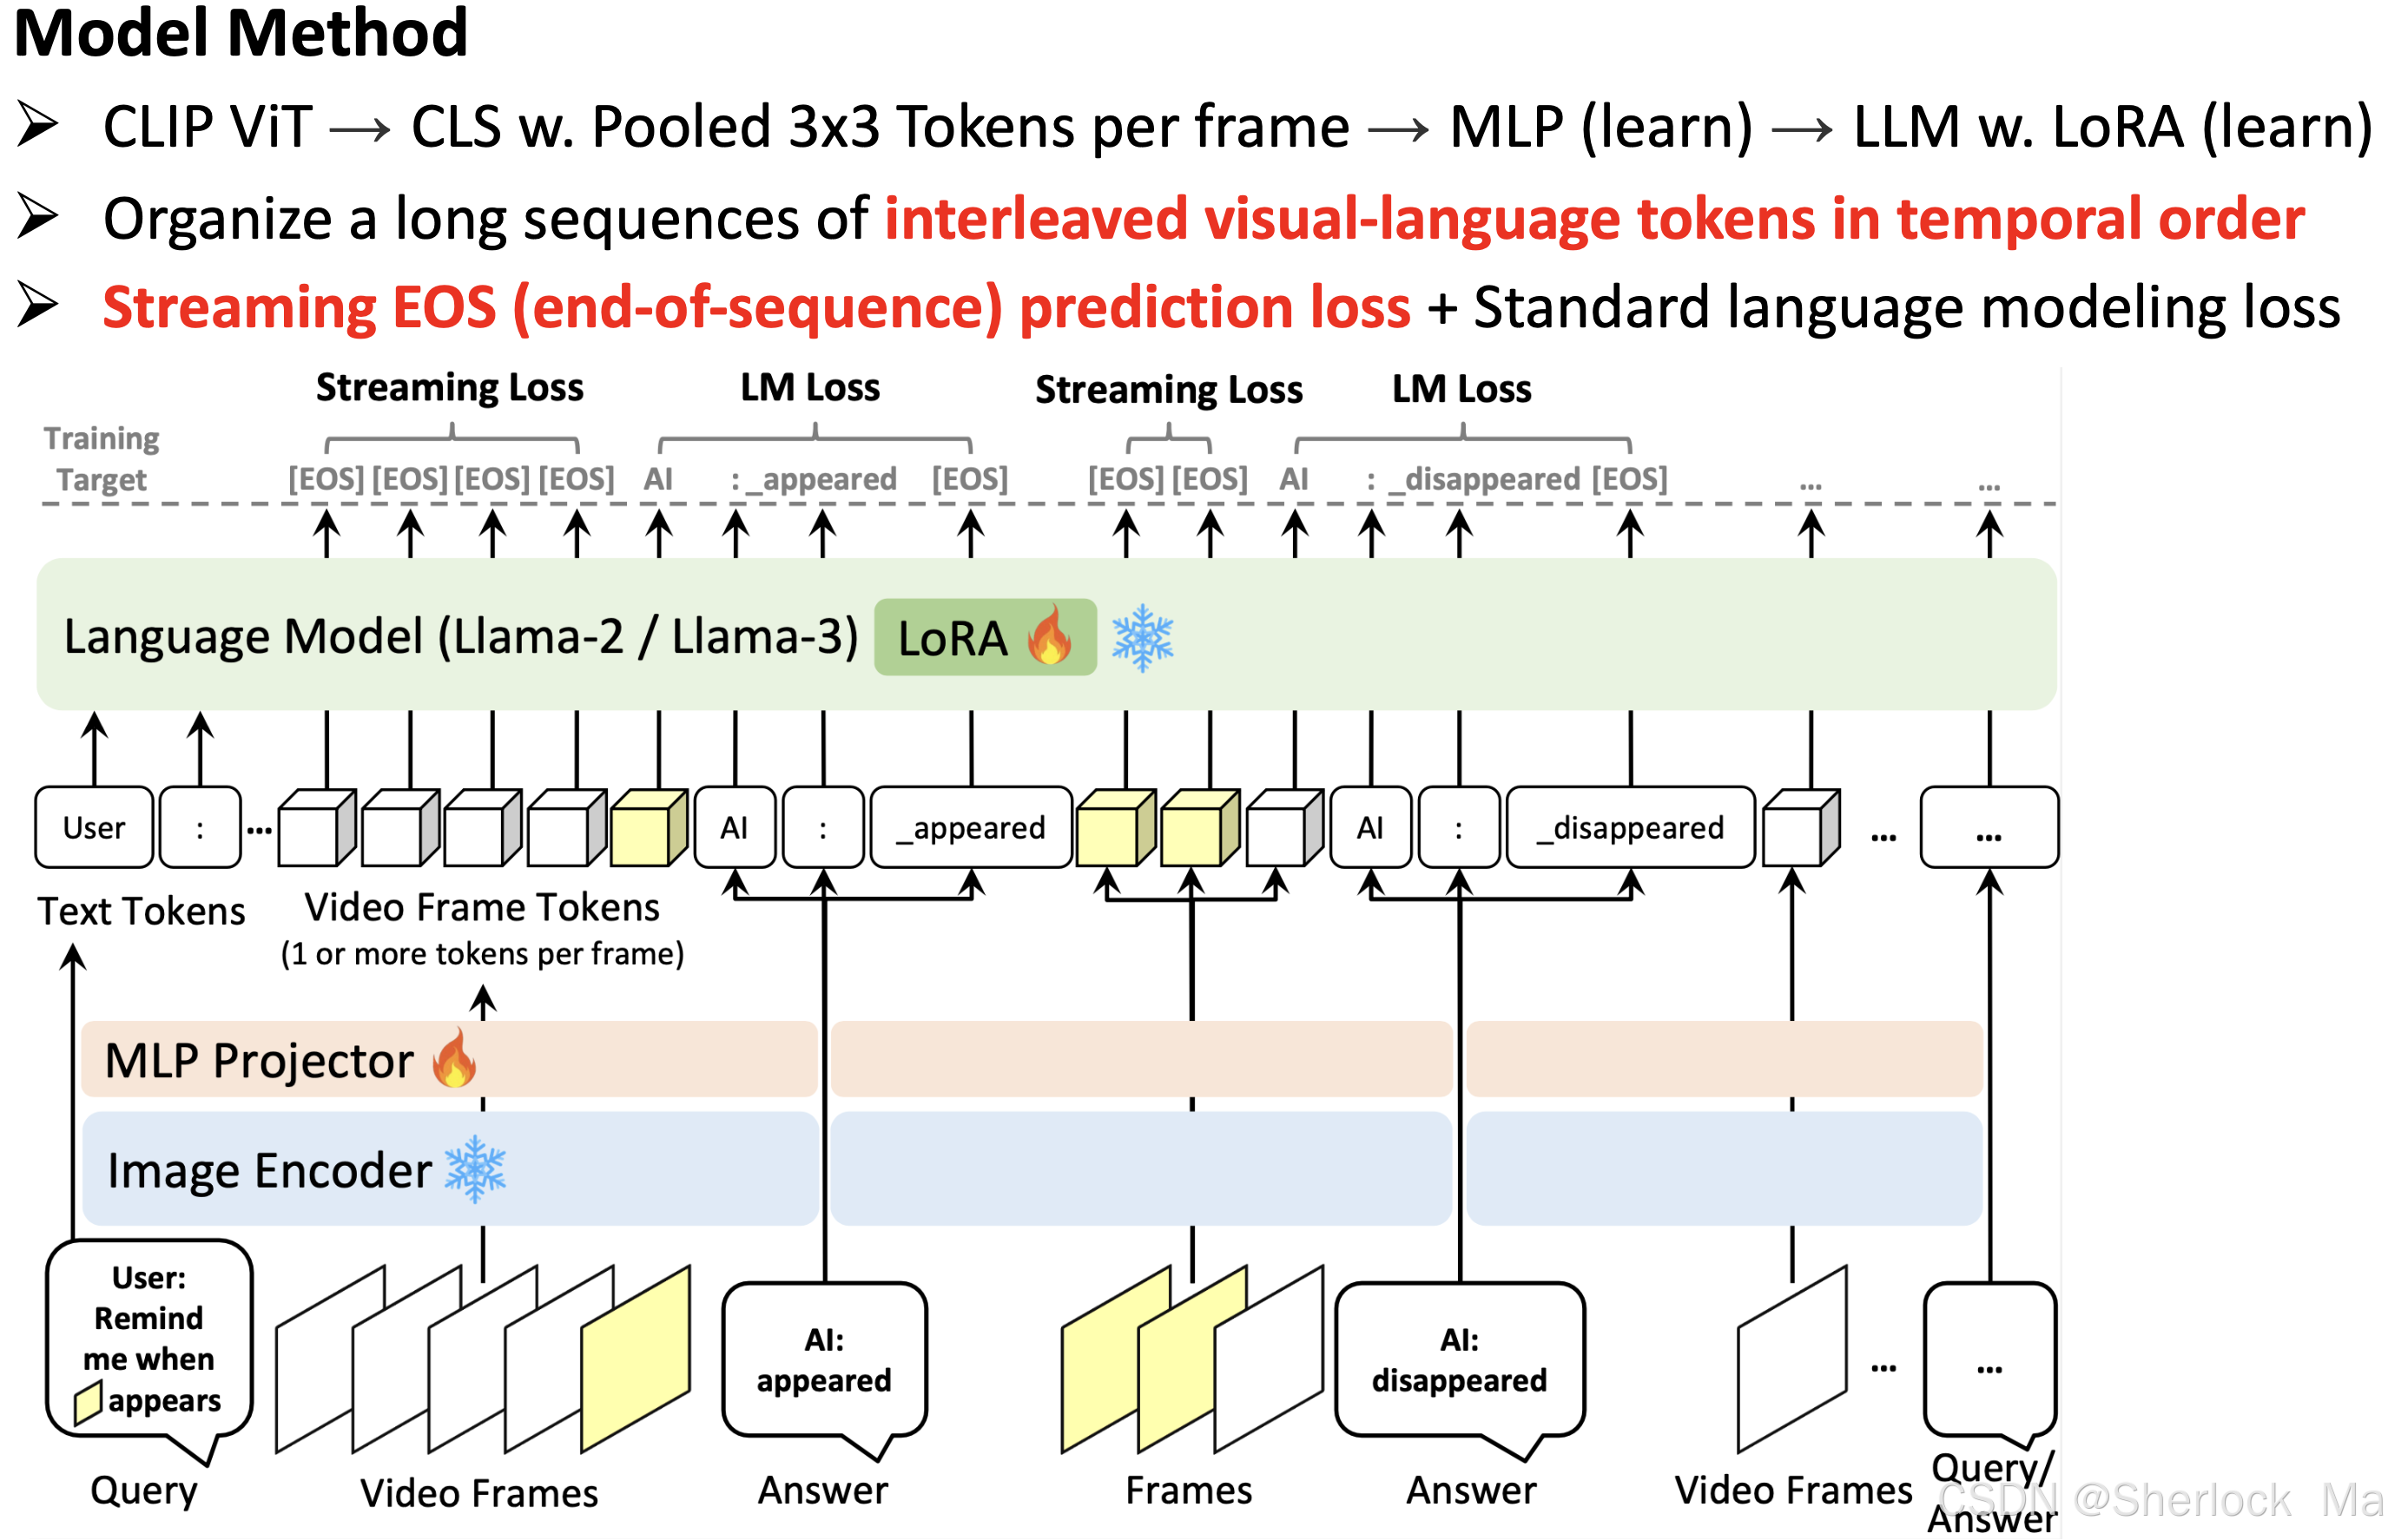
类似于LLaVA ,它包括三个关键组件:图像编码器,MLP 和语言模型。
- 对于图像编码器,我们利用CLIP ViT-L 编码器(在DataComp 1B上预训练)以2 FPS提取视频帧嵌入。每个视频帧嵌入具有(1 + hp × wp)× c的形状,其中(1 + hp × wp)表示CLS令牌和平均池化空间令牌。
- 然后将从图像编码器提取的帧嵌入馈送到MLP投影仪中以形成帧令牌,如LLaVA-1.5所示。
- 然后,帧标记与语言标记交织,作为LLM的输入,Llama-2- 7 B-Chat。最后,我们将LoRA纳入LLM的每个线性层以进行有效调谐。
训练方法
简单来说,当模型判断当前帧不需要生成语言响应时(即保持沉默),它会预测EOS token(即直接终结对话,也就是不输出)。这样,模型就可以在不需要生成响应的帧上“跳过”语言生成,从而节省计算资源。而如果判断需要生成内容,就会直接输出内容。
模型将对话数据和视频帧的时间顺序作为输入序列。为了学习模型在视频流中何时回答或保持沉默,作者不仅采用标准语言建模(LM)损失,还引入了流EOS预测损失。当需要生成语言时,这种额外的损失会监督模型,使其能够产生时间对齐的响应,并减少冗余的对话历史。如下图所示。
损失函数

- LM Loss(Language Modeling Loss)通常指的是自回归语言模型的损失。在自回归语言模型中,目标是预测给定前文(context)的下一个词(token)的概率分布。因此,LM Loss通常计算的是模型输出的概率分布与真实下一个词的概率分布之间的差异,这通常通过交叉熵损失(Cross-Entropy Loss)来实现。
- Streaming Loss 的目的是让模型学会在视频流中适当的时间点生成语言响应。具体来说,它通过最大化EOS token的预测概率来实现这一点,当模型判断当前帧不需要生成语言响应时(即保持沉默),它会预测EOS token。这样,模型就可以在不需要生成响应的帧上“跳过”语言生成,从而节省计算资源,并保持模型的实时响应能力。
lj+1是一个指示器,表示是否应该计算该位置的损失(即该位置是否为语言模型需要预测的token)。如果lj+1为1,则计算该位置的损失;如果为0,则不计算损失。fj同理。
推理的细节
纠正偏好预测EOS
模型会偏向EOS token的预测。为了解决这个问题,作者引入阈值θ来校正EOS token的输出概率:如果P[EOS] j < θ,则EOS将不被视为下一个token。在实际使用中,作者发现将θ设置为0.5会产生比没有阈值更好的结果。
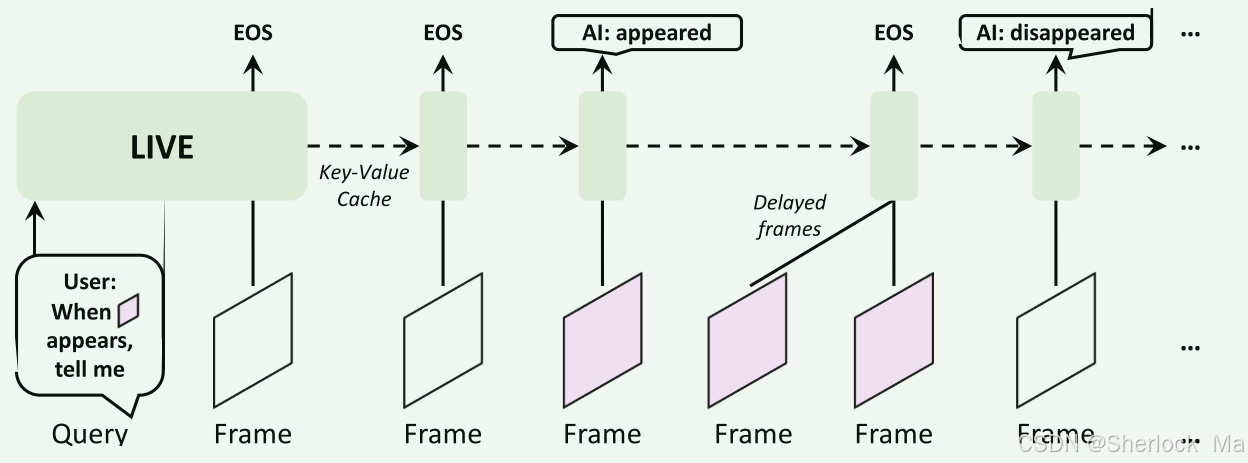
KV Cache
在推理过程中,视频作为逐帧流输入,默认FPS为2。模型将当前帧作为输入,并在运行中生成token。模型在输入过程中保持连续的KV Cache,以加快推理速度。此外,作者并行化快速视频帧编码器和较慢的语言模型,以避免后者的瓶颈。视频帧令牌可以一直被编码和缓冲,无需等待语言解码。
在代码层次,这里其实就是将LLM的use_cache设置为True,这时模型推理的输入就是单个Token。单个Token的Key和Value会与之前缓存的在变量past_key_value中的Key和Value进行torch.cat()拼接操作得到完整Key,Value序列。这些值可以在后续的解码步骤中被重用,以加速生成过程。代码详情请看LiveLlamaForCausalLM
实验部分就不多介绍了,感兴趣的读者请自行查看
3.代码解析
环境配置
使用Python3.10以上的版本
conda install -y pytorch torchvision torchaudio pytorch-cuda=12.1 -c pytorch -c nvidia
pip install transformers accelerate deepspeed peft editdistance Levenshtein tensorboard gradio moviepy submitit
pip install flash-attn --no-build-isolation
ffmpeg安装
wget https://johnvansickle.com/ffmpeg/releases/ffmpeg-release-amd64-static.tar.xz
tar xvf ffmpeg-release-amd64-static.tar.xz
rm ffmpeg-release-amd64-static.tar.xz
mv ffmpeg-7.0.1-amd64-static ffmpeg
如果需要实时语音互动,应安装ChatTTS:
pip install omegaconf vocos vector_quantize_pytorch cython
git clone git+https://github.com/2noise/ChatTTS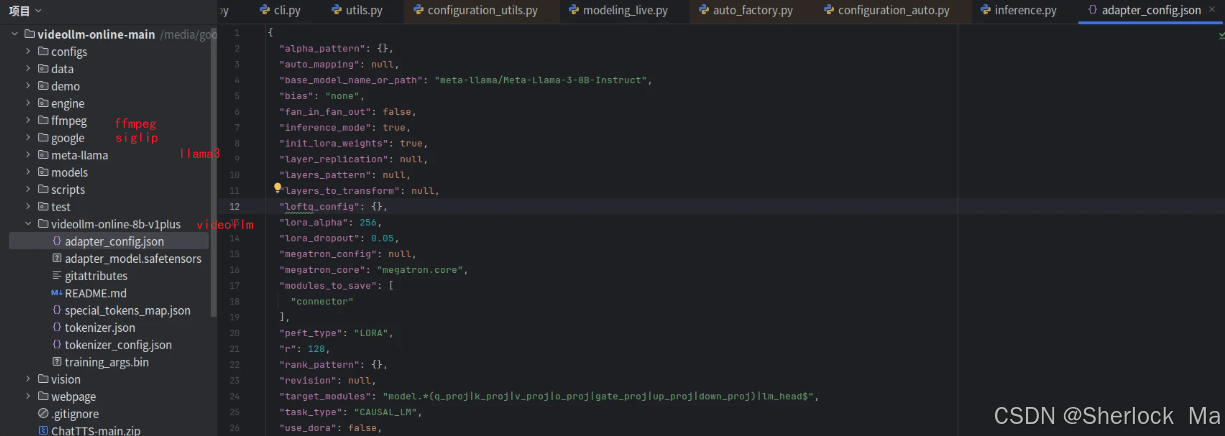
mv ChatTTS demo/rendering/权重下载:https://huggingface.co/chenjoya/videollm-online-8b-v1plus
语言模型权重下载(LLaMA3,需申请,如果不通过,可以通过魔搭社区下载):https://huggingface.co/chenjoya/videollm-online-8b-v1plus
siglip:https://huggingface.co/google/siglip-large-patch16-384
文件位置参考图:
报错解决
如果报这个错:
RuntimeError: video_reader video backend is not available. Please compile torchvision from source and try again可以参考作者的回复Installation Issue · Issue #24 · showlab/videollm-online · GitHub,也可以像我一样把下面这行代码注释掉
# torchvision.set_video_backend('video_reader')如果报KeyError:"siglip" ......
说明你的transformers库太老了,应该更新一下:
pip install -U transformers运行
作者提供了两个版本的运行代码,分别是demo/app.py和demo/cli.py。其中app.py提供了一个网页,供使用者可视化操作;cli.py则是纯代码版,可用于调试,这里我们以cli.py为例,讲解代码。
使用如下命令运行代码:
python -m demo.cli --resume_from_checkpoint chenjoya/videollm-online-8b-v1pluscli.py
liveinfer是本项目的关键类,通过这个类,我们可以实时加载图像、通过大模型实时理解和回答问题。本项目的所有核心代码都是通过LiveInfer类封装好,然后在外部进行调用的。
liveinfer = LiveInfer()实例化liveinfer对象后,代码会运行main()函数,用于处理视频文件并模拟实时对话。具体步骤如下:
- 准备视频文件:检查并生成指定FPS和分辨率的视频文件。
- 输入查询:向LiveInfer对象输入多个查询,模拟实时对话。
- 处理视频帧:逐帧处理视频,记录处理时间和对话内容。
- 保存历史记录:将处理过程中的对话历史记录保存为JSON文件。
def main(liveinfer: LiveInfer):
    # 1.准备视频文件
    src_video_path = 'demo/assets/cooking.mp4'
    name, ext = os.path.splitext(src_video_path)
    ffmpeg_video_path = os.path.join('demo/assets/cache', name + f'_{liveinfer.frame_fps}fps_{liveinfer.frame_resolution}' + ext)       # demo/assets/cache缓存地址
    save_history_path = src_video_path.replace('.mp4', '.json')
    if not os.path.exists(ffmpeg_video_path):   # 检查处理后的视频文件是否存在
        os.makedirs(os.path.dirname(ffmpeg_video_path), exist_ok=True)
        ffmpeg_once(src_video_path, ffmpeg_video_path, fps=liveinfer.frame_fps, resolution=liveinfer.frame_resolution)  # 调用 ffmpeg_once 函数生成处理后的视频文件。
        logger.warning(f'{src_video_path} -> {ffmpeg_video_path}, {liveinfer.frame_fps} FPS, {liveinfer.frame_resolution} Resolution')

    liveinfer.load_video(ffmpeg_video_path)     # 使用 LiveInfer 对象加载处理后的视频文件

    # 2.向 LiveInfer 对象输入多个查询,模拟实时对话。
    liveinfer.input_query_stream('Please narrate the video in real time.', video_time=0.0)      # # 处理用户查询并将其和时间点添加到查询队列中
    liveinfer.input_query_stream('Hi, who are you?', video_time=1.0)
    liveinfer.input_query_stream('Yes, I want to check its safety.', video_time=3.0)
    liveinfer.input_query_stream('No, I am going to install something to alert pedestrians to move aside. Could you guess what it is?', video_time=12.5)

    # 3.处理视频帧
    timecosts = []
    pbar = tqdm.tqdm(total=liveinfer.num_video_frames, bar_format="{l_bar}{bar}| {n_fmt}/{total_fmt}{postfix}]")
    history = {'video_path': src_video_path, 'frame_fps': liveinfer.frame_fps, 'conversation': []}
    for i in range(300):    # 循环处理视频帧
        # liveinfer.frame_token_interval_threshold -= 0.00175 # decay
        start_time = time.time()
        liveinfer.input_video_stream(i / liveinfer.frame_fps)   # 处理视频流中的帧数据
        query, response = liveinfer()       # 获取问题query和助手的响应response
        end_time = time.time()
        timecosts.append(end_time - start_time)
        fps = (i + 1) / sum(timecosts)
        pbar.set_postfix_str(f"Average Processing FPS: {fps:.1f}")
        pbar.update(1)

        # 根据处理结果记录用户查询、助手响应或时间信息。
        if query:
            history['conversation'].append({'role': 'user', 'content': query, 'time': liveinfer.video_time, 'fps': fps, 'cost': timecosts[-1]})
            print(query)
        if response:
            history['conversation'].append({'role': 'assistant', 'content': response, 'time': liveinfer.video_time, 'fps': fps, 'cost': timecosts[-1]})
            print(response)
        if not query and not response:
            history['conversation'].append({'time': liveinfer.video_time, 'fps': fps, 'cost': timecosts[-1]})

    # 4.保存历史记录
    json.dump(history, open(save_history_path, 'w'), indent=4)
    print(f'The conversation history has been saved to {save_history_path}.')
接下来,我们一个个来看
ffmpeg_once()
这个函数用于处理缓存视频文件。如果之前没有视频缓存文件,会调用 ffmpeg_once 函数生成处理后的视频文件。具体功能如下:
- 创建目标目录:确保目标文件的目录存在,如果不存在则创建。
- 构建 FFmpeg 命令:初始化 FFmpeg 命令的基本部分,包括输入文件路径、输出文件路径等。
- 设置帧率:如果指定了帧率 fps,则在命令中添加相应的参数。
- 设置分辨率:如果指定了分辨率 resolution,则在命令中添加相应的参数,包括缩放和填充操作。
- 执行命令:使用 subprocess.run 执行构建好的 FFmpeg 命令。
这个代码会在demo/assets/cache/demo/assets文件夹下保存一个每秒2帧的缓存视频文件。
def ffmpeg_once(src_path: str, dst_path: str, *, fps: int = None, resolution: int = None, pad: str = '#000000', mode='bicubic'):
    os.makedirs(os.path.dirname(dst_path), exist_ok=True)
    command = [     # 根据处理结果记录用户查询、助手响应或时间信息。
        './ffmpeg/ffmpeg',
        '-y',
        '-sws_flags', mode,
        '-i', src_path,
        '-an',
        '-threads', '10',
    ]
    if fps is not None:     # 设置帧率
        command += ['-r', str(fps)]
    if resolution is not None:      # 设置分辨率
        command += ['-vf', f"scale='if(gt(iw\\,ih)\\,{resolution}\\,-2)':'if(gt(iw\\,ih)\\,-2\\,{resolution})',pad={resolution}:{resolution}:(ow-iw)/2:(oh-ih)/2:color='{pad}'"]
    command += [dst_path]       # 添加输出文件路径
    subprocess.run(command, check=True)     # 执行命令
input_query_stream()
这个函数用于将query放入队列,供下一步使用。
def input_query_stream(self, query, history=None, video_time=None):     # 处理用户查询并将其和时间点添加到查询队列中
    if video_time is None:
        self.query_queue.append((self.video_time, query))   # collections.deque()
    else:
        self.query_queue.append((video_time, query))
    if not self.past_key_values:
        return f'(NOTE: No video stream here. Please select or upload a video. Then the assistant will answer "{query} (at {self.video_time}s)" in the video stream)'
    return f'(NOTE: Received "{query}" (at {self.video_time}s). Please wait until previous frames have been processed)'
这个代码会将时间点和问题query拼起来,然后放入query_queue队列中,query_query的类型是Python的collections.deque(),这是Python内置的队列类。
运行input_query_stream()函数后,队列的元素构建结果如下:
(0.0, 'Please narrate the video in real time.')input_video_stream()
这个函数用于读取视频帧,放入队列,供下一步使用,具体功能如下:
- 计算当前帧索引:根据输入的视频时间 video_time 和帧率 self.frame_fps 计算当前帧的索引 frame_idx。
- 检查是否需要处理新帧:如果 frame_idx 大于 self.last_frame_idx,则计算需要处理的新帧的范围 ranger。
- 提取帧数据并进行视觉嵌入:从 self.video_tensor 中提取指定范围的帧数据,并通过模型进行视觉嵌入处理,生成 frames_embeds。
- 更新帧嵌入队列:将处理后的帧嵌入及其对应的时间戳添加到 self.frame_embeds_queue 队列中。
- 更新状态变量:更新 self.last_frame_idx 和 self.video_time
def input_video_stream(self, video_time):       # 处理视频流中的帧数据
    frame_idx = int(video_time * self.frame_fps)
    if frame_idx > self.last_frame_idx:
        ranger = range(self.last_frame_idx + 1, frame_idx + 1)      # 计算需要处理的帧范围
        frames_embeds = self.model.visual_embed(self.video_tensor[ranger]).split(self.frame_num_tokens)     # [frame_num_tokens, 总/frame_num_tokens]=[10,4096]提取帧数据并进行视觉嵌入
        self.frame_embeds_queue.extend([(r / self.frame_fps, frame_embeds) for r, frame_embeds in zip(ranger, frames_embeds)])      # 更新队列
    self.last_frame_idx = frame_idx
    self.video_time = video_time
liveinfer()
query, response = liveinfer() # 获取问题query和助手的响应response这里使用对象名liveinfer调用函数,其实是调用LiveInfer类里面的__call__()函数,
这段代码定义了一个类的方法 __call__,其主要功能是处理视频帧的嵌入数据并生成响应。具体步骤如下:
- 等待队列不为空:通过一个 while 循环,持续检查 frame_embeds_queue 队列是否为空,直到队列中有数据为止。(这里应该是app.py设置了并行操作,有时可能读取视频速度慢,导致视频帧队列为空,如果这时尝试读取视频帧,就会报错。这里加了循环,只有视频帧队列不为空才放行)
- 获取视频时间和查询:调用 _call_for_streaming 方法,获取视频时间 video_time 和查询 query。
- 处理响应:如果 video_time 不为 None,则调用 _call_for_response 方法,进一步处理查询并生成响应 response。
- 返回结果:最终返回 query 和 response。
def __call__(self, ):
    while not self.frame_embeds_queue:      # 这里应该是处理异步的循环队列,直到队列不为空。 这个队列是视觉嵌入的结果
        continue
    video_time, query = self._call_for_streaming()
    response = None
    if video_time is not None:
        query, response = self._call_for_response(video_time, query)
    return query, response
_call_for_streaming()
这段代码定义了一个名为 _call_for_streaming 的方法,主要用于处理视频帧并判断是否需要回答,其返回结果将决定是否调用self._call_for_response()进行回答,具体功能如下:
- 检查查询队列:如果 query_queue 不为空且当前帧的时间大于 query_queue 中的第一个查询时间,则从 query_queue 中取出查询并返回。如果query时间点早于当前帧,则立即返回,让_call_for_response()回答
- 处理帧嵌入:从 frame_embeds_queue 中取出帧嵌入数据,并根据 past_key_values 和 last_ids 生成输入嵌入。
- 这里需要注意,对于last_ids:
- 如果是初始化,last_ids需要将system_prompt和add_stream_prompt拼起来。add_stream_prompt表示有视频流传入,这里是让tokenizer添加了对应的token
- 如果last_ids是EOS,即上次预测结果是EOS,需要将last_ids和add_stream_prompt拼起来(手动添加对应的token),长度[1,3],(因为EOS代表终止,需要更改才能让模型继续输出)
- 其他条件下只有last_ids,长度[1,1]
- 然后把last_ids和图像拼起来,经过tokenier,变成[1,last_ids_len+10,4096]
- 这里需要注意,对于last_ids:
- 模型推理:使用模型进行推理,并更新 past_key_values(更新的代码在LiveLlamaForCausalLM讲解)。
- 再次检查查询队列:如果 query_queue 不为空且当前帧的时间大于等于 query_queue 中的第一个查询时间,则从 query_queue 中取出查询并返回。当前视频帧刚被被处理,query也需要立刻回答
- 生成下一个 token:
- 计算下一个 token 的分数,
- 如果分数低于阈值则置零(EOS偏好纠正)
- 选择得分最高的 token 作为 last_ids。
- 返回结果:如果 last_ids 不是 frame_token_interval_id(表示不需要回答,值为11),则返回当前帧时间和 None;否则继续循环。
def _call_for_streaming(self, ):
    while self.frame_embeds_queue:
        # 1. if query is before next frame, response  【如果query时间点早于当前帧,则立即返回。
        if self.query_queue and self.frame_embeds_queue[0][0] > self.query_queue[0][0]:     # 如果 query_queue 队列不为空,并且当前帧的时间大于 query_queue 中第一个查询的时间,则从 query_queue 中取出查询并返回。
            video_time, query = self.query_queue.popleft()
            return video_time, query
        video_time, frame_embeds = self.frame_embeds_queue.popleft()    # 弹出当前视频帧
        if not self.past_key_values:    # 初始化
            self.last_ids = self._start_ids
        elif self.last_ids == self.eos_token_id:    # 如果上一次是EOS,需要和stream_prompt_ids拼起来
            self.last_ids = torch.cat([self.last_ids, self._added_stream_prompt_ids], dim=1)
        inputs_embeds = torch.cat([    # 和图像帧拼起来
            self.model.get_input_embeddings()(self.last_ids).view(1, -1, self.hidden_size),     #
            frame_embeds.view(1, -1, self.hidden_size),     # 图像
        ], dim=1)       # [1,len,4096]  处理帧嵌入
        outputs = self.model(inputs_embeds=inputs_embeds, use_cache=True, past_key_values=self.past_key_values)     # 模型推理 logits=[1,42,128256]
        self.past_key_values = outputs.past_key_values      # 论文中的KV-Cache
        # 2. if the same time, response after frame at that time    【再次检查查询队列:如果当前帧的时间大于等于 query_queue 中的第一个查询时间,则从 query_queue 中取出查询并返回。
        if self.query_queue and video_time >= self.query_queue[0][0]:
            video_time, query = self.query_queue.popleft()
            return video_time, query
        # 3. if the next is frame but next is not interval, then response
        next_score = outputs.logits[:,-1:].softmax(dim=-1)
        if next_score[:,:,self.frame_token_interval_id] < self.frame_token_interval_threshold:      # 论文中的纠正偏好预测EOS
            next_score[:,:,self.frame_token_interval_id].zero_()
        self.last_ids = next_score.argmax(dim=-1)
        if self.last_ids != self.frame_token_interval_id:   # 如果判断这时候要回答,只f返回点
            return video_time, None
    return None, None       # 如果判断这时候不需要回答,返回None
我这里写了一个伪代码,方便大家理解
while :
    if 视频帧时间 > 队列中第一个query时间:  # 这说明当前视频帧已经被处理了,query必须立刻回答
        弹出query
        return query队列的时间点和query

    视频帧弹出
    处理视频帧,放入KV-Cache

    if 视频帧时间 >= 队列中第一个query时间:  # 当前视频帧刚被被处理,query也需要立刻回答
        弹出query
        返回query队列的时间点和query

    EOS偏好纠正
    if last_ids != 间隔符:    # 说明这时候模型预测到有变化,需要回答
        return 视频帧的时间点和None(query=None)

return None, None    # 不需要回答
_call_for_response()
这段代码定义了一个名为 _call_for_response 的方法,用于生成回答。这里会调用fast_greedy_generate()进行生成。其主要流程如下:
- 如果query发生变化,更新last_ids
- 将query转换为模板
- 添加add_stream_query_prompt=True, add_generation_prompt=True
- add_stream_query_prompt表示有视频流和query传入,这里是让tokenizer添加了对应的token
- add_generation_prompt表示需要输出,这里是让tokenizer添加了对应的token
- query没变,那就加上
- add_generation_prompt:这里就是向大模型表示,该生成输出结果了。
- 编码后输入给模型
- 输出
def _call_for_response(self, video_time, query):
    if query is not None:       # query发生变化,需更新
        self.last_ids = self.tokenizer.apply_chat_template([{'role': 'user', 'content': query}], add_stream_query_prompt=True, add_generation_prompt=True, return_tensors='pt').to('cuda')
    else:       # 检查 last_ids 是否等于 933,如果不等于则抛出异常,否则使用 last_ids。
        assert self.last_ids == 933, f'{self.last_ids} != 933' # HACK, 933 = ]\n
        self.last_ids = self._added_stream_generation_ids
    inputs_embeds = self.model.get_input_embeddings()(self.last_ids)    # [1,len,4096]
    output_ids, self.past_key_values = fast_greedy_generate(model=self.model, inputs_embeds=inputs_embeds, past_key_values=self.past_key_values, eos_token_id=self.eos_token_id, inplace_output_ids=self.inplace_output_ids)    # 生成输出 token 序列
    self.last_ids = output_ids[:, -1:]
    if query:
        query = f'(Video Time = {video_time}s) User: {query}'
    response = f'(Video Time = {video_time}s) Assistant:{self.tokenizer.decode(output_ids[0], skip_special_tokens=True, clean_up_tokenization_spaces=True)}'    # 构建响应字符串
    return query, response
对于add_generation_prompt,以下文字来源于文档:
如果设置了此项,则会在格式化输出中附加一个提示,其中包含表示助手信息开始的标记。当您想从模型中生成一个响应时,这将非常有用。
fast_greedy_generate()代码如下:
这里其实就是调用大模型预测,需要注意的是,这里设置了past_key_values,即KV-Cache,有缓存信息,因此除第一次外,每次的输入都是[1,1,4096];而每次的输出都是[1,1,128256],也就是每次只输出一个字符,最后统一返回整句话。
def fast_greedy_generate(*, model: LiveMixin, inputs_embeds: torch.Tensor, past_key_values: Cache, eos_token_id: int, inplace_output_ids: torch.Tensor):
    for i in range(inplace_output_ids.size(1)):
        outputs = model(inputs_embeds=inputs_embeds, past_key_values=past_key_values, use_cache=True)
        past_key_values = outputs.past_key_values
        new_token_id = outputs.logits[:, -1:].argmax(dim=-1)    # 调用模型生成新 token
        inplace_output_ids[:, i] = new_token_id     # 更新新 token
        if new_token_id == eos_token_id:
            break
        inputs_embeds = model.get_input_embeddings()(new_token_id)    # 更新输入嵌入向量
    return inplace_output_ids[:, :i+1], past_key_values     # 返回输出结果和KV-Cache
返回的结果最终回到cli.py,打印输出。
简单总结一下整个流程:
- call_for_streaming是负责判断需不需要回答,如果视频时间点已经>=query时间点了,直接返回,进行预测。如果模型预测的第11位(last_ids)被判定为frame_token_interval_id,那么不需要回答。如果没被判定为frame_token_interval_id,跳出,进入call_for_response进行回答。
- 而call_for_response会生成结果,最后的字符会是EOS,表示结束输出,所以下次回到call_for_streaming时会拼接added_stream_prompt_ids,表示还有新输入需要处理。
LiveLlamaForCausalLM
到这里,代码的整体流程就讲完了,接下来,我们来看看大模型是怎么进行预测的。LiveLlamaForCausalLM是作者自定义的类,其父类为LlamaForCausalLM(transformers库),LiveLlamaForCausalLM会调用父类方法进行推理。
class LiveLlamaForCausalLM(LlamaForCausalLM, LiveMixin):
    ...

    def forward(  ...    ):
        if inputs_embeds is None:
            inputs_embeds = self.joint_embed(input_ids, frames)
        outputs = super().forward(  # 调用父类推理
            attention_mask = attention_mask,
            position_ids = position_ids,
            past_key_values = past_key_values,
            inputs_embeds = inputs_embeds,
            # labels
            use_cache = use_cache,
            output_attentions = output_attentions,
            output_hidden_states = output_hidden_states,
            return_dict = return_dict,
            cache_position=cache_position,
        )

        ...

        return outputs
KV-Cache
LlamaForCausalLM的父类是LlamaModel,KV-Cache的更新代码需要在LlamaModel每一层的attention里面查看,
KV-Cache的作用:如果一个新请求与之前的请求共享系统提示,那么共享提示的 KV 缓存可以直接用于新请求,而不需要重新计算。
这里需要注意的是:当LLM的use_cache使用True时,这时模型推理的输入hidden就是单个Token(因为是在fast_greedy_generate()里循环输入),之后LLM内部会使用past_key_value(也就是论文中的KV-Cache)变量。单个Token的Key和Value会与之前缓存的在变量past_key_value中的Key和Value进行torch.cat()拼接操作得到完整Key,Value序列。这些值可以在后续的解码步骤中被重用,以加速生成过程。
KV-cache会不断变大,并占用显存,根据文档的说法,到了一定大小,会自动删除不需要的cache。
写的比较好的一篇文章,供读者参考:https://zhuanlan.zhihu.com/p/667471165
以及这一篇:详解-大模型推理(Llama3)相关参数和显存计算!_llama3结构-CSDN博客
在transformers库的modeling_llama.py下,我们进入llama的attention代码中,我们可以看到past_key_value是怎么更新的:past_key_value保存了llama模型32层的每一层参数,这里就是按layer_idx取出对应层的kv缓存,然后拼接给key_states, value_states,最后计算attention。
拼接过程:[1,8,1,128]+[1,8,cache_len,128]=[1,8,cache_len+1,128]
key_states, value_states = past_key_value.update(key_states, value_states, self.layer_idx, cache_kwargs)训练
数据集
数据集下载
视频:Egocentric 4D Perception (EGO4D)
标签:https://huggingface.co/datasets/chenjoya/videollm-online-chat-ego4d-134k/tree/main
数据集格式:
"video_uid": "f7a0beb6-b220-40c0-a72d-ec4b79134a73",
        "conversation": [
            {
                "role": "user",
                "content": "What are the prerequisites for the next task?",
                "time": 138.6
            },
            {
                "role": "assistant",
                "content": "Before proceeding, please make sure you have sliced the tomatoes. We've already added pepper, salt, and sauce to them.",
                "time": 138.6
            },
            {
                "role": "assistant",
                "content": "You've just added salt to the sliced tomatoes. The next step is to add sauce.",
                "time": 149.5
            },
            {
                "role": "assistant",
                "content": "You're on the right track! To confirm, you've added pepper, salt, and sauce to the sliced tomatoes. Now, you need to mix the ingredients.",
                "time": 150.0
            },
数据集制作:制作过程参考data/preprocess/README.md
使用方法
- 下载 Ego4D 目标步骤视频
- 获取 Ego4D goalstep 视频的视频 ID
- 在 https://huggingface.co/datasets/chenjoya/videollm-online-chat-ego4d-134k/blob/main/goalstep_livechat_trainval_filtered_21k.json 中选择视频 ID 下的对话
- 按照 Ego4D goalstep 视频的帧预处理和编码进行操作
- 现在应该有 .pt 文件和 .json 文件了。这样就可以开始训练了。
参考:https://github.com/showlab/videollm-online/issues/33
4.总结
总的来说,这个项目确实非常出色,它并不是依靠复杂的深度学习算法,而是通过巧妙的封装和颇具创意的构思与想法来吸引注意。
代码部分虽然不涉及太多深度学习的内容,但正是这种对现有对transformers库和llama3模型的熟练掌握和巧妙应用,使得整个项目显得格外引人注目。作者不仅展示了如何高效地利用transformers库来构建和优化模型,还深入探讨了llama3模型的特性和潜力,这种对技术的精准把握和创新应用,无疑为项目的成功奠定了坚实的基础。
在这篇博客中,我们探索了VideoLLM-online,这是一个突破性的模型,它通过实时处理视频流并进行交互式对话,为流媒体视频交互带来了革命性的进步。这个模型不仅能够理解视频中的视觉内容,还能够在视频播放的同时提供实时的语言反馈,使得视频观看体验变得更加生动和互动。VideoLLM-online在多个视频识别任务中展现了卓越的性能,包括活动识别、视频问答和内容预测等,它的高效率和准确性为视频内容的自动化理解和交互提供了新的可能性。总的来说,VideoLLM-online标志着向更智能、更个性化的视频交互体验迈出的重要一步,为未来智能视频应用的发展奠定了坚实的基础。
如果您对VideoLLM-online模型的创新突破和它为视频交互带来的无限可能感到兴奋,那么请不要犹豫,动动手指,给我们一个关注和点赞吧!您的每一次互动都是我们继续探索和分享前沿技术动力的源泉。加入我们,一起见证智能视频技术如何塑造我们的数字世界,让每一次观看都成为一次全新的发现之旅。感谢您的支持,让我们共同期待更多令人激动的更新!


 1775
1775

 被折叠的 条评论
为什么被折叠?
被折叠的 条评论
为什么被折叠?
 到【灌水乐园】发言


