- Flutter和Dart系列文章
- 项目GitHub地址
- 容器类
Widget和布局类Widget都作用于其子Widget,不同的是:- 布局类
Widget一般都需要接收一个widget数组(children),他们直接或间接继承自(或包含)MultiChildRenderObjectWidget - 而容器类
Widget一般只需要接受一个子Widget(child),他们直接或间接继承自(或包含)SingleChildRenderObjectWidget - 布局类
Widget是按照一定的排列方式来对其子Widget进行排列 - 而容器类
Widget一般只是包装其子Widget,对其添加一些修饰(补白或背景色等)、变换(旋转或剪裁等)、或限制(大小等)。
- 布局类
Flutter官方并没有对Widget进行官方分类,我们对其分类主要是为了方便讨论和对Widget功能的区分记忆- 相关容器类
Widget主要分为以下几种- 填充类容器
Padding - 布局限制类容器
ConstrainedBox、SizeBox - 装饰类容器
DecoratedBox - 变换类容器
Transform - 组合容器
Container - 导航类容器
Scaffold、TabBar、AppBar等
- 填充类容器
Padding
Padding可以给其子元素设置内边距
class Padding extends SingleChildRenderObjectWidget {
    const Padding({
        Key key,
        // 内边距
        @required this.padding,
        Widget child,
    })

    final EdgeInsetsGeometry padding;
}
EdgeInsetsGeometry是一个抽象类,一般情况都使用EdgeInsets,它是EdgeInsetsGeometry的一个子类, 下面是的定义的一些方法
class EdgeInsets extends EdgeInsetsGeometry {
    // 根据上下左右分别设置边距
    const EdgeInsets.fromLTRB(this.left, this.top, this.right, this.bottom);

    // 统一设置四周边距
    const EdgeInsets.all(double value)

    // 只设置其中某几个边距
    const EdgeInsets.only({
        // 下面的都是默认值
        this.left = 0.0,
        this.top = 0.0,
        this.right = 0.0,
        this.bottom = 0.0
    });

    // 根据水平和垂直方向设置, 上下间距一样, 左右间距一样
    const EdgeInsets.symmetric({ double vertical = 0.0,
                             double horizontal = 0.0 })

    // 静态变量, 上下左右, 都是0
    static const EdgeInsets zero = EdgeInsets.only();
}
示例
class MyApp extends StatelessWidget {
  @override
  Widget build(BuildContext context) {
    return Padding(
      padding: EdgeInsets.all(20),
      child: Icon(Icons.phone, color: Colors.cyan,),
    );
  }
}
ConstrainedBox
ConstrainedBox和SizedBox都是通过RenderConstrainedBox来渲染的SizedBox只是ConstrainedBox一个定制ConstrainedBox主要用于对子widget添加额外的约束
class ConstrainedBox extends SingleChildRenderObjectWidget {

  ConstrainedBox({
    Key key,
    @required this.constraints,
    Widget child
  })

  /// 给子widget添加约束
  final BoxConstraints constraints;
BoxConstraints
BoxConstraints设置Widget的约束, 内部设置了四个属性: 最大/小宽度和最大小高度, 下面是其相关构造函数和实例函数
class BoxConstraints extends Constraints {
  /// 构造函数
  const BoxConstraints({
    // 最小宽度
    this.minWidth = 0.0,
    // 最大宽度
    this.maxWidth = double.infinity,
    // 最小高度
    this.minHeight = 0.0,
    // 最大高度
    this.maxHeight = double.infinity
  });

  /// 根据指定的Size设置约束
  BoxConstraints.tight(Size size)
    : minWidth = size.width,
      maxWidth = size.width,
      minHeight = size.height,
      maxHeight = size.height;

  // 根据指定的宽高设置, 参数可为空
  const BoxConstraints.tightFor({
    double width,
    double height
  }): minWidth = width != null ? width : 0.0,
      maxWidth = width != null ? width : double.infinity,
      minHeight = height != null ? height : 0.0,
      maxHeight = height != null ? height : double.infinity;

  // 默认宽高都是最大值, 参数可为空
  const BoxConstraints.tightForFinite({
    double width = double.infinity,
    double height = double.infinity
  }): minWidth = width != double.infinity ? width : 0.0,
      maxWidth = width != double.infinity ? width : double.infinity,
      minHeight = height != double.infinity ? height : 0.0,
      maxHeight = height != double.infinity ? height : double.infinity;

  // 根据Size参数, 设置其最大值, 最小值为0
  BoxConstraints.loose(Size size)
    : minWidth = 0.0,
      maxWidth = size.width,
      minHeight = 0.0,
      maxHeight = size.height;

  // 根据宽高设置, 如果参数为空则默认为最大值
  const BoxConstraints.expand({
    double width,
    double height
  }): minWidth = width != null ? width : double.infinity,
      maxWidth = width != null ? width : double.infinity,
      minHeight = height != null ? height : double.infinity,
      maxHeight = height != null ? height : double.infinity;
}
使用实例
class ConstrainedBoxView extends StatelessWidget {
  @override
  Widget build(BuildContext context) {
    // TODO: implement build
    return ConstrainedBox(
      constraints: BoxConstraints(
        minWidth: double.infinity,  // 宽度设置最大
        minHeight: 50,    // 高度最小值设置50
      ),
      child: Container(
        height: 10,   // 设置高度为10
        child: DecoratedBox(decoration: BoxDecoration(color: Colors.orange)),
      ),
    );
  }
}

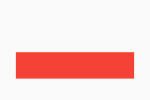
- 可以看到, 虽然将
Container的高度设置为10像素,但是最终却是50像素,这正是ConstrainedBox的最小高度限制生效了 - 如果将
Container的高度设置为80像素,那么最终红色区域的高度也会是80像素,因为在此示例中,ConstrainedBox只限制了最小高度,并未限制最大高度
SizedBox
SizedBox用于给子widget指定固定的宽高
// SizedBox的几种构造函数
class SizedBox extends SingleChildRenderObjectWidget {
  /// 设置固定的高度
  const SizedBox({ Key key, this.width, this.height, Widget child })
    : super(key: key, child: child);

  /// 创建一个最大宽高的box
  const SizedBox.expand({ Key key, Widget child })
    : width = double.infinity,
      height = double.infinity,
      super(key: key, child: child);

  /// 创建一个最小宽高(都是0)的box
  const SizedBox.shrink({ Key key, Widget child })
    : width = 0.0,
      height = 0.0,
      super(key: key, child: child);

  /// 创建一个指定size 的box
  SizedBox.fromSize({ Key key, Widget child, Size size })
    : width = size?.width,
      height = size?.height,
      super(key: key, child: child);
}
这里我们创建一个指定宽高的Widget
class SizedBoxView extends StatelessWidget {
  @override
  Widget build(BuildContext context) {
    // TODO: implement build
    return SizedBox(
      width: 80,
      height: 80,
      child: Container(
        child: DecoratedBox(decoration: BoxDecoration(color: Colors.orange)),
      ),
    );
  }
}

// 实际上SizedBox和只是ConstrainedBox一个定制, 上面的代码等价于
ConstrainedBox(
  constraints: BoxConstraints.tightFor(width: 80.0,height: 80.0),
  child: Container(
    child: DecoratedBox(decoration: BoxDecoration(color: Colors.orange)),
  ),
)
而实际上ConstrainedBox和SizedBox都是通过RenderConstrainedBox来渲染的,我们可以看到ConstrainedBox和SizedBox的createRenderObject()方法都返回的是一个RenderConstrainedBox对象
// SizedBox
class SizedBox extends SingleChildRenderObjectWidget {
 RenderConstrainedBox createRenderObject(BuildContext context) {
    return RenderConstrainedBox(
      additionalConstraints: _additionalConstraints,
    );
  }

  BoxConstraints get _additionalConstraints {
    return BoxConstraints.tightFor(width: width, height: height);
  }
}

// ConstrainedBox
class ConstrainedBox extends SingleChildRenderObjectWidget {
  RenderConstrainedBox createRenderObject(BuildContext context) {
    return RenderConstrainedBox(additionalConstraints: constraints);
  }

  final BoxConstraints constraints;
}
多重限制问题
- 如果某一个
widget有多个父ConstrainedBox限制 - 对于
minWidth和minHeight来说,是取父子中相应数值较大的。只有这样才能保证父限制与子限制不冲突 - 对于
maxWidth和maxHeight来说, 无效, 最终宽高都是0
UnconstrainedBox
const UnconstrainedBox({
    Key key,
    Widget child,
    // TextDirection, 表示水平方向子widget的布局顺序
    this.textDirection,
    // 子Widget在主轴上的对其方式
    this.alignment = Alignment.center,
    // 设置约束的轴, 水平or垂直, Axis.horizontal
    this.constrainedAxis,
})
UnconstrainedBox不会对子Widget产生任何限制,它允许其子Widget按照其本身大小绘制- 一般情况下,我们会很少直接使用此
widget,但在"去除"多重限制的时候也许会有帮助
ConstrainedBox(
  constraints: BoxConstraints(
    minWidth: 60,
    minHeight: 100,
  ),
  child: UnconstrainedBox(  // “去除”父级限制
    textDirection: TextDirection.ltr,
    alignment: Alignment.center,
    constrainedAxis: Axis.horizontal,
    child: ConstrainedBox(
      constraints: BoxConstraints(
        minWidth: 90,
        minHeight: 20,
      ),
      child: DecoratedBox(decoration: BoxDecoration(color: Colors.red)),
    ),
  )
);
- 上面代码中,如果没有中间的
UnconstrainedBox,那么根据上面所述的多重限制规则,那么最终将显示一个90×100的红色框 - 但是由于
UnconstrainedBox“去除”了父ConstrainedBox的限制,则最终会按照子ConstrainedBox的限制来绘制红色框,即90×20:

- 但是需要注意,
UnconstrainedBox对父限制的“去除”并非是真正的去除,上面例子中虽然红色区域大小是90×20,但上方仍然有80的空白空间。 - 也就是说父限制的
minHeight(100.0)仍然是生效的,只不过它不影响最终子元素的大小,但仍然还是占有相应的空间,可以认为此时的父ConstrainedBox是作用于子ConstrainedBox上,而红色框只受子ConstrainedBox限制,这一点请读者务必注意 - 并且目前没有什么方式能够彻底去除父
BoxConstraints的限制 - 在定义一个通用的
widget时,如果对子widget指定限制时一定要注意,因为一旦指定限制条件,子widget如果要进行相关自定义大小时将可能非常困难,因为子widget在不更改父widget的代码的情况下无法彻底去除其限制条件
DecoratedBox
DecoratedBox可以在其子widget绘制前(或后)绘制一个装饰Decoration(如背景、边框、渐变等), 构造函数如下
const DecoratedBox({
    Key key,
    @required this.decoration,
    this.position = DecorationPosition.background,
    Widget child
})
decoration: 代表将要绘制的装饰,它类型为Decoration是一个抽象类,它定义了一个接口createBoxPainter(),子类的主要职责是需要通过实现它来创建一个装饰器, 所以后面我们将使用BoxDecoration来实现该属性position:此属性决定在哪里绘制Decoration,它接收DecorationPosition的枚举类型,该枚举类两个值:background:在子widget之后绘制,即背景装饰(是默认值)foreground:在子widget之上绘制,即前景
BoxDecoration
BoxDecoration是一个Decoration的子类, 通常我们都是使用它来实现上面的类似decoration的相关属性
const BoxDecoration({
    // 背景颜色
    this.color,
    // 背景图片, DecorationImage
    this.image,
    // 边框
    this.border,
    // 圆角
    this.borderRadius,
    // 阴影
    this.boxShadow,
    // 渐变色
    this.gradient,
    // 背景颜色和背景图片的混合渲染模式`BlendMode`, 下面会介绍该枚举值
    this.backgroundBlendMode,
    // 形状
    this.shape = BoxShape.rectangle,
})
image
设置背景图片DecorationImage
const DecorationImage({
    // ImageProvider类型
    @required this.image,
    this.colorFilter,
    this.fit,
    this.alignment = Alignment.center,
    this.centerSlice,
    this.repeat = ImageRepeat.noRepeat,
    this.matchTextDirection = false,
})
image
- 图片的设置方式, 是
ImageProvider类型的 ImageProvider是一个抽象类, 需要使用其子类实现NetworkImageFileImageMemoryImage
colorFilter
- 在绘制图像之前应用于图像的滤色器, 这个属性值是
ColorFilter类 ColorFilter的构造方法中有两个属性, 分别设置颜色图像和图片图像, 后面也将使用这两个名词解释各个枚举值
// 两个属性, 分别设置颜色图像和图片图像
const ColorFilter.mode(Color color, BlendMode blendMode)
BlendMode有以下枚举值, 带有src表示图片图像不显示, dst表示颜色图像不显示
blendMode | 枚举值意义 |
|---|---|
clear | 颜色图像和图片图像都不显示 |
src | 显示颜色图像不显示图片图像 |
dst | 显示图片图像不显示颜色图像 |
srcOver | 颜色图像在图片图像的上面 |
dstOver | 颜色图像在图片图像的下面 |
srcIn | 显示图片图像, 但只显示和颜色图像重合的部分(两者的交集) |
dstIn | 显示颜色图像, 但只显示和图片图像重合的部分(两者的交集) |
srcOut | 显示图片图像, 但只显示和颜色图像不重合的部分(两者的差集) |
dstOut | 显示颜色图像, 但只显示和图片图像不重合的部分(两者的差集), 一般都是空了 |
srcATop | 将图片图像合成到颜色图像上面, 只合成交集的部分 |
dstATop | 将颜色图像合成到图片图像上面, 只合成交集的部分 |
xor | 图片图像和颜色图像合成的结果 |
plus | 图片和颜色的合成, 但是会受透明度的影响 |
modulate | 将图片图像和颜色图像的颜色分量相乘。这只能产生相同或较暗的颜色(乘以白色,1.0,结果不变;乘以黑色,0.0,结果为黑色 |
screen | 将图片图像和颜色图像的颜色分量的倒数相乘, 并反转结果 |
overlay | 在调整图片图像和颜色图像的组件以使其有利于目标之后,将其相乘 |
darken | 通过从每个颜色通道中选择最低值来合成图片图像和颜色图像 |
lighten | 通过从每个颜色通道中选择最高值来合成图片图像和颜色图像 |
除此之外还有好几个枚举值, 但是我确实不知道该怎么解释了, 上面的解释好像也不是很清晰, 模模糊糊, 还是建议大家自测看效果图吧, 或者看看官方文档, 也有效果图, 其实很多枚举值还是用不到的, 如果有比较好的解释的话, 欢迎大家多多提出建议…大写的尴尬
border
设置边框的样式,BoxBorder是一个抽象类, 有以下两个类共三种实现方式
// Border的两种实现方式
class Border extends BoxBorder {
  const Border({
    this.top = BorderSide.none,
    this.right = BorderSide.none,
    this.bottom = BorderSide.none,
    this.left = BorderSide.none,
  })

  factory Border.all({
    Color color = const Color(0xFF000000),
    double width = 1.0,
    BorderStyle style = BorderStyle.solid,
  })
}

// 下面是BorderSide的构造函数, 之前的文字中都介绍过, 这里就不在提及了
class BorderSide {
  const BorderSide({
    this.color = const Color(0xFF000000),
    this.width = 1.0,
    this.style = BorderStyle.solid,
  })
}

// BorderDirectional的构造函数
class BorderDirectional extends BoxBorder {
  const BorderDirectional({
    this.top = BorderSide.none,
    this.start = BorderSide.none,
    this.end = BorderSide.none,
    this.bottom = BorderSide.none,
  })
}
boxShadow
设置盒子的阴影, 这个阴影和盒子的形状保持一致, 接受的值是一个存储BoxShadow的列表, 下面下看一下BoxShadow的构造函数
const BoxShadow({
    // 颜色
    Color color = const Color(0xFF000000),
    // 阴影相对于盒子的偏移量
    Offset offset = Offset.zero,
    // 阴影的模糊程度, 值越大阴影越模糊
    double blurRadius = 0.0,
    // 阴影向相反方向增加的像素值
    this.spreadRadius = 0.0
})

// 演示示例, 四个边都添加阴影
[
    BoxShadow(color: Colors.grey, offset: Offset(-5, -5), blurRadius: 10, spreadRadius: 0),
    BoxShadow(color: Colors.red, offset: Offset(5, 5), blurRadius: 10, spreadRadius: 0),
],
gradient
设置背景颜色为渐变色, Gradient又是一个抽象类, 如下一共有三个子类
LinearGradientRadialGradientSweepGradient
// 线性渐变
const LinearGradient({
    // 起始点
    this.begin = Alignment.centerLeft,
    // 终点
    this.end = Alignment.centerRight,
    // 色值数组
    @required List<Color> colors,
    // 值列表,装有0.0到1.0的数值
    List<double> stops,
    // 渐变平铺模式,指定在开始和结束以外的区域平铺模式
    this.tileMode = TileMode.clamp,
})

// 圆形渐变,
const RadialGradient({
    // 渐变的中心)
    this.center = Alignment.center,
    // 渐变的半径,浮点型,具体数值需要乘以盒子的宽度
    this.radius = 0.5,
    @required List<Color> colors,
    List<double> stops,
    this.tileMode = TileMode.clamp,
    this.focal,
    this.focalRadius = 0.0
})

const SweepGradient({
    // 位置的中心点
    this.center = Alignment.center,
    // 起始点的角度
    this.startAngle = 0.0,
    // 终点的角度
    this.endAngle = math.pi * 2,
    @required List<Color> colors,
    List<double> stops,
    this.tileMode = TileMode.clamp,
})
三种渐变色效果如下所示

LinearGradient线性渐变色下, 渐变模式TileMode各枚举值对应的效果如下

shape
设置背景的形状, 针对背景色, 背景图片和渐变色, BoxShape类型是个枚举值
enum BoxShape {
  // 保持不变
  rectangle,

  // 剪切成圆形, 和borderRadius属性冲突
  circle,
}
Transform
Transform可以在其子Widget绘制时对其进行一个矩阵变换, 可以对child做平移、旋转、缩放等操作Matrix4是一个4D矩阵,通过它可以实现各种矩阵操作
Transform
先来看下Transform的一些构造函数吧
class Transform extends SingleChildRenderObjectWidget {
  // 创建一个矩阵变换Widget
  const Transform({
    Key key,
    // 矩阵执行的变换操作, 接受一个Matrix4对象
    @required this.transform,

    // 旋转点,相对于左上角顶点的偏移。默认旋转点事左上角顶点,
    // 接受一个Offset对象
    this.origin,
    // 对其方式
    this.alignment,
    // 点击区域是否也做相应的改变
    this.transformHitTests = true,
    Widget child,
  })

  // 创建一个旋转变换矩阵
  Transform.rotate({
    Key key,
    // 设置旋转角度
    @required double angle,
    this.origin,
    this.alignment = Alignment.center,
    this.transformHitTests = true,
    Widget child,
  })

  // 创建一个平移矩阵
  Transform.translate({
    Key key,
    @required Offset offset,
    this.transformHitTests = true,
    Widget child,
  })

  // 创建一个缩放矩阵
  Transform.scale({
    Key key,
    // 设置缩放比例, 0-1的数值
    @required double scale,
    this.origin,
    this.alignment = Alignment.center,
    this.transformHitTests = true,
    Widget child,
  })
}
下面是每一种变换形式的具体示例
旋转
Transform.rotate可以对子widget进行旋转变换, 如下代码
Container(
  color: Colors.black,
  child: Transform.rotate(
    // 这里☞旋转的角度, math.pi是指180度
    angle: -math.pi / 4,
    child: Container(
      padding: const EdgeInsets.all(8.0),
      color: const Color(0xFFE8581C),
      child: const Text('https://titanjun.top'),
    ),
  )
)

平移
Transform.translate接收一个offset参数,可以在绘制时沿x、y轴对子widget平移指定的距离
Container(
  color: Colors.black,
  child: Transform.translate(
    // 默认原点为左上角,右移5像素,向下平移15像素
    offset: const Offset(5.0, 15.0),
    child: Container(
      padding: const EdgeInsets.all(8.0),
      color: const Color(0xFF7F7F7F),
      child: const Text('Quarter'),
    ),
  )
)

缩放
Transform.scale可以对子Widget进行缩小或放大
Container(
  color: Colors.black,
  child: Transform.scale(
    origin: Offset(5, 5),
    // 缩小为原来的0.5倍
    scale: 0.5,
    child: Container(
      padding: const EdgeInsets.all(8.0),
      color: const Color(0xFFE8581C),
      child: const Text('Bad Ideas'),
    ),
  )
)
注意点
Transform的变换是应用在绘制阶段,而并不是应用在布局(layout)阶段- 所以无论对子widget应用何种变化,其占用空间的大小和在屏幕上的位置都是固定不变的,因为这些是在布局阶段就确定的
Row(
  mainAxisAlignment: MainAxisAlignment.center,
  children: <Widget>[
    DecoratedBox(
      decoration:BoxDecoration(color: Colors.red),
      child: Transform.scale(scale: 1.5,
          child: Text("Hello world")
      )
    ),
    Text("你好", style: TextStyle(color: Colors.green, fontSize: 18.0),)
  ],
)

- 由于第一个
Text应用变换(放大)后,其在绘制时会放大,但其占用的空间依然为红色部分,所以第二个text会紧挨着红色部分,最终就会出现文字有重合部分。 - 由于矩阵变化只会作用在绘制阶段,所以在某些场景下,在UI需要变化时,可以直接通过矩阵变化来达到视觉上的UI改变,而不需要去重新触发build流程,这样会节省
layout的开销,所以性能会比较好 - 如之前介绍的
Flow widget,它内部就是用矩阵变换来更新UI,除此之外,Flutter的动画widget中也大量使用了Transform以提高性能
RotatedBox
RotatedBox和Transform.rotate功能相似,它们都可以对子widget进行旋转变换,但是有一点不同:RotatedBox的变换是在layout阶段,会影响在子widget的位置和大小- 我们将上面介绍
Transform.rotate时的示例改一下
Row(
  mainAxisAlignment: MainAxisAlignment.center,
  children: <Widget>[
    DecoratedBox(
      decoration: BoxDecoration(color: Colors.red),
      //将Transform.rotate换成RotatedBox
      child: RotatedBox(
        // int类型
        quarterTurns: 1, //旋转90度(1/4圈)
        child: Text("Hello world"),
      ),
    ),
    Text("你好", style: TextStyle(color: Colors.green, fontSize: 18.0),)
  ],
),

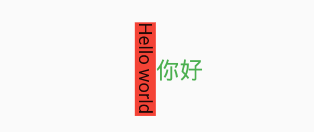
由于
RotatedBox是作用于layout阶段,所以widget会旋转90度(而不只是绘制的内容),decoration会作用到widget所占用的实际空间上,所以就是上图的效果。读者可以和前面Transform.rotate示例对比理解
Matrix4
一个4D变换矩阵, Transform使用Matrix4使其子Widget进行矩阵变换, 下面是其相关构造函数
// 4 x 4矩阵
factory Matrix4(double arg0, double arg1, double arg2, double arg3, double arg4, double arg5, double arg6, double arg7, double arg8, double arg9, double arg10, double arg11, double arg12, double arg13, double arg14, double arg15)

// 设置一个新的矩阵
factory Matrix4.columns(Vector4 arg0, Vector4 arg1, Vector4 arg2, Vector4 arg3)

// 复合平移、旋转、缩放,形成新的转换矩阵
factory Matrix4.compose(Vector3 translation, Quaternion rotation, Vector3 scale)

// 复制一个4*4的张量(矩阵)
factory Matrix4.copy(Matrix4 other)

// 缩放矩阵, Vector3(double x, double y, double z)
factory Matrix4.diagonal3(Vector3 scale)

// 缩放矩阵, 只是参数不同而已
factory Matrix4.diagonal3Values(double x, double y, double z)


Matrix4.fromBuffer(ByteBuffer buffer, int offset)

// 使用给定的Float64List构造Matrix4
Matrix4.fromFloat64List(Float64List _m4storage)

// 将一个16位的一维数组转换成4*4的矩阵
factory Matrix4.fromList(List<double> values)

// 恢复初始状态,也就是4*4的单位矩阵
factory Matrix4.identity()

// 取相反的矩阵,就是反着来
factory Matrix4.inverted(Matrix4 other)

// 两个4维向量的乘积合并
factory Matrix4.outer(Vector4 u, Vector4 v)

// 围绕X轴旋转
factory Matrix4.rotationX(double radians)

// 围绕Y轴旋转
factory Matrix4.rotationY(double radians)

// 围绕Z轴旋转
factory Matrix4.rotationZ(double radians)

// 扭曲变换
factory Matrix4.skew(double alpha, double beta)

// 沿着x轴扭曲
factory Matrix4.skewX(double alpha)

// 沿着y轴扭曲
factory Matrix4.skewY(double beta)

// 移动矩阵
factory Matrix4.translation(Vector3 translation)

// 移动矩阵, 参数不同而已
factory Matrix4.translationValues(double x, double y, double z)

// 全是0的4*4的张量
factory Matrix4.zero()
Container
Container是一个容器类widget,它本身不对应具体的RenderObject,它是DecoratedBox、ConstrainedBox、Transform、Padding、Align等widget的一个组合widget- 所以我们只需通过一个
Container可以实现同时需要装饰、变换、限制的场景 - 下面是
Container的相关定义
Container({
    Key key,
    // 对其方式
    this.alignment,
    // 内边距
    this.padding,
    // 背景颜色
    Color color,
    // 背景装饰
    Decoration decoration,
    // 前景装饰
    this.foregroundDecoration,
    double width,
    double height,
    //容器大小的限制条件
    BoxConstraints constraints,
    // 容器的外边距, EdgeInsets
    this.margin,
    // 设置变换矩阵
    this.transform,
    this.child,
})
- 容器的大小可以通过
width、height属性来指定,也可以通过constraints来指定,如果同时存在时,width、height优先。实际上Container内部会根据width、height来生成一个constraints color和decoration是互斥的,实际上,当指定color时,Container内会自动创建一个decoration
使用实例
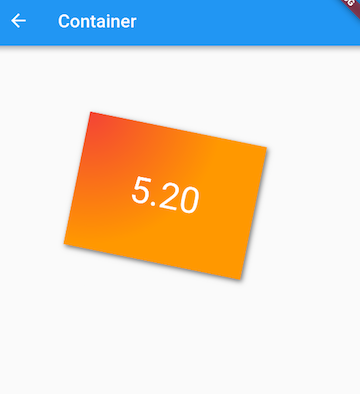
通过使用来实现如下效果

Container(
  margin: EdgeInsets.only(top: 50.0, left: 120.0), //容器外补白
  constraints: BoxConstraints.tightFor(width: 200.0, height: 150.0), //卡片大小
  decoration: BoxDecoration(//背景装饰
      gradient: RadialGradient( //背景径向渐变
          colors: [Colors.red, Colors.orange],
          center: Alignment.topLeft,
          radius: .98
      ),
      boxShadow: [ //卡片阴影
        BoxShadow(
            color: Colors.black54,
            offset: Offset(2.0, 2.0),
            blurRadius: 4.0
        )
      ]
  ),
  transform: Matrix4.rotationZ(.2), //卡片倾斜变换
  alignment: Alignment.center, //卡片内文字居中
  child: Text( //卡片文字
    "5.20", style: TextStyle(color: Colors.white, fontSize: 40.0),
  ),
);


 242
242

 被折叠的 条评论
为什么被折叠?


