


文章目录
先上图 , 该图是本博客的总结 ;

Bias 属性使用前提
Bias 属性使用前提 :
- 1.水平方向 : 使用
app:layout_constraintHorizontal_bias的前提 , 必须先设置水平方向的约束 , 使用 Left , Right 或者 Start , End 组合成的属性约束 , 如 :
//将 被约束组件 的 左侧 约束到 目标组件 的左侧
app:layout_constraintLeft_toLeftOf
//将 被约束组件 的 左侧 约束到 目标组件 的右侧
app:layout_constraintLeft_toRightOf

//将 被约束组件 的 右侧 约束到 目标组件 的左侧
app:layout_constraintRight_toLeftOf
//将 被约束组件 的 右侧 约束到 目标组件 的右侧
app:layout_constraintRight_toRightOf


//将 被约束组件 的 开始 约束到 目标组件 的 结束
app:layout_constraintStart_toEndOf
//将 被约束组件 的 开始 约束到 目标组件 的 开始
app:layout_constraintStart_toStartOf

//将 被约束组件 的 结束 约束到 目标组件 的 开始
app:layout_constraintEnd_toStartOf
//将 被约束组件 的 结束 约束到 目标组件 的 结束
app:layout_constraintEnd_toEndOf
- 2.垂直方向 : 使用
app:layout_constraintVertical_bias的前提 , 必须先设置垂直方向的约束 , 使用 Top , Bottom 组合成的属性约束 , 如 :
//将 被约束组件 的 上方 约束到 目标组件 的上方
layout_constraintTop_toTopOf
//将 被约束组件 的 上方 约束到 目标组件 的下方
layout_constraintTop_toBottomOf

//将 被约束组件 的 下方 约束到 目标组件 的上方
layout_constraintBottom_toTopOf
//将 被约束组件 的 下方 约束到 目标组件 的下方
layout_constraintBottom_toBottomOf
水平偏移 属性 ( app:layout_constraintHorizontal_bias )
注意前提 : 该属性生效的前提是 , 必须设置水平方向上的两个约束 ; Left ( 或 Start ) 约束 和 Right ( 或 End ) 约束都必须设置 ;
水平偏移 ( app:layout_constraintHorizontal_bias ) :
- 1.作用 : 设置水平约束后水平方向的偏移属性 ;
- 2.官网解释 : 当组件左侧和右侧 ( 或者 开始 和 结束 ) 两边被约束后, 两个联系之间的比例 ; ( 讲的很概括 )
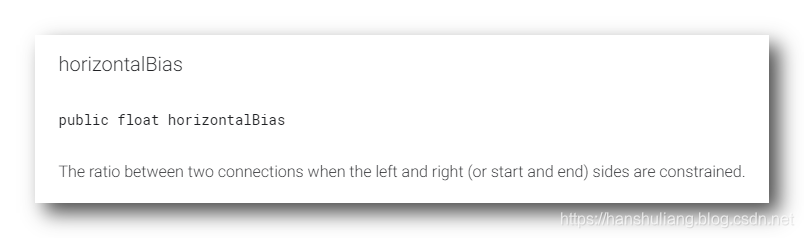
- 3.详细说明 : 左侧和右侧被约束后 , 组件左侧到被约束位置的距离 ( D l e f t ) (D_{left}) (Dleft) 与 组件左侧到左侧被约束位置的距离 ( D l e f t ) (D_{left}) (Dleft) 与 组件右侧到右侧被约束的距离 ( D r i g h t ) (D_{right}) (Dright) 之和 的 比例 ; 公式为 :
B i a s = D l e f t D l e f t + D r i g h t Bias=\cfrac{D_{left}}{D_{left} + D_{right}} Bias=Dleft+DrightDleft
- 4.公式说明 :
- ① 不涉及组件宽高数据 : Bias 的计算中 , 不涉及组件的宽度 ;
- ② 左右缝隙控制 : 组件被约束后 , 肯定与被约束的位置有缝隙 , Bias 偏移属性 , 是控制左右缝隙所占的比例的 ;
- ③ 本质 : Bias 偏移属性 , 其本质是对 被约束组件 左右缝隙的控制 , D l e f t D_{left} Dleft 是组件左侧的缝隙 , D r i g h t D_{right} Dright 是组件右侧的缝隙 ;
- 5.图解 : 下图中可以清晰的展示出 , 其组件的宽度与 Bias 属性无关 , Bias 控制的是组件左侧和右侧的缝隙 ;

- 6.代码示例 :
<?xml version="1.0" encoding="utf-8"?>
<android.support.constraint.ConstraintLayout xmlns:android="http://schemas.android.com/apk/res/android"
    xmlns:app="http://schemas.android.com/apk/res-auto"
    xmlns:tools="http://schemas.android.com/tools"
    android:layout_width="match_parent"
    android:layout_height="match_parent"
    tools:context=".MainActivity">

    <!--
        被 约束 的组件
        组件宽高 占比 1/4

    -->
    <Button
        android:id="@+id/button1"
        android:layout_width="0dip"
        android:layout_height="0dip"
        android:text="被约束组件"

        app:layout_constraintWidth_default="percent"
        app:layout_constraintWidth_percent="0.25"

        app:layout_constraintHeight_default="percent"
        app:layout_constraintHeight_percent="0.25"


        app:layout_constraintLeft_toLeftOf="parent"
        app:layout_constraintRight_toRightOf="parent"
        app:layout_constraintHorizontal_bias="0.25"

        app:layout_constraintTop_toTopOf="parent"
        app:layout_constraintBottom_toBottomOf="parent"
        app:layout_constraintVertical_bias="0.5" />

</android.support.constraint.ConstraintLayout>
垂直偏移 属性 ( app:layout_constraintVertical_bias )
注意前提 : 该属性生效的前提是 , 必须设置垂直方向上的两个约束 ; Top 约束 和 Bottom 约束都必须设置 ;
垂直偏移 ( app:layout_constraintVertical_bias ) :
- 1.作用 : 设置垂直约束后垂直方向的偏移属性 ;
- 2.官网解释 : 当组件顶部和底部 被约束后, 两个联系之间的比例 ; ( 讲的很概括 )
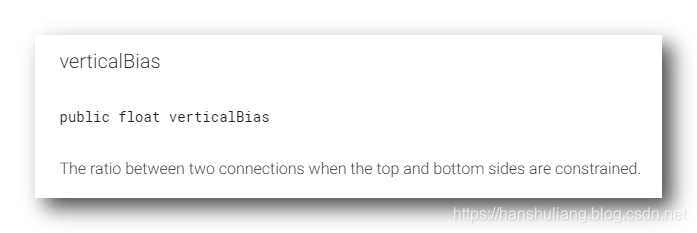
- 3.详细说明 : 顶部和底部被约束后 , 组件顶部到顶部被约束位置的距离 ( D t o p ) (D_{top}) (Dtop) 与 组件顶部到顶部被约束位置的距离 ( D t o p ) (D_{top}) (Dtop) 与 组件底部到底部被约束的距离 ( D b o t t o m ) (D_{bottom}) (Dbottom) 之和 的 比例 ; 公式为 :
B i a s = D t o p D t o p + D b o t t o m Bias=\cfrac{D_{top}}{D_{top} + D_{bottom}} Bias=Dtop+DbottomDtop
- 4.公式说明 :
- ① 不涉及组件宽高数据 : Bias 的计算中 , 不涉及组件的高度 ;
- ② 左右缝隙控制 : 组件被约束后 , 与被约束的位置肯定存在缝隙 , Bias 偏移属性 , 是控制顶部缝隙所占的比例的 ;
- ③ 本质 : Bias 偏移属性 , 其本质是对 被约束组件 上下缝隙的控制 , D t o p D_{top} Dtop 是组件顶部的缝隙 , D b o t t o m D_{bottom} Dbottom 是组件底部的缝隙 ;
- 5.图解 : 下图中可以清晰的展示出 , 其组件的高度与 Bias 属性无关 , Bias 控制的是组件顶部和底部的缝隙 ;

- 6.代码示例 :
<?xml version="1.0" encoding="utf-8"?>
<android.support.constraint.ConstraintLayout xmlns:android="http://schemas.android.com/apk/res/android"
    xmlns:app="http://schemas.android.com/apk/res-auto"
    xmlns:tools="http://schemas.android.com/tools"
    android:layout_width="match_parent"
    android:layout_height="match_parent"
    tools:context=".MainActivity">

    <!--
        被 约束 的组件
        组件宽高 占比 1/4

    -->
    <Button
        android:id="@+id/button1"
        android:layout_width="0dip"
        android:layout_height="0dip"
        android:text="被约束组件"

        app:layout_constraintWidth_default="percent"
        app:layout_constraintWidth_percent="0.25"

        app:layout_constraintHeight_default="percent"
        app:layout_constraintHeight_percent="0.25"


        app:layout_constraintLeft_toLeftOf="parent"
        app:layout_constraintRight_toRightOf="parent"
        app:layout_constraintHorizontal_bias="0.25"

        app:layout_constraintTop_toTopOf="parent"
        app:layout_constraintBottom_toBottomOf="parent"
        app:layout_constraintVertical_bias="0.25" />

</android.support.constraint.ConstraintLayout>
代码 + 测量图 + 公式 ( 不清楚的可以对着测量图和公式变量自己算 )
测量图 + 公式 :
- 1.代码 :
- ① 组件宽高 : 组件的宽高各占屏幕的 1 4 \cfrac{1}{4} 41 ;
- ② Bias 偏移 : 其 水平 和 垂直 方向的 Bias 偏移 各是 0.25 0.25 0.25 ;
<?xml version="1.0" encoding="utf-8"?>
<android.support.constraint.ConstraintLayout xmlns:android="http://schemas.android.com/apk/res/android"
    xmlns:app="http://schemas.android.com/apk/res-auto"
    xmlns:tools="http://schemas.android.com/tools"
    android:layout_width="match_parent"
    android:layout_height="match_parent"
    tools:context=".MainActivity"
    android:background="#FFFFFF">

    <!--
        被 约束 的组件
        组件宽高 占比 1/4

    -->
    <TextView
        android:id="@+id/button1"
        android:layout_width="0dip"
        android:layout_height="0dip"
        android:text="被约束组件"
        android:textColor="#000000"
        android:gravity="center"
        android:background="#00FF00"

        app:layout_constraintWidth_default="percent"
        app:layout_constraintWidth_percent="0.25"

        app:layout_constraintHeight_default="percent"
        app:layout_constraintHeight_percent="0.25"


        app:layout_constraintLeft_toLeftOf="parent"
        app:layout_constraintRight_toRightOf="parent"
        app:layout_constraintHorizontal_bias="0.25"

        app:layout_constraintTop_toTopOf="parent"
        app:layout_constraintBottom_toBottomOf="parent"
        app:layout_constraintVertical_bias="0.25" />

</android.support.constraint.ConstraintLayout>
- 2.代码 布局 对应 的 原始 截图 :

- 3.对应标注图 + 公式变量 :

- 4.图中的标尺说明 : 图中的尺寸 是 制图工具自动生成的 , 不是随便乱标的数值 , 一切数值都是准确真实的 ;
- 5.对应变量说明 :
- ① 屏幕宽度 : D s c r e e n w i d t h = 5130 D_{screenwidth} =5130 Dscreenwidth=5130
- ② 屏幕高度 : D s c r e e n h e i g h t = 7890 D_{screenheight} =7890 Dscreenheight=7890
- ③ 组件宽度 : D w i d t h = 1282 D_{width} =1282 Dwidth=1282
- ④ 组件高度 : D h e i g h t = 1972 D_{height} =1972 Dheight=1972
- ⑤ 组件左侧缝隙 : D l e f t = 962 D_{left}=962 Dleft=962
- ⑥ 组件右侧缝隙 : D r i g h t = 2886 D_{right}=2886 Dright=2886
- ⑦ 组件上方缝隙 : D t o p = 1479 D_{top}=1479 Dtop=1479
- ⑧ 组件下方缝隙 : D b o t t o m = 4440 D_{bottom}=4440 Dbottom=4440
- 6.相关公式 :
- ① 组件宽度占屏幕 25 % 25\% 25% : D s c r e e n w i d t h = 4 D w i d t h D_{screenwidth}=4D_{width} Dscreenwidth=4Dwidth
- ② 组件高度占屏幕 25 % 25\% 25% : D s c r e e n h e i g h t = 4 D h e i g h t D_{screenheight}=4D_{height} Dscreenheight=4Dheight
- ③ app:layout_constraintHorizontal_bias = 0.25 : D l e f t D l e f t + D r i g h t = 0.25 \cfrac{D_{left}}{D_{left} + D_{right}}=0.25 Dleft+DrightDleft=0.25
- ④ app:layout_constraintVertical_bias= 0.25 : D t o p D t o p + D b o t t o m = 0.25 \cfrac{D_{top}}{D_{top} + D_{bottom}}=0.25 Dtop+DbottomDtop=0.25
博客写完了 , 画图画的眼有点花 来张图看看风景 ;

相关代码地址 :
- 1.GitHub 项目展示地址 : UI_Demos_4_CSDN_Blog
- 2.本博客相关代码地址 :
- ① Bias 偏移布局示例 : activity_bias.xml


 640
640

 被折叠的 条评论
为什么被折叠?
被折叠的 条评论
为什么被折叠?
 到【灌水乐园】发言


