


简介
通过卷积我们可以提取图片的轮廓 可以进行图片平滑处理 可以处理彩色图片
黑白图片处理
导包
import numpy as np
import tensorflow as tf
import matplotlib.pyplot as plt
%matplotlib inline
原图

flower = plt.imread('./flower.png')
flower.shape
plt.imshow(flower,cmap = plt.cm.gray)

data = flower.reshape(1,332,444,1)
# 浮雕效果 卷积核
filter_ = np.array([[-1,-1,0],[-1,0,1],[0,1,1]]).reshape(3,3,1,1)
# neural network
# KNN ----> nearest neighbors
# CNN ---->convolution neural network:卷积神经网络
conv = tf.nn.conv2d(input = data,filter = filter_,strides=[1,1,1,1],padding='SAME')
with tf.Session() as sess:
    image = sess.run(conv).reshape(332,444)
plt.imshow(image,cmap = plt.cm.gray) #调整颜色

修改卷积核
data = flower.reshape(1,332,444,1)
# 强调边缘
filter_ = np.array([[1,1,1],[1,-10,1],[1,1,1]]).reshape(3,3,1,1)
# neural network
# KNN ----> nearest neighbors
# CNN ---->convolution neural network:卷积神经网络
conv = tf.nn.conv2d(input = data,filter = filter_,strides=[1,1,1,1],padding='SAME')
with tf.Session() as sess:
    image = sess.run(conv).reshape(332,444)
plt.imshow(image,cmap = plt.cm.gray)

data = flower.reshape(1,332,444,1)
# 边缘检测
filter_ = np.array([[-1,-1,-1],[-1,9,-1],[-1,-1,-1]]).reshape(3,3,1,1)
# neural network
# KNN ----> nearest neighbors
# CNN ---->convolution neural network:卷积神经网络
conv = tf.nn.conv2d(input = data,filter = filter_,strides=[1,1,1,1],padding='SAME')
with tf.Session() as sess:
    image = sess.run(conv).reshape(332,444)
plt.imshow(image,cmap = plt.cm.gray)

卷积核也可以通过随机数进行生成 正太分布 效果会有变化
filter_ = np.random.randn(3,3,1,1)
图片平滑
原图 有噪声

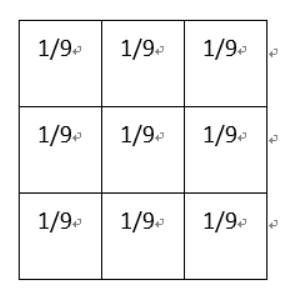
均值滤波平滑原理
平滑均值滤波
该卷积核的作用在于取九个值的平均值代替中间像素值,所以起到的平滑的效果
import numpy as np
import matplotlib.pyplot as plt
%matplotlib inline
import tensorflow as tf

plt.figure(figsize=(12,9))
moon = plt.imread('./moonlanding.png')
#一般图片后缀以png结尾 图片是float类型值
plt.imshow(moon,cmap = plt.cm.gray)
data = moon.reshape(1,474,630,1)

# 均值平滑,滤波 将噪声清除掉 变得平滑 求平均值
filter_ = np.array([[1/9]*9]).reshape(3,3,1,1)
conv = tf.nn.conv2d(data,filter_,[1,1,1,1],'SAME')
with tf.Session() as sess:
    image = sess.run(conv).reshape(474,630)
plt.figure(figsize=(12,9))
plt.imshow(image,cmap = plt.cm.gray)

高斯平滑原理
高斯平滑
高斯平滑水平和垂直方向呈现高斯分布,更突出了中心点在像素平滑后的权重,相比于均值滤波而言,有着更好的平滑效果

data = moon.reshape(1,474,630,1)
# 高斯平滑,滤波 更丝润平滑一点
filter_ = np.array([[1/16,2/16,1/16],[2/16,4/16,2/16],[1/16,2/16,1/16]]).reshape(3,3,1,1)
conv = tf.nn.conv2d(data,filter_,[1,1,1,1],'SAME')
with tf.Session() as sess:
    image = sess.run(conv).reshape(474,630)
plt.figure(figsize=(12,9))
plt.imshow(image,cmap = plt.cm.gray)

这就是卷积核起名为filter的原因 意为 过滤掉不重要的东西 留下特征
彩色图片处理
import numpy as np
import matplotlib.pyplot as plt
%matplotlib inline
import tensorflow as tf
image = plt.imread('./sence.jpg') #图片自己找
plt.imshow(image)
image.shape

data = image.reshape(1,662,1000,3).astype(np.float32)
# and a filter / kernel tensor of shape
# `[filter_height, filter_width, in_channels(和上面3对应), out_channels]
filter_ = np.array([[1/27]*81]).reshape(3,3,3,3)
conv = tf.nn.conv2d(data,filter_,[1,1,1,1],'SAME')
with tf.Session() as sess:
    result = sess.run(conv).reshape(662,1000,3)
plt.imshow(result.astype(np.uint8))
#输出的三个通道的值完全一样 所以是黑白图片

data = image.reshape(1,662,1000,3).astype(np.float32)
# and a filter / kernel tensor of shape
# `[filter_height, filter_width, in_channels, out_channels]
filter_ = np.random.rand(3,3,3,3)/13
#随机数 /13是因为有的像素超过1了
conv = tf.nn.conv2d(data,filter_,[1,1,1,1],'SAME')
with tf.Session() as sess:
    result = sess.run(conv).reshape(662,1000,3)
plt.imshow(result.astype(np.uint8))

卷积,对每个通道进行卷积运算
data = image.reshape(1,662,1000,3).astype(np.float32)
# data.shape = (3,662,1000,1)
data = np.transpose(data,axes = [3,1,2,0]) #转置 一个通道一个样本
# and a filter / kernel tensor of shape
# `[filter_height, filter_width, in_channels, out_channels]
filter_ = np.array([[1/9]*9]).reshape(3,3,1,1)
conv = tf.nn.conv2d(data,filter_,[1,1,1,1],'SAME')
with tf.Session() as sess:
    result = sess.run(conv).reshape(3,662,1000)
    result = np.transpose(result,[1,2,0])
    print(result.shape)
plt.figure(figsize=(16,12))
plt.imshow(result.astype(np.uint8))

data = image.reshape(1,662,1000,3).astype(np.float32)
# data.shape = (3,662,1000,1)
data = np.transpose(data,axes = [3,1,2,0])
# and a filter / kernel tensor of shape
# `[filter_height, filter_width, in_channels, out_channels]
filter_ = np.array([[1/49]*49]).reshape(7,7,1,1) #让值变得更加模糊
conv = tf.nn.conv2d(data,filter_,[1,1,1,1],'SAME')
with tf.Session() as sess:
    result = sess.run(conv).reshape(3,662,1000)
    result = np.transpose(result,[1,2,0])
    print(result.shape)
plt.figure(figsize=(16,12))
plt.imshow(result.astype(np.uint8))

一张图片清楚 需要每个像素值之间差距大才可以 求他们之间的平均值代替 会变得模糊 元素值之间变得差不多了
人选出来 背景虚化
plt.imshow(image[230:600,420:550])

data = image.reshape(1,662,1000,3).astype(np.float32)
# data.shape = (3,662,1000,1)
data = np.transpose(data,axes = [3,1,2,0])
# and a filter / kernel tensor of shape
# `[filter_height, filter_width, in_channels, out_channels]
filter_ = np.array([[1/49]*49]).reshape(7,7,1,1)
conv = tf.nn.conv2d(data,filter_,[1,1,1,1],'SAME')
with tf.Session() as sess:
    result = sess.run(conv).reshape(3,662,1000)
    result = np.transpose(result,[1,2,0])
    print(result.shape)
plt.figure(figsize=(16,12))
result = result.astype(np.uint8)
result[230:600,420:550] = image[230:600,420:550]
plt.imshow(result)


 1057
1057


 被折叠的 条评论
为什么被折叠?
被折叠的 条评论
为什么被折叠?
 到【灌水乐园】发言


