


什么是MCP?
一切的起源是 anthropic 官网的这篇文章:https://www.anthropic.com/news/model-context-protocol,里面是这么描述的:
It provides a universal, open standard for connecting AI systems with data sources, replacing fragmented integrations with a single protocol. The result is a simpler, more reliable way to give AI systems access to the data they need.
它为连接 AI 系统和数据源提供了一个通用的开放标准,用单一协议取代了分散的集成。结果是 AI 系统可以更简单、更可靠地访问其所需的数据。
再有就是网站:https://modelcontextprotocol.io/introduction中,如此描述:
MCP is an open protocol that standardizes how applications provide context to LLMs. Think of MCP like a USB-C port for AI applications. Just as USB-C provides a standardized way to connect your devices to various peripherals and accessories, MCP provides a standardized way to connect AI models to different data sources and tools.
MCP 是一种开放协议,它标准化了应用向 AI 应用提供上下文的方式。您可以将 MCP 视为 AI 应用的 USB-C 端口。正如 USB-C 提供了一种将设备连接到各种外围设备和配件的标准化方式一样,MCP 提供了一种将 AI 模型连接到不同数据源和工具的标准化方式。

为什么需要 MCP
平台上提供的可以调用工具的模型,都是带有 functionCall 标记的,具体实现是跟模型和平台强相关的。
比如上面展示的 DeepSeek 带工具调用的模型,也不是跟普通版本一起上线,说明每个模型都有额外的开发成本,无法直接套用。
那就更不用提不同平台之间了,几乎就不可能兼容。
综合来看,就是 functionCall 方案,在不同模型、不同 AI Agent 平台之间无法通用。
MCP协议与function call非常相似,MCP最大的优势是整合了之前各家大模型不同的function call的标准,整合成了一个标准协议

MCP 的工作原理
通用架构
https://modelcontextprotocol.io/introduction#general-architecture

核心架构
Transport layer
The transport layer handles the actual communication between clients and servers. MCP supports multiple transport mechanisms:
- Stdio transport
- Uses standard input/output for communication
- Ideal for local processes
- HTTP with SSE transport
- Uses Server-Sent Events for server-to-client messages
- HTTP POST for client-to-server messages
All transports use JSON-RPC 2.0 to exchange messages. See the specification for detailed information about the Model Context Protocol message format.
Message types
MCP has these main types of messages:
- Requests expect a response from the other side:
interface Request {
  method: string;
  params?: { ... };
}
- Results are successful responses to requests:
interface Result {
  [key: string]: unknown;
}
- Errors indicate that a request failed:
interface Error {
  code: number;
  message: string;
  data?: unknown;
}
- Notifications are one-way messages that don’t expect a response:
interface Notification {
  method: string;
  params?: { ... };
}
MCP软件集合网站
https://www.modelscope.cn/mcp
聚合优质MCP资源,拓展模型智能边界
https://smithery.ai/
Extend your agent with 4,826 capabilities via Model Context Protocol servers.
https://www.pulsemcp.com/
Browse and discover MCP use cases, servers, clients, and news
https://github.com/punkpeye/awesome-mcp-servers
A collection of MCP servers.
MCP汇总
https://github.com/modelcontextprotocol/servers/tree/main/src/time
https://github.com/modelcontextprotocol/servers/tree/main/src/filesystem
https://github.com/modelcontextprotocol/servers/tree/main/src/git
https://github.com/modelcontextprotocol/servers/tree/main/src/github
https://github.com/AgentDeskAI/browser-tools-mcp
https://github.com/executeautomation/mcp-playwright
https://github.com/modelcontextprotocol/servers/tree/main/src/sequentialthinking
https://github.com/modelcontextprotocol/servers/tree/main/src/memory
fetch
baidu-map
slack
duckduckgo
desktop-commander
安装环境
uv(python)
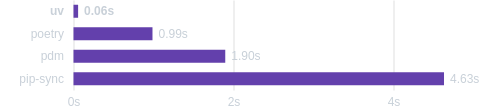
为什么不用pip?
使用 uv 时无需进行特定安装。使用 uvx 直接运行。
⚡️ 比pip快10-100x
https://github.com/pypa/pip
https://ossinsight.io/analyze/pypa/pip?vs=astral-sh%2Fuv#overview
安装
https://github.com/astral-sh/uv?tab=readme-ov-file#installation
# On macOS and Linux.
curl -LsSf https://astral.sh/uv/install.sh | sh
source $HOME/.local/bin/env

downloading uv 0.6.12 x86_64-unknown-linux-gnu
no checksums to verify
installing to /home/d/.local/bin
  uv
  uvx
everything's installed!

To add $HOME/.local/bin to your PATH, either restart your shell or run:

    source $HOME/.local/bin/env (sh, bash, zsh)
    source $HOME/.local/bin/env.fish (fish)
WARNING: The following commands are shadowed by other commands in your PATH: uv uvx
nvm(nodejs)
https://github.com/nvm-sh/nvm?tab=readme-ov-file#install–update-script
curl -o- https://raw.githubusercontent.com/nvm-sh/nvm/v0.40.2/install.sh | bash

=> Downloading nvm from git to '/home/d/.nvm'
=> 正克隆到 '/home/d/.nvm'...
remote: Enumerating objects: 382, done.
remote: Counting objects: 100% (382/382), done.
remote: Compressing objects: 100% (325/325), done.
remote: Total 382 (delta 43), reused 178 (delta 29), pack-reused 0 (from 0)
接收对象中: 100% (382/382), 386.80 KiB | 426.00 KiB/s, 完成.
处理 delta 中: 100% (43/43), 完成.
* (头指针在 FETCH_HEAD 分离)
  master
=> Compressing and cleaning up git repository

=> Appending nvm source string to /home/d/.bashrc
=> Appending bash_completion source string to /home/d/.bashrc
=> Close and reopen your terminal to start using nvm or run the following to use it now:

export NVM_DIR="$HOME/.nvm"
[ -s "$NVM_DIR/nvm.sh" ] && \. "$NVM_DIR/nvm.sh"  # This loads nvm
[ -s "$NVM_DIR/bash_completion" ] && \. "$NVM_DIR/bash_completion"  # This loads nvm bash_completion
cline插件
一个一个安装太费劲,我给大家准备好了。其中windows麻烦点,需要linux命令前加上cmd /c xxx

window配置如下
{
  "mcpServers": {

    "time": {
      "disabled": false,
      "timeout": 60,
      "command": "cmd",
      "args": [
        "/c",
        "uvx",
        "mcp-server-time",
        "--local-timezone=Asia/Shanghai"
      ],
      "env": {},
      "transportType": "stdio"
    },
    "filesystem": {
      "timeout": 60,
      "command": "cmd",
      "args": [
        "/c",
        "npx",
        "-y",
        "@modelcontextprotocol/server-filesystem",
        "D://SourceCode//dcl-modules"
      ],
      "transportType": "stdio"
    },
    "git": {
      "timeout": 60,
      "command": "cmd",
      "args": [
        "/c",
        "uvx",
        "mcp-server-git",
        "--repository",
        "D://SourceCode//dcl-modules"
      ],
      "transportType": "stdio"
    },
    "github": {
      "command": "cmd",
      "args": [
        "/c",
        "npx -y",
        "@modelcontextprotocol/server-github"
      ],
      "env": {
        "GITHUB_PERSONAL_ACCESS_TOKEN": "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"
      }
    },
    "browser-tools": {
      "timeout": 60,
      "command": "cmd",
      "args": [
        "/c",
        "npx -y @agentdeskai/browser-tools-mcp@1.2.0"
      ],
      "transportType": "stdio"
    },
    "mcp-playwright": {
      "disabled": false,
      "timeout": 60,
      "command": "cmd",
      "args": [
        "/c",
        "npx",
        "-y",
        "@executeautomation/playwright-mcp-server"
      ],
      "env": {},
      "transportType": "stdio"
    },
    "sequentialthinking": {
      "disabled": false,
      "timeout": 60,
      "command": "cmd",
      "args": [
        "/c",
        "npx",
        "-y",
        "@modelcontextprotocol/server-sequential-thinking"
      ],
      "env": {},
      "transportType": "stdio"
    },
    "memory": {
      "timeout": 60,
      "command": "cmd",
      "args": [
        "/c",
        "npx",
        "-y",
        "@modelcontextprotocol/server-memory"
      ],
      "env": {
        "MEMORY_FILE_PATH": "D://SourceCode//memory.json"
      },
      "transportType": "stdio"
    }
  }
}
linux配置如下
{
  "mcpServers": {
    "time": {
      "autoApprove": [
      ],
      "disabled": false,
      "timeout": 60,
      "command": "uvx",
      "args": [
        "mcp-server-time",
        "--local-timezone=Asia/Shanghai"
      ],
      "env": {},
      "transportType": "stdio"
    },
    "filesystem": {
      "autoApprove": [
      ],
      "timeout": 60,
      "command": "npx",
      "args": [
        "-y",
        "@modelcontextprotocol/server-filesystem",
        "/home/d/SourceCode/homelab"
      ],
      "transportType": "stdio"
    },
    "git": {
      "autoApprove": [
      ],
      "timeout": 60,
      "command": "uvx",
      "args": [
        "mcp-server-git",
        "--repository",
        "/home/d/SourceCode/homelab"
      ],
      "transportType": "stdio"
    },
    "github": {
      "autoApprove": [
      ],
      "timeout": 60,
      "command": "npx",
      "args": [
        "-y",
        "@modelcontextprotocol/server-github"
      ],
      "env": {
        "GITHUB_PERSONAL_ACCESS_TOKEN": "github_pat_xxx"
      },
      "transportType": "stdio"
    },
    "browser-tools": {
      "autoApprove": [
      ],
      "timeout": 60,
      "command": "npx",
      "args": [
        "-y @agentdeskai/browser-tools-mcp@1.2.0"
      ],
      "transportType": "stdio"
    },
    "mcp-playwright": {
      "autoApprove": [
      ],
      "disabled": false,
      "timeout": 60,
      "command": "npx",
      "args": [
        "-y",
        "@executeautomation/playwright-mcp-server"
      ],
      "env": {},
      "transportType": "stdio"
    },
    "sequentialthinking": {
      "autoApprove": [
      ],
      "disabled": false,
      "timeout": 60,
      "command": "npx",
      "args": [
        "-y",
        "@modelcontextprotocol/server-sequential-thinking"
      ],
      "env": {},
      "transportType": "stdio"
    },
    "memory": {
      "autoApprove": [
      ],
      "timeout": 60,
      "command": "npx",
      "args": [
        "-y",
        "@modelcontextprotocol/server-memory"
      ],
      "env": {
        "MEMORY_FILE_PATH": "/home/d/memory.json"
      },
      "transportType": "stdio"
    }
  }
}
测试MCP:time
现在几点了?

伦敦现在几点了?

当纽约是下午四点,那伦敦是几点?

将伦敦时间上午 9:30 转换为纽约时间

continue插件
一堆bug,等更新后再说
cherry-studio
为什么不用chatbox?
chatbox
https://chatboxai.app
https://github.com/chatboxai/chatbox
cherry-stuio
https://cherry-ai.com
https://github.com/CherryHQ/cherry-studio
chatbox VS cherry-stuio
https://ossinsight.io/analyze/CherryHQ/cherry-studio?vs=chatboxai%2Fchatbox#overview
从stars数上看:

从commit次数看:

平台支持与可访问性比较
● Cherry Studio:目前主要支持PC客户端(Windows、macOS、Linux),注重桌面端的完整体验
● ChatBox:全面支持PC客户端、网页端以及移动端,提供更灵活的跨平台访问能力
MCP(模型上下文协议)
Chatbox 目前不支持MCP(模型上下文协议)。从已知的 Chatbox 相关资料中,未提及有对 MCP 的支持功能。
Cherry Studio支持MCP。Cherry Studio 最新版本正式支持 MCP,使这个开源知识库的能力进一步拓展。它支持两种 MCP 服务类型:STDIO(标准输入 / 输出)和 SSE(服务器发送事件)。前者能够直接访问本机文件和应用程序,实现 AI 与本地资源的深度融合,后者则运行在远程服务器上。
参考:https://zhuanlan.zhihu.com/p/27467823353
安装环境:bun和uv
https://docs.cherry-ai.com/advanced-basic/mcp/install
https://github.com/oven-sh/bun/releases
https://github.com/astral-sh/uv/releases
linux和windows配置
和上面的配置一样,粘贴进去,然后保存,再打开,只是需要自己打开"isActive": true

模型配置
ollama中 qwen2.5:14b默认不会勾选工具,会导致页面上没有MCP选项。

测试MCP:filesystem
homelab下有哪些文件?

常见问题
cline是系统提示词调用,Cherry Studio是tool-call调用,而DeepSeek R1不支持,DeepSeek V3(0324):
{
  "message": "Tool Call Parser Not Given!",
  "error": {
    "object": "error",
    "message": "Tool Call Parser Not Given!",
    "type": "BadRequestError",
    "param": null,
    "code": 400
  },
  "code": 400,
  "param": null,
  "type": "BadRequestError"
}
参考
https://zhuanlan.zhihu.com/p/29001189476
https://zhuanlan.zhihu.com/p/1888987961812562085
https://x.com/qloog/status/1911595849714680169


 152
152

 被折叠的 条评论
为什么被折叠?
被折叠的 条评论
为什么被折叠?
 到【灌水乐园】发言


