


动态组件
- 使用一个名叫 AdDirective 的辅助指令来在模板中标记出有效的插入点:
src\app\shared\directives\ad.directive.ts
import { Directive, ViewContainerRef } from '@angular/core';

@Directive({
  selector: '[ad-host]'
})
export class AdDirective {

  constructor(public viewContainerRef: ViewContainerRef) { }

}
AdDirective 注入了 ViewContainerRef 来获取对容器视图的访问权,这个容器就是那些动态加入的组件的宿主。 在
@Directive 装饰器中,要注意选择器的名称:ad-host,它就是你将应用到元素上的指令。
- 要应用 AdDirective,回忆一下来自 ad.directive.ts 的选择器 ad-host。把它应用到< ng-template >(不用带方括号)。 这下,Angular 就知道该把组件动态加载到哪里了。
src\app\shared\ad-banner\ad-banner.component.ts
import { Component, OnInit, Input, ViewChild, ComponentFactoryResolver, AfterViewInit } from '@angular/core';
import { TabItem } from '../../model/tab-item.model';
import { AdDirective } from '../directives/ad.directive';

@Component({
  selector: 'app-ad-banner',
  template: `
                <div class="ad-banner-example">
                  <ng-template ad-host ></ng-template>
                </div>
              `
})
export class AdBannerComponent implements OnInit, AfterViewInit {
  @Input() tab: TabItem;
  @ViewChild(AdDirective, {static: true}) adHost: AdDirective;

  interval: any;

  constructor(
    private componentFactoryResolver: ComponentFactoryResolver,
  ) { }

  ngOnInit() {
  }

  ngAfterViewInit() {
    setTimeout(() => {
      this.loadComponent();
    });
  }

  loadComponent() {
    let componentFactory = this.componentFactoryResolver.resolveComponentFactory(this.tab.component);
    let viewContainerRef = this.adHost.viewContainerRef;

    viewContainerRef.clear();

    let componentRef = viewContainerRef.createComponent(componentFactory);

    let instance = componentRef.instance;
    this.tab.componentInstance = componentRef.instance;
    if (this.tab && this.tab.data) {
      if (instance.getData && typeof instance.getData === 'function') {
        instance.getData(this.tab.data);
      }
    }
  }


}
src\app\model\tab-item.model.ts
import { Type } from '@angular/core';

export class TabItem {
    title?: string;
    id?: string;
    component?: Type<any>; //组件实例
    closable?: boolean;// 是否可以关闭
    data?: any;
    componentInstance?: any;
}
< ng-template >元素是动态加载组件的最佳选择,因为它不会渲染任何额外的输出。
- loadComponent() 使用 ComponentFactoryResolver 来为每个具体的组件解析出一个 ComponentFactory。 然后 ComponentFactory 会为每一个组件创建一个实例。
src\app\base\test\test.component.html
<nz-layout class="layout">
    <nz-header>

    </nz-header>
    <nz-layout>
      <nz-sider [nzWidth]="200" style="background:#fff">
        <ul nz-menu [nzMode]="'inline'" style="height:100%">
          <li nz-submenu>
            <span title>基本原理</span>
            <ul>
              <li (click)="toOtherPage('yxzn')" nz-menu-item>英雄指南</li>
              <li (click)="toOtherPage('jg')" nz-menu-item>架构</li>
              <li (click)="toOtherPage('zjymb')" nz-menu-item>组件与模板</li>
              <li (click)="toOtherPage('bd')" nz-menu-item>表单</li>
            </ul>
          </li>
        </ul>
      </nz-sider>
      <nz-layout style="padding:0 24px 24px">
        <nz-content style="background:#fff; padding: 24px; min-height: 280px;">
            <nz-tabset
                [nzType]="'card'"
                [nzSelectedIndex]="currentIndex"
                (nzSelectedIndexChange)="nzSelectedIndexChange($event)"
                [nzShowPagination]=false
                >
                <nz-tab  *ngFor="let tab of tabs" [nzTitle]="titleTemplate">
                    <ng-template #titleTemplate>
                        <div>
                            {{ tab.title }}
                            <i *ngIf="tab.closable == true" style='position: relative;' nz-icon type="close"
                            (click)="closeTab(tab)" class="ant-tabs-close-x"></i>
                        </div>
                    </ng-template>
                    <div>
                        <!--选项卡切换页面-->
                        <app-ad-banner [tab]="tab"></app-ad-banner>
                    </div>

                </nz-tab>
            </nz-tabset>
        </nz-content>
      </nz-layout>
    </nz-layout>
</nz-layout>
src\app\base\test\test.component.ts
import { Component, OnInit } from '@angular/core';
import { TabService } from '../../shared/ad-banner/tab.service';
import { CloseTabEmitService } from '../../shared/ad-banner/close-tab-emit.service';
import { Subscription } from 'rxjs';
import { TabItem } from '../../model/tab-item.model';
import { TAB_LIST } from '../../shared/ad-banner/tab.source';
import * as $ from 'jquery';

@Component({
  selector: 'app-test',
  templateUrl: './test.component.html',
  styleUrls: ['./test.component.less']
})
export class TestComponent implements OnInit {

  private tabList = [];
  tabSourceSub: Subscription;
  tabSourceIdSub: Subscription;
  currentIndex = 0;
  // 当前的tab
  currentTab: TabItem;
  tabs: Array<TabItem> = [];

  constructor(
    private tabService: TabService,
    private closeTabEmit: CloseTabEmitService,
  ) {
    this.tabList = TAB_LIST;
    this.tabSourceIdSub = this.tabService._tabSourceId$.subscribe((obj: any) => {
      let tab = this.getTabById(obj.id);
      tab.data = obj.data;
      this.handleTab(tab);
    })
   }

  ngOnInit() {
    let tab = this.getTabById('yxzn');
    this.tabs.push(tab);

    this.closeTabEmit.closeEmit.subscribe((id)=>{//组件点击取消返回
      let name = this.getTabById(id);
      this.closeTab(name);
    })

    $('.panel-collapse .list-group-item').on('click',function(){
      $('.panel-collapse .list-group-item').removeClass('active');
      $(this).addClass('active');//左侧导航栏的active切换
      // console.log(that.tabName);
    })
  }

  closeTab(tab){
    this.tabs.splice(this.tabs.indexOf(tab), 1);
  }

  nzSelectedIndexChange(number) {//点击顶部tabs传递的number
    this.currentIndex = number;
    this.currentTab = this.tabs[number];
  }

  private getTabById(id: string): TabItem {
    return this.tabList.find(ele => ele.id == id);
  }

  private handleTab(tab) {
    if (this.isTabNotExist(tab.id)) {
      this.addTab(tab);
    } else {
      this.refreshTab(tab)
    }
    this.currentIndex = this.getTabIndex(tab.id);
  }

  private isTabNotExist(id: string): boolean {
    return this.getTabIndex(id) == -1;
  }

  private getTabIndex(id: string) {
    return this.tabs.findIndex(ele => ele.id == id)
  }

  private addTab(tab: TabItem) {
    console.log('add', tab);
    this.tabs.push(tab);
  }

  private refreshTab(tab: TabItem) {
    console.log('refres', tab);
    let componentInstance = tab.componentInstance;
    if (componentInstance && componentInstance.getData && typeof componentInstance.getData == 'function') {
      componentInstance.getData(tab.data)
    }
  }
  changeTab(direction){
    if(direction == 'left'){
      this.currentIndex-=1
    }else if(direction == 'right'){
      this.currentIndex+=1
    }
  }

  ngOnDestroy(): void {
    this.tabSourceSub.unsubscribe();
    this.tabSourceIdSub.unsubscribe();
  }

  toOtherPage(tabId){
    this.tabService.addTabById(tabId);
  }

}
src\app\shared\ad-banner\tab.service.ts
import { Injectable } from '@angular/core';
import { Subject, Observable } from 'rxjs';
import { TabItem } from '../../model/tab-item.model';

@Injectable({
  providedIn: 'root'
})
export class TabService {
  private tabSource: Subject<any> = new Subject<any>();
  public _tabSourceOb: Observable<any>;

  private tabSourceId: Subject<Object> = new Subject<Object>();
  public _tabSourceId$: Observable<Object>;

  constructor() {
    this._tabSourceOb = this.tabSource.asObservable();
    this._tabSourceId$ = this.tabSourceId.asObservable();
   }

  addTab(tab: TabItem) {
    this.tabSource.next(tab);
  }

  addTabById(id: string, data?: any) {
    let _data = data ? data : {};
    this.tabSourceId.next({ id, data: _data });
  }
}
src\app\shared\ad-banner\tab.source.ts
import { TabItem } from '../../model/tab-item.model';
import { YxznListComponent } from '../../base/yxzn/yxzn-list/yxzn-list.component';
import { BdListComponent } from '../../base/bd/bd-list/bd-list.component';
import { ZjymbListComponent } from '../../base/zjymb/zjymb-list/zjymb-list.component';
import { JgListComponent } from '../../base/jg/jg-list/jg-list.component';

export const TAB_LIST: Array<TabItem> = [
    {
        id: 'yxzn', title: '英雄指南', component: YxznListComponent, closable: false, data:{}
    },
    {
        id: 'jg', title: '架构', component: JgListComponent, closable: true, data:{}
    },
    {
        id: 'zjymb', title: '组件与模板', component: ZjymbListComponent, closable: true, data:{}
    },
    {
        id: 'bd', title: '表单', component: BdListComponent, closable: true, data:{}
    }
];
src\app\shared\ad-banner\close-tab-emit.service.ts
import { Injectable, OnInit, EventEmitter } from '@angular/core';

@Injectable({
  providedIn: 'root'
})
export class CloseTabEmitService implements OnInit {
  public closeEmit: any;

  constructor() {
    // 定义发射事件
    this.closeEmit = new EventEmitter();
   }

  ngOnInit() {

  }
}
- 通常,Angular 编译器会为模板中所引用的每个组件都生成一个 ComponentFactory 类。 但是,对于动态加载的组件,模板中不会出现对它们的选择器的引用。
要想确保编译器照常生成工厂类,就要把这些动态加载的组件添加到 NgModule 的 entryComponents 数组中:
entryComponents:[
    YxznListComponent,
    JgListComponent,
    ZjymbListComponent,
    BdListComponent,
  ],
界面效果如下:


路由
里程碑1:路由模块
你需要路由模块吗?
路由模块在根模块或者特性模块替换了路由配置。
路由模块是设计选择,它的价值在配置很复杂,并包含专门守卫和解析器服务时尤其明显。
在配置很简单时,它可能看起来很多余,一些开发者跳过路由模块(例如 AppRoutingModule),并将路由配置直接混合在关联模块中(比如 AppModule )。从中选择一种模式,并坚持模式的一致性。
大多数开发者都应该采用路由模块,以保持一致性。 它在配置复杂时,能确保代码干净。 它让测试特性模块更加容易。 它的存在让人一眼就能看出这个模块是带路由的。 开发者可以很自然的从路由模块中查找和扩展路由配置。
当你用 CLI 命令 ng new 创建新项目时,会提示:

如果Yes, 这会告诉 CLI 包含上 @angular/router 包,并创建一个名叫 app-routing.module.ts 的文件。 然后你就可以在添加到项目或应用中的任何 NgModule 中使用路由功能了。
src\app\app-routing.module.ts
import { NgModule } from '@angular/core';
import { Routes, RouterModule } from '@angular/router';
import { CrisisListComponent } from './base/crisis-list/crisis-list.component';
import { PageNotFoundComponent } from './base/page-not-found/page-not-found.component';
import { HeroListComponent } from './base/hero-list/hero-list.component';

const appRoutes: Routes = [
  { path: 'crisis-center', component: CrisisListComponent },
  { path: 'heroes',        component: HeroListComponent },
  { path: '',   redirectTo: '/heroes', pathMatch: 'full' },
  { path: '**', component: PageNotFoundComponent }
];

@NgModule({
  imports: [RouterModule.forRoot(
    appRoutes,
    { enableTracing: true } // <-- debugging purposes only
  )],
  exports: [RouterModule]
})
export class AppRoutingModule { }
另外,用下列命令生成带路由的 NgModule:
ng generate module my-module --routing
这将创建一个名叫 my-module-routing.module.ts 的独立文件,来保存这个 NgModule 的路由信息。
该文件包含一个空的 Routes 对象,你可以使用一些指向各个组件和 NgModule 的路由来填充该对象。
src\app\app.component.html
<router-outlet></router-outlet>
运行效果:

里程碑2:特性模块
虽然可以把文件都放在 src/app/ 目录下,但那样很难维护。 大部分开发人员更喜欢把每个特性区都放在它自己的目录下, 然后,把它们导入到主模块中。
- 用模块把应用和路由组织为一些特性区,每个特性区都专注于特定的业务用途。
- 命令式的从一个组件导航到另一个
- 通过路由传递必要信息和可选信息
ng generate module heroes/heroes --module app --flat --routing
在 heroes 目录下创建一个带路由的 HeroesModule,并把它注册进 AppModule 中。
src\app\base\heroes\heroes.module.ts
import { NgModule } from '@angular/core';
import { CommonModule } from '@angular/common';

import { HeroesRoutingModule } from './heroes-routing.module';
import { HeroDetailComponent } from './hero-detail/hero-detail.component';
import { HeroListComponent } from './hero-list/hero-list.component';

@NgModule({
  declarations: [
    HeroDetailComponent,
    HeroListComponent,
  ],
  imports: [
    CommonModule,
    HeroesRoutingModule
  ]
})
export class HeroesModule { }
src\app\base\heroes\heroes-routing.module.ts
import { NgModule } from '@angular/core';
import { Routes, RouterModule } from '@angular/router';
import { HeroListComponent } from './hero-list/hero-list.component';
import { HeroDetailComponent } from './hero-detail/hero-detail.component';

const heroesRoutes: Routes = [
  { path: 'heroes',  component: HeroListComponent },
  { path: 'hero/:id', component: HeroDetailComponent }
];

@NgModule({
  imports: [
    RouterModule.forChild(heroesRoutes)
  ],
  exports: [
    RouterModule
  ]
})
export class HeroesRoutingModule { }
注意路径中的 :id 令牌。它为路由参数在路径中创建一个“空位”。在这里,路由器把英雄的 id 插入到那个“空位”中。
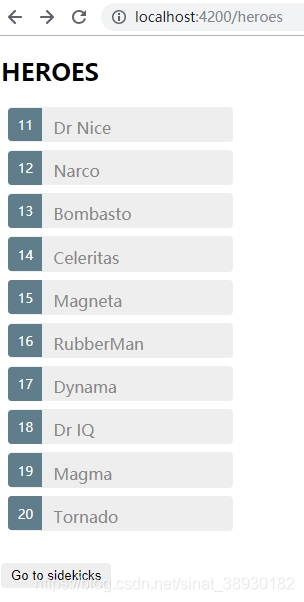
src\app\base\heroes\hero-list\hero-list.component.html
<h2>HEROES</h2>
<ul class="heroes">
  <li *ngFor="let hero of heroes$ | async"
    [class.selected]="hero.id === selectedId">
    <a [routerLink]="['/hero', hero.id]">
      <span class="badge">{{ hero.id }}</span>{{ hero.name }}
    </a>
  </li>
</ul>

<button routerLink="/sidekicks">Go to sidekicks</button>
src/app/app-routing.module.ts
import { NgModule }              from '@angular/core';
import { RouterModule, Routes }  from '@angular/router';

import { CrisisListComponent }   from './crisis-list/crisis-list.component';
// import { HeroListComponent }  from './hero-list/hero-list.component';  // <-- delete this line
import { PageNotFoundComponent } from './page-not-found/page-not-found.component';

const appRoutes: Routes = [
  { path: 'crisis-center', component: CrisisListComponent },
  // { path: 'heroes',     component: HeroListComponent }, // <-- delete this line
  { path: '',   redirectTo: '/heroes', pathMatch: 'full' },
  { path: '**', component: PageNotFoundComponent }
];

@NgModule({
  imports: [
    RouterModule.forRoot(
      appRoutes,
      { enableTracing: true } // <-- debugging purposes only
    )
  ],
  exports: [
    RouterModule
  ]
})
export class AppRoutingModule {}
导入模块的顺序很重要
src/app/app.module.ts
imports: [
  BrowserModule,
  FormsModule,
  HeroesModule,
  AppRoutingModule
],
注意,AppRoutingModule 是最后一个。如果你先列出了 AppRoutingModule,那么通配符路由就会被注册在“英雄管理”路由之前。 通配符路由(它匹配任意URL)将会拦截住每一个到“英雄管理”路由的导航,因此事实上屏蔽了所有“英雄管理”路由。
- 路由配置的顺序很重要。 路由器会接受第一个匹配上导航所要求的路径的那个路由。
- 当所有路由都在同一个 AppRoutingModule 时,你要把默认路由和通配符路由放在最后(这里是在 /heroes 路由后面), 这样路由器才有机会匹配到 /heroes 路由,否则它就会先遇到并匹配上该通配符路由,并导航到“页面未找到”路由。
点击某一个英雄后:

里程碑3:子路由
此部分会展示如何组织危机中心,来满足 Angular 应用所推荐的模式:
- 把每个特性放在自己的目录中。
- 每个特性都有自己的 Angular 特性模块。
- 每个特性区都有自己的根组件。
- 每个特性区的根组件中都有自己的路由出口及其子路由。
- 特性区的路由很少(或完全不)与其它特性区的路由交叉。
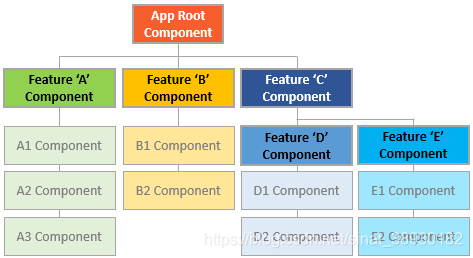
如果你还有更多特性区,它们的组件树是这样的:
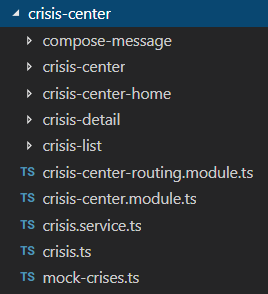
crisis-center 目录结构如下:
src\app\base\crisis-center\crisis-center
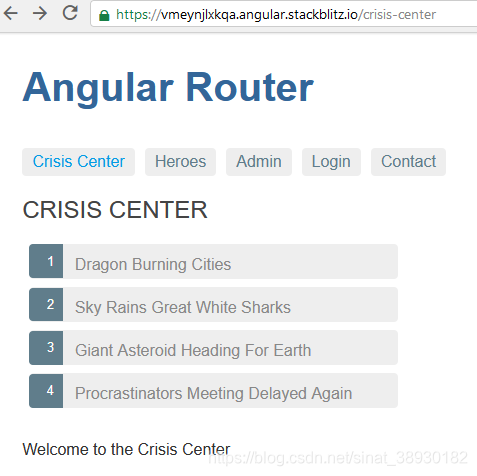
<h2>CRISIS CENTER</h2>
<router-outlet></router-outlet>
CrisisCenterComponent 和 AppComponent 有下列共同点:
- 它是危机中心特性区的根,正如 AppComponent 是整个应用的根。
- 它是危机管理特性区的壳,正如 AppComponent 是管理高层工作流的壳。
就像大多数的壳一样,CrisisCenterComponent 类也非常简单,甚至比 AppComponent 更简单:
它没有业务逻辑,它的模板中没有链接,只有一个标题和用于放置危机中心的子组件的 < router-outlet>。
src\app\base\crisis-center\crisis-center-routing.module.ts
import { NgModule }             from '@angular/core';
import { RouterModule, Routes } from '@angular/router';

import { CrisisCenterHomeComponent } from './crisis-center-home/crisis-center-home.component';
import { CrisisListComponent }       from './crisis-list/crisis-list.component';
import { CrisisCenterComponent }     from './crisis-center/crisis-center.component';
import { CrisisDetailComponent }     from './crisis-detail/crisis-detail.component';

const crisisCenterRoutes: Routes = [
  {
    path: 'crisis-center',
    component: CrisisCenterComponent,
    children: [
      {
        path: '',
        component: CrisisListComponent,
        children: [
          {
            path: ':id',
            component: CrisisDetailComponent
          },
          {
            path: '',
            component: CrisisCenterHomeComponent
          }
        ]
      }
    ]
  }
];

@NgModule({
  imports: [
    RouterModule.forChild(crisisCenterRoutes)
  ],
  exports: [
    RouterModule
  ]
})
export class CrisisCenterRoutingModule { }
注意:
1.父路由 crisis-center 有一个 children 属性,它有一个包含 CrisisListComponent 的路由。 CrisisListModule 路由还有一个带两个路由的 children 数组。
2.路由器会把这些路由对应的组件放在 CrisisCenterComponent 的 RouterOutlet 中,而不是 AppComponent 壳组件中的。
CrisisListComponent 包含危机列表和一个 RouterOutlet,用以显示 Crisis Center Home 和 Crisis Detail 这两个路由组件。

里程碑4:路由守卫
(注:此部分内容有原文参考:https://blog.csdn.net/qq_35765126/article/details/76394193 )
往路由配置中添加守卫,来处理这些场景:
- 该用户可能无权导航到目标组件。
- 可能用户得先登录(认证)。
- 在显示目标组件前,你可能得先获取某些数据。
- 在离开组件前,你可能要先保存修改。
- 你可能要询问用户:你是否要放弃本次更改,而不用保存它们?
路由器可以支持多种守卫接口:
- 用CanActivate来处理导航到某路由的情况。
- 用CanActivateChild来处理导航到某子路由的情况。
- 用CanDeactivate来处理从当前路由离开的情况.
- 用Resolve在路由激活之前获取路由数据。
- 用CanLoad来处理异步导航到某特性模块的情况。
(在分层路由的每个级别上,你都可以设置多个守卫。 路由器会先按照从最深的子路由由下往上检查的顺序来检查 CanDeactivate() 和 CanActivateChild() 守卫。 然后它会按照从上到下的顺序检查 CanActivate() 守卫。 如果特性模块是异步加载的,在加载它之前还会检查 CanLoad() 守卫。 如果任何一个守卫返回 false,其它尚未完成的守卫会被取消,这样整个导航就被取消了。)
在开始 路由守卫 之前,顺便回顾下 子路由 和 路由传参 其中两种方式。
src\app\app-routing.module.ts
import { NgModule } from '@angular/core';
import { Routes, RouterModule } from '@angular/router';
import { PageNotFoundComponent } from './base/page-not-found/page-not-found.component';
import { HomeComponent } from './base/home/home.component';
import { ProductComponent } from './base/product/product/product.component';
import { ProductDescComponent } from './base/product/product-desc/product-desc.component';

const appRoutes: Routes = [
  {path: 'home', component: HomeComponent},
  {path: 'product', component: ProductComponent, children:[
    {path: 'desc/:id', component: ProductDescComponent},//在路径中传递参数 ['./desc',2]
    {path: 'desc', component: ProductDescComponent}//在查询参数中传递参数 [queryParams] = "{id:1}"
  ]},
  {path: '', redirectTo: '/home', pathMatch: 'full'},
  { path: '**', component: PageNotFoundComponent }
];

@NgModule({
  imports: [RouterModule.forRoot(appRoutes)],
  exports: [RouterModule]
})
export class AppRoutingModule { }
1.path不能以斜杠(/)开头。 路由器会为解析和构建最终的URL,当在应用的多个视图之间导航时,可以任意使用相对路径和绝对路径。
2.路由的定义顺序使用先匹配者优先的策略来匹配路由,所以,具体路由应该放在通用路由的前面。在上面的配置中,带静态路径的路由被放在了前面;后面是空路径路由,作为默认路由;而通配符路由被放在最后面,因为它能匹配上每一个URL,因此,应该只有找不到其它能匹配的路由时才匹配它。
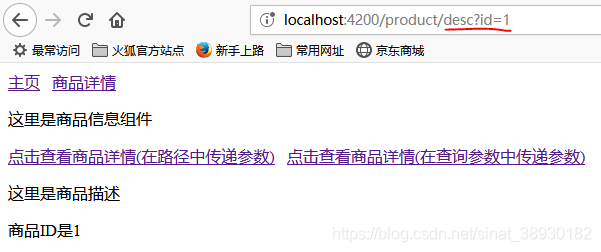
src\app\app.component.html
<a [routerLink]="['/home']">主页</a>
<a [routerLink]="['/product']">商品详情</a>
<router-outlet></router-outlet>
src\app\base\home\home.component.html
<div class="home">
    <p>这里是主页组件</p>
</div>
src\app\base\product\product\product.component.html
<div class="product">
<p>这里是商品信息组件</p>
<a [routerLink]="['./desc',2]">点击查看商品详情(在路径中传递参数)</a>
<a [routerLink]= "['./desc']" [queryParams] = "{id:1}"> 点击查看商品详情(在查询参数中传递参数)</a>
</div>
<router-outlet></router-outlet>
1.子路由是./
2.给路由传递参数的方法:在路径中传递、在查询参数中传递
src\app\base\product\product-desc\product-desc.component.ts
import { Component, OnInit } from '@angular/core';
import { ActivatedRoute } from '@angular/router';

@Component({
  selector: 'app-product-desc',
  templateUrl: './product-desc.component.html',
  styleUrls: ['./product-desc.component.less']
})
export class ProductDescComponent implements OnInit {
  public  productId: number;

  constructor(private routerInfo: ActivatedRoute) { }

  ngOnInit() {
    // this.productId = this.routerInfo.snapshot.params['id'];//当在路径中传递参数
    this.productId = this.routerInfo.snapshot.queryParams['id'];//当在查询参数中传递参数
  }
}
src\app\base\product\product-desc\product-desc.component.html
<p>这里是商品描述</p>
<p> 商品ID是{{productId}}</p>
运行结果:
图1
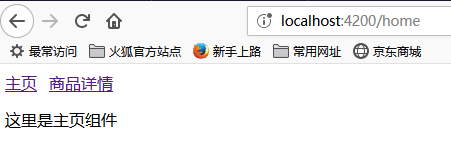
图2

图3
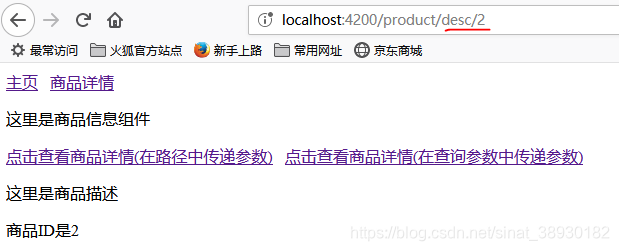
图4
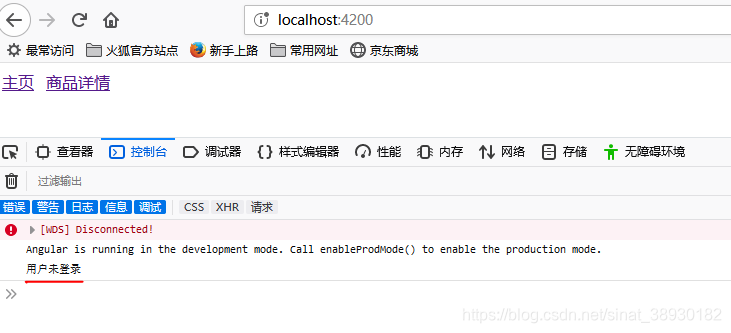
现在介绍三个路由守卫:
1.canactivate:要求认证
应用程序通常会根据访问者来决定是否授予某个特性区的访问权。 我们可以只对已认证过的用户或具有特定角色的用户授予访问权,还可以阻止或限制用户访问权,直到用户账户激活为止。
CanActivate守卫是一个管理这些导航类业务规则的工具。
CanActivate:[] 接收一个数组,可以指定多个路由守卫,当视图进入此路由时,所有守卫会被依次调用,如果有一个守卫返回false,则路由请求会被拒绝掉。
src\app\shared\guard\login.guard.ts
import { Injectable } from '@angular/core';
import {  CanActivate } from '@angular/router';

@Injectable({
  providedIn: 'root'
})
export class LoginGuard implements CanActivate  {

  canActivate() {
     let loggedIn : boolean = Math.random() < 0.5;
      if (!loggedIn) {
         console.log( ' 用户未登录' );
      }
      return loggedIn;
  }

}
配置路由,可以添加多个守卫:
src\app\app-routing.module.ts
{path: 'home', component: HomeComponent, canActivate: [LoginGuard]},
路由配置文件里要添加providers
@NgModule({
  imports: [RouterModule.forRoot(appRoutes)],
  exports: [RouterModule],
  providers: [LoginGuard]
})
运行结果:
对一个组件添加多个守卫,给上一个home组件按照同样的步骤添加一个test.guard.ts ,让这个守卫返回false,果然home这个组件就没法加载出来。
src\app\shared\guard\test.guard.ts
import { Injectable } from '@angular/core';
import { CanActivate } from '@angular/router';

@Injectable({
  providedIn: 'root'
})
export class TestGuard implements CanActivate {

  canActivate () {
    return false;
  }

}
2.CanDeactivate 处理未保存的更改
在现实世界中,我们得先把用户的改动积累起来。 我们可能不得不进行跨字段的校验,可能要找服务器进行校验,可能得把这些改动保存成一种待定状态,直到用户或者把这些改动作为一组进行确认或撤销所有改动。
当用户要导航到外面时,我们应该暂停,并让用户决定该怎么做。如果用户选择了取消,我们就留下来,并允许更多改动。如果用户选择了确认,那就进行保存。
在保存成功之前,我们还可以继续推迟导航。如果我们让用户立即移到下一个界面,而保存却失败了(可能因为数据不符合有效性规则),我们就会丢失该错误的上下文环境。
在等待服务器的答复时,我们没法阻塞它 —— 这在浏览器中是不可能的。 我们只能用异步的方式在等待服务器答复之前先停止导航。
src\app\shared\guard\unsave.guard.ts
import { Injectable } from '@angular/core';
import { CanDeactivate } from '@angular/router';
import { HomeComponent } from '../../base/home/home.component';
@Injectable({
providedIn: 'root'
})
export class UnsaveGuard implements CanDeactivate<HomeComponent> {
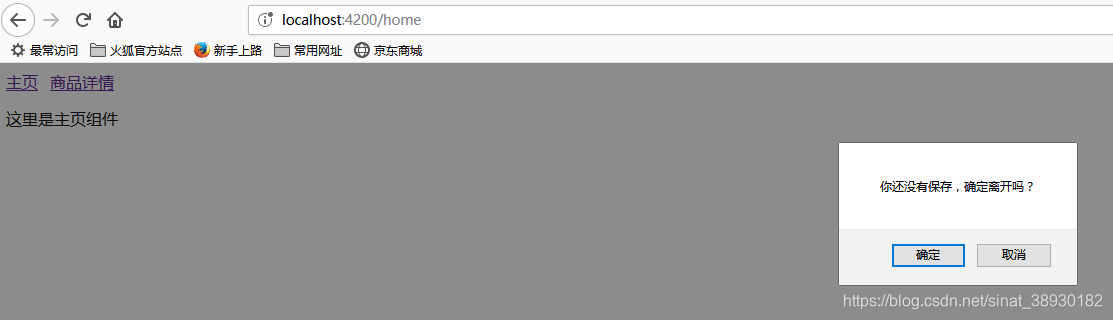
canDeactivate (component: HomeComponent) {
return window.confirm('你还没有保存,确定离开吗?');
}
}
src\app\app-routing.module.ts
{path: 'home', component: HomeComponent, canActivate: [LoginGuard, TestGuard], canDeactivate: [UnsaveGuard]},
@NgModule({
  imports: [RouterModule.forRoot(appRoutes)],
  exports: [RouterModule],
  providers: [LoginGuard, TestGuard, UnsaveGuard]
})
当离开home时浏览器会弹出消息框 如果确认就会路由到其他组件,如果取消就会留在当前。
 3.resolve守卫
预先获取组件数据,导航前预先加载路由信息。
如果你在使用真实 api,很有可能数据返回有延迟,导致无法即时显示。 在这种情况下,直到数据到达前,显示一个空的组件不是最好的用户体验。
最好预先从服务器上获取完数据,这样在路由激活的那一刻数据就准备好了。 还要在路由到此组件之前处理好错误。
src\app\shared\guard\product.resolve.ts
import {ActivatedRouteSnapshot, Resolve, Router, RouterStateSnapshot} from '@angular/router';
import {Injectable} from '@angular/core';
import {Product} from '../product/product.component';
@Injectable ()
export class  ProductResolve implements  Resolve <Product> {
  constructor(private  router: Router) {
  }
  resolve(route: ActivatedRouteSnapshot, state: RouterStateSnapshot) {
    const productId: number = route.params['id'];
    if (productId == 1) {
      return new Product(2);
    }else {
      this.router.navigate(['/home']);
      return undefined;
    }
  }
}
product.component.ts里实例化
export class Product {
	constructor(public productIds: number) {
	}
}
配置路由
src\app\app-routing.module.ts
{path: 'product/:id', component: ProductComponent, children: [
{path: 'desc', data: [{id: 1}], component: ProductDescComponent}
], resolve: [ProductResolve]},
@NgModule({
  imports: [RouterModule.forRoot(appRoutes)],
  exports: [RouterModule],
  providers: [LoginGuard, TestGuard, UnsaveGuard, ProductResolve]
})
product.component.html
<div class="product">
  <p>
    这里是商品信息组件
  </p>
  <a [routerLink]= "['./desc']"> 点击查看商品详情</a>
  {{productIds}}
</div>

<router-outlet></router-outlet>
组件之间的交互
常见的组件通讯场景,也就是让两个或多个组件之间共享信息的方法。
src\app\base\hero\hero.ts
export class Hero {
    name: string;
}

export const HEROES = [
    {name: 'Dr IQ'},
    {name: 'Magneta'},
    {name: 'Bombasto'}
];
(一)通过输入型绑定把数据从父组件传到子组件。
src\app\base\hero\hero-parent\hero-parent.component.html
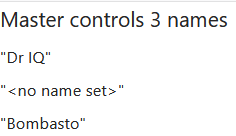
<h2>{{master}} controls {{heroes.length}} heroes</h2>
<app-hero-child *ngFor="let hero of heroes"
  [hero]="hero"
  [master]="master">
</app-hero-child>
src\app\base\hero\hero-parent\hero-parent.component.ts
import { Component, OnInit } from '@angular/core';
import { HEROES } from '../hero';

@Component({
  selector: 'app-hero-parent',
  templateUrl: './hero-parent.component.html',
  styleUrls: ['./hero-parent.component.less']
})
export class HeroParentComponent implements OnInit {
  heroes = HEROES;
  master = 'Master';

  constructor() { }

  ngOnInit() {
  }

}
src\app\base\hero\hero-child\hero-child.component.html
<h3>{{hero.name}} says:</h3>
<p>I, {{hero.name}}, am at your service, {{masterName}}.</p>
src\app\base\hero\hero-child\hero-child.component.ts
import { Component, OnInit, Input } from '@angular/core';
import { Hero } from '../hero';

@Component({
  selector: 'app-hero-child',
  templateUrl: './hero-child.component.html',
  styleUrls: ['./hero-child.component.less']
})
export class HeroChildComponent implements OnInit {
  @Input() hero: Hero;
  @Input('master') masterName: string;

  constructor() { }

  ngOnInit() {
  }

}
第二个 @Input 为子组件的属性名 masterName 指定一个别名 master(不推荐为起别名,请参见angular风格指南).
运行结果:

(二)通过 setter 截听输入属性值的变化
使用一个输入属性的 setter,以拦截父组件中值的变化,并采取行动。
src\app\base\name-parent\name-parent.component.html
<h2>Master controls {{names.length}} names</h2>
<app-name-child *ngFor="let name of names" [name]="name"></app-name-child>
src\app\base\name-parent\name-parent.component.ts
import { Component, OnInit } from '@angular/core';

@Component({
  selector: 'app-name-parent',
  templateUrl: './name-parent.component.html',
  styleUrls: ['./name-parent.component.less']
})
export class NameParentComponent implements OnInit {
  names = ['Dr IQ', '   ', '  Bombasto  '];

  constructor() { }

  ngOnInit() {
  }

}
src\app\base\name-child\name-child.component.html
<h3>"{{name}}"</h3>
src\app\base\name-child\name-child.component.ts
import { Component, OnInit, Input } from '@angular/core';

@Component({
  selector: 'app-name-child',
  templateUrl: './name-child.component.html',
  styleUrls: ['./name-child.component.less']
})
export class NameChildComponent implements OnInit {
  private _name = '';

  constructor() { }

  ngOnInit() {
  }

  @Input()
  set name(name: string) {
    this._name = (name && name.trim()) || '<no name set>';
  }

  get name(): string { return this._name; }

}
运行结果:
(三)通过ngOnChanges()来截听输入属性值的变化
使用 OnChanges 生命周期钩子接口的 ngOnChanges() 方法来监测输入属性值的变化并做出回应。
当需要监视多个、交互式输入属性的时候,本方法比用属性的 setter 更合适。
src\app\base\version-parent\version-parent.component.html
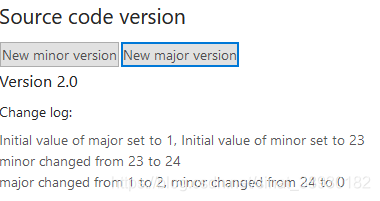
<h2>Source code version</h2>
<button (click)="newMinor()">New minor version</button>
<button (click)="newMajor()">New major version</button>
<app-version-child [major]="major" [minor]="minor"></app-version-child>
src\app\base\version-parent\version-parent.component.ts
import { Component, OnInit } from '@angular/core';

@Component({
  selector: 'app-version-parent',
  templateUrl: './version-parent.component.html',
  styleUrls: ['./version-parent.component.less']
})
export class VersionParentComponent implements OnInit {
  major = 1;
  minor = 23;

  constructor() { }

  ngOnInit() {
  }

  newMinor() {
    this.minor++;
  }

  newMajor() {
    this.major++;
    this.minor = 0;
  }

}
src\app\base\version-child\version-child.component.html
<h3>Version {{major}}.{{minor}}</h3>
<h4>Change log:</h4>
<ul>
    <li *ngFor="let change of changeLog">{{change}}</li>
</ul>
src\app\base\version-child\version-child.component.ts
import { Component, OnInit, Input, OnChanges, SimpleChange } from '@angular/core';

@Component({
  selector: 'app-version-child',
  templateUrl: './version-child.component.html',
  styleUrls: ['./version-child.component.less']
})
export class VersionChildComponent implements OnInit, OnChanges {
  @Input() major: number;
  @Input() minor: number;
  changeLog: string[] = [];

  constructor() { }

  ngOnInit() {
  }

  ngOnChanges(changes: {[propKey: string]: SimpleChange}) {
    let log: string[] = [];
    for (let propName in changes) {
      let changedProp = changes[propName];
      let to = JSON.stringify(changedProp.currentValue);
      if (changedProp.isFirstChange()) {
        log.push(`Initial value of ${propName} set to ${to}`);
      } else {
        let from = JSON.stringify(changedProp.previousValue);
        log.push(`${propName} changed from ${from} to ${to}`);
      }
    }
    this.changeLog.push(log.join(', '));
  }

}
运行结果:

依次点击两个按钮 - >
(四)父组件监听子组件的事件
子组件暴露一个 EventEmitter 属性,当事件发生时,子组件利用该属性 emits(向上弹射)事件。父组件绑定到这个事件属性,并在事件发生时作出回应。
子组件的 EventEmitter 属性是一个输出属性,通常带有@Output 装饰器。
src\app\base\voter\voter.component.html
<h4>{{name}}</h4>
<button (click)="vote(true)"  [disabled]="didVote">Agree</button>
<button (click)="vote(false)" [disabled]="didVote">Disagree</button>
src\app\base\voter\voter.component.ts
import { Component, OnInit, Input, Output, EventEmitter } from '@angular/core';

@Component({
  selector: 'app-voter',
  templateUrl: './voter.component.html',
  styleUrls: ['./voter.component.less']
})
export class VoterComponent implements OnInit {
  @Input()  name: string;
  @Output() voted = new EventEmitter<boolean>();
  didVote = false;

  constructor() { }

  ngOnInit() {
  }

  vote(agreed: boolean) {
    this.voted.emit(agreed);
    this.didVote = true;
  }

}
src\app\base\votetaker\votetaker.component.html
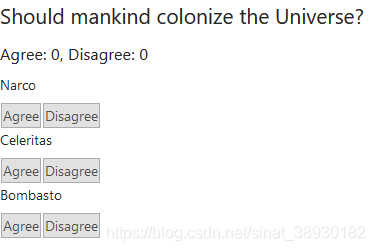
<h2>Should mankind colonize the Universe?</h2>
<h3>Agree: {{agreed}}, Disagree: {{disagreed}}</h3>
<app-voter *ngFor="let voter of voters"
    [name]="voter"
    (voted)="onVoted($event)">
</app-voter>
src\app\base\votetaker\votetaker.component.ts
import { Component, OnInit } from '@angular/core';

@Component({
  selector: 'app-votetaker',
  templateUrl: './votetaker.component.html',
  styleUrls: ['./votetaker.component.less']
})
export class VotetakerComponent implements OnInit {
  agreed = 0;
  disagreed = 0;
  voters = ['Narco', 'Celeritas', 'Bombasto'];

  constructor() { }

  ngOnInit() {
  }

  onVoted(agreed: boolean) {
    agreed ? this.agreed++ : this.disagreed++;
  }

}
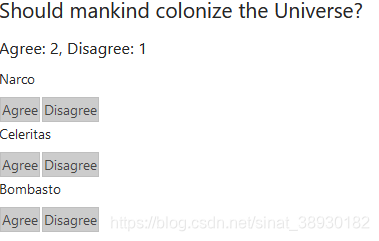
父组件 VoteTakerComponent绑定了一个事件处理器(onVoted()),用来响应子组件的事件($event)并更新一个计数器。
运行结果:
依次点击Agree、Agree和Disagree - >
(五)父组件与子组件通过本地变量互动
父组件不能使用数据绑定来读取子组件的属性或调用子组件的方法。但可以在父组件模板里,新建一个本地变量来代表子组件,然后利用这个变量来读取子组件的属性和调用子组件的方法。
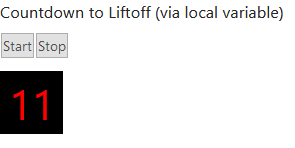
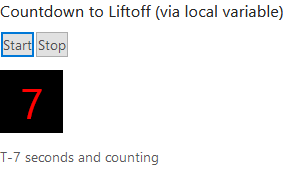
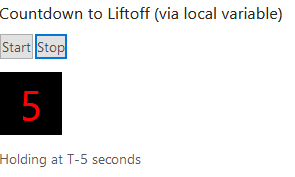
src\app\base\countdown-parent\countdown-parent.component.html
<h3>Countdown to Liftoff (via local variable)</h3>
<button (click)="timer.start()">Start</button>
<button (click)="timer.stop()">Stop</button>
<div class="seconds">{{timer.seconds}}</div>
<app-countdown-timer #timer></app-countdown-timer>
1.父组件不能通过数据绑定使用子组件的 start 和 stop 方法,也不能访问子组件的 seconds 属性。
2.把本地变量(#timer)放到(< countdown-timer >)标签中,用来代表子组件。这样父组件的模板就得到了子组件的引用,于是可以在父组件的模板中访问子组件的所有属性和方法。
src\app\base\countdown-timer\countdown-timer.component.ts
import { Component, OnInit } from '@angular/core';

@Component({
  selector: 'app-countdown-timer',
  templateUrl: './countdown-timer.component.html',
  styleUrls: ['./countdown-timer.component.less']
})
export class CountdownTimerComponent implements OnInit {
  intervalId = 0;
  message = '';
  seconds = 11;

  clearTimer() { clearInterval(this.intervalId); }

  constructor() { }

  ngOnInit() {
  }

  start() { this.countDown(); }
  stop()  {
    this.clearTimer();
    this.message = `Holding at T-${this.seconds} seconds`;
  }

  private countDown() {
    this.clearTimer();
    this.intervalId = window.setInterval(() => {
      this.seconds -= 1;
      if (this.seconds === 0) {
        this.message = 'Blast off!';
      } else {
        if (this.seconds < 0) { this.seconds = 10; } // reset
        this.message = `T-${this.seconds} seconds and counting`;
      }
    }, 1000);
  }

}
src\app\base\countdown-timer\countdown-timer.component.html
<p>{{message}}</p>
运行结果:
父组件模板中显示的秒数和子组件状态信息里的秒数同步
(六)父组件调用@ViewChild()
父组件与子组件通过本地变量互动是个简单便利的方法。但是也有局限性,因为父组件-子组件的连接必须全部在父组件的模板中进行。父组件本身的代码对子组件没有访问权。
如果父组件的类需要读取子组件的属性值或调用子组件的方法,就不能使用本地变量方法。
当父组件类需要这种访问时,可以把子组件作为 ViewChild,注入到父组件里面。
下面的例子用与倒计时相同的范例来解释这种技术。 它的外观或行为没有变化。子组件CountdownTimerComponent也和原来一样。
src\app\base\countdown-parent\countdown-parent.component.html
<h3>Countdown to Liftoff (via ViewChild)</h3>
<button (click)="start()">Start</button>
<button (click)="stop()">Stop</button>
<div class="seconds">{{ seconds() }}</div>
<app-countdown-timer></app-countdown-timer>
src\app\base\countdown-parent\countdown-parent.component.ts
import { Component, OnInit, ViewChild, AfterViewInit } from '@angular/core';
import { CountdownTimerComponent } from '../countdown-timer/countdown-timer.component';

@Component({
  selector: 'app-countdown-parent',
  templateUrl: './countdown-parent.component.html',
  styleUrls: [
    './countdown-parent.component.less',
    '../../../../assets/demo.css'
    ]
})
export class CountdownParentComponent implements AfterViewInit {
  @ViewChild(CountdownTimerComponent, {static: false})

  private timerComponent: CountdownTimerComponent;

  seconds() { return 0; }

  ngAfterViewInit() {
    setTimeout(() => this.seconds = () => this.timerComponent.seconds, 0);
  }

  start() { this.timerComponent.start(); }
  stop() { this.timerComponent.stop(); }

}
1.首先,必须导入对装饰器 ViewChild 以及生命周期钩子 AfterViewInit 的引用。
2.接着,通过 @ViewChild 属性装饰器,将子组件 CountdownTimerComponent 注入到私有属性 timerComponent 里面。
3.组件元数据里就不再需要 #timer 本地变量了。而是把按钮绑定到父组件自己的 start 和 stop 方法,使用父组件的 seconds 方法的插值表达式来展示秒数变化。
4.ngAfterViewInit() 生命周期钩子是非常重要的一步。被注入的计时器组件只有在 Angular 显示了父组件视图之后才能访问,所以它先把秒数显示为 0.
5.然后 Angular 会调用 ngAfterViewInit 生命周期钩子,但这时候再更新父组件视图的倒计时就已经太晚了。Angular 的单向数据流规则会阻止在同一个周期内更新父组件视图。应用在显示秒数之前会被迫再等一轮。
6.使用 setTimeout() 来等下一轮,然后改写 seconds() 方法,这样它接下来就会从注入的这个计时器组件里获取秒数的值。
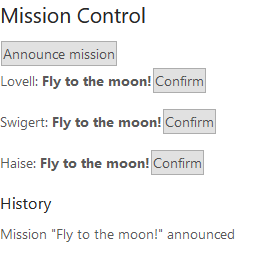
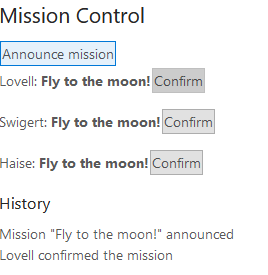
(七)父组件和子组件通过服务来通讯
父组件和它的子组件共享同一个服务,利用该服务在组件家族内部实现双向通讯。
该服务实例的作用域被限制在父组件和其子组件内。这个组件子树之外的组件将无法访问该服务或者与它们通讯。
src\app\base\mission\mission.service.ts
import { Injectable } from '@angular/core';
import { Subject } from 'rxjs';

@Injectable({
  providedIn: 'root'
})
export class MissionService {
  // Observable string sources
  private missionAnnouncedSource = new Subject<string>();
  private missionConfirmedSource = new Subject<string>();

  // Observable string streams
  missionAnnounced$ = this.missionAnnouncedSource.asObservable();
  missionConfirmed$ = this.missionConfirmedSource.asObservable();

  // Service message commands
  announceMission(mission: string) {
    this.missionAnnouncedSource.next(mission);
  }

  confirmMission(astronaut: string) {
    this.missionConfirmedSource.next(astronaut);
  }
}
MissionControlComponent 提供服务的实例,并将其共享给它的子组件(通过 providers 元数据数组),子组件可以通过构造函数将该实例注入到自身。
src\app\base\mission\mission-control\mission-control.component.html
<h2>Mission Control</h2>
<button (click)="announce()">Announce mission</button>
<app-astronaut *ngFor="let astronaut of astronauts"
    [astronaut]="astronaut">
</app-astronaut>
<h3>History</h3>
<ul>
    <li *ngFor="let event of history">{{event}}</li>
</ul>
src\app\base\mission\mission-control\mission-control.component.ts
import { Component, OnInit } from '@angular/core';
import { MissionService } from '../mission.service';

@Component({
  selector: 'app-mission-control',
  templateUrl: './mission-control.component.html',
  styleUrls: ['./mission-control.component.less'],
  providers: [MissionService]
})
export class MissionControlComponent {
  astronauts = ['Lovell', 'Swigert', 'Haise'];
  history: string[] = [];
  missions = ['Fly to the moon!', 'Fly to mars!', 'Fly to Vegas!'];
  nextMission = 0;

  constructor(private missionService: MissionService) {
    missionService.missionConfirmed$.subscribe(
      astronaut => {
        this.history.push(`${astronaut} confirmed the mission`);
      });
  }

  announce() {
    let mission = this.missions[this.nextMission++];
    this.missionService.announceMission(mission);
    this.history.push(`Mission "${mission}" announced`);
    if (this.nextMission >= this.missions.length) { this.nextMission = 0; }
  }

}
AstronautComponent 也通过自己的构造函数注入该服务。由于AstronautComponent 是 MissionControlComponent 的子组件,所以获取到的是父组件的这个服务实例。
src\app\base\mission\astronaut\astronaut.component.html
<p>
    {{astronaut}}: <strong>{{mission}}</strong>
    <button
        (click)="confirm()"
        [disabled]="!announced || confirmed">
        Confirm
    </button>
</p>
src\app\base\mission\astronaut\astronaut.component.ts
import { Component, OnInit, OnDestroy, Input } from '@angular/core';
import { Subscription } from 'rxjs';
import { MissionService } from '../mission.service';

@Component({
  selector: 'app-astronaut',
  templateUrl: './astronaut.component.html',
  styleUrls: ['./astronaut.component.less']
})
export class AstronautComponent implements OnDestroy {
  @Input() astronaut: string;
  mission = '<no mission announced>';
  confirmed = false;
  announced = false;
  subscription: Subscription;

  constructor(private missionService: MissionService) {
    this.subscription = missionService.missionAnnounced$.subscribe(
      mission => {
        this.mission = mission;
        this.announced = true;
        this.confirmed = false;
    });
  }

  confirm() {
    this.confirmed = true;
    this.missionService.confirmMission(this.astronaut);
  }

  ngOnDestroy() {
    this.subscription.unsubscribe();
  }

}
1.注意,这个例子保存了 subscription 变量,并在 AstronautComponent 被销毁时调用 unsubscribe() 退订。 这是一个用于防止内存泄漏的保护措施。实际上,在这个应用程序中并没有这个风险,因为 AstronautComponent 的生命期和应用程序的生命期一样长。但在更复杂的应用程序环境中就不一定了。
2.不需要在 MissionControlComponent 中添加这个保护措施,因为它作为父组件,控制着 MissionService 的生命期。
3.History 日志证明了:在父组件 MissionControlComponent 和子组件 AstronautComponent 之间,信息通过该服务实现了双向传递。
运行结果:
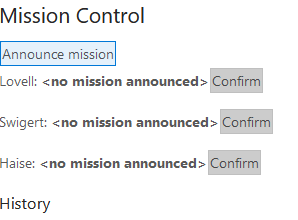
点击 ‘Announce mission’按钮 - >
点击第一个‘Comfirm’按钮 - >
DI实战
(一)嵌套的服务依赖
有时候一个服务依赖其它服务…而其它服务可能依赖另外的更多服务。 依赖注入框架会负责正确的顺序解析这些嵌套的依赖项。 在每一步,依赖的使用者只要在它的构造函数里简单声明它需要什么,框架就会完成所有剩下的事情。
src\app\shared\service\user.service.ts
import { Injectable } from '@angular/core';

@Injectable({
  providedIn: 'root'
})
export class UserService {

  getUserById(userId: number): any {
    return {name: 'Bombasto', role: 'Admin'};
  }
}
src\app\shared\service\user-context.service.ts
import { Injectable } from '@angular/core';
import { UserService } from './user.service';
import { LoggerService } from './logger.service';

@Injectable({
  providedIn: 'root'
})
export class UserContextService {
  name: string;
  role: string;
  loggedInSince: Date;

  constructor(private userService: UserService, private loggerService: LoggerService) {
    this.loggedInSince = new Date();
  }

  loadUser(userId: number) {
    let user = this.userService.getUserById(userId);
    this.name = user.name;
    this.role = user.role;

    this.loggerService.logDebug('loaded User');
  }
}
src\app\shared\service\logger.service.ts
import { Injectable } from '@angular/core';

@Injectable({
  providedIn: 'root'
})
export class LoggerService {
  logs: string[] = [];

  logInfo(msg: any)  { this.log(`INFO: ${msg}`); }
  logDebug(msg: any) { this.log(`DEBUG: ${msg}`); }
  logError(msg: any) { this.log(`ERROR: ${msg}`, true); }

  private log(msg: any, isErr = false) {
    this.logs.push(msg);
    isErr ? console.error(msg) : console.log(msg);
  }
}
src\app\shared\test\test.component.ts
import { Component, OnInit } from '@angular/core';
import { LoggerService } from '../service/logger.service';
import { UserContextService } from '../service/user-context.service';

@Component({
  selector: 'app-test',
  templateUrl: './test.component.html',
  styleUrls: ['./test.component.less']
})
export class TestComponent implements OnInit {
  private userId = 1;

  constructor(logger: LoggerService, public userContext: UserContextService) {
    userContext.loadUser(this.userId);
    logger.logInfo('AppComponent initialized');
  }

  ngOnInit() {
  }

}
src\app\shared\test\test.component.html
<div class="di-component">
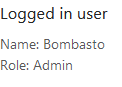
<h3>Logged in user</h3>
<div>Name: {{userContext.name}}</div>
<div>Role: {{userContext.role}}</div>
</div>
当 Angular 新建 TestComponent 时,依赖注入框架会先创建一个 LoggerService 的实例,然后创建 UserContextService 实例。 UserContextService 也需要框架刚刚创建的这个 LoggerService 实例,这样框架才能为它提供同一个实例。
UserContextService 还需要框架创建过的 UserService。 UserService 没有其它依赖,所以依赖注入框架可以直接 new 出该类的一个实例,并把它提供给 UserContextService 的构造函数。
运行结果:
(二)把服务的范围限制到某个组件的子树下
Angular 应用程序有多个依赖注入器,组织成一个与组件树平行的树状结构。每个注入器都会创建依赖的一个单例。在所有该注入器负责提供服务的地方,所提供的都是同一个实例。 可以在注入器树的任何层级提供和建立特定的服务。这意味着,如果在多个注入器中提供该服务,那么该服务也就会有多个实例。
由根注入器提供的依赖可以注入到应用中任何地方的任何组件中。 但有时候你可能希望把服务的有效性限制到应用程序的一个特定区域。
src/app/sorted-heroes.component.ts
@Component({
  selector: 'app-sorted-heroes',
  template: `<div *ngFor="let hero of heroes">{{hero.name}}</div>`,
  providers: [HeroService]
})
export class SortedHeroesComponent implements OnInit {
  constructor(private heroService: HeroService) { }
}
当 Angular 新建 SortedHeroesComponent 的时候,它会同时新建一个 HeroService 实例,该实例只在该组件及其子组件(如果有)中可见。
也可以在应用程序别处的另一个组件里提供 HeroService。这样就会导致在另一个注入器中存在该服务的另一个实例。
(三)多个服务实例(沙箱式隔离)
在组件树的同一个级别上,有时需要一个服务的多个实例。
每个组件都需要该服务的单独实例。 每个服务有自己的工作状态,与其它组件的服务和状态隔离。这叫做沙箱化,因为每个服务和组件实例都在自己的沙箱里运行。
src\app\base\hero\service\hero.service.ts
import { Injectable } from '@angular/core';
import { Hero } from '../hero';

@Injectable({
  providedIn: 'root'
})
export class HeroService {

  private heroes: Array<Hero> = [
    new Hero(1, 'RubberMan', 'Hero of many talents', '123-456-7899'),
    new Hero(2, 'Magma', 'Hero of all trades', '555-555-5555'),
    new Hero(3, 'Dr Nice', 'The name says it all', '111-222-3333')
 ];

  getHeroById(id: number): Hero {
    return this.heroes.find(hero => hero.id === id);
  }

  getAllHeroes(): Array<Hero> {
    return this.heroes;
  }
}
src\app\base\hero\service\hero-cache.service.ts
import { Injectable } from '@angular/core';
import { Hero } from '../hero';
import { HeroService } from './hero.service';

@Injectable()
export class HeroCacheService {

  hero: Hero;
  constructor(private heroService: HeroService) {}

  fetchCachedHero(id: number) {
    if (!this.hero) {
      this.hero = this.heroService.getHeroById(id);
    }
    return this.hero;
  }
}
src\app\base\hero\hero-bios\hero-bios.component.ts
@Component({
  selector: 'app-hero-bios',
  template: `
    <app-hero-bio [heroId]="1"></app-hero-bio>
    <app-hero-bio [heroId]="2"></app-hero-bio>
    <app-hero-bio [heroId]="3"></app-hero-bio>`,
  providers: [HeroService]
})
export class HeroBiosComponent {
}
src\app\base\hero\hero-bio\hero-bio.component.ts
import { Component, OnInit, Input } from '@angular/core';
import { HeroCacheService } from '../service/hero-cache.service';

@Component({
  selector: 'app-hero-bio',
  templateUrl: './hero-bio.component.html',
  styleUrls: ['./hero-bio.component.less'],
  providers: [HeroCacheService]
})
export class HeroBioComponent implements OnInit {
  @Input() heroId: number;

  constructor(private heroCache: HeroCacheService) { }

  ngOnInit() { this.heroCache.fetchCachedHero(this.heroId); }

  get hero() { return this.heroCache.hero; }

}
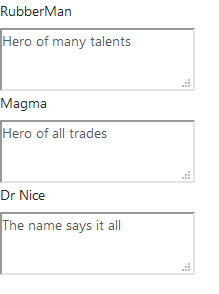
父组件 HeroBiosComponent 把一个值绑定到 heroId。ngOnInit 把该 id 传递到服务,然后服务获取和缓存英雄。hero 属性的 getter 从服务里面获取缓存的英雄。
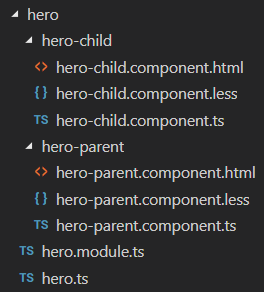
三个 HeroBioComponent 实例不能共享同一个 HeroCacheService 实例。否则它们会相互冲突,争相把自己的英雄放在缓存里面。它们应该通过在自己的元数据(metadata)providers 数组里面列出 HeroCacheService, 这样每个 HeroBioComponent 就能拥有自己独立的 HeroCacheService 实例了。
src\app\base\hero\hero-bio\hero-bio.component.html
<h4>{{hero.name}}</h4>
<ng-content></ng-content>
<textarea cols="25" [(ngModel)]="hero.description"></textarea>
运行结果:
(四)使用参数装饰器来限定依赖查找方式
默认情况下,DI 框架会在注入器树中查找一个提供商,从该组件的局部注入器开始,如果需要,则沿着注入器树向上冒泡,直到根注入器。
- 第一个配置过该提供商的注入器就会把依赖(服务实例或值)提供给这个构造函数。
- 如果在根注入器中也没有找到提供商,则 DI 框架将会抛出一个错误。
通过在类的构造函数中对服务参数使用参数装饰器,可以提供一些选项来修改默认的搜索行为。
1.用 @Optional 来让依赖是可选的,以及使用 @Host 来限定搜索方式
某些情况下,你需要限制搜索,或容忍依赖项的缺失。 你可以使用组件构造函数参数上的 @Host 和 @Optional 这两个限定装饰器来修改 Angular 的搜索行为。
- @Optional 属性装饰器告诉 Angular 当找不到依赖时就返回 null。
- @Host 属性装饰器会禁止在宿主组件以上的搜索。宿主组件通常就是请求该依赖的那个组件。不过,当该组件投影进某个父组件时,那个父组件就会变成宿主。下面的例子中介绍了第二种情况。
src\app\base\hero\hero-bios\hero-bios.component.ts (修改HeroBiosComponent)
@Component({
  selector: 'app-hero-bios-and-contacts',
  template: `
    <app-hero-bio [heroId]="1"> <app-hero-contact></app-hero-contact> </app-hero-bio>
    <app-hero-bio [heroId]="2"> <app-hero-contact></app-hero-contact> </app-hero-bio>
    <app-hero-bio [heroId]="3"> <app-hero-contact></app-hero-contact> </app-hero-bio>`,
  providers: [HeroService]
})
export class HeroBiosAndContactsComponent {
  constructor(logger: LoggerService) {
    logger.logInfo('Creating HeroBiosAndContactsComponent');
  }
}
在 < hero-bio > 标签中是一个新的 < hero-contact > 元素。Angular 就会把相应的 HeroContactComponent投影(transclude)进 HeroBioComponent 的视图里, 将它放在 HeroBioComponent 模板的 < ng-content > 标签槽里。
src\app\base\hero\hero-bio\hero-bio.component.ts
import { Component, OnInit, Input } from '@angular/core';
import { HeroCacheService } from '../service/hero-cache.service';

@Component({
  selector: 'app-hero-bio',
  templateUrl: './hero-bio.component.html',
  styleUrls: ['./hero-bio.component.less'],
  providers: [HeroCacheService]
})
export class HeroBioComponent implements OnInit {
  @Input() heroId: number;

  constructor(private heroCache: HeroCacheService) { }

  ngOnInit() { this.heroCache.fetchCachedHero(this.heroId); }

  get hero() { return this.heroCache.hero; }

}
src\app\base\hero\hero-bio\hero-bio.component.html
<h4>{{hero.name}}</h4>
<ng-content></ng-content>
<textarea cols="25" [(ngModel)]="hero.description"></textarea>
src\app\base\hero\hero-contact\hero-contact.component.html
<div>Phone #: {{phoneNumber}}
    <span *ngIf="hasLogger">!!!</span>
</div>
src\app\base\hero\hero-contact\hero-contact.component.ts
import { Component, OnInit, Host, Optional } from '@angular/core';
import { HeroCacheService } from '../service/hero-cache.service';
import { LoggerService } from '../../../shared/service/logger.service';

@Component({
  selector: 'app-hero-contact',
  templateUrl: './hero-contact.component.html',
  styleUrls: ['./hero-contact.component.less']
})
export class HeroContactComponent {

  hasLogger = false;

  constructor(
      @Host() // limit to the host component's instance of the HeroCacheService
      private heroCache: HeroCacheService,

      @Host()     // limit search for logger; hides the application-wide logger
      @Optional() // ok if the logger doesn't exist
      private loggerService: LoggerService
  ) {
    if (loggerService) {
      this.hasLogger = true;
      loggerService.logInfo('HeroContactComponent can log!');
    }
  }

  get phoneNumber() { return this.heroCache.hero.phone; }

}
1.@Host() 函数是构造函数属性 heroCache 的装饰器,确保从其父组件 HeroBioComponent 得到一个缓存服务。如果该父组件中没有该服务,Angular 就会抛出错误,即使组件树里的再上级有某个组件拥有这个服务,还是会抛出错误。
2.另一个 @Host() 函数是构造函数属性 loggerService 的装饰器。 在本应用程序中只有一个在 AppComponent 级提供的 LoggerService 实例。 该宿主 HeroBioComponent 没有自己的 LoggerService 提供商。
3.如果没有同时使用 @Optional() 装饰器的话,Angular 就会抛出错误。当该属性带有 @Optional() 标记时,Angular 就会把 loggerService 设置为 null,并继续执行组件而不会抛出错误。
运行结果:

如果注释掉 @Host() 装饰器,Angular 就会沿着注入器树往上走,直到在 AppComponent 中找到该日志服务。日志服务的逻辑加了进来,所显示的英雄信息增加了 “!!!” 标记,这表明确实找到了日志服务。
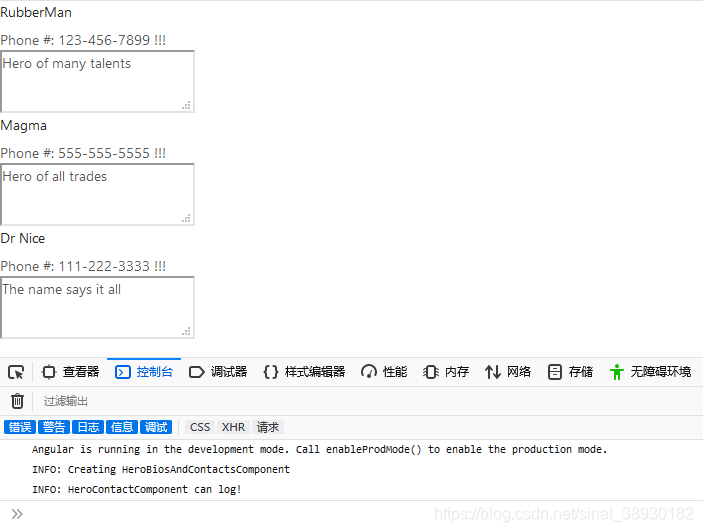
如果你恢复了 @Host() 装饰器,并且注释掉 @Optional 装饰器,应用就会抛出一个错误,因为它在宿主组件这一层找不到所需的 Logger。
 2.使用 @Inject 指定自定义提供商
自定义提供商让你可以为隐式依赖提供一个具体的实现,比如内置浏览器 API。
src\app\shared\service\storage.service.ts
import { Inject, Injectable, InjectionToken } from '@angular/core';

export const BROWSER_STORAGE = new InjectionToken<Storage>('Browser Storage', {
  providedIn: 'root',
  factory: () => localStorage
});

@Injectable({
  providedIn: 'root'
})
export class BrowserStorageService {
  constructor(@Inject(BROWSER_STORAGE) public storage: Storage) {}

  get(key: string) {
    this.storage.getItem(key);
  }

  set(key: string, value: string) {
    this.storage.setItem(key, value);
  }

  remove(key: string) {
    this.storage.removeItem(key);
  }

  clear() {
    this.storage.clear();
  }
}
factory 函数返回 window 对象上的 localStorage 属性。Inject 装饰器修饰一个构造函数参数,用于为某个依赖提供自定义提供商。现在,就可以在测试期间使用 localStorage 的 Mock API 来覆盖这个提供商了,而不必与真实的浏览器 API 进行交互。
3.使用 @Self 和 @SkipSelf 来修改提供商的搜索方式
注入器也可以通过构造函数的参数装饰器来指定范围。下面的例子就在 Component 类的 providers 中使用浏览器的 sessionStorage API 覆盖了 BROWSER_STORAGE 令牌。同一个 BrowserStorageService 在构造函数中使用 @Self 和 @SkipSelf 装饰器注入了两次,来分别指定由哪个注入器来提供依赖。
src\app\shared\storage\storage.component.ts
import { Component, OnInit, Self, SkipSelf } from '@angular/core';
import { BROWSER_STORAGE, BrowserStorageService } from './storage.service';

@Component({
  selector: 'app-storage',
  template: `
    Open the inspector to see the local/session storage keys:

    <h3>Session Storage</h3>
    <button (click)="setSession()">Set Session Storage</button>

    <h3>Local Storage</h3>
    <button (click)="setLocal()">Set Local Storage</button>
  `,
  providers: [
    BrowserStorageService,
    { provide: BROWSER_STORAGE, useFactory: () => sessionStorage }
  ]
})
export class StorageComponent implements OnInit {

  constructor(
    @Self() private sessionStorageService: BrowserStorageService,
    @SkipSelf() private localStorageService: BrowserStorageService,
  ) { }

  ngOnInit() {
  }

  setSession() {
    this.sessionStorageService.set('hero', 'Dr Nice - Session');
  }

  setLocal() {
    this.localStorageService.set('hero', 'Dr Nice - Local');
  }
}
使用 @Self 装饰器时,注入器只在该组件的注入器中查找提供商。@SkipSelf 装饰器可以让你跳过局部注入器,并在注入器树中向上查找,以发现哪个提供商满足该依赖。 sessionStorageService 实例使用浏览器的 sessionStorage 来跟 BrowserStorageService 打交道,而 localStorageService 跳过了局部注入器,使用根注入器提供的 BrowserStorageService,它使用浏览器的 localStorage API。
HttpClient
大多数前端应用都需要通过 HTTP 协议与后端服务器通讯。
准备工作:
要想使用 HttpClient,就要先导入 Angular 的 HttpClientModule。
import { NgModule }         from '@angular/core';
import { BrowserModule }    from '@angular/platform-browser';
import { HttpClientModule } from '@angular/common/http';

@NgModule({
  imports: [
    BrowserModule,
    // import HttpClientModule after BrowserModule.
    HttpClientModule,
  ],
  declarations: [
    AppComponent,
  ],
  bootstrap: [ AppComponent ]
})
export class AppModule {}
在 AppModule 中导入 HttpClientModule 之后,你可以把 HttpClient 注入到应用类中,比如:
src\app\product-manage\product.service.ts
import { Injectable } from '@angular/core';
import { HttpClient } from '@angular/common/http';

@Injectable()
export class ConfigService {
  constructor(private http: HttpClient) { }
}
请求数据和把数据发送到服务器
举例: src\app\product-manage\product.service.ts
import { Injectable } from '@angular/core';
import { HttpClient, HttpHeaders } from '@angular/common/http';
import { map } from 'rxjs/operators';
import { Product } from '../model/product';

@Injectable({
  providedIn: 'root'
})
export class ProductService {

  private infoUrl = '/api/product/getInfo';
  private delateUrl = '/api/product/delete';

  constructor(private http: HttpClient) { }

  /* 产品列表 */
  getList(data) {
    return this.http.post('/api/product/getList', data);
  }

  /* 详细 */
  getInfo(id: string) {
    const url = `${this.infoUrl}/${id}`;
    return this.http.get(url)
  }

  /* 保存 */
  saveProduct(product: Product) {
    return this.http.post('/api/product/save', product)
  }

  /* 删除 */
  delete(id: string) {
    const deleteUrl = `${this.delateUrl}/${id}`;
    return this.http.get(deleteUrl)
  }

  getNameList(data) {
    return this.http.post('/api/manual/getList', data).pipe(
      map((res: any) => {
        return res.datas.result
      }),
      map((res: Array<any>) => {
        return res.map(item => {
          return {
            productName: item.productName, manualSerie: item.manualSerie, manualName: item.manualName
          }
        })
      })
    );
  }
}
请求的防抖
this.searchTextStream
      .debounceTime(500)
      .distinctUntilChanged((x,y) => {
        return _.isEqual(x,y);
      })
      .subscribe((search:TestcodeSearch) => {
        this.loadData(search);
      });
1.debounceTime(500) - 等待,直到用户停止输入。
2.distinctUntilChanged() - 等待,直到搜索内容发生了变化。
使用已发布的库
把某个库添加到运行时的全局范围中
例如,要使用 Bootstrap 4,
1.首先就要使用 npm 包管理器来安装该库及其依赖:
npm install jquery --save
npm install popper.js --save
npm install bootstrap --save
或者
npm i bootstrap jquery popper.js --save-dev
–save和–save-dev 可以省掉你手动修改package.json文件的步骤。
- npm install module-name --save(自动把模块和版本号添加到dependencies部分)
- npm install module-name --save-dev(自动把模块和版本号添加到devdependencies部分)
2.在 angular.json 配置文件中,把关联的脚本文件添加到 “scripts” 数组中:
"scripts": [
  "node_modules/jquery/dist/jquery.slim.js",
  "node_modules/popper.js/dist/umd/popper.js",
  "node_modules/bootstrap/dist/js/bootstrap.js"
],
3.把 Bootstrap 的 CSS 文件添加到 “styles” 数组中:
"styles": [
  "node_modules/bootstrap/dist/css/bootstrap.css",
  "src/styles.css"
],
4.运行或重启 ng serve,看看你的应用是否正在使用 Bootstrap 4。
反向代理
1.创建一个 proxy.conf.json 文件,与 package.json 放在同一目录下。添加内容如下:
{
    "/api":{
        "target":"http://localhost:8080/"
    }
}
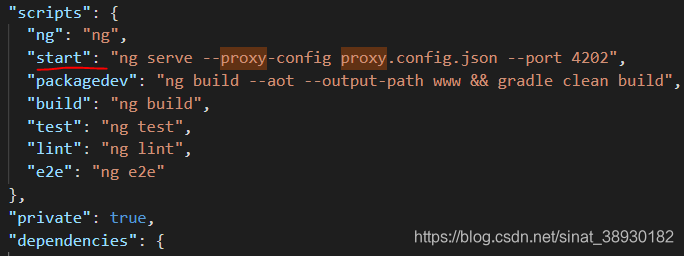
2.在 package.json 中为 start 添加 如下内容:
"start": "ng serve --proxy-config proxy.config.json --open",
或者
"start": "ng serve --proxy-config proxy.config.json --port 4202",
等等…
更多有关内容请浏览官网“开发工作流”中‘构建与运行’部分内容 https://angular.cn/guide/build#proxying-to-a-backend-server
CLI命令
Angular CLI 是一个命令行界面工具,可用于初始化、开发、构建和维护 Angular 应用。 你可以在命令行窗口中直接使用此工具,也可以通过 Angular Console 这样的交互式界面来间接使用。
安装 Angular CLI
Angular CLI 的主版本会跟随它所支持的 Angular 主版本,不过其小版本可能会独立发布。
npm install -g @angular/cli
CLI 命令语法
1.大多数命令以及少量选项,会有别名。别名会显示在每个命令的语法描述中。
2.选项名带有双中线前缀(–)。 选项别名带有单中线前缀(-)。 参数没有前缀。 比如:
ng build my-app -c production
3.通常,生成的工件(artifact)名称可以作为命令的参数进行指定,也可以使用 --name 选项。
4.参数和选项的名称可以用小驼峰或中线分隔的格式给出。 --myOptionName 等价于 --my-option-name。
详解
ng add
ng add <collection> [options]
将已发布库的npm包添加到工作区,并以库的原理图指定的任何方式配置默认应用程序项目以使用该库。
| 参数 | 说明 |
|---|---|
| < collection > | 要添加的包 |
| 选项 | 说明 |
|---|---|
| –defaults=true /false | 如果为true,则禁用具有默认选项的交互式输入提示。 |
| –help= true /false /json /JSON | 在控制台中显示此命令的帮助消息。默认值: false |
| –interactive=true /false | 如果为false,则禁用交互式输入提示。 |
| –registry=registry | 要使用的NPM注册表。 |
ng analytics
ng analytics <settingOrProject> <projectSetting> [options]
配置Angular CLI使用指标的收集。See https://v8.angular.io/cli/usage-analytics-gathering.
| 参数 | 说明 |
|---|---|
| < settingOrProject> | 直接启用或禁用用户的所有使用情况分析,或提示用户以交互方式设置状态,或设置项目的默认状态。 |
| < projectSetting> | 设置项目的默认分析启用状态。 |
| 选项 | 说明 |
|---|---|
| –help= true /false /json /JSON | 在控制台中显示此命令的帮助消息。默认值: false |
ng build
ng build <project> [options]
ng b <project> [options]
将Angular应用程序编译到给定输出路径中名为dist /的输出目录中。必须从工作空间目录中执行。
使用webpack构建工具,使用工作区配置文件(angular.json)中指定的默认配置选项或使用命名的备用配置。使用CLI创建项目时,默认情况下会创建“生产”配置,您可以通过指定–prod选项来使用该配置。
| 参数 | 说明 |
|---|---|
| < project> | 要构建的项目的名称。 可以是应用程序或库。 |
| 选项 | 说明 |
|---|---|
| –aot=true /false | 使用预先编译进行构建。默认值: false |
| –prod=true /false | “–configuration = production”的简写。 如果为true,则将构建配置设置为生产目标。 默认情况下,生产目标在工作空间配置中设置,以便所有构建都使用捆绑,有限的树抖动以及有限的死代码消除。 |
| –configuration=configuration | 命名构建目标,在angular.json的“配置”部分中指定。 每个命名目标都附带该目标的选项默认配置。 显式设置会覆盖“–prod”标志。别名: -c |
| –deleteOutputPath=true /false | 在构建之前删除输出路径。默认值: true |
| –help= true /false /json /JSON | 在控制台中显示此命令的帮助消息。默认值: false |
ng config
ng config <jsonPath> <value> [options]
在工作空间的angular.json文件中检索或设置Angular配置值。
| 参数 | 说明 |
|---|---|
| < jsonPath> | 以JSON路径格式设置或查询的配置键。 例如:“a [3] .foo.bar [2]”。 如果未提供新值,则返回此键的当前值。 |
| < value> | 如果提供,则为给定配置密钥的新值。 |
| 选项 | 说明 |
|---|---|
| –global=true /false | 如果为true,则访问调用方主目录中的全局配置。默认值: false。别名: -g |
| –help= true /false /json /JSON | 在控制台中显示此命令的帮助消息。默认值: false |
ng doc
ng doc <keyword> [options]
ng d <keyword> [options]
在浏览器中打开官方Angular文档(angular.io),并搜索给定的关键字。
| 参数 | 说明 |
|---|---|
| < keyword> | 要搜索的关键字,如angular.io中的搜索栏中所提供。 |
| 选项 | 说明 |
|---|---|
| –search=true /false | 如果为true,则搜索angular.io的所有内容。 否则,仅搜索API参考文档。默认值: false。别名: -s |
| –help= true /false /json /JSON | 在控制台中显示此命令的帮助消息。默认值: false |
ng e2e
ng e2e <project> [options]
ng e <project> [options]
构建并提供Angular应用程序,然后使用Protractor运行端到端测试。
必须从工作空间目录中执行。 如果未提供项目名称,则将对所有项目执行。
| 参数 | 说明 |
|---|---|
| < project> | 要构建的项目的名称。 可以是应用程序或库。 |
| 选项 | 说明 |
|---|---|
| –configuration=configuration | 命名构建目标,在angular.json的“配置”部分中指定。 每个命名目标都附带该目标的选项默认配置。 显式设置会覆盖“–prod”标志。别名: -c |
| –host=host | |
| –port | 用于为应用程序提供服务的端口。 |
| –prod=true /false | “–configuration = production”的简写。 如果为true,则将构建配置设置为生产目标。 默认情况下,生产目标在工作空间配置中设置,以便所有构建都使用捆绑,有限的树抖动以及有限的死代码消除。 |
| –specs | 覆盖量角器配置中的规范。 |
| –help= true /false /json /JSON | 在控制台中显示此命令的帮助消息。默认值: false |
ng generate
ng generate <schematic> [options]
ng g <schematic> [options]
基于原理图生成 和/或 修改文件。
| 参数 | 说明 |
|---|---|
| < schematic> | 原理图或集合:生成原理图。该选项可以接受下列子命令之一:appShell、application、class、component、directive、enum、guard、interface、library、module、pipe、service、serviceWorker、universal、webWorker |
| 选项 | 说明 |
|---|---|
| –defaults=true /false | 如果为true,则禁用具有默认选项的交互式输入提示。 |
| –help= true /false /json /JSON | 在控制台中显示此命令的帮助消息。默认值: false |
| –interactive=true /false | 如果为false,则禁用交互式输入提示。 |
| –force=true /false | 如果为true,则强制覆盖现有文件。默认值: false。别名: -f |
Schematic 命令 see: https://angular.cn/cli/generate
ng help
ng help [options]
列出可用命令及其简短描述。
有关各个命令的帮助,请在命令中使用–help或-h选项。比如:ng help serve
| 选项 | 说明 |
|---|---|
| –help= true /false /json /JSON | 在控制台中显示此命令的帮助消息。默认值: false |
ng lint
ng lint <project> [options]
ng l <project> [options]
在给定项目文件夹中的Angular应用程序代码上运行linting工具。
获取项目的名称,如angular.json工作空间配置文件的projects部分中指定的那样。 如果未提供项目名称,则将对所有项目执行。默认的linting工具是TSLint,默认配置在项目的tslint.json文件中指定。
| 参数 | 说明 |
|---|---|
| < project> | lint项目的名称。 |
| 选项 | 说明 |
|---|---|
| –configuration=configuration | 要使用的linting配置。别名: -c |
| –exclude | 要从linting中排除的文件。 |
| –files | 要包含在linting中的文件。 |
| –fix=true /false | 修复了linting错误(可能会覆盖linted文件)。默认值: false |
| –force=true /false | 即使有linting错误也能成功。默认值: false |
| –format=format | 输出格式(prose, json, stylish, verbose, pmd, msbuild, checkstyle, vso, fileslist)。默认值: prose |
| –silent=true /false | 显示输出文本。默认值: false |
| –tsConfig=tsConfig | TypeScript配置文件的名称。 |
| –tslintConfig=tslintConfig | TSLint配置文件的名称。 |
| –typeCheck=true /false | 控制linting的类型检查。默认值: false |
| –help= true /false /json /JSON | 在控制台中显示此命令的帮助消息。默认值: false |
ng new
ng new <name> [options]
ng n <name> [options]
创建并初始化一个新的Angular应用程序,该应用程序是新工作区的默认项目。
如果您计划在工作区中拥有多个应用程序,则可以通过将–createApplication选项设置为false来创建空工作区。然后,您可以使用ng generate application创建初始应用程序。这允许工作空间名称与初始应用程序名称不同,并确保所有应用程序驻留在/ projects子文件夹中,与配置文件的结构相匹配。
| 参数 | 说明 |
|---|---|
| < name> | 新工作区和初始项目的名称。 |
| 选项 | 说明 |
|---|---|
| –dryRun=true /false | 如果为true,则运行并报告活动而不写出结果。默认值: false。别名: -d |
| –verbose=true /false | 如果为true,则向输出日志记录添加更多详细信息。默认值: false。别名: -v |
| –skipGit=true /false | 如果为true,则不初始化git存储库。默认值: false。别名: -g |
| –skipInstall=true /false | 如果为true,则不安装依赖包。默认值: false。 |
| –skipTests=true /false | 如果为true,则不会为新项目生成“spec.ts”测试文件。默认值: false。别名: -S |
ng run
ng run <target> [options]
使用项目中定义的可选自定义构建器配置运行Architect目标。
根据提供的配置,Architect是CLI用于执行复杂任务(如编译)的工具。 CLI命令运行Architect目标,例如build,serve,test和lint。 每个命名目标都有一个默认配置,由“options”对象指定,以及“配置”对象中一组可选的命名备用配置。例如,新生成的应用程序的“服务”目标具有名为“生产”的预定义备用配置。
您可以在angular.json文件的“架构师”部分中定义新目标及其配置选项。 如果这样做,可以使用ng run命令从命令行运行它们。 使用以下格式执行命令:ng run project:target[:configuration]
| 参数 | 说明 |
|---|---|
| < target> | 要运行的Architect目标。 |
| 选项 | 说明 |
|---|---|
| –configuration=configuration | 命名构建器配置,在angular.json的“配置”部分中定义。 构建器使用命名配置来运行给定目标。别名: -c |
| –help= true /false /json /JSON | 在控制台中显示此命令的帮助消息。默认值: false |
ng serve
ng serve <project> [options]
ng s <project> [options]
构建并提供应用程序,重建文件更改。
| 参数 | 说明 |
|---|---|
| < project> | 要构建的项目的名称。 可以是应用程序或库。 |
| 选项 | 说明 |
|---|---|
| –host=host | 默认值: localhost |
| –port | 端口。默认值: 4200 |
| –liveReload=true /false | 是否使用实时重新加载来重新加载页面。默认值: true |
ng test
ng test <project> [options]
ng t <project> [options]
在项目中运行单元测试。
获取项目的名称,如angular.json工作空间配置文件的projects部分中指定的那样。 如果未提供项目名称,则将对所有项目执行。
| 参数 | 说明 |
|---|---|
| < project> | 要构建的项目的名称。 可以是应用程序或库。 |
ng update
ng update [options]
更新您的应用程序及其依赖项。
通过运行以下命令,对核心框架和CLI的当前稳定版本执行基本更新。ng update @ angular / cli @ angular / core
要更新到下一个测试版或预发行版,请使用–next = true选项。
有关更新应用程序的详细信息和指导,请参阅交互式Angular更新指南。
| 选项 | 说明 |
|---|---|
| –all=true /false | 是否更新package.json中的所有包。默认值: false |
| –allowDirty=true /false | 是否允许在存储库包含已修改或未跟踪的文件时进行更新。 |
| –force=true /false | 如果为false,如果安装的软件包与更新不兼容,则会出错。默认值: false |
| –from=from | 要从中迁移的版本。 仅适用于正在更新的单个程序包,且仅适用于仅迁移。 |
| –migrateOnly=true /false | 仅执行迁移,不更新已安装的版本。 |
| –next=true /false | 使用最大的版本,包括beta和RC。默认值: false |
| –packages | 要更新的包的名称。 |
| –to=to | 要应用迁移的版本。 仅适用于正在更新的单个程序包,且仅适用于仅迁移。 需要指定。 默认为检测到的已安装版本。 |
| –help= true /false /json /JSON | 在控制台中显示此命令的帮助消息。默认值: false |
ng version
ng version [options]
ng v [options]
输出Angular CLI版本。
| 选项 | 说明 |
|---|---|
| –help= true /false /json /JSON | 在控制台中显示此命令的帮助消息。默认值: false |
ng xi18n
ng xi18n <project> [options]
从源代码中提取i18n消息。
| 参数 | 说明 |
|---|---|
| < project> | 要构建的项目的名称。 可以是应用程序或库。 |
| 选项 | 说明 |
|---|---|
| –browserTarget=browserTarget | 目标从中提取。 |
| –configuration=configuration | 命名构建目标,在angular.json的“配置”部分中指定。 每个命名目标都附带该目标的选项默认配置。 显式设置会覆盖“–prod”标志。别名: -c |
| –i18nFormat= xmb /xlf /xlif /xliff /xlf2 /xliff2 | 生成文件的输出格式。默认值: xlf |
| –i18nLocale=i18nLocale | 指定应用程序的源语言。 |
| –outFile=outFile | 要输出的文件的名称。 |
| –outputPath=outputPath | 将放置输出的路径。 |
| –prod=true /false | “–configuration = production”的简写。 如果为true,则将构建配置设置为生产目标。 默认情况下,生产目标在工作空间配置中设置,以便所有构建都使用捆绑,有限的树抖动以及有限的死代码消除。 |
| –progress=true /false | 将进度记录到控制台。默认值: true |
| –help= true /false /json /JSON | 在控制台中显示此命令的帮助消息。默认值: false |


 341
341


 被折叠的 条评论
为什么被折叠?
被折叠的 条评论
为什么被折叠?
 到【灌水乐园】发言


