


CycleGAN更换MNIST底色
完整代码:https://github.com/SongDark/domain_transfer_mnist
概述
可能你会觉得我吃饱了撑的,杀鸡用牛刀,拿GAN来做MNIST的底色变换。其实只是为了试验方便,我懒得下载大型数据集罢了。。。你如果感兴趣,去这里下载数据集,能实现“从普通马到斑马的转换”,模型是一样的。
数据准备
从 这里 下载 mnist.npz。
- 将背景改成彩色,数字保持白色,背景rgb随机生成。
# [28, 28] -> [28, 28, 3]
def change_background(img):
    rgb = np.random.randint(low=0, high=255, size=(3,))
    res = np.tile(img[:,:,None], (1,1,3))
    for i in range(3):
        res[:,:,i][res[:,:,i]<127.5] = rgb[i]
    return res
- 将数字改成彩色,背景改为白色,数字rgb随机生成。
# [28, 28] -> [28, 28, 3]
def change_numeral(img):
    rgb = np.random.randint(low=0, high=255, size=(3,))
    res = np.tile(img[:,:,None], (1,1,3))
    for i in range(3):
        res[:,:,i][res[:,:,i]>=127.5] = rgb[i]
        res[:,:,i][res[:,:,i]<127.5] = 255
    return res
| 原始图像 | 彩底白字 | 白底彩字 |
|---|---|---|
 |  |  |
CycleGAN
论文参考:CycleGAN论文 Unpaired Image-to-Image Translation using Cycle-Consistent Adversarial Networks
代码实现参考: https://hardikbansal.github.io/CycleGANBlog/
概述
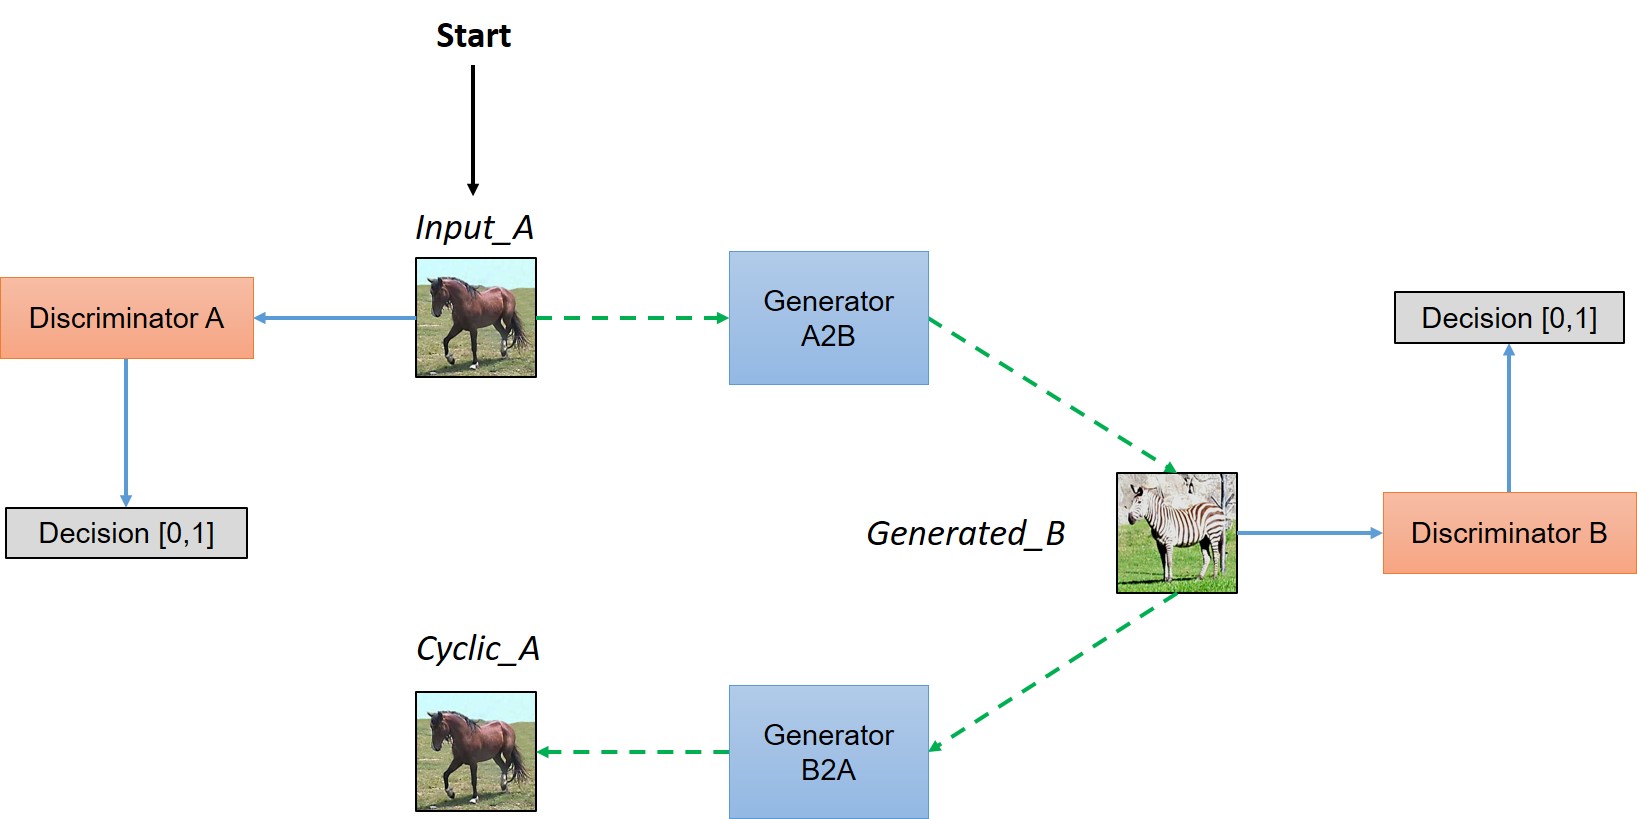
Pix2Pix之类的网络做Domain Transfer时需要两个Domain中对应的两个样本才能训练,而CycleGAN不需要这样的配对样本,也能实现转换。CycleGAN有两个步骤,首先将原Domain样本映射到目标Domain,然后再映射回来。映射到目标域的工作由Generator实现,Generator生成的样本质量由一个Discriminator判断。如果Generator的结构足够复杂,那么对抗训练总能够保证它生成的图片属于目标Domain,但不一定是我们所期望的。倘若Generator学到的是“周围彩色,中间白色”,那么它生成一些周围彩色中间一坨白色的无意义样本似乎也是合理的。我们所期望的是,生成的样本中能包含关于源图像的一些有用信息,利用这些信息可以恢复出原图像,那么Generator至少应该学着提取“周围彩色,中间白色,数字是8”这样的信息才行。
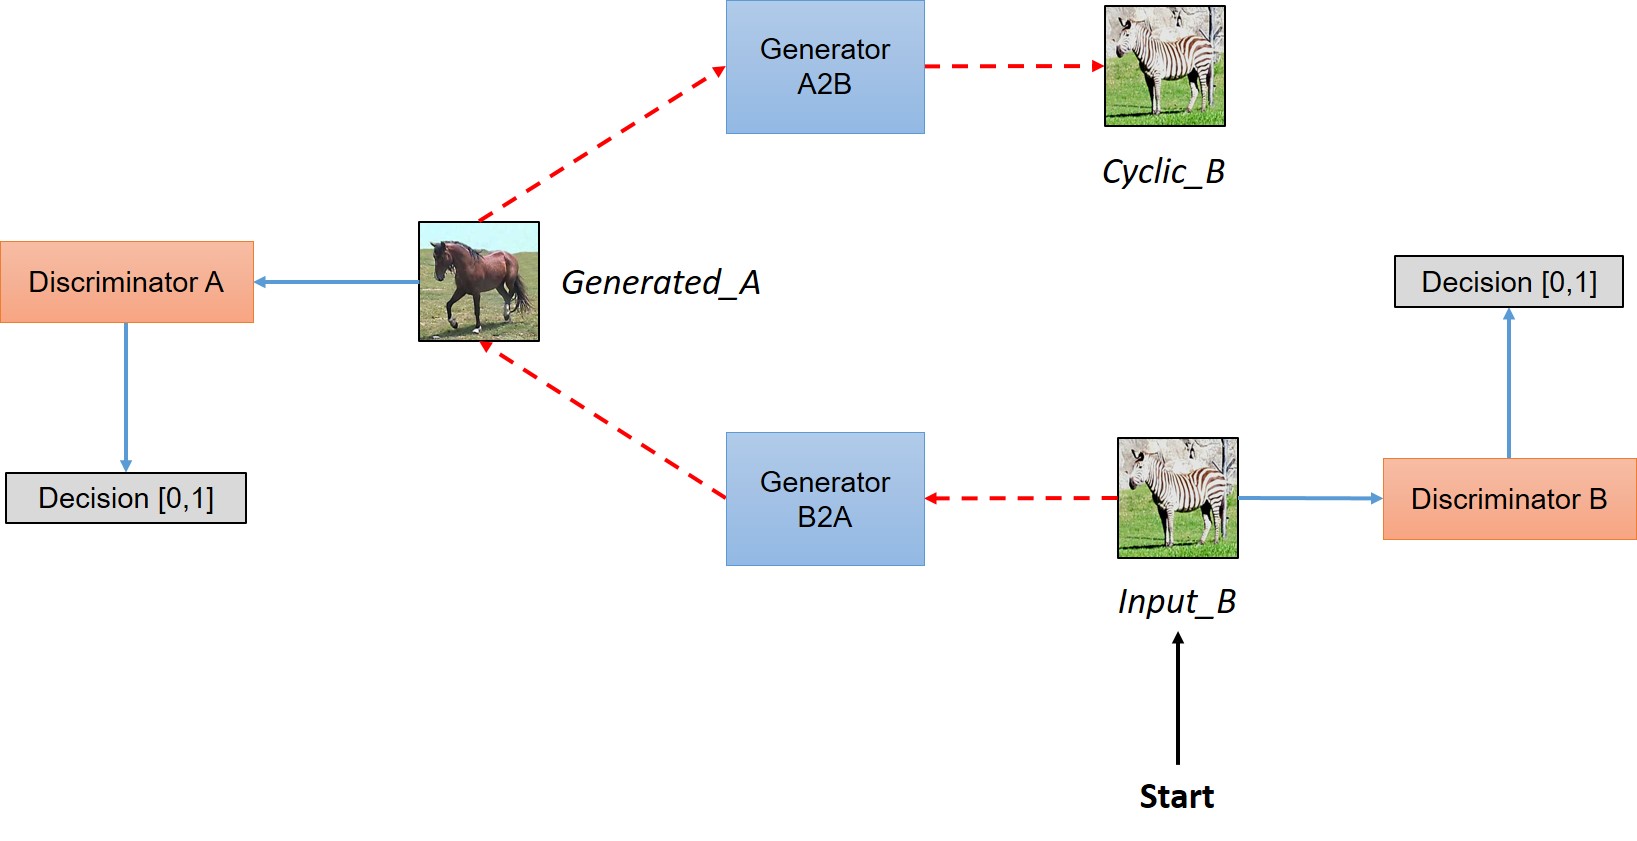
为了实现上面提到的功能,需要两对Generator和Discriminator,Generator输入图像输出图像,Discriminator输入图像输出真假判定,下面的两张图给出了样本的走向。
(图片出自 https://hardikbansal.github.io/CycleGANBlog/)
生成器设计
生成器Generator接受图像输入,输出同等尺寸(通道数除外)的图像,例如输入黑白MNIST图像
(
28
,
28
,
1
)
(28,28,1)
(28,28,1),就应该输出尺寸为
(
28
,
28
,
3
)
(28,28,3)
(28,28,3)的彩色图像。Generator要具备提取特征的能力(需要卷积层)、从特征生成图像的能力(需要解卷积层)和保持原图像基本不变只微调部分细节的能力(这里指变色,需要Res层)。
Generator中的激活函数应用relu。
Generator的最后一层激活函数需依照真实数据样本分布决定,若为
(
0
,
1
)
(0,1)
(0,1)则用sigmoid,
(
−
1
,
1
)
(-1,1)
(−1,1)则用tanh。

def resnet_block(x, dim, is_training=True, name='resnet'):
    with tf.variable_scope(name):
        out = tf.pad(x, [[0,0],[1,1],[1,1],[0,0]], "REFLECT")
        out = tf.nn.relu(bn(conv2d(out, dim, 3, 3, 1, 1, 0.02, padding="VALID", name=name+'_c1'), is_training, name=name+'_bn1'))
        out = tf.pad(out, [[0,0],[1,1],[1,1],[0,0]], "REFLECT")
        out = bn(conv2d(out, dim, 3, 3, 1, 1, 0.02, padding="VALID", name=name+'_c2'), is_training, name=name+'_bn2')
        out = tf.nn.relu(x + out)
    return out

class CNN_Generator(BasicBlock):
    def __init__(self, output_dim, name=None):
        super(CNN_Generator, self).__init__(None, name or "CNN_Generator")
        self.output_dim = output_dim

    def __call__(self, x, is_training=True, reuse=False):
        with tf.variable_scope(self.name, reuse=reuse):
            pad_x = tf.pad(x, [[0,0],[3,3],[3,3],[0,0]], "REFLECT")
            c1 = tf.nn.relu(bn(conv2d(pad_x, 32, 7, 7, 1, 1, padding="VALID", name="g_c1"), is_training, name='g_bn1'))
            c2 = tf.nn.relu(bn(conv2d(c1, 64, 3, 3, 2, 2, padding="SAME", name="g_c2"), is_training, name='g_bn2'))
            c3 = tf.nn.relu(bn(conv2d(c2, 128, 3, 3, 2, 2, padding="SAME", name='g_c3'), is_training, name='g_bn3'))

            r1 = resnet_block(c3, 128, is_training, name='r1')
            r2 = resnet_block(r1, 128, is_training, name='r2')
            r3 = resnet_block(r2, 128, is_training, name='r3')
            r4 = resnet_block(r3, 128, is_training, name='r4')
            r5 = resnet_block(r4, 128, is_training, name='r5')
            r6 = resnet_block(r5, 128, is_training, name='r6')

            d1 = tf.nn.relu(bn(deconv2d(r6, 64, 3, 3, 2, 2, padding="SAME", name='g_dc1'), is_training, name='g_bn4'))
            d2 = tf.nn.relu(bn(deconv2d(d1, 32, 3, 3, 2, 2, padding="SAME", name='g_dc2'), is_training, name='g_bn5'))
            d2_pad = tf.pad(d2, [[0,0],[3,3],[3,3],[0,0]], "REFLECT")
            c4 = bn(conv2d(d2_pad, self.output_dim, 7, 7, 1, 1, padding="VALID", name="g_c4"), is_training, name='g_bn6')

            out = tf.nn.sigmoid(c4)
        return out
判别器设计
判别器Discriminator接受图像输入,输出尺寸本应是
(
b
a
t
c
h
_
s
i
z
e
,
1
)
(batch\_size, 1)
(batch_size,1),但 这里 对应于
(
b
a
t
c
h
_
s
i
z
e
,
256
,
256
,
3
)
(batch\_size, 256, 256, 3)
(batch_size,256,256,3)输入图像的输出尺寸为
(
b
a
t
c
h
_
s
i
z
e
,
32
,
32
,
1
)
(batch\_size, 32, 32, 1)
(batch_size,32,32,1),我理解为:将原图像不断卷积提取高层特征,至
(
32
,
32
)
(32,32)
(32,32)大小的feature map中每一个位置的值都表明了原图像对应局部的真假,用多个局部的真假替代了整体单一的真假,各局部为真的总和越多,则输入图像越真实。Discriminator结构就是多层卷积。
Discriminator中的激活函数应用leaky_relu。
Discriminator的第一层和最后一层不应加batch_norm,最后一层不应加激活函数。
class CNN_Discriminator(BasicBlock):
    def __init__(self, name=None):
        super(CNN_Discriminator, self).__init__(None, name or "Discriminator_CNN")

    def __call__(self, x, y=None, is_training=True, reuse=False):
        with tf.variable_scope(self.name, reuse=reuse):
            # [bz, 14, 14, 64]
            net = lrelu(conv2d(x, 64, 4, 4, 2, 2, padding="SAME", name='d_conv1'), name='d_l1')
            # [bz, 7, 7, 128]
            net = lrelu(bn(conv2d(net, 128, 4, 4, 2, 2, padding="SAME", name='d_conv2'), is_training, name='d_bn2'), name='d_l2')
            # [bz, 4, 4, 256]
            net = lrelu(bn(conv2d(net, 256, 4, 4, 2, 2, padding="SAME", name='d_conv3'), is_training, name='d_bn3'), name='d_l3')
            # [bz, 4, 4, 512]
            net = lrelu(bn(conv2d(net, 512, 4, 4, 1, 1, padding="SAME", name='d_conv4'), is_training, name='d_bn4'), name='d_l4')
            # [bz, 4, 4, 1]
            yd = conv2d(net, 1, 4, 4, 1, 1, padding="SAME", name='d_conv5')

        return yd, net
损失函数
最后有三部分损失函数需要最优化,但实际上实现的时候,会将重构损失配上一个比重(比如10)加到G-loss上。
- 重构损失
c y c l i c _ l o s s = ∣ i n p u t A − c y c l i c A ∣ + ∣ i n p u t B − c y c l i c B ∣ cyclic\_loss=|input_A-cyclic_A|+|input_B-cyclic_B| cyclic_loss=∣inputA−cyclicA∣+∣inputB−cyclicB∣ - Domain A的G-loss和D-loss
D _ l o s s A = ( d e c A − 1 ) 2 + d e c _ g e n A 2 G _ l o s s A = ( d e c _ g e n A − 1 ) 2 + 10 × c y c l i c _ l o s s \begin{matrix} D\_loss_A=(dec_A-1)^2+dec\_gen_A^2 \\ \\ G\_loss_A= (dec\_gen_A-1)^2 + 10\times cyclic\_loss \end{matrix} D_lossA=(decA−1)2+dec_genA2G_lossA=(dec_genA−1)2+10×cyclic_loss - Domain B的G-loss和D-loss
D _ l o s s B = ( d e c B − 1 ) 2 + d e c _ g e n B 2 G _ l o s s B = ( d e c _ g e n B − 1 ) 2 + 10 × c y c l i c _ l o s s \begin{matrix} D\_loss_B=(dec_B-1)^2+dec\_gen_B^2 \\ \\ G\_loss_B= (dec\_gen_B-1)^2 + 10\times cyclic\_loss \end{matrix} D_lossB=(decB−1)2+dec_genB2G_lossB=(dec_genB−1)2+10×cyclic_loss
D_loss_real_A = tf.reduce_mean(tf.squared_difference(logit_real_A, 1))
D_loss_real_B = tf.reduce_mean(tf.squared_difference(logit_real_B, 1))
D_loss_fake_A = tf.reduce_mean(tf.square(logit_fake_A))
D_loss_fake_B = tf.reduce_mean(tf.square(logit_fake_B))
D_loss_A = D_loss_real_A + D_loss_fake_A
D_loss_B = D_loss_real_B + D_loss_fake_B

reconstruct_loss = tf.reduce_mean(tf.abs(source_A - cyc_A)) + tf.reduce_mean(tf.abs(source_B - cyc_B))
G_loss_A = tf.reduce_mean(tf.squared_difference(logit_fake_B, 1)) + 10 * reconstruct_loss
G_loss_B = tf.reduce_mean(tf.squared_difference(logit_fake_A, 1)) + 10 * reconstruct_loss
转换效果
由于配对训练,训练完之后能得到两个生成器,输入为黑底白字时,生成器A能生成对应的彩底白字图像,输入为彩底白字图像时,生成器B能生成对应的黑底白字图像。
黑底白字与白底彩字的转换这里没有实现,实际上区别仅在于更换数据集而已,如果你有兴趣可以去试试。
| 输入 | Epoch 0 | Epoch 60 | Epoch 99 |
|---|---|---|---|
 |  |  |  |
 |  |  |  |
loss变化曲线
可以看到D-loss在训练后期在0.5附近波动,说明生成器生成的样本足够好,以至于判别器在乱猜(五五开)。
| reconstruct loss | G&D loss A | G&D loss B |
|---|---|---|
 |  |  |
一点心得
- CycleGAN仿佛可以作为万能的转换器使用
- 想要微调源数据的局部而不改变大局,上Res
- 判别器的输出不一定得是单节点的,用节点矩阵可以分别衡量局部的真假
完整代码
https://github.com/SongDark/domain_transfer_mnist
参考资料
Understanding and Implementing CycleGAN in TensorFlow
CycleGAN-tensorflow
tensorflow tf.pad
获取MNIST数据的几种方法
Tensorflow中的Pad


 1594
1594

 被折叠的 条评论
为什么被折叠?
被折叠的 条评论
为什么被折叠?
 到【灌水乐园】发言


