


需要实现的功能如下

第一个“我的报名”
这里可以显示用户报名了多少个活动,点击后跳转到另外一个界面可以详细了解用户报名的详细信息:
首先这里用户授权登陆后,会把用户的登录信息存到缓存区中,获取缓存区中的用户名,作为增删改查数据的唯一标识。
下面是“我的”界面的js代码:
//获取应用实例
const app = getApp()

Page({
  data: {
    userInfo: null,
    menu: [
      { id: '../personal/personal', src: "images/1215892.png", title: "完善信息", height: 0, },
      { id: '../order/order', src: "images/1215856.png", title: "我的圈子", height: 0, },
      { id: '../activitysignup/activitysignup', src: "images/1215860.png", title: "我的报名", height: 0 },
      { id: '../US/US', src: "images/1215861.png", title: "了解我们", height: 0 },
    ],

  },
  goto: function (e) {
    wx.navigateTo({ url: e.currentTarget.id });

  },
  //用户授权后获取用户信息
  getUserInfo: function (e) {
    if (e.detail.userInfo) {
      const { userInfo } = e.detail;
      wx.setStorageSync("userinfo", userInfo)
      wx.switchTab({
        url: '../index/index'
      })
    } else {
      //用户按了拒绝按钮
      wx.showModal({
        title: '警告',
        content: '您点击了拒绝授权,将无法进入小程序,请授权之后再进入!!!',
        showCancel: false,
        confirmText: '返回授权',
        success: function (res) {
          if (res.confirm) {
            console.log('用户点击了“返回授权”')
          }
        }
      })
    }

  },
  /**
     * 生命周期函数--监听页面加载
     */
  onLoad: function (options) {
    var that = this
    //从缓存中获取用户信息
    var userInfo = wx.getStorageSync('userinfo')
    //获取用户名
    var uname = userInfo.nickName
    //对后台发送请求把计算后报名活动的总数返回到页面
    wx.request({
      url: 'http://127.0.0.1:8000/count/',
      data: { username: uname },
      method: "POST",
      //发送post请求,一定要加上以下这句代码
      header: { "Content-Type": "application/x-www-form-urlencoded" },
      success: res => {
        that.setData({
        //把后台返回的值赋值给count
          count: res.data
        })
        //打印出数据
        console.log(res.data)
      }
    })
  },
  //把用户信息存到缓存区
  onShow() {
    const userInfo = wx.getStorageSync("userinfo");
    this.setData({ userInfo })
  }
})
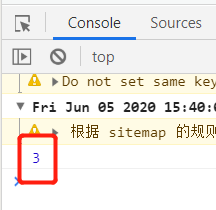
把count的值显示到页面上
<!--user.wxml-->
<view class="user_info_wrap">
  <view class="user_img_wrap" >
    <image class="user_bg" wx:if="{{userInfo.avatarUrl != null}}" src="{{userInfo.avatarUrl}}"/>
    <view class="user_bg1" wx:if="{{userInfo.avatarUrl == null}}"></view>
    <view class="user_info">
      <image wx:if="{{userInfo.avatarUrl != null}}" src="{{userInfo.avatarUrl}}" class="user_icon"></image>
      <image wx:if="{{userInfo.avatarUrl == null}}" src="../../images/a4.png" class="user_icon"></image>
      <view class="user_name">
      {{userInfo.nickName}}
      <button class="weui-btn" type="primary" wx:if="{{userInfo.avatarUrl == null}}" open-type="getUserInfo" bindgetuserinfo="getUserInfo">授权登录</button>
      </view>
    </view>
  </view>
</view>

<view class="user-content">
  <view class="user-main">
    <view class="history_wrap" >
    <!--显示活动报名的总数-->
      <navigator url="/pages/activitysignup/activitysignup">
        <view class="his_num">{{count}}</view>
        <view class="his_name">我的报名</view>
      </navigator>
      <navigator url="../order/order">
        <view class="his_num"> 0</view>
        <view class="his_name">我的发布</view>
      </navigator>
      <navigator url="../order/order">
        <view class="his_num"> 0</view>
        <view class="his_name">我的足迹</view>
      </navigator>
    </view>
  </view>
</view>


<!--菜单显示页面 -->
<view  wx:for="{{menu}}" wx:key="menu" id = '{{item.id}}' bindtap='goto'>
  <view id='menu'>
    <image src='{{item.src}}'></image>
    <text id='title'>{{item.title}}</text>
    <text id='otherInfo'>{{item.otherInfo}}</text>
    <text id='sign'> > </text>
    <text id='info' style='height:{{item.height}}rpx'></text>
  </view>
</view>
** 后台定义了查询计算活动总数的方法,这里是采用了django作为后台**
#在views.py定义一下方法
def count(request):
	#获取请求携带的用户名取出来
    name = request.POST.get("username")
    conn = pymysql.connect(host='localhost', port=3306,user='root', passwd='root', db='xcx', charset='utf8')
    cursor = conn.cursor(cursor=pymysql.cursors.DictCursor)
    #把计算后的活动总数赋值给num
    num = cursor.execute("select *  from zt where user=%s", [name])
    conn.commit()
    cursor.close()
    conn.close()
    #向小程序页面返回num的值
    return HttpResponse(num, content_type="application/json , charset=utf-8")

    #urls.py:
    urlpatterns = [
		url(r'count/', views.count),
    ]
后台返回的值:
根据用户名与各活动对应的id设计,名为zt的数据表如下:

第二个“我的报名”活动详情页面
简单的界面设计:

wxml代码:
<!--pages/activitysignup.wxml-->
<!--定义一个可滑动界面-->
<scroll-view class="content" scroll-y="true">
      <!--遍历取到的活动信息-->
      <view class="content_item" wx:for="{{activitylist}}">
      <!--点击可跳转到对应id的活动-->
        <navigator url="/pages/detail/detail?id={{item.id}}">
          <image src="{{item.url}}"></image>
          <view class="content_text">
            <view><text>{{item.text}}</text></view>
            <view><text>{{item.time}}</text></view>
          </view>
        </navigator>
      </view>

  </scroll-view>
wxcss代码:
/* pages/activitysignup.wxss */
.content{
  width: 100%;
  height: 100%;
}
.content_item{
  width: 100%;
}
.content_item image{
  width: 60px;
  height: 60px;
  float: left;
}
.content_text{
  width:230px;
  height: 60px;
  margin-top: 5px;
  margin-left: 20px;
  float: left;
  font-size: 14px;
  font-family: "楷体";
  font-weight: bold;
}
js代码:
// pages/activitysignup.js
Page({

  /**
   * 生命周期函数--监听页面加载
   */
  onLoad: function (options) {
    var that = this
    var userInfo = wx.getStorageSync('userinfo')
    var uname = userInfo.nickName
    wx.request({
      url: 'http://127.0.0.1:8000/query/',
      data: { username: uname },
      method: "POST",
      header: { "Content-Type": "application/x-www-form-urlencoded" },
      success: res => {
        that.setData({
          activitylist: res.data
        })
        console.log(res.data)
      }
    })
  },

})
django代码:
根据所有活动“activity”数据表和用户报名表“zt”的对应的id和用户名进行查询用户的所有报名信息,把查询到的信息赋值给book,然后以json格式返回小程序页面
def query(request):
    name=request.POST.get("username")
    conn = pymysql.connect(host='localhost', port=3306, user='root', passwd='root', db='xcx', charset='utf8')
    cursor = conn.cursor(cursor=pymysql.cursors.DictCursor)
    cursor.execute("select * from activity join zt on id = activity_id where user='%s'"% (name))
    # 获取返回信息
    book = cursor.fetchall()
    conn.commit()
    cursor.close()
    conn.close()
    return  HttpResponse(json.dumps(book, ensure_ascii=False),content_type="application/json , charset=utf-8")
activity数据表的设计

小程序取到数据后打印出来,查看是否拿到数据

报名活动界面
不管是获取报名活动信息,还是总数,首先要判断,哪些活动是用户已报名的,所以在报名界面的按钮上绑定了一些方法,如果用户报名了这个活动,就把活动的id和用户名的数据存入到报名表zt里面,反之删除。
报名活动界面的js代码:
Page({
  //点击报名
  addFavorites: function () {
    let listid = this.data.list
    console.log("123:" + listid)
    var key = listid.id
    var value = listid
    var userInfo = wx.getStorageSync('userinfo')
    var uname = userInfo.nickName
    try {
      wx.setStorage({
        key: key,
        data: value,
        success: res => {
          console.log(res.data)
        }
      })
      wx.request({
        url: 'http://127.0.0.1:8000/insert/',
        method: "POST",
        header: { "Content-Type": "application/x-www-form-urlencoded" },
        data: { username: uname, activityid:key},
        success: res => {
          console.log(res.data)
        },
        fail: function () {
          wx.showToast({
            title: '服务器网络错误!',
            icon: 'loading',
            duration: 1500
          })
        },
      })
      console.log("success")
    } catch (e) {
      console.log("false")
    }
    var news = wx.getStorageSync(listid.id)
    console.log("缓存区:" + news)
    this.setData({
      isAdd: true
    })
  },
  //取消报名
  cancelFavorites: function () {
    let list = this.data.list
    var id = list.id
    var userInfo = wx.getStorageSync('userinfo')
    var uname = userInfo.nickName
    wx.request({
      url: 'http://127.0.0.1:8000/delete/',
      method: "POST",
      header: { "Content-Type": "application/x-www-form-urlencoded" },
      data: { username: uname, activityid: id },
      success: res => {
        console.log("删除成功!")
      },
      fail: function () {
        wx.showToast({
          title: '服务器网络错误!',
          icon: 'loading',
          duration: 1500
        })
      },
    })
    wx.removeStorageSync(list.id)
    this.setData({
      isAdd: false
    })
  },
  /**
   * 生命周期函数--监听页面加载
   */
  onLoad: function (options) {
    let id = options.id
    var message = {}
    //检查当前新闻是否在收藏夹中
    var news = wx.getStorageSync(id)
    console.log("news:" + news)
    //已存在
    if (news != '') {
      console.log("缓存取到数据")
      this.setData({
        isAdd: true,
        list: news
      })
    }
    //不存在
    else {
      console.log("后台取到数据")
      wx.request({
        url: 'http://127.0.0.1:8000/test_api/',
        header: {
          'content-type': 'application/json'
        },
        success: res => {
          for (var i = 0; i < res.data.length; i++) {
            if (id == res.data[i].id) {
              message = res.data[i];
              break;
            }
          }
          this.setData({
            list: message,
            isAdd: false,
          })
        }
      })

    }
  },

})
django代码:
def insert(request):
    name=request.POST.get("username")
    id = request.POST.get("activityid")
    conn = pymysql.connect(host='localhost', port=3306, user='root', passwd='root', db='xcx', charset='utf8')
    cursor = conn.cursor(cursor=pymysql.cursors.DictCursor)
    cursor.execute("insert into zt (user,activity_id) value (%s,%s)", [name, id])
    conn.commit()
    cursor.close()
    conn.close()
    return HttpResponse("插入成功!", content_type="application/json , charset=utf-8")

def delete(request):
    name = request.POST.get("username")
    id = request.POST.get("activityid")
    conn = pymysql.connect(host='localhost', port=3306, user='root', passwd='root', db='xcx', charset='utf8')
    cursor = conn.cursor(cursor=pymysql.cursors.DictCursor)
    count = cursor.execute("delete from zt where user=%s and activity_id=%s", [name, id])
    conn.commit()
    cursor.close()
    conn.close()
    return HttpResponse(0, content_type="application/json , charset=utf-8")
“完善信息”界面
页面设计效果如下:
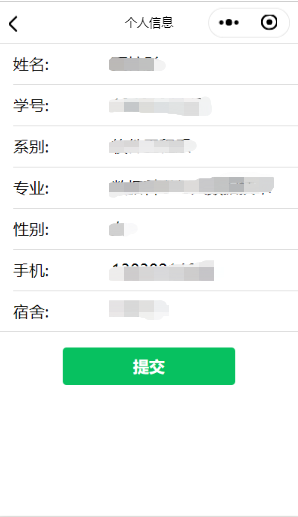
首先设计一个用户填写信息的表单,在页面加载的时候会进行查询用户是否之前填写过信息,如有填写过,就把用户信息显示出来,如果没有填写,用户填写后会添加到数据库
wxml代码:
表单绑定一个提交信息的函数formSubmit
<!--pages/personal.wxml-->
<form bindsubmit="formSubmit">
  <view class="weui-cells weui-cells_after-title">
    <view class="weui-cell weui-cell_input">
      <view class="weui-cell_hd">
        <view class="weui-label">姓名:</view>
      </view>
      <view class="weui-cell_bd">
        <input class="weui-input" value="{{list1.realname}}" name="realname" placeholder="请输入真实姓名"/>
      </view>
    </view>

    <view class="weui-cell weui-cell_input">
      <view class="weui-cell__hd">
        <view class="weui-label">学号:</view>
      </view>
      <view class="weui-cell__bd">
        <input class="weui-input" value="{{list1.student_id}}" name="sid" placeholder="请输入学号"/>
      </view>
    </view>

    <view class="weui-cell weui-cell_input">
      <view class="weui-cell_hd">
        <view class="weui-label">系别:</view>
      </view>
      <view class="weui-cell_bd">
        <input class="weui-input" value="{{list1.dept}}" name="dept" placeholder="请输入系别"/>
      </view>
    </view>

    <view class="weui-cell weui-cell_input">
      <view class="weui-cell_hd">
        <view class="weui-label">专业:</view>
      </view>
      <view class="weui-cell_bd">
        <input class="weui-input" value="{{list1.major}}" name="major" placeholder="请输入专业"/>
      </view>
    </view>

    <view class="weui-cell weui-cell_input">
      <view class="weui-cell_hd">
        <view class="weui-label">性别:</view>
      </view>
      <view class="weui-cell_bd">
        <input class="weui-input"  name="sex" value='{{list1.gender}}'/>
      </view>
    </view>

    <view class="weui-cell weui-cell_input">
      <view class="weui-cell_hd">
        <view class="weui-label">手机:</view>
      </view>
      <view class="weui-cell_bd">
        <input class="weui-input" value="{{list1.telephone}}" name="tel" placeholder="请输入手机号码"/>
      </view>
    </view>
    <view class="weui-cell weui-cell_input">
      <view class="weui-cell_hd">
        <view class="weui-label">宿舍:</view>
      </view>
      <view class="weui-cell_bd">
        <input class="weui-input" value="{{list1.dormitory}}" name="dor" placeholder="请输入宿舍号"/>
      </view>
    </view>
  </view>
  <view class="page__bd page__bd_spacing addBtn">
     <button  class="weui-btn" type="primary" formType="submit">提交</button>
  </view>
</form>
wxcss代码:
/* pages/personal.wxss */
.addBtn{
  margin-top: 40rpx;
}
js代码:
// pages/personal.js
Page({
  formSubmit:function(e){
    var userInfo = wx.getStorageSync('userinfo')
    var uname = userInfo.nickName
    console.log(uname)
    console.log(e.detail.value)
    if (e.detail.value.realname.length == 0){
      wx.showToast({
        title: '姓名不能为空!',
        icon: 'none',
        duration:1500
      })
      setTimeout(function(){
        wx.hideToast()
      },2000)
    }
    else if (e.detail.value.sid.length == 0){
      wx.showToast({
        title: '学号不能为空!',
        icon: 'none',
        duration: 1500
      })
      setTimeout(function () {
        wx.hideToast()
      }, 2000)
    } else if (e.detail.value.major.length == 0){
      wx.showToast({
        title: '专业不能为空!',
        icon: 'none',
        duration: 1500
      })
      setTimeout(function () {
        wx.hideToast()
      }, 2000)
    } else if (e.detail.value.dept.length == 0) {
      wx.showToast({
        title: '系别不能为空!',
        icon: 'none',
        duration: 1500
      })
      setTimeout(function () {
        wx.hideToast()
      }, 2000)
    } else if (e.detail.value.tel.length == 0 || e.detail.value.tel.length > 11 || e.detail.value.tel.length < 11) {
      wx.showToast({
        title: '手机号码为空或格式错误!',
        icon: 'none',
        duration: 1500
      })
      setTimeout(function () {
        wx.hideToast()
      }, 2000)
    } else if (e.detail.value.dor.length == 0) {
      wx.showToast({
        title: '宿舍号不能为空!',
        icon: 'none',
        duration: 1500
      })
      setTimeout(function () {
        wx.hideToast()
      }, 2000)
    }else{
      wx.request({
        url: 'http://127.0.0.1:8000/insertUser/',
        method:"POST",
        header: { "Content-Type": "application/x-www-form-urlencoded" },
        data: { username: uname,realname: e.detail.value.realname, sid: e.detail.value.sid, dept: e.detail.value.dept, major: e.detail.value.major, sex: e.detail.value.sex, tel: e.detail.value.tel, dor: e.detail.value.dor},
        success: res =>{
          console.log(res.data)
            wx.showToast({
              title: '提交成功!',
              duration: 1000
            })
        },
      })
    }
  },
  /**
   * 生命周期函数--监听页面加载
   */
  onLoad: function (options) {
    let id = options.id
    var that = this
    var userInfo = wx.getStorageSync('userinfo')
    var uname = userInfo.nickName
    var msg={}
    wx.request({
      url: 'http://127.0.0.1:8000/getUser/',
      data:{username:uname},
      method: "POST",
      header: { "Content-Type": "application/x-www-form-urlencoded" },
      success: res => {
        for (var i = 0; i < res.data.length; i++) {
          if (id == res.data[i].id) {
            msg = res.data[i];
            break;
          }
        }
        that.setData({
          list1: msg,
        })
      }
    })

  },
})
django代码:
#views.py
#查询用户信息
def getUser(request):
    uname = request.POST.get("username")
    # 连接数据库
    conn = pymysql.connect(host='localhost', port=3306, user="root", passwd="root", db="xcx", charset="utf8")
    # 创建一个cursor对象
    cursor = conn.cursor(cursor=pymysql.cursors.DictCursor)
    # 执行sql语句
    cursor.execute("select * from user where username='%s'" % (uname))
    # 获取返回信息
    list1 = cursor.fetchall()
    print(list1)
    # 关闭数据库连接
    cursor.close()
    conn.close()
    return HttpResponse(json.dumps(list1, ensure_ascii=False), content_type="application/json,charset=utf-8")

#插入用户信息
def insertUser(request):
    uname = request.POST.get("username")
    ulname = request.POST.get("realname")
    studentid = request.POST.get("sid")
    dep = request.POST.get("dept")
    umajor = request.POST.get("major")
    sex = request.POST.get("sex")
    telnum = request.POST.get("tel")
    dorm = request.POST.get("dor")
    # 连接数据库
    conn = pymysql.connect(host='localhost', port=3306, user="root", passwd="root", db="xcx", charset="utf8")
    # 创建一个cursor对象
    cursor = conn.cursor(cursor=pymysql.cursors.DictCursor)
    # 执行sql语句
    cursor.execute("insert into user(username,realname,student_id,dept,major,gender,telephone,dormitory) values(%s,%s,%s,%s,%s,%s,%s,%s)",[uname,ulname,studentid,dep,umajor,sex,telnum,dorm])
    conn.commit()
    # 关闭数据库连接
    cursor.close()
    conn.close()
    return HttpResponse("插入成功!")

#urls.py
urlpatterns = [
    url(r'test_api/', views.test_api, name='test_api'),
    url(r'updateUser/', views.updateUser, name='updateUser'),
    url(r'getUser/', views.getUser, name='getUser'),
    url(r'insertUser/',views.insertUser,name='insertUser'),
    url(r'query/', views.query),
    url(r'insert/', views.insert),
    url(r'delete/', views.delete),
    url(r'count/', views.count),
    url(r'^images/(?P<path>.*)$', serve, {'document_root': settings.STATICFILES_DIRS[0]}),
]
user表的设计如下:


 1519
1519


 被折叠的 条评论
为什么被折叠?
被折叠的 条评论
为什么被折叠?
 到【灌水乐园】发言


