


一.导入素材
1.在制作2D人物时,提供一种实现人物动作和更换服装的操作,就是将完整的像素人物不同的部位切割出来,单独制作,例如人物动的地方是手臂和腿,那么我们就可以单独制作这部分的帧动画。
2.由于采用的是俯视角2D,所以无论是人物动作还是室内物品一般切割时锚点绑定在脚底,pivot选择Bottom。
3.切割图片时,如果想要将设置应用于其他图片,点击右上角设置,创建一个预设,之后选择需要切割的图片,添加这个预设即可。


4.对于切割图片的部分讲解:
1)切割图片的模式(Type): Automatic:自动切割
Grid By Cell Size:按照像素大小
Grid By Cell Count:按照切割数量
Isometric:等距离切割
2)切割图片的方法(Method):Delete Existing:删除现有的,重新创建
Smart:删除空的切割下来的片段
Safe:保留所有切割下来的图片
二.创建角色
1.Sorting Gourp
在父物体上添加这个组件,将所有子物体的渲染作为一个整体,这样做的好处是,如果需要渲染多个物体,并且Sorting Layer和Order in Layer相同时,不会出现分别渲染的错误。例如下图:

2.摄像机渲染逻辑
一般的,摄像机会先渲染z轴大的(也就是靠近摄像机的),但是由于我们做的是一个2D俯视角的游戏,所以我们希望人物不受z轴影响,而是受y轴影响。y轴越小(也就是往下移动),我们就优先渲染。因此,我们需要更改设置,Edit->Project settings->Camera setting,进行如下设置。

那么在图片调整中,我们会有锚点的概念,它的作用我们举个例子,我们已经调整为y轴渲染,那么现在有一棵树挡在玩家面前,那么为什么它可以遮挡玩家呢,因为它的锚点更低(相较于玩家的锚点)
3.实现人物基本移动
首先是为人物添加Box Collider 2D和Rigidbody 2D组件,并且碰撞体设置在人物脚底,刚体中重力加速度(Gravity Scale)改为0。接下来写基本的移动脚本,如下图所示:
using System.Collections;
using System.Collections.Generic;
using UnityEngine;

public class Player : MonoBehaviour
{
    private Rigidbody2D rb;

    public float speed;

    private float inputX;
    private float inputY;

    private Vector2 movementInput;

    private Animator[] animators;
    private bool isMoving;
    private void Awake()
    {
        rb = GetComponent<Rigidbody2D>();
        animators = GetComponentsInChildren<Animator>();
    }

    private void Update()
    {
        PlayerInput();
        SwitchAnimation();
    }

    private void FixedUpdate()
    {
        Movement();
    }

    private void PlayerInput()
    {
        //if(inputY == 0)用来使得玩家不能斜方向移动
        inputX = Input.GetAxisRaw("Horizontal");
        //if(inputX == 0)
        inputY = Input.GetAxisRaw("Vertical");

        if(inputX !=0 && inputY != 0)//斜方向移动时,控制速度不要过快
        {
            inputX *= 0.6f;
            inputY *= 0.6f;
        }
        if (Input.GetKey(KeyCode.LeftShift))
        {
            inputX *= 0.85f;
            inputY *= 0.85f;
        }
        else
        {
            inputX *= 0.5f;
            inputY *= 0.5f;
        }

        movementInput = new Vector2(inputX, inputY);
        isMoving = movementInput != Vector2.zero;
    }

    private void Movement()
    {
        rb.MovePosition(rb.position + movementInput * speed * Time.deltaTime);//修正在不同设备上,不同帧数情况,使其同一运行。Time.deltaTime是帧间隔时间
    }

    private void SwitchAnimation()
    {
        foreach (var anim in animators)
        {
            anim.SetBool("isMoving",isMoving);
            if (isMoving)
            {
                anim.SetFloat("InputX",inputX);
                anim.SetFloat("InputY",inputY);
            }
        }
    }
}
4.实现人物动画
我们之前提到,将玩家各部位拆分,单独制作动画,那么我们需要一个基础的Animator Controller,再使用Animator Override Controller以其为模板,添加动画即可。

对于动画切换的逻辑,我们主体使用Blend Tree,等待和【走路,跑步】的逻辑是利用bool值进行切换。

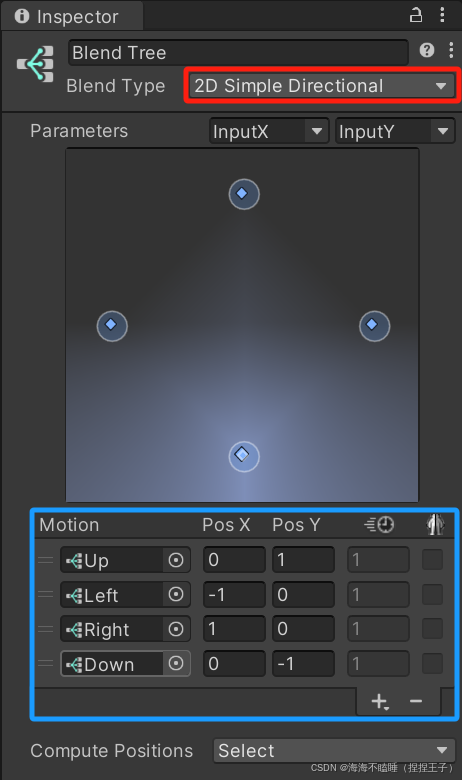
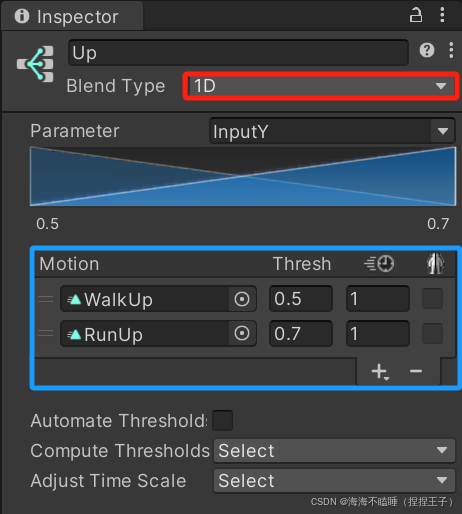
而Blend Tree内部则如图所示(以Walk Run为例):

主体Blend Tree中参数如左下图,具体的方向Blend Tree如右下图:
其中右下图篮框中Thresh指的是按键输入的值(上方Parameter中的float值)
5.实现人物在不同情况下切换动画
1.等待和行走之间切换
在Player脚本中添加切换动画(等待与行动之间切换)的方法
2.选中物品举起的动画切换
2.1新建PartType(动作)和PartName(部位)的枚举
public enum PartType
{
    None,Carry,Hoe,Break,
}

public enum PartName
{
    Body,Hair,Arm,Tool,
}
2.2创建AnimatorOverride脚本:
public class AnimatorOverride : MonoBehaviour
{
    private Animator[] animators;

    public SpriteRenderer HoldItem;

    [Header("各部分动画列表")]
    public List<animatorType> animatorsTypes;

    private Dictionary<string, Animator> animatorsNameDict = new Dictionary<string, Animator>();

    private void Awake()
    {
        animators = GetComponentsInChildren<Animator>();
        foreach (var anim in animators)
        {
            animatorsNameDict.Add(anim.name , anim);
        }
    }
    private void OnEnable()
    {
        EventHandler.ItemSelectedEvent += OnItemSelectedEvent;
    }
    private void OnDisable()
    {
        EventHandler.ItemSelectedEvent -= OnItemSelectedEvent;
    }

    private void OnItemSelectedEvent(ItemDetails itemDetails, bool isSelected)
    {
        //不同的物品类型返回不同的动作
        PartType currentType = itemDetails.itemType switch
        {
            ItemType.Seed => PartType.Carry,
            ItemType.Commodity => PartType.Carry,
            _ => PartType.None,

        } ;
        if (isSelected == false )
        {
            currentType = PartType.None;
            HoldItem.enabled = false;
        }
        else
        {
            if (currentType == PartType.Carry)
            {
                HoldItem.enabled = true;
                HoldItem.sprite = itemDetails.itemOnWorldSprite;
            }
        }

        SwitchAnimator(currentType);
    }

    private void SwitchAnimator(PartType partType)
    {
        foreach (var item in animatorsTypes)
        {
            if (item.partType == partType)
            {
                animatorsNameDict[item.partName.ToString()].runtimeAnimatorController = item.controller;
            }
        }
    }
}
2.3由于需要使用点击,所以需要创建一个新的事件,在EventHandler中创建事件,因此在Slot_UI中呼叫已经订阅事件的方法。
2.4在InsPector界面填写相关animatorsTypes的列表。
三.创建地图
1.创建基本的地图结构
首先是对于场景来讲,摄像机和人物都是保持不变的,而场景在不断变化,所以我们可以创建两个场景分别管理,如下图所示:(SampleMap Scence是一个场景TileMap的模板)


注释:左侧图片中01.Field场景中储存这各种Tilemap,从上到下依次是显示优先级(越往下越高)
2.地图绘制
在绘制地图时,我们可以使用Rule tile进行绘制。
首先,在Project中创建->2D->Tiles->Rule Tile
然后,在Inspector中我们需要先给总的tile附一张图片,作为代表,如下图所示:

之后,为我们草地的每个瓦片指定对应的规则,左下图的意思是,中心点代表该瓦片,以该瓦片为中心四周,×代表此处不能有其他瓦片,√代表可以有其他瓦片。就如同右下图,制作过程中我们需要考虑外倒角(蓝色框)和内倒角(红色框),要做好相应衔接


最后,做完草地外部后,应该填充其内部瓦片,为了让其更加自然,我们可以随机多种瓦片,如下图所示:

最后附上整个瓦片的规则供参考:

注意土地,草地,草或者花等装饰,三者应在不同的Tilemap中绘制。
3.地图绘制出现的缝隙问题
在绘制地图的过程中,我们会遇到如下图所示的缝隙问题:

这个时候,我们需要在Project中创建->2D->Sprite Atlas,这个的用处是将所有拖入的图片看作一个整体处理,将之前切割的图片拖入,并且进行相关设置即可解决这个问题,如下图所示:

注意:最下面红框就是切割图片的文件夹,Padding可以改为8,使得整个集合更加松散(防止将图片误作为一个整体进行切割)。
4.地图碰撞层
1.我们之前已经创建了有关碰撞的Tile Map,我们需要添加三个组件:

注意:RigidBody改为静态,只需要添加Composite Collider 2D组件就会自带Rigidbody组件了,还有就是在Tilemap Collider 2D中勾上Used By Composite即可。
2.在设置碰撞时,我们经常会遇到斜面碰撞体的情况,unity会自动将其碰撞范围设置为(蓝线),我们一般需要的是(绿线),所以我们需要调整范围。

这时我们需要打开图片编辑,![]() 将其改为Custom Physics Shape,然后调整范围。
将其改为Custom Physics Shape,然后调整范围。
3.最后,是隐藏掉碰撞层,有两种方式,第一种是直接隐藏掉Tilemap Renderer,另一种是给碰撞层专门设置一个Layer,然后让摄像机在拍摄时剔除掉这一层即可
四.创建相机
1.实现相机跟随
在Package Manager中下载Cinemachine,之后再Hireachy窗口创建2D虚拟相机,然后把玩家拖入跟随即可。
之后需要调整视野范围,我们可以通过调整Lens Ortho Size大小,调整相机焦距,也可以使用2D Pixel Perfect,具体操作为如下:
在MainCamera中添加2D Pixel Perfect组件,之后在虚拟相机中找到下图红框位置添加Cinemachine Pixel Perfect即可。

注意:2D Pixel Perfect组件中的设置如下:
第一行的设置要与你切割图片的设置相同,第二行为美术绘制的参考比例。

2.设置摄像机边界
1.首先时是在虚拟相机中添加Cinemachine Confiner组件,之后在每个场景中创建带有Polygon Collider 2D组件的空物体,之后为地图设置边界,并且改为Is Trigger。
注意:在调整边界的同时按下Ctrl可以自动吸附对齐,在该组件中有如下图选项:

Element 0中Size表示多边形的节点数,调整好以后把下方坐标改为整数。
2.由于场景切换需要同时切换边界,所以我们需要一个脚本去自动获取每个场景中的边界信息,代码如下图所示:
//之后讲完补充代码
五.对于景观物品的设置
1.添加动画
添加动画需要使用控制器组件,还有需要动画片段(调整合适的速度),有一个快捷方式说将多张帧动画一起拖入你要创建的物品中,会自动生成片段和控制器。
2.景观物品遮挡半透明
1.先在官网下载Dotween插件(具体安装细节B站有详细视频,这里不再介绍)
2.需要给景观物品添加脚本,用脚本调整图片透明度,该脚本需要挂载到子物体(父物体上挂载碰撞体)上,代码如下:
using UnityEngine;
using DG.Tweening;

[RequireComponent(typeof(SpriteRenderer))]//确保一定有挂载该组件
public class ItemFader : MonoBehaviour
{
    private SpriteRenderer spriteRenderer;

    private void Awake()
    {
        spriteRenderer = GetComponent<SpriteRenderer>(); ;
    }

    public void FadeIn()
    {
        Color targetColor = new Color(1,1,1);
        spriteRenderer.DOColor(targetColor,Settings.fadeDuration);//变成(目标颜色)所需要的(时间)
    }
    public void FadeOut()
    {
        Color targetColor = new Color(1, 1 ,1 , Settings .targetAlpha);
        spriteRenderer.DOColor(targetColor, Settings.fadeDuration);
    }
}
3.对于出现的一些变量,我们希望统一管理方便调试,所以创建Settings脚本
using UnityEngine;

//创建一系列常量或者静态变量,方便其他代码直接调用
public class Settings
{
    public const float fadeDuration = 0.35f;//场景物品变透明所需要的时间
    public const float targetAlpha = 0.45f;//场景物品透明度
}
4.还需要检测玩家是否到达景观物品背后的脚本,挂载到玩家身上,代码如下:
using UnityEngine;

public class TriggerItemFader : MonoBehaviour
{
    private void OnTriggerEnter2D(Collider2D other)
    {
        ItemFader[] faders = other .GetComponentsInChildren<ItemFader>();
        if (faders.Length > 0)
        {
            foreach (var item in faders)
            {
                item.FadeOut();
            }
        }
    }
   private void OnTriggerExit2D(Collider2D other)
    {
        ItemFader[] faders = other.GetComponentsInChildren<ItemFader>();
        //查找碰撞物体所有子物体的ItemFader组件脚本,ItemFader[] faders声明了一个 ItemFader 类型的数组变量 faders
        if (faders.Length > 0)//如果存在
        {
            foreach (var item in faders)//遍历faders,执行指定函数
            {
                item.FadeIn();
            }
        }
    }
}
六.背包系统
1.背包数据初始化
背包中的物品我们自定义一个类,代码如下:
using UnityEngine;

[System.Serializable]
public class ItemDetails
{
    public int itemID;
    public string name;
    public ItemType itemType;
    public Sprite itemIcon;
    public Sprite itemOnWorldSpring;
    public string itemDescription;//物品描述
    public int itemUseRadius;//摆放范围
    public bool canPickedup;//是否可以拾取
    public bool canDropped;//是否可以扔在地上
    public bool canCarried;//是否可以举着
    public int itemPrice;//物品价格
    [Range(0, 1)]
    public float sellPercentage;//出售时物品的折价率
}
物品类型我们用一个枚举来定义,代码如下:
public enum ItemType
{
    Seed ,Commodity ,Furniture,//种子,商品,家具
    HoeTool ,ChopTool ,BreakTool ,ReapTool ,WaterTool ,CollectTool ,//锄头,斧头,石镐,镰刀,水壶,菜篮子(收获)
    ReapableScenery//可以被割的杂草
}
弄一个列表来存储物品信息,代码如下:
using System.Collections.Generic;
using UnityEngine;
[CreateAssetMenu(fileName = "ItemDataList_SO", menuName = "Inventory/ItemDataList")]
//在 Unity 的 Assets 菜单中添加一个“创建”选项。

public class ItemDataList_SO : ScriptableObject
//ItemDataList_SO 继承自 ScriptableObject,使得它可作为 Unity中一个资源文件,存储数据并在游戏不同部分之间共享。
{
    public List<ItemDetails> itemDetailsList;
}
最后,在 Unity 编辑器中创建 ItemDataList_SO(通过在 Assets 文件夹中右键点击,选择 Create -> Inventory -> ItemDataList)。可以在itemDetailsList中填充不同的物品信息,用来存储和管理游戏中所有物品的详细信息。
2.使用UI Tookit和UI Builder制作物品编辑器
这里只说一个我遇到的问题,就是界面会变成这样,如下图所示:

在界面右上角会出现![]() 这个按钮,点击选择如图主题(Theme)即可,如果没有这个选项,就点击左上角File->New,然后关闭,再点开原来界面就有了(我也不知道这是我电脑的问题还是版本的问题,所以只能这么解决,虽然也是临时的)
这个按钮,点击选择如图主题(Theme)即可,如果没有这个选项,就点击左上角File->New,然后关闭,再点开原来界面就有了(我也不知道这是我电脑的问题还是版本的问题,所以只能这么解决,虽然也是临时的)
接下来是代码部分,去使得编辑器可以读取之前创建的SO文件中的数据,代码如下:
using UnityEditor;
using UnityEngine;
using UnityEngine.UIElements;
using UnityEditor.UIElements;
using System.Collections.Generic;
using System;
using System.Linq;

public class ItemEditor : EditorWindow
{
    private ItemDataList_SO dataBase;//存储基础数据文件
    private List<ItemDetails> itemList = new List<ItemDetails>();//初始化数据列表
    private VisualTreeAsset ItemRowTemplate;
    private ListView itemListView;
    private ScrollView ItemDetailsSection;
    private ItemDetails activeItem;
    private VisualElement iconPreview;
    private Sprite defaultIcon;//默认预览图片

    [SerializeField]
    private VisualTreeAsset m_VisualTreeAsset = default;

    [MenuItem("HaiHai/ItemEditor")]
    public static void ShowExample()
    {
        ItemEditor wnd = GetWindow<ItemEditor>();
        wnd.titleContent = new GUIContent("ItemEditor");
    }

    public void CreateGUI()
    {
        // Each editor window contains a root VisualElement object
        VisualElement root = rootVisualElement;

        // VisualElements objects can contain other VisualElement following a tree hierarchy.
        //VisualElement label = new Label("Hello World! From C#");
        //root.Add(label);

        // Instantiate UXML
        VisualElement labelFromUXML = m_VisualTreeAsset.Instantiate();
        root.Add(labelFromUXML);

        ItemRowTemplate = AssetDatabase.LoadAssetAtPath<VisualTreeAsset>("Assets/Editor/UI Builder/ItemRowTemplate.uxml");//加载列表中每项模板
        defaultIcon = AssetDatabase.LoadAssetAtPath<Sprite>("Assets/M Studio/Art/Items/Icons/icon_M.png");

        //变量赋值
        itemListView = root.Q<VisualElement>("ItemList").Q<ListView>("ListView");//在根节点之下查找名为“ItemList”的VisualElement,继续在其基础上查找名为"ListView"的ListView
        ItemDetailsSection = root.Q<ScrollView>("ItemDetails");
        iconPreview = ItemDetailsSection.Q<VisualElement>("Icon");

        //获取按键
        root.Q<Button>("AddButton").clicked += OnAddClicked;
        root.Q<Button>("DeleteButton").clicked += OnDeleteClicked;

        LoadDataBase();

        GenerateListView();

    }

    private void OnDeleteClicked()
    {
        itemList.Remove(activeItem);
        itemListView.Rebuild();
        ItemDetailsSection.visible = false;
    }

    private void OnAddClicked()
    {
        ItemDetails newItem = new ItemDetails();
        newItem.itemName = "New Item";
        newItem.itemID = 1000 + itemList.Count;
        itemList.Add(newItem);
        itemListView.Rebuild();
    }

    private void LoadDataBase()
    {
       var dataArray = AssetDatabase.FindAssets("ItemDataList_SO");//找到数据文件,返回字符串数组

        if (dataArray.Length > 1)
        {
            var path = AssetDatabase.GUIDToAssetPath(dataArray[0]);//将找到对应基础数据文件的路径,因为基础数据文件就一个,所以dataArray[0]
            dataBase = AssetDatabase.LoadAssetAtPath(path, typeof(ItemDataList_SO)) as ItemDataList_SO;//本身会返回Object类型,所以需要强制转化
        }

        itemList = dataBase.itemDetailsList;

        EditorUtility.SetDirty(dataBase);//如果不标记则无法保存修改后数据

    }

    private void GenerateListView()
    {
        Func<VisualElement> makeItem = () => ItemRowTemplate.CloneTree();//克隆模板

        //将数据绑定在每项上,e(VisualElement),i(索引)
        Action<VisualElement, int> bindItem = (e, i) =>
        {
            if (i < itemList.Count)
            {
                if (itemList[i].itemIcon != null)
                {
                    e.Q<VisualElement>("Icon").style.backgroundImage = itemList[i].itemIcon.texture;//等号左侧查找窗口图片设置的位置,右侧查找基础数据文件中图片
                }

                e.Q<Label>("Name").text = itemList[i] == null ? "NO ITEM" : itemList[i].itemName;
            }
        };

        itemListView.fixedItemHeight = 50;
        itemListView.itemsSource = itemList;//列表视图的数据来源为基础数据文件
        itemListView.makeItem = makeItem;
        itemListView.bindItem = bindItem;

        itemListView.onSelectionChange += OnListSelectionChange;

        ItemDetailsSection.visible = false;//右侧信息面板不可见
    }

    private void OnListSelectionChange(IEnumerable<object> selectedItem)
    {
        activeItem = (ItemDetails)selectedItem.First();
        GetItemDetails();
        ItemDetailsSection.visible = true;
    }

    private void GetItemDetails()
    {
        ItemDetailsSection.MarkDirtyRepaint();

        ItemDetailsSection.Q<IntegerField>("ItemID").value = activeItem.itemID;
        ItemDetailsSection.Q<IntegerField>("ItemID").RegisterValueChangedCallback(evt =>
        {
            activeItem.itemID = evt.newValue;
        });

        ItemDetailsSection.Q<TextField>("ItemName").value = activeItem.itemName;
        ItemDetailsSection.Q<TextField>("ItemName").RegisterValueChangedCallback(evt =>
        {
            activeItem.itemName = evt.newValue;
            itemListView.Rebuild();//更改名字时,左侧列表也实时更改
        });

        iconPreview.style.backgroundImage = activeItem.itemIcon == null ? defaultIcon.texture : activeItem.itemIcon.texture;

        ItemDetailsSection.Q<ObjectField>("ItemIcon").value = activeItem.itemIcon;
        ItemDetailsSection.Q<ObjectField>("ItemIcon").RegisterValueChangedCallback(evt =>
        {
            Sprite newIcon = evt.newValue as Sprite;
            activeItem.itemIcon = newIcon;
            iconPreview.style.backgroundImage = newIcon == null ? defaultIcon.texture : newIcon.texture;
            itemListView.Rebuild();
        });

        ItemDetailsSection.Q<ObjectField>("ItemSprite").value = activeItem.itemOnWorldSprite;
        ItemDetailsSection.Q<ObjectField>("ItemSprite").RegisterValueChangedCallback(evt =>
        {
            activeItem.itemOnWorldSprite = (Sprite)evt.newValue;
        });

        ItemDetailsSection.Q<EnumField>("ItemType").Init(activeItem.itemType);
        ItemDetailsSection.Q<EnumField>("ItemType").value = activeItem.itemType;
        ItemDetailsSection.Q<EnumField>("ItemType").RegisterValueChangedCallback(evt =>
        {
            activeItem.itemType = (ItemType)evt.newValue;
        });

        ItemDetailsSection.Q<TextField>("Description").value = activeItem.itemDescription;
        ItemDetailsSection.Q<TextField>("Description").RegisterValueChangedCallback(evt =>
        {
            activeItem.itemDescription = evt.newValue;
        });

        ItemDetailsSection.Q<IntegerField>("ItemUseRadius").value = activeItem.itemUseRadius;
        ItemDetailsSection.Q<IntegerField>("ItemUseRadius").RegisterValueChangedCallback(evt =>
        {
            activeItem.itemUseRadius = evt.newValue;
        });

        ItemDetailsSection.Q<Toggle>("CanPickedUp").value = activeItem.canPickedup;
        ItemDetailsSection.Q<Toggle>("CanPickedUp").RegisterValueChangedCallback(evt =>
        {
            activeItem.canPickedup = evt.newValue;
        });

        ItemDetailsSection.Q<Toggle>("CanDropped").value = activeItem.canDropped;
        ItemDetailsSection.Q<Toggle>("CanDropped").RegisterValueChangedCallback(evt =>
        {
            activeItem.canDropped = evt.newValue;
        });

        ItemDetailsSection.Q<Toggle>("CanCarried").value = activeItem.canCarried;
        ItemDetailsSection.Q<Toggle>("CanCarried").RegisterValueChangedCallback(evt =>
        {
            activeItem.canCarried = evt.newValue;
        });

        ItemDetailsSection.Q<IntegerField>("Price").value = activeItem.itemPrice;
        ItemDetailsSection.Q<IntegerField>("Price").RegisterValueChangedCallback(evt =>
        {
            activeItem.itemPrice = evt.newValue;
        });

        ItemDetailsSection.Q<Slider>("SellPercentage").value = activeItem.sellPercentage;
        ItemDetailsSection.Q<Slider>("SellPercentage").RegisterValueChangedCallback(evt =>
        {
            activeItem.sellPercentage = evt.newValue;
        });

    }
}
3.创建InventoryManager和Item
InventoryManager是永久化存在的管理器,用于管理背包中物品的拾取和获取等功能。
//解耦合,如果需要调用,需要使用对应命名空间
namespace MFarm.Inventory
{
    public class InventoryManager : Singleton<InventoryManager>
    {
        [Header("物品数据")]
        public ItemDataList_SO itemDataList_SO;

        [Header("背包数据")]
        public InventoryBag_SO playerBag;

        public ItemDetails GetItemDetails(int ID)//查找物品
        {
            return itemDataList_SO.itemDetailsList.Find(i => i.itemID == ID);//谓词函数
        }

        private void Start()
        {
            EventHandler.CallUpdateInventoryUI(InventoryLocation.Player, playerBag.itemList);
        }

        public void AddItem(Item item ,bool toDestory)//添加物品到背包
        {
            var index = GetItemIndexInBag(item.itemID);//从SO文件列表中获取信息(是否存在与拾取物品相同的物品)

            AddItemAtIndex(item.itemID, index, 1);

            if(toDestory)
            {
                Debug.Log(GetItemDetails(item.itemID).itemID + "Name:" + GetItemDetails(item.itemID).itemName);
                Destroy(item.gameObject);
            }

            //更新UI
            EventHandler.CallUpdateInventoryUI(InventoryLocation.Player, playerBag.itemList);
        }

        //检查背包是否存在空位
        private bool CheckBagCapacity()
        {
            for (int i = 0; i < playerBag.itemList.Count; i++)
            {
                if (playerBag.itemList[i].itemID == 0)
                {
                    return true;
                }
            }
            return false;
        }

        //获取被拾取物在背包中的位置,如果不存在返回-1
        private int GetItemIndexInBag(int ID)
        {
            for (int i = 0; i < playerBag.itemList.Count; i++)
            {
                if (playerBag.itemList[i].itemID == ID)
                {
                    return i;
                }
            }
            return -1;
        }

        //检查背包中是否存在被拾取物品
        private void AddItemAtIndex(int ID, int index, int amount)
        {
            if (index == -1 && CheckBagCapacity())//背包不存在该物品,并且存在空位
            {
                var item = new InventoryItem { itemID = ID, itemAmount = amount };
                for (int i = 0; i < playerBag.itemList.Count; i++)
                {
                    if (playerBag.itemList[i].itemID == 0)
                    {
                        playerBag.itemList[i] = item;
                        break;
                    }
                }
            }
            else//背包已经存在该物品
            {
                int currentAmount = playerBag.itemList[index].itemAmount + amount;
                var item = new InventoryItem { itemID = ID, itemAmount = currentAmount };

                playerBag.itemList[index] = item;
            }

        }

        public void SwapItem(int fromIndex, int toIndex)
        {
            InventoryItem currentItem = playerBag.itemList[fromIndex];
            InventoryItem targetItem = playerBag.itemList[toIndex];

            if (targetItem.itemID != 0)
            {
                playerBag.itemList[toIndex] = currentItem;
                playerBag.itemList[fromIndex] = targetItem;
            }
            else
            {
                playerBag.itemList[toIndex] = currentItem;
                playerBag.itemList[fromIndex] = new InventoryItem();
            }

            EventHandler.CallUpdateInventoryUI(InventoryLocation.Player, playerBag.itemList);
        }
    }
}
基础物品作为父级,显示在游戏中的图片作为子级,在父级上挂载Item脚本和碰撞体。

namespace MFarm.Inventory
{
    public class Item : MonoBehaviour
    {
        public int itemID = 0;

        private SpriteRenderer spriteRenderer;
        public  ItemDetails itemDetails;
        private BoxCollider2D coll;

        private void Awake()
        {
            spriteRenderer = GetComponentInChildren<SpriteRenderer>();
            coll = GetComponent<BoxCollider2D>();
        }

        private void Start()
        {
            if (itemID != 0)
            {
                Init(itemID);
            }
        }
        public void Init(int ID)
        {
            itemID = ID;
            itemDetails = InventoryManager.Instance.GetItemDetails(itemID);

            if (itemDetails != null)
            {
                spriteRenderer .sprite = itemDetails.itemOnWorldSprite != null ? itemDetails.itemOnWorldSprite : itemDetails.itemIcon;

                //图片锚点如果在下端,会使碰撞范围与图片发生偏移,需要矫正
                Vector2 newSize = new Vector2(spriteRenderer.sprite.bounds.size.x, spriteRenderer.sprite.bounds.size.y);
                coll.size = newSize;
                coll.offset = new Vector2(0, spriteRenderer.sprite.bounds.center.y);
            }
        }
    }
}
4.单例模式
public class Singleton<T> : MonoBehaviour where T : Singleton<T>
{
    private static T instance;//泛型类

    public static T Instance//静态公共属性,获取唯一实例
    {
        get => instance;
    }
    protected virtual void Awake()
    {
        if (instance != null)
            Destroy(gameObject);//如果已经创建实例,那么销毁当前对象
        else
            instance = (T)this;//如果没有,那么将当前对象赋值给instance
    }

    protected virtual void OnDestroy()
    {
        if(instance == this)
        {
            instance = null;
        }
    }
}
5.*谓词函数
1.定义:接受一个或多个参数,并返回一个布尔值的函数。
2.使用方法:
 Predicate<Student> predicate = student => student.Age >= 18 && student.Score >= 80;
//定义一个谓词函数Predicate(名字是predicate),Student是一个类,student是这个类的列表(集合)
3.作用:用于查找,筛选特定对象。
6.拾取物品基本逻辑
挂载在玩家身上的脚本,用于拾取物品基本逻辑,如下:
namespace MFarm.Inventory
{
    public class ItemPickUp : MonoBehaviour
    {
        private void OnTriggerEnter2D(Collider2D other)
        {
            Item item = other.GetComponent<Item>();

            if (item != null)
            {
                if (item.itemDetails.canPickedup)
                {
                    InventoryManager.Instance.AddItem(item ,true );
                }
            }
        }
    }
}
7.实现背包的数据结构
创建拾取物品的结构体(在原本的DataCollection脚本中增加):
[System.Serializable]
public struct InventoryItem
{
    public int itemID;
    public int itemAmount;
}
这需要创建一个背包的SO文件(由于拾取物品需要储存多个数据):
[CreateAssetMenu(fileName = "InventoryBag_SO", menuName = "Inventory/InventoryBag_SO")]

public class InventoryBag_SO : ScriptableObject
{
    public List<InventoryItem> itemList;
}
8.事件系统
需要一个事件响应的中转站,一方面接收呼叫事件的指令,一方面向订阅事件的脚本传入指令,使其执行相应函数方法。
using System;

public static class EventHandler
{
    public static event Action<InventoryLocation, List<InventoryItem>> UpdateInventoryUI;
    public static void CallUpdateInventoryUI(InventoryLocation location, List<InventoryItem> list)
    {
        UpdateInventoryUI?.Invoke(location, list);
    }

    public static event Action<int, Vector3> InstantiateItemInScene;
    public static void CallInstantiateItemInScene(int ID, Vector3 pos)
    {
        InstantiateItemInScene?.Invoke(ID, pos);
    }

    public static event Action<ItemDetails, bool> ItemSelectedEvent;
    public static void CallItemSelectedEvent( ItemDetails itemDetails, bool isSelected)
    {
        ItemSelectedEvent?.Invoke(itemDetails, isSelected);
    }
}
9.管理UI
首先,创建一个总体管理所有物品Ui的脚本
using UnityEngine.UI;

namespace MFarm.Inventory
{
    public class Inventory_UI : MonoBehaviour
    {
        [Header("拖拽图片")]
        public Image dragItem;

        [Header("背包UI")]
        [SerializeField] private GameObject bagUI;
        private bool bagOpened;

        [SerializeField] private Slot_UI[] playerSlots;

        public GameObject itemTooltip;

        private void OnEnable()
        {
            EventHandler.UpdateInventoryUI += OnUpdateInventoryUI;
        }

        private void OnDisable()
        {
            EventHandler.UpdateInventoryUI -= OnUpdateInventoryUI;
        }

        private void Start ()
        {
            //给予每个格子序号
            for (int i = 0; i < playerSlots.Length; i++)
            {
                playerSlots[i].slotIndex = i;
            }

            bagOpened = bagUI.activeInHierarchy;//背包UI是否在Hierarchy窗口打开
        }

        private void Update()
        {
            if (Input.GetKeyDown(KeyCode.B))
            {
                OpenBagUI();
            }
        }

        private void OnUpdateInventoryUI(InventoryLocation location, List<InventoryItem> list)
        {
            switch (location)
            {
                case InventoryLocation.Player:
                    for (int i = 0; i < playerSlots.Length; i++)
                    {
                        if (list[i].itemAmount > 0)
                        {
                            var item = InventoryManager.Instance.GetItemDetails(list[i].itemID);
                            playerSlots[i].UpdateSlot(item, list[i].itemAmount);
                        }
                        else
                        {
                            playerSlots[i].UpdateEmptySlot();
                        }
                    }
                    break;
            }
        }

        public void OpenBagUI()
        {
            bagOpened = !bagOpened;

            bagUI.SetActive(bagOpened);
        }

        public void UpdateSlotHightlight(int index)
        {
            foreach (var slot in playerSlots)
            {
                if (slot.isSelected && slot.slotIndex == index)
                {
                    slot.slotHightlight.gameObject.SetActive(true);
                }
                else
                {
                    slot.isSelected = false;
                    slot.slotHightlight.gameObject.SetActive(false);
                }
            }
        }
    }

}
其次,对于每个格子,也需要相应的脚本控制
using UnityEngine.UI;
using TMPro;
using UnityEngine.EventSystems;
using static UnityEditor.Progress;

namespace MFarm.Inventory
{
    public class Slot_UI : MonoBehaviour, IPointerClickHandler, IBeginDragHandler,IDragHandler, IEndDragHandler
    {
        [Header("组件获取")]
        [SerializeField] private Image slotImage;//在Inspector中获取
        [SerializeField] private TextMeshProUGUI amountText;
        [SerializeField] private Button button;
         public Image slotHightlight;

        [Header("格子类型")]
        public SlotType slotType;

        public bool isSelected;//是否被选中

        public int slotIndex;//格子本身序号

        //物品信息
        public ItemDetails itemDetails;
        public int itemAmount;

        private Inventory_UI inventoryUI => GetComponentInParent<Inventory_UI>();
        private void Start()
        {
            isSelected = false;
            if (itemDetails.itemID == 0)
            {
                UpdateEmptySlot();
            }
        }

        public void UpdateSlot(ItemDetails item, int amount)
        {
            itemDetails = item;
            slotImage.sprite = item.itemIcon;
            itemAmount = amount;
            amountText.text = amount.ToString();
            slotImage.enabled = true;
            button.interactable = true;
        }
        public void UpdateEmptySlot()
        {
            if (isSelected)
            {
                isSelected = false;
            }

            slotImage.enabled = false;
            amountText.text = string.Empty;
            button.interactable = false;//按钮不可点按
        }

        public void OnPointerClick(PointerEventData eventData)
        {
            if (itemAmount == 0) return;
            isSelected = !isSelected;
            inventoryUI.UpdateSlotHightlight(slotIndex);
            if (slotType == SlotType.Bag)
            {
                 EventHandler.CallItemSelectedEvent(itemDetails, isSelected);
            }
        }

        public void OnBeginDrag(PointerEventData eventData)
        {
            if (itemAmount != 0)
            {
                inventoryUI.dragItem.enabled = true;
                inventoryUI.dragItem.sprite = slotImage.sprite;
                inventoryUI.dragItem.SetNativeSize();

                isSelected = true;
                inventoryUI.UpdateSlotHightlight(slotIndex);
            }
        }

        public void OnDrag(PointerEventData eventData)
        {
            inventoryUI.dragItem.transform.position = Input.mousePosition;//跟随鼠标移动
        }

        public void OnEndDrag(PointerEventData eventData)
        {
            inventoryUI.dragItem.enabled = false;
            //Debug.Log(eventData.pointerCurrentRaycast);

            if (eventData.pointerCurrentRaycast.gameObject != null)//鼠标拖拽的位置在UI上
            {
                if (eventData.pointerCurrentRaycast.gameObject.GetComponent<Slot_UI>() == null)//鼠标拖拽位置是背包或者下边栏
                    return;

                var targetSlot = eventData.pointerCurrentRaycast.gameObject.GetComponent<Slot_UI>();
                int targetIndex = targetSlot.slotIndex;

                //在Player自身范围内交换
                if (slotType == SlotType.Bag && targetSlot.slotType == SlotType.Bag)
                {
                    InventoryManager.Instance.SwapItem(slotIndex,targetIndex);
                }

                inventoryUI.UpdateSlotHightlight(-1);//清空高亮显示
            }
        }
    }
}
10.物品提示UI的制作
首先,需要制作一个提示框,将各组件赋给脚本,使得脚本可以执行相应功能,脚本挂载在提示框的父级,如下图所示:
using TMPro;
using UnityEngine.UI;

public class ItemToolTip_UI : MonoBehaviour
{
    [SerializeField] private TextMeshProUGUI nameText;
    [SerializeField] private TextMeshProUGUI typeText;
    [SerializeField] private TextMeshProUGUI descriptionText;
    [SerializeField] private Text valueText;
    [SerializeField] private GameObject bottomPart;

    public void SetupTooltip(ItemDetails itemDetails, SlotType slotType)
    {
        nameText.text = itemDetails.itemName;
        typeText.text = GetItemType(itemDetails.itemType);
        descriptionText.text = itemDetails.itemDescription;

        if (itemDetails.itemType == ItemType.Seed || itemDetails.itemType == ItemType.Commodity || itemDetails.itemType == ItemType.Furniture)
        {
            bottomPart.SetActive(true);

            var price = itemDetails.itemPrice;
            if (slotType == SlotType.Bag)//背包需要显示折后价格,便于玩家出售商品
            {
                price = (int)(price * itemDetails.sellPercentage);
            }
            valueText.text = price.ToString();
        }
        else
        {
            bottomPart.SetActive(false);
        }
        LayoutRebuilder.ForceRebuildLayoutImmediate(GetComponent<RectTransform>());
    }

    private string GetItemType(ItemType itemType)
    {
        return itemType switch
        {
            ItemType.Seed => "种子",
            ItemType.Commodity => "商品",
            ItemType.Furniture => "家具",
            ItemType.ReapTool => "工具",
            ItemType.HoeTool => "工具",
            ItemType.CollectTool => "工具",
            ItemType.ChopTool => "工具",
            ItemType.BreakTool => "工具",
            ItemType.WaterTool => "工具",
            _ => "无"

        };
    }
}
其次,需要给每个格子赋予一个脚本,使其可以获取每个格子中物品的相应参数,如下图所示:
using Unity.VisualScripting;
using UnityEngine;
using UnityEngine.EventSystems;

namespace MFarm.Inventory
{
    [RequireComponent(typeof(Slot_UI))]//避免代码滥用
    public class ShowItemTooltip : MonoBehaviour,IPointerEnterHandler,IPointerExitHandler
    {
        private Slot_UI slot_UI;
        private Inventory_UI inventory_UI => GetComponentInParent<Inventory_UI>();
        private ItemToolTip_UI itemToolTip_UI;

        private void Start()
        {
            slot_UI = GetComponent<Slot_UI>();
            itemToolTip_UI = inventory_UI.itemTooltip.GetComponent<ItemToolTip_UI>();
        }

        public void OnPointerEnter(PointerEventData eventData)
        {
            if (slot_UI.itemAmount != 0)
            {
                inventory_UI.itemTooltip.SetActive(true);
                inventory_UI.itemTooltip.transform.position = transform.position + transform.up * 140;//用来调整提示框到格子的距离
                itemToolTip_UI.SetupTooltip(slot_UI.itemDetails, slot_UI.slotType);

            }
            else
            {
                inventory_UI.itemTooltip.SetActive(false);
            }
        }

        public void OnPointerExit(PointerEventData eventData)
        {
            inventory_UI.itemTooltip.SetActive(false);
        }

    }
}
注意:C# 8.0 引入了 switch 表达式,它允许你直接返回结果而不需要使用 case 和 break。它的语法更加简洁和直观,就如上方ItemToolTip_UI脚本中GetItemType方法一样。
11.背包UI制作
1.防止图片拉伸
如果希望自己的图片不会拉伸影响,可以在图片设置中调整绿色边线,外部区域不受拉伸影响,如图所示:


2.纵向排列UI
在星露谷UI中,下方居中位置会有一个物品栏(纵向),供玩家使用,每个物品框都是单独的,我们可以将其添加到同一个父级之下,同时给父级添加组件(Horizontal Layout Group):

如果我们希望给单独的子级进行个性化的摆放位置,而不受父级约束,可以使用组件(Layout Element):

3.恢复图片本身
只需要拖动贴图到Image组件中后,点击下方按钮,即可复原:

4.注意
1.如果不希望键盘控制UI的切换,需要将Navigation切换为None即可。

2.字体导入,希望应用在TextMeshPro中,需要右键点击该字体 -> Creat -> TextMeshPro -> Font Asset即可。如果在使用字体时,出现文字丢失(也就是出现空方格),这是因为Padding与Atlas Width(Height)不匹配,可以将Atlas Width(Height)调大即可。

3.富文本
12.所有背包系统代码梳理
1.Item.cs
根据itemID在物品数据中查找相关数据,并赋予挂载该脚本物体的物品信息。
2.ItemPickUp.cs
挂载玩家身上,用于玩家拾取物品。
3.注意
这两个脚本都需要InventoryManager中的函数方法。
4.Slot_UI.cs
用于单个格子的UI脚本,其中存在的函数方法:更新空格子,更新非空格子,格子中物品的拖拽。
5.Inventory_UI.cs
用于格子集合的UI脚本,其中存在的函数方法:给每个格子分配序号,打开背包UI,更新格子UI(需要使用Slot_UI中的更新函数)(注册事件函数),更新选中物品的高亮显示。
6.InventoryManager.cs
管理场景中背包数据的管理器,拥有函数方法:查找物品,添加物品,检查物品,交换物品。
7.ItemManager.cs
管理场景中物品数据的管理器,拥有函数方法:
8.EventHandler.cs
事件管理中继脚本
9.脚本相互关联的思维导图
此图为一个阶段性总结:

13.注意
1.Instantiate 函数
在 Unity 中,Instantiate 函数用于创建一个对象的副本。这个函数非常有用,特别是在需要动态生成游戏对象时,比如在游戏中生成敌人、道具或其他元素。
需要参数说明:
Prefab: 你要实例化的预制体(GameObject)。
Position: 新实例化的对象在场景中的位置(Vector3 类型)。
Rotation: 新实例化的对象的旋转(Quaternion 类型)。//2D可以选择不添加,如果没有需求的话
Parent: 可选参数,指定新实例化的对象的父对象(Transform 类型)。
例如:
using UnityEngine;

public class Example : MonoBehaviour
{
    public GameObject prefab; // 需要在 Inspector 中拖拽预设体到这里
    public Transform parentTransform; // 需要在 Inspector 中拖拽父对象的 Transform 到这里

    void Start()
    {
        // 实例化预设体
        GameObject instance1 = Instantiate(prefab);

        // 实例化预设体并设置位置、旋转和父对象
        GameObject instance3 = Instantiate(prefab, new Vector3(10, 0, 0), Quaternion.Euler(0, 45, 0), parentTransform);
    }
}
2.raycast target

取消勾选,意味着鼠标点击该物体,会直接穿透,不会响应鼠标事件,并且可以节约性能。
来源:1.Unity官方API
2.自己的感悟和理解(如有错误,欢迎指正)
3.B站M_Studio老师相关视频


 2086
2086

 被折叠的 条评论
为什么被折叠?
被折叠的 条评论
为什么被折叠?
 到【灌水乐园】发言


