


1. quick start
本文参照官方文档
https://www.gradio.app/guides/quickstart
和
https://www.gradio.app/docs/gradio/flagging
1.1 Installation
python >= 3.10 for gradio==5.8.0
python >=3.8 for gradio==4.44.1
pip install --upgrade gradio
1.2 Building Your First Demo
gradio最简单的应用是Interface类
import gradio as gr

def greet(name, intensity):
    return "Hello, " + name + "!" * int(intensity)

demo = gr.Interface(
    fn=greet,
    inputs=["text", "slider"],
    outputs=["text"],
)

demo.launch()
gr.Interface可以简单实现一个gradio服务。
其中会实现一个函数,这个函数要自己定义,其输入和输出可以有很多个,并且每一个可以配备一个前端的框,gr.Interface中inputs和outputs个数需要跟fn的输入和输出个数对应。
在上述代码中,inputs=[“text”,“slider”],outputs=[“text”]对应下图
其中"text","slider"分别对应gr.Textbox()和gr.Slider()
text默认为文本框,slider为滑动选中数值,输入的[“text”]对应一个文本框。
总是就是对应一个component,或者这个conponent的shortcut。关于component和shortcut可以查询文档

可以通过gradio x.py实现调试功能,但是必须要有demo服务
demo = gr.Interface()
demo.launch()
后续会详细介绍
完成后
python xx.py
#或者
gradio xx.py
即可。
1.3 Sharing Your Demo
如果想公网分享:
demo.launch(share=True)
1.4 gradio进阶功能
a. gr.Blocks
可以自定义更多的数据流和前端页面样式。
比如:某些框的输出,可以是某个框的输入。
后续会详细介绍
b.gr.ChatInterface
专门给了一个对话服务的高级API,有点类似gr.Interface。
可见文档
2. Building Interfaces
2.1 The interface class
再查看之前的代码
import gradio as gr

def greet(name, intensity):
    return "Hello, " + name + "!" * int(intensity)

demo = gr.Interface(
    fn=greet,
    inputs=["text", "slider"],
    outputs=["text"],
)

demo.launch()
2.1.1 Gradio Components
gr.Interface中的inputs和outputs可以是刚才提到gradio自带的超过30个conponents,还可以是gradio社区中分享的conponets
2.1.2 conponent属性
可以通过gr.Textbox()/gr.Slider()。。。 括号中进行自定义属性,例子:
import gradio as gr

def greet(name, intensity):
    return "Hello, " + name + "!" * intensity

demo = gr.Interface(
    fn=greet,
    inputs=["text", gr.Slider(value=2, minimum=1, maximum=10, step=1)],
    outputs=[gr.Textbox(label="greeting", lines=3)],
)

demo.launch()
实现了一个默认值为2,最小值为1,最大为10,步长为1的slider,
和标签为greeting,占据3行的textbox。

常用的设置:value=xx(默认初始值),label=‘xx’(conponent左上角的框名)
gr.Interface可以实现多输入多输出,并会将输入放在左边一列,逐行展示,输出放在右边一列,逐行展示。
2.1.3 Multiple Input and Output Components
对应函数fn中输入输出个数,输入输出conponent个数也可以有不止一个。
import gradio as gr

def greet(name, is_morning, temperature):
    salutation = "Good morning" if is_morning else "Good evening"
    greeting = f"{salutation} {name}. It is {temperature} degrees today"
    celsius = (temperature - 32) * 5 / 9
    return greeting, round(celsius, 2)

demo = gr.Interface(
    fn=greet,
    inputs=["text", "checkbox", gr.Slider(0, 100)],
    outputs=["text", "number"],
)
demo.launch()
2.1.4 关于Image:
输入可以是NumPy array with the shape (height, width, 3),最后是rgb维度。
也可以是PIL.Image类
也可以是filepath,gr.Image(type=‘filepath’)选择。
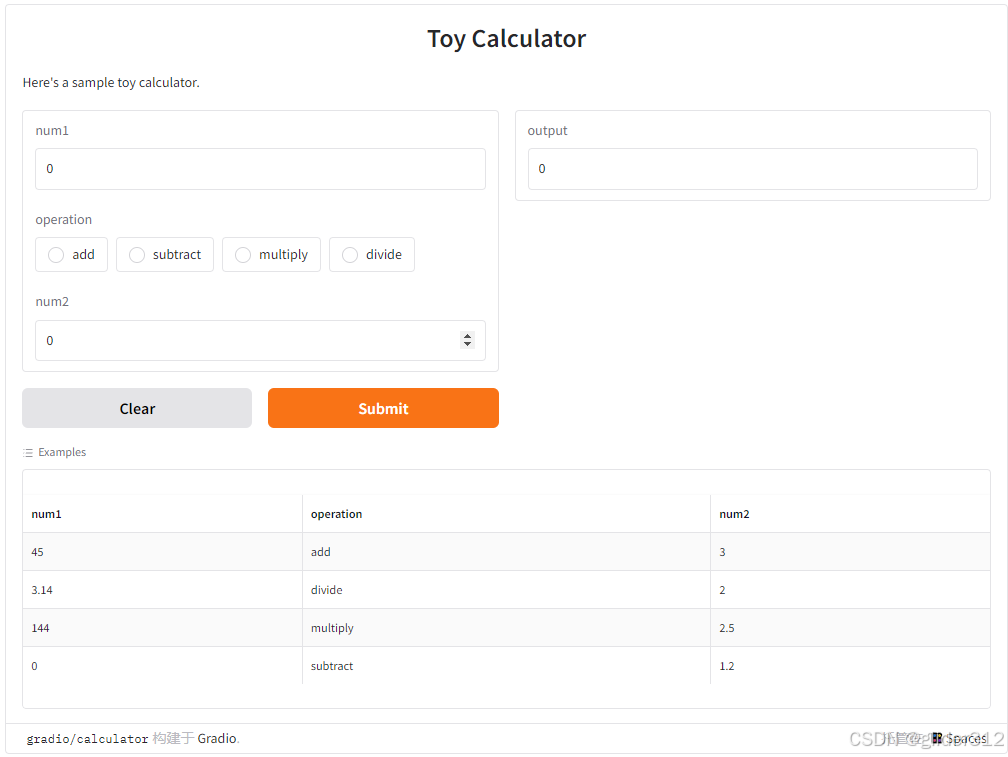
2.1.5 gr.Radio创建单选框,gr.Interface(examples=[[,]…]) 提供示例
import gradio as gr

def calculator(num1, operation, num2):
    if operation == "add":
        return num1 + num2
    elif operation == "subtract":
        return num1 - num2
    elif operation == "multiply":
        return num1 * num2
    elif operation == "divide":
        if num2 == 0:
            raise gr.Error("Cannot divide by zero!")
        return num1 / num2

demo = gr.Interface(
    calculator,
    [
        "number",
        gr.Radio(["add", "subtract", "multiply", "divide"]),
        "number"
    ],
    "number",
    examples=[
        [45, "add", 3],
        [3.14, "divide", 2],
        [144, "multiply", 2.5],
        [0, "subtract", 1.2],
    ],
    title="Toy Calculator",
    description="Here's a sample toy calculator.",
)

demo.launch()
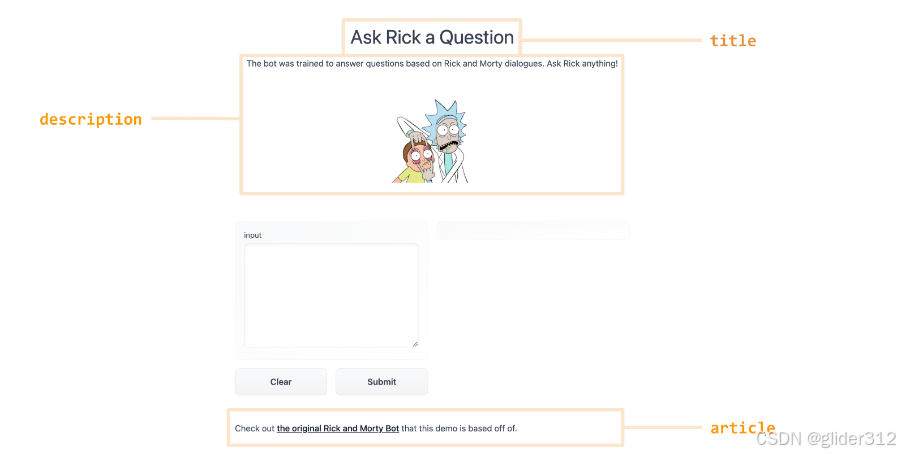
2.1.6 文本描述
title:在最上方,作为标题,接受文本输入
description:接受文本、markdown 或者 HTML ,在标题下面
article:接受文本、markdown 或者 HTML ,在interface下面
gr.Interface(title=xx,description=xx,article=xx)
对每一个conponent,可以通过
gr.XX(label=xx;info=xx)进行描述
当然也可以通过gr.Markdown()直接进行。
2.1.7 折叠块
可以通过gr.Interface(additional_inputs=[])来放置需要手动点击下拉按钮才能看到的输入
import gradio as gr

def generate_fake_image(prompt, seed, initial_image=None):
    return f"Used seed: {seed}", "https://dummyimage.com/300/09f.png"

demo = gr.Interface(
    generate_fake_image,
    inputs=["textbox"],
    outputs=["textbox", "image"],
    additional_inputs=[
        gr.Slider(0, 1000),
        "image"
    ]
)

demo.launch()
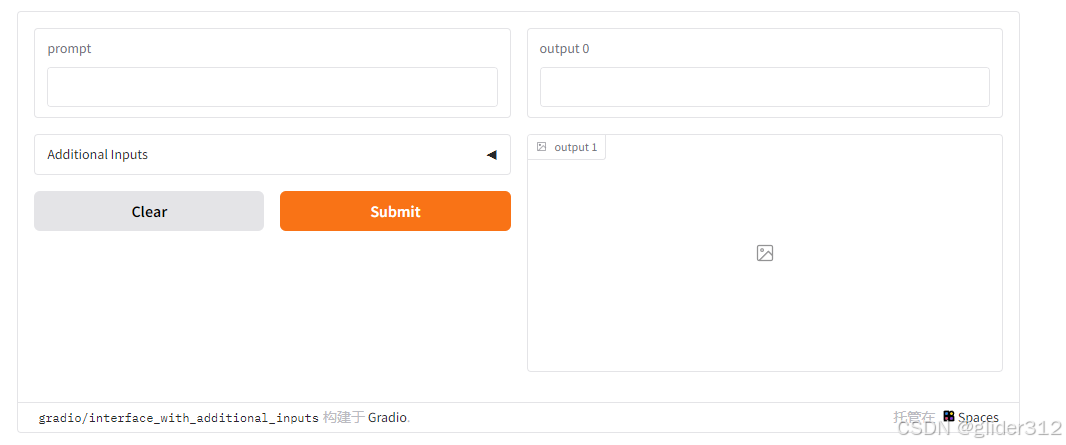
可以通过设置
gr.Interface( additional_inputs_accordion = )自定义additional inputs。
如果接收的是一个str,那么会给additional inputs增加label,也可以接收gr.Accordion()进行自定义,这样还可以通过open参数自定义是否默认展开
import gradio as gr

def generate_fake_image(prompt, seed, initial_image=None):
   return f"Used seed: {seed}", "https://dummyimage.com/300/09f.png"

demo = gr.Interface(
   generate_fake_image,
   inputs=["textbox"],
   outputs=["textbox", "image"],
   additional_inputs_accordion =gr.Accordion(open=False,label='look',render=False),
   additional_inputs=[
       gr.Slider(0, 1000),
       "image"
   ]
)

demo.launch()
2.2 More on examples
2.2.1 Providing Examples
在2.1中提到,gr.Interface(examples=[[],[]])可以提供示例,如果只有一个变量就只需要单列表。
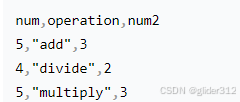
2.2.2 Loading Examples from a Directory
也可以从文件夹获取(多输入时,examples=‘/demo/calculator/examples’,在这个文件夹中要有log.csv)
2.2.3 Providing Partial Examples
如果只想提供部分输入的example,只需要在不需要提供example的位置填写None。
2.2.4 Caching examples
有时想要连output一起存储起来,可以用cache_examples参数
注意要提供examples
iface = gr.Interface(
    fn=greet,
    inputs=["text", "image"],
    outputs=["image"],
    examples=[["Bob", './bug.png'], ["Alice", './dragon.png']],
    cache_examples=True
)
cache_examples设置为True,会在.py运行时就直接逐个运行所有examples,然后打开graio后,直接点击每一个example即可。
cache_examples设置为"lazy",会直接生成网页,在网页上点击example生成后建立cache,下一次点击即可直接得到对应输入输出。
会在当前文件夹下生成一个gradio_cached_examples/dir文件夹,存储cache,但一旦建立后,不能再改变,如果函数或者对应关系改变,需要手动删除重新生成。
2.2.5 gr.File
也可以用gradio进行文件的上传\下载
例如上传:
import gradio as gr
import os

def save_file(file):


   # 保存文件到指定目录
   with open('materia.rar', "wb") as f:
       #print(file)
       f.write(file)
   return f"文件已保存!"

demo = gr.Interface(
   fn=save_file,
   inputs=[gr.File(label="上传文件", type='binary', file_types=["*"],visible=True)],
   outputs="text",
   title="保存文件",
   description="上传文件并保存到指定目录",

)

if __name__ == "__main__":
   demo.launch(share=True)
2.3 flagging
用户在前端发现生成结果不好,或者感兴趣,可以点击flag按钮
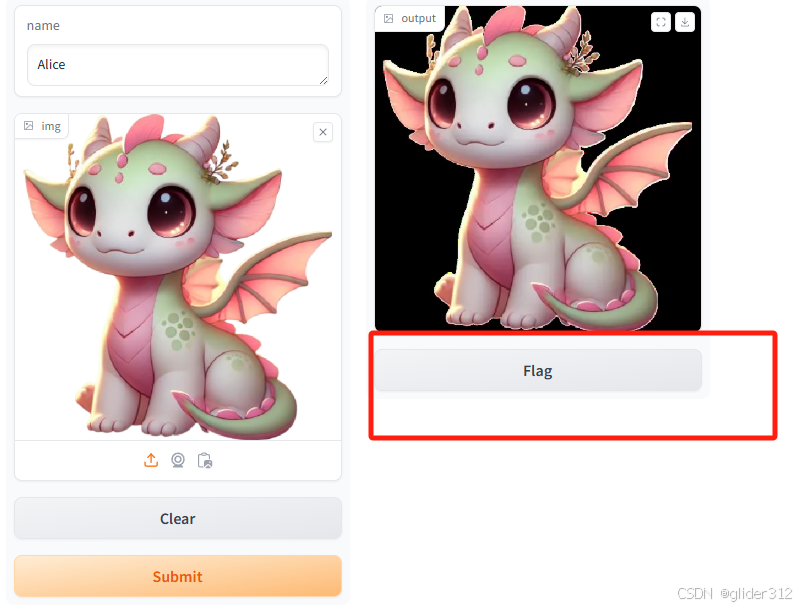
会默认存储在./flagged文件夹,里面会将这个示例和输出给存储下来。
这个目录也可以
gr.Interface(flagging_dir=)设置
还可以让用户进一步选择为什么flag:
iface = gr.Interface(
    fn=greet,
    inputs=["text", "image"],
    outputs=["image"],
    examples=[["Bob", './bug.png'], ["Alice", './dragon.png']],
    cache_examples='lazy',flagging_options=['correct', 'incorrect']
)

2.4 Interface state
目前gr.Interface只能实现多个输入到多个输出,一次性的,第二次执行功能与第一次毫不相干stateless。
现在引入一个state概念,可以让不同demo运行时的状态交互。
分为global state(所有打开gradio的用户交互) 和session state(当前session内交互)
2.4.1 global state
import gradio as gr

scores = []

def track_score(score):
    scores.append(score)
    top_scores = sorted(scores, reverse=True)[:3]
    return top_scores

demo = gr.Interface(
    track_score,
    gr.Number(label="Score"),
    gr.JSON(label="Top Scores")
)
demo.launch()
可以看到scores相当于一个全局变量,这样所有用户只要打开gradio,其中一个运行了demo,就会存储到scores里,另一个用户运行时会受到影响。
2.4.2 session state
在session中记录,就需要在函数中更新变量值。
gr.State(value=)提供了储存变量值的功能,并且可以初始化。
在gradio界面中不会显示,只是在后端存储。
由于是在函数内更新,作用于在函数内,用户之间不会发生交互。
import gradio as gr

def store_message(message: str, history: list[str]):
    output = {
        "Current messages": message,
        "Previous messages": history[::-1]
    }
    history.append(message)
    return output, history

demo = gr.Interface(fn=store_message,
                    inputs=["textbox", gr.State(value=[])],
                    outputs=["json", gr.State()])

demo.launch()
注意:gr.Interface()只能有一个gr.State(),当然里面可以有多个值。这样的话只要出现gr.State()就都指向这个变量。
gr.Blocks()由于可以有多个函数,所以可以有多个state;gr.Chatbox()对话功能会自带state管理
2.5 实时交互
2.5.1 Live Interfaces
gr.Interface(
live=True
)
可以实现实时交互,没有submit了。
2.5.2 Streaming Components
有些输入是streaming的,比如gr.Image(source=[“webcam”],streaming=True)表示每一帧输入都会通过fn函数,其实如果不加streaming,那都不是image了,会报错“ValueError: Input must be >= 1-d.”。
比如gr.Audio(source=‘microphone’, streaming=True),也一样,会每一帧输入fn函数。
但gr.Audio(source=‘microphone’),就会在停止录制后,将整个音频文件输入fn函数。
2.6 The 4 Kinds of Gradio Interfaces
2.6.1 标准,输入定义自己的组件,输出定义自己的组件
import numpy as np
import gradio as gr

def sepia(input_img):
    sepia_filter = np.array([
        [0.393, 0.769, 0.189],
        [0.349, 0.686, 0.168],
        [0.272, 0.534, 0.131]
    ])
    sepia_img = input_img.dot(sepia_filter.T)
    sepia_img /= sepia_img.max()
    return sepia_img

demo = gr.Interface(sepia, gr.Image(), "image")
demo.launch()
2.6.2 只有输出
import time

import gradio as gr

def fake_gan():
    time.sleep(1)
    images = [
            "https://images.unsplash.com/photo-1507003211169-0a1dd7228f2d?ixlib=rb-1.2.1&ixid=MnwxMjA3fDB8MHxwaG90by1wYWdlfHx8fGVufDB8fHx8&auto=format&fit=crop&w=387&q=80",
            "https://images.unsplash.com/photo-1554151228-14d9def656e4?ixlib=rb-1.2.1&ixid=MnwxMjA3fDB8MHxwaG90by1wYWdlfHx8fGVufDB8fHx8&auto=format&fit=crop&w=386&q=80",
            "https://images.unsplash.com/photo-1542909168-82c3e7fdca5c?ixlib=rb-1.2.1&ixid=MnwxMjA3fDB8MHxzZWFyY2h8MXx8aHVtYW4lMjBmYWNlfGVufDB8fDB8fA%3D%3D&w=1000&q=80",
    ]
    return images

demo = gr.Interface(
    fn=fake_gan,
    inputs=None,
    outputs=gr.Gallery(label="Generated Images", columns=[2]),
    title="FD-GAN",
    description="This is a fake demo of a GAN. In reality, the images are randomly chosen from Unsplash.",
)

demo.launch()
2.6.3 只有输入,用于提交表单
import random
import string
import gradio as gr

def save_image_random_name(image):
    random_string = ''.join(random.choices(string.ascii_letters, k=20)) + '.png'
    image.save(random_string)
    print(f"Saved image to {random_string}!")

demo = gr.Interface(
    fn=save_image_random_name,
    inputs=gr.Image(type="pil"),
    outputs=None,
)
demo.launch()
2.6.4 输入输出为同一组件,体现在函数就是,递归
import gradio as gr
from transformers import pipeline

generator = pipeline('text-generation', model = 'gpt2')

def generate_text(text_prompt):
  response = generator(text_prompt, max_length = 30, num_return_sequences=5)
  return response[0]['generated_text']

textbox = gr.Textbox()

demo = gr.Interface(generate_text, textbox, textbox)

demo.launch()
3. Building with Blocks
3.1 Blocks and Event Listeners
3.1.1 Blocks structure
import gradio as gr


def greet(name):
    return "Hello " + name + "!"


with gr.Blocks() as demo:
    name = gr.Textbox(label="Name")
    output = gr.Textbox(label="Output Box")
    greet_btn = gr.Button("Greet")
    greet_btn.click(fn=greet, inputs=name, outputs=output, api_name="greet")

demo.launch()
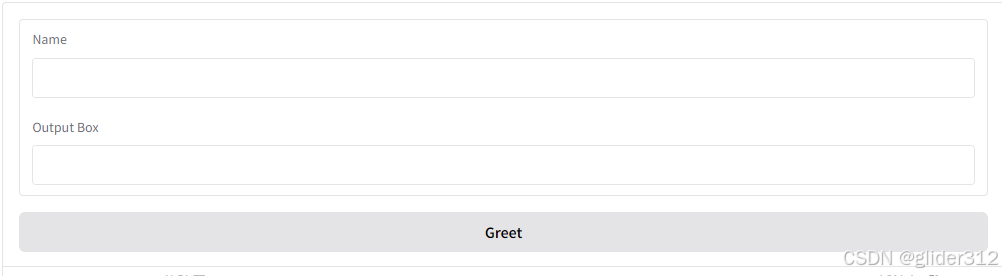
分为几个部分:
with gr.Blocks() as demo:
中,使用到的是gr.Interface中完全一样的gradio组件。
他们会自动的排布。
gr.Button()定义了一个按钮,click()是一个时间监听器,它手动定义了一个数据流,通过fn函数,将inputs=和outputs=的部分联系在一起,形成一个手动版本的(gr.Interface)
click(api_name=‘greet’)定义了button的名字。
可以通过给fn函数加上@button.click()实现同样功能。
import gradio as gr

with gr.Blocks() as demo:
    name = gr.Textbox(label="Name")
    output = gr.Textbox(label="Output Box")
    greet_btn = gr.Button("Greet")

    @greet_btn.click(inputs=name, outputs=output)
    def greet(name):
        return "Hello " + name + "!"

demo.launch()
3.1.2 Event Listeners and Interactivity
gradio默认了input组件有属性interactive=True,output属性interactive=False,可以手动将后者设置为True,于是output的文本框中也可以编辑(虽然没啥用
3.1.3 Types of Event Listeners
Event Listeners说白了就是通过监控某一种行为(例如button.click()代表点击这个按钮的行为),当这个行为出现的时候,触发事件(也就是fn),当然还需要将fn的输入和输出分别跟gradio的某个元素通过制定输入输出联系起来。
button.click()并不特殊,只是因为gr.Button()这个组件,如下图,有一个click()的event listener
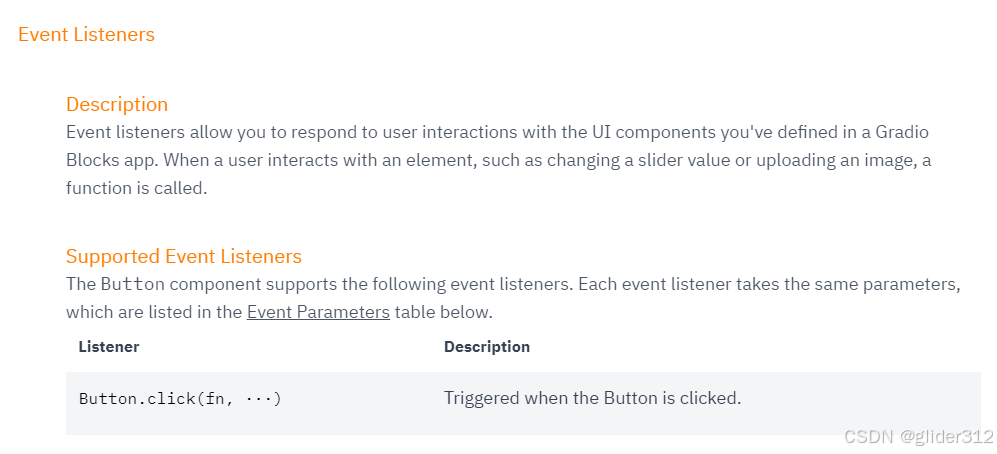
而Textbox也有自己的event listener:
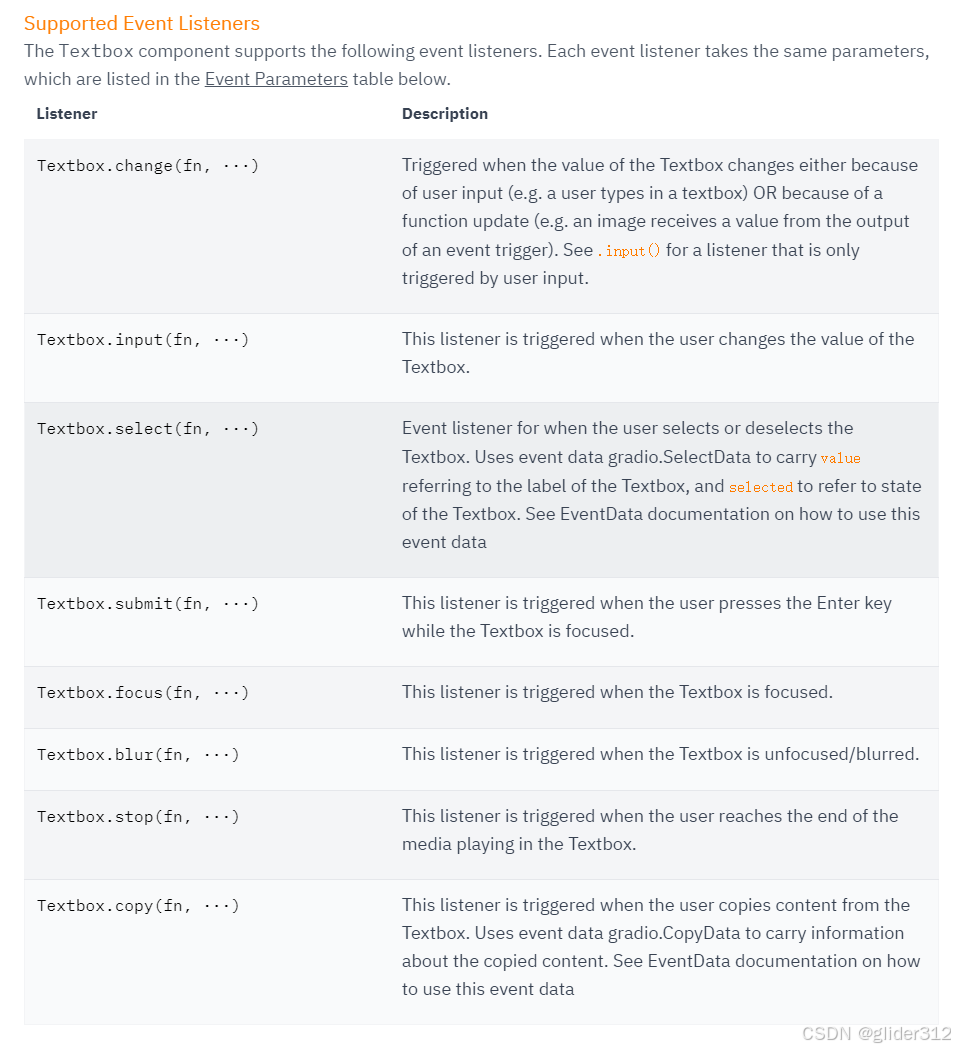
change:只要textbox里有改动就调用fn(gradio中,有函数值返回通常也会更新,这种情况也算进去)
input:只有change的第一个监控
select:选中一部分,或者全选框
submit:回车
focus:点击框内一处
blur:本来在框内点击,现在其他地方点击
3.1.4 Multiple data flows
import gradio as gr

def increase(num):
    return num + 1

with gr.Blocks() as demo:
    a = gr.Number(label="a")
    b = gr.Number(label="b")
    atob = gr.Button("a > b")
    btoa = gr.Button("b > a")
    atob.click(increase, a, b)
    btoa.click(increase, b, a)

demo.launch()
可以看到两个数据流共享了同一函数,并且以对方的输出为输入,非常自有。
另一个串行数据流例子:
from transformers import pipeline

import gradio as gr

asr = pipeline("automatic-speech-recognition", "facebook/wav2vec2-base-960h")
classifier = pipeline("text-classification")

def speech_to_text(speech):
    text = asr(speech)["text"]
    return text

def text_to_sentiment(text):
    return classifier(text)[0]["label"]

demo = gr.Blocks()

with demo:
    audio_file = gr.Audio(type="filepath")
    text = gr.Textbox()
    label = gr.Label()

    b1 = gr.Button("Recognize Speech")
    b2 = gr.Button("Classify Sentiment")

    b1.click(speech_to_text, inputs=audio_file, outputs=text)
    b2.click(text_to_sentiment, inputs=text, outputs=label)

demo.launch()
3.1.5 Function Input List vs Dict
事件监听器(例如.click()),根据函数fn,可以有多个输入,这些输入可以用列表[v1,v2]或者字典键{key1,key2}输入变量。区别在于函数内也要以键来获取值。(所以直接用列表最简单明了)
import gradio as gr

with gr.Blocks() as demo:
    a = gr.Number(label="a")
    b = gr.Number(label="b")
    with gr.Row():
        add_btn = gr.Button("Add")
        sub_btn = gr.Button("Subtract")
    c = gr.Number(label="sum")

    def add(num1, num2):
        return num1 + num2
    add_btn.click(add, inputs=[a, b], outputs=c)

    def sub(data):
        return data[a] - data[b]
    sub_btn.click(sub, inputs={a, b}, outputs=c)

demo.launch()
3.1.6 Function Return List vs Dict
return的时候也一样,可以用列表,也可以用字典,推荐用列表。
用字典的话,在函数中return字典{a:x,b:xx},在调用时outputs={a,b}
with gr.Blocks() as demo:
    food_box = gr.Number(value=10, label="Food Count")
    status_box = gr.Textbox()

    def eat(food):
        if food > 0:
            return {food_box: food - 1, status_box: "full"}
        else:
            return {status_box: "hungry"}

    gr.Button("Eat").click(
        fn=eat,
        inputs=food_box,
        outputs=[food_box, status_box]
    )
3.1.7 Updating Component Configurations
可以在函数返回时,返回conponent,例如gr.Textbox(),那么就可以在()中定义conponent的属性,从而达到更新conponent本身的能力。
用value=参数可以更新值。
import gradio as gr

def change_textbox(choice):
    if choice == "short":
        return gr.Textbox(lines=2, visible=True)
    elif choice == "long":
        return gr.Textbox(lines=8, visible=True, value="Lorem ipsum dolor sit amet")
    else:
        return gr.Textbox(visible=False)

with gr.Blocks() as demo:
    radio = gr.Radio(
        ["short", "long", "none"], label="What kind of essay would you like to write?"
    )
    text = gr.Textbox(lines=2, interactive=True, show_copy_button=True)
    radio.change(fn=change_textbox, inputs=radio, outputs=text)

demo.launch()
3.1.8 Not Changing a Component’s Value
如果想保留conponent中的值不改变,可以通过在函数中返回gr.skip()实现
import random
import gradio as gr

with gr.Blocks() as demo:
    with gr.Row():
        clear_button = gr.Button("Clear")
        skip_button = gr.Button("Skip")
        random_button = gr.Button("Random")
    numbers = [gr.Number(), gr.Number()]

    clear_button.click(lambda : (None, None), outputs=numbers)
    skip_button.click(lambda : [gr.skip(), gr.skip()], outputs=numbers)
    random_button.click(lambda : (random.randint(0, 100), random.randint(0, 100)), outputs=numbers)

demo.launch()
3.1.9 Running Events Consecutively
如果想让事件监听器,在触发结束后,马上触发下一个函数,可以用.then(fn,inputs,outputs)
import gradio as gr
import random
import time

with gr.Blocks() as demo:
    chatbot = gr.Chatbot()
    msg = gr.Textbox()
    clear = gr.Button("Clear")

    def user(user_message, history):
        return "", history + [[user_message, None]]

    def bot(history):
        bot_message = random.choice(["How are you?", "I love you", "I'm very hungry"])
        time.sleep(2)
        history[-1][1] = bot_message
        return history

    msg.submit(user, [msg, chatbot], [msg, chatbot], queue=False).then(
        bot, chatbot, chatbot
    )
    clear.click(lambda: None, None, chatbot, queue=False)

demo.launch()
3.1.10 Binding Multiple Triggers to a Function
如果想用多个事件监听器触发同一个函数,可以显式调用gr.on(triggers=[component_a.click,conponent_b.submit…])
import gradio as gr

with gr.Blocks() as demo:
    name = gr.Textbox(label="Name")
    output = gr.Textbox(label="Output Box")
    greet_btn = gr.Button("Greet")
    trigger = gr.Textbox(label="Trigger Box")

    def greet(name, evt_data: gr.EventData):
        return "Hello " + name + "!", evt_data.target.__class__.__name__

    def clear_name(evt_data: gr.EventData):
        return ""

    gr.on(
        triggers=[name.submit, greet_btn.click],
        fn=greet,
        inputs=name,
        outputs=[output, trigger],
    ).then(clear_name, outputs=[name])

demo.launch()
还可以用修饰器
@gr.on(triggers=[component_a.click,conponent_b.submit…])
如果不显式传入triggers,就会绑定所有的有用change的trigger的conponent。
import gradio as gr

with gr.Blocks() as demo:
    with gr.Row():
        num1 = gr.Slider(1, 10)
        num2 = gr.Slider(1, 10)
        num3 = gr.Slider(1, 10)
    output = gr.Number(label="Sum")

    @gr.on(inputs=[num1, num2, num3], outputs=output)
    def sum(a, b, c):
        return a + b + c

demo.launch()
在gr.on后接gr.then可以减轻很多代码的书写
3.1.11 Binding a Component Value Directly to a Function of Other Components
可以通过在定义组件的时候直接定义fn,inputs,得到实时的outputs,这样可以少写很多代码。
例如:
with gr.Blocks() as demo:
  num1 = gr.Number()
  num2 = gr.Number()
  product = gr.Number(lambda a, b: a * b, inputs=[num1, num2])
等同于
with gr.Blocks() as demo:
  num1 = gr.Number()
  num2 = gr.Number()
  product = gr.Number()

  gr.on(
    [num1.change, num2.change, demo.load],
    lambda a, b: a * b,
    inputs=[num1, num2],
    outputs=product
  )
3.2 Controlling Layout
3.2.1 Rows
with gr.Row():
开启一行,在这一行中布局
import gradio as gr
with gr.Blocks() as demo:
    with gr.Row(equal_height=True):
        btn1 = gr.Textbox("Button 1")
        btn2 = gr.Button("Button 2")


demo.launch()

默认情况下,会等高
可以通过
with gr.Row(equal_height=False)不等高
默认情况下,会平分一列,
可以通过组件中的scale参数设置值,会按比例分配
可以设置最小宽度,如果极端情况下,所有的框的最小宽度都无法满足,会折叠起来
with gr.Blocks() as demo:
    with gr.Row():
        btn0 = gr.Button("Button 0", scale=0,min_width=100)
        btn1 = gr.Button("Button 1", scale=1)
        btn2 = gr.Button("Button 2", scale=2)
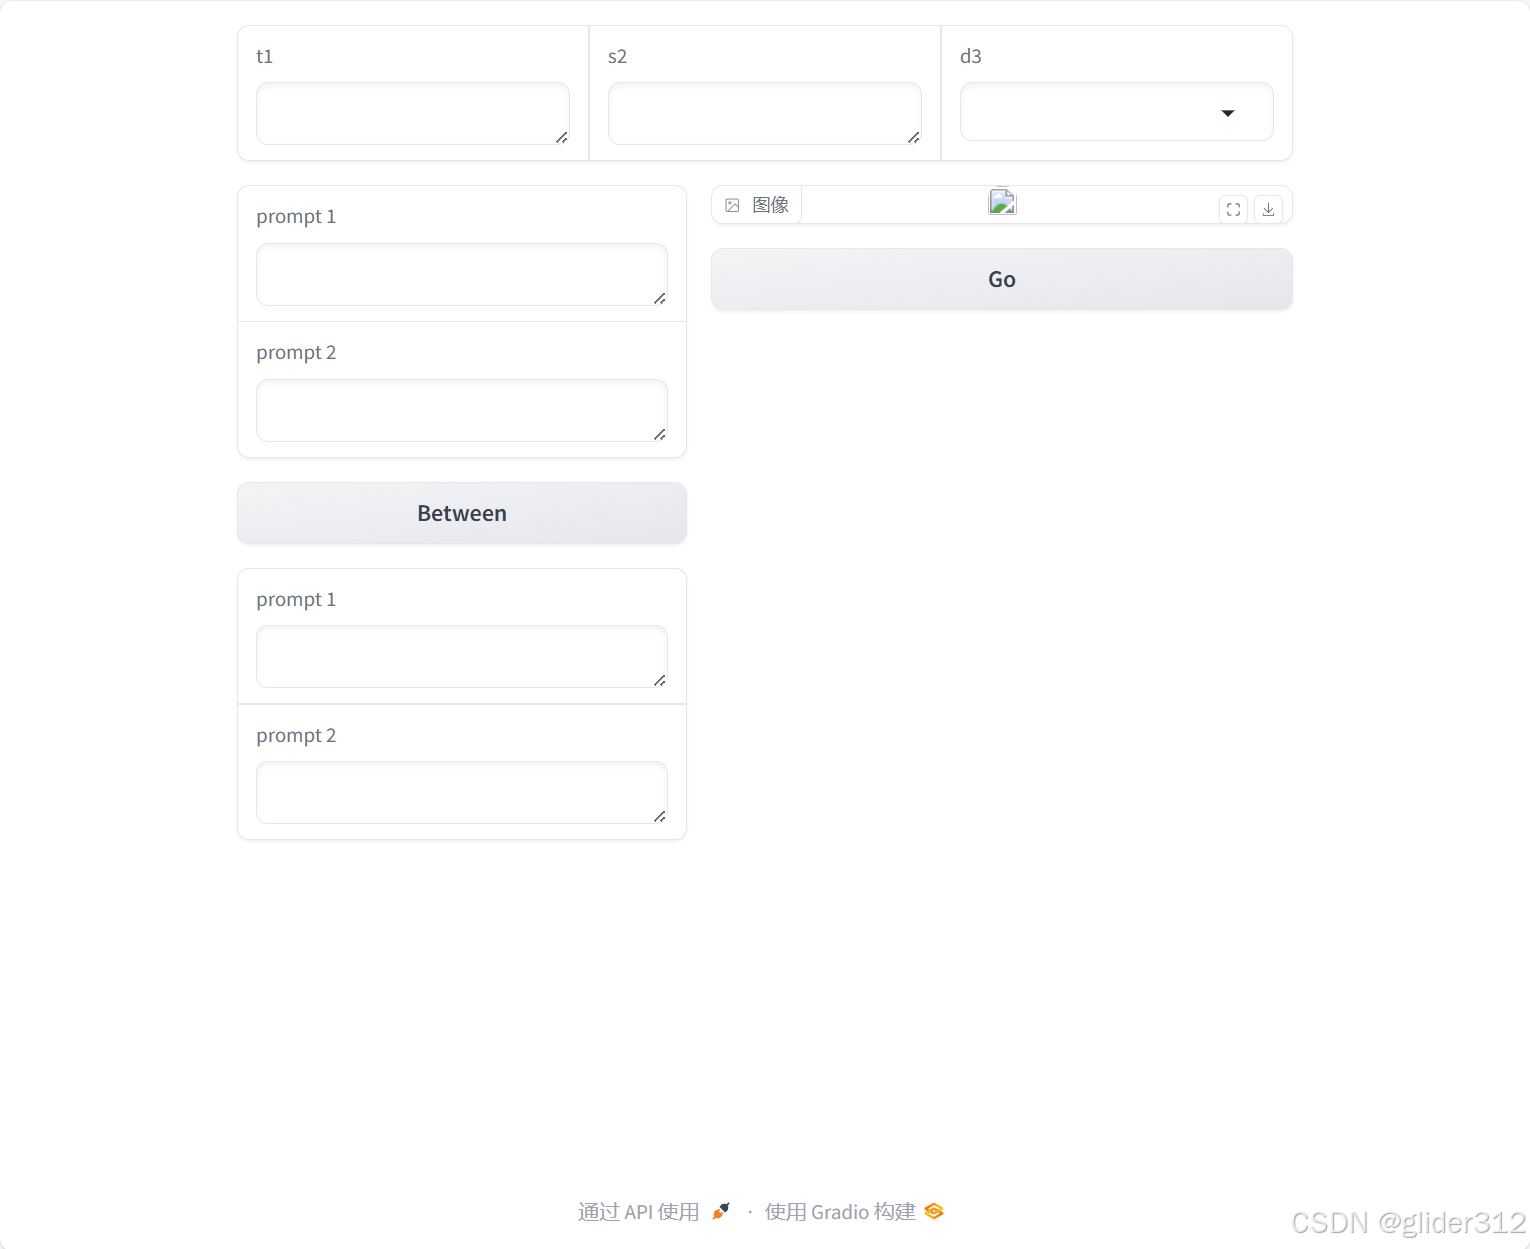
3.2.2 Columns and Nesting
with gr.Column(scale=1, min_width=300)会开启一列,内部组件自动垂直放置。因为在这里开启了一列,所以可以指明列的宽度比例和最低宽度。
注意,没有with gr.Column()也没有with gr.Row()的时候,会默认垂直放置,但如果有就会遵循。
import gradio as gr

with gr.Blocks() as demo:
    with gr.Row():
        text1 = gr.Textbox(label="t1")
        slider2 = gr.Textbox(label="s2")
        drop3 = gr.Dropdown(["a", "b", "c"], label="d3")
    with gr.Row():
        with gr.Column(scale=1, min_width=300):
            text1 = gr.Textbox(label="prompt 1")
            text2 = gr.Textbox(label="prompt 2")
            inbtw = gr.Button("Between")
            text4 = gr.Textbox(label="prompt 1")
            text5 = gr.Textbox(label="prompt 2")
        with gr.Column(scale=2, min_width=300):
            img1 = gr.Image("images/cheetah.jpg")
            btn = gr.Button("Go")

demo.launch()
Fill Browser Height / Width
使得高度/宽度占据整个屏幕
import gradio as gr

with gr.Blocks(fill_height=True) as demo:
    gr.Chatbot(scale=1)
    gr.Textbox(scale=0)
一般行排列都会占据整个屏幕,所以这个选项一般出现在列排列时。
3.2.3 Dimensions
可以给组件传入width= 参数设定组件大小,可以是一个值,也可以是CSS格式字符串
import gradio as gr

with gr.Blocks() as demo:
    im = gr.ImageEditor(width="50vw")

demo.launch()
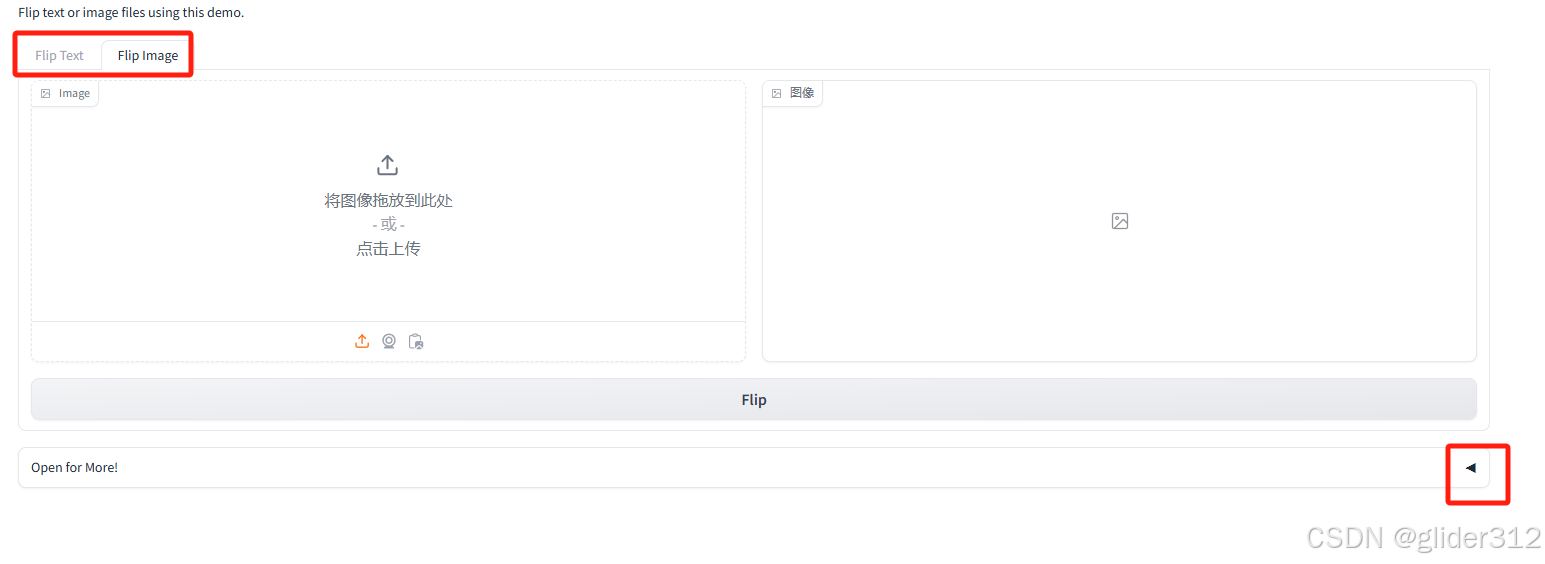
3.2.4 Tabs and Accordions
通过 with gr.Tab(‘tab_name’):
可以实现内容板块切换
通过 with gr.Accordion(“Open for More!”, open=False):
可以实现折叠功能
import numpy as np
import gradio as gr

def flip_text(x):
    return x[::-1]

def flip_image(x):
    return np.fliplr(x)

with gr.Blocks() as demo:
    gr.Markdown("Flip text or image files using this demo.")
    with gr.Tab("Flip Text"):
        text_input = gr.Textbox()
        text_output = gr.Textbox()
        text_button = gr.Button("Flip")
    with gr.Tab("Flip Image"):
        with gr.Row():
            image_input = gr.Image()
            image_output = gr.Image()
        image_button = gr.Button("Flip")

    with gr.Accordion("Open for More!", open=False):
        gr.Markdown("Look at me...")
        temp_slider = gr.Slider(
            0, 1,
            value=0.1,
            step=0.1,
            interactive=True,
            label="Slide me",
        )

    text_button.click(flip_text, inputs=text_input, outputs=text_output)
    image_button.click(flip_image, inputs=image_input, outputs=image_output)

demo.launch()
3.2.5 Visibility
可以对组件设置参数visibility=True/False,或者对布局设置,来控制是否显示。
3.2.6 Defining and Rendering Components Separately
有时候不想在某个位置马上显示对应框。
但是在之后定义其他组件或者事件监控需要传递这个组件的函数,导致这个组件又必须提前定义。
但一定义,这个框就显示出来了。
例如:想让Examples在Textbox上面出现。
就可以先定义在gr.Block ()之外,再通过.render渲染出来。
import gradio as gr
input_textbox = gr.Textbox()

with gr.Blocks() as demo:
    gr.Examples(["hello", "bonjour", "merhaba"], input_textbox)
    input_textbox.render()

demo.launch()
提到gr.Example,补充一下,
可以通过
gr.Example([[,][,]…,[,]],cache_example,inputs=,outputs=,examples_per_page=)插入examples,并可以设置cache_examples,每页的example数量。
3.3 State in Blocks
3.3.1 Global State
一样,设置全局变量,就可以在不同用户的session之间传递信息。
3.3.2 Session State
在gr.Interface()中,只能设定一个gr.State(),并且只要出现gr.State()都指向一个变量。
gr.Blocks()更加灵活,但也一样。
用var1=gr.State()显示定义一个state变量。
再次注意,用gr.State()比较通常使用是可以留存history记录,在函数中会同时作为输入和输出,起到类似于hidden_var = hidden_var + var的作用,这个hidden_var相当于一个invisible的conponent。
import gradio as gr

with gr.Blocks() as demo:
    cart = gr.State([])
    items_to_add = gr.CheckboxGroup(["Cereal", "Milk", "Orange Juice", "Water"])

    def add_items(new_items, previous_cart):
        cart = previous_cart + new_items
        return cart

    gr.Button("Add Items").click(add_items, [items_to_add, cart], cart)

    cart_size = gr.Number(label="Cart Size")
    gr.Button("Get Cart Size").click(lambda cart: len(cart), cart, cart_size)

demo.launch()
3.3.3 Local State(gradio 5.8.0)
利用gr.BrowserState(),实现即便用户页面刷新或者关闭,也留存的变量。
import random
import string
import gradio as gr

with gr.Blocks() as demo:
    gr.Markdown("Your Username and Password will get saved in the browser's local storage. "
                "If you refresh the page, the values will be retained.")
    username = gr.Textbox(label="Username")
    password = gr.Textbox(label="Password", type="password")
    btn = gr.Button("Generate Randomly")
    local_storage = gr.BrowserState(["", ""])

    @btn.click(outputs=[username, password])
    def generate_randomly():
        u = "".join(random.choices(string.ascii_letters + string.digits, k=10))
        p = "".join(random.choices(string.ascii_letters + string.digits, k=10))
        return u, p

    @demo.load(inputs=[local_storage], outputs=[username, password])
    def load_from_local_storage(saved_values):
        print("loading from local storage", saved_values)
        return saved_values[0], saved_values[1]

    @gr.on([username.change, password.change], inputs=[username, password], outputs=[local_storage])
    def save_to_local_storage(username, password):
        return [username, password]

demo.launch()
可以看到在demo.load时,可以直接通过输入local_storage导入,说明关闭页面后,local_storage也储存了下来。
3.4 Dynamic Apps with the Render Decorator
目前,启动页面后,组件和事件监听器就固定了,不能添加新的,也不能移除已有的。
@gr.render 可以做到动态。
3.4.1 Dynamic Number of Components
利用 @gr.render 实现一个,将输入字符分解为每个字符一个Textbox。
import gradio as gr

with gr.Blocks() as demo:
   input_text = gr.Textbox(label="input")

   @gr.render(inputs=input_text)
   def show_split(text):
       if len(text) == 0:
           gr.Markdown("## No Input Provided")
       else:
           for letter in text:
               gr.Textbox(letter)

demo.launch()
简单来说,@gr.render作为修饰器赋予了下面的函数根据条件动态创建并渲染的能力。
@gr.render默认在demo.load()以及所有inputs.change()事件监听下触发,当然可以覆盖触发方式:
import gradio as gr

with gr.Blocks() as demo:
    input_text = gr.Textbox(label="input")
    mode = gr.Radio(["textbox", "button"], value="textbox")

    @gr.render(inputs=[input_text, mode], triggers=[input_text.submit])
    def show_split(text, mode):
        if len(text) == 0:
            gr.Markdown("## No Input Provided")
        else:
            for letter in text:
                if mode == "textbox":
                    gr.Textbox(letter)
                else:
                    gr.Button(letter)

demo.launch()
使用了submit的触发方式覆盖。
3.4.2 Dynamic Event Listeners
在@gr.render修饰的函数中定义事件监听器并且执行,即可新增加事件监听器。
import gradio as gr

with gr.Blocks() as demo:
    text_count = gr.State(1)
    add_btn = gr.Button("Add Box")
    add_btn.click(lambda x: x + 1, text_count, text_count)

    @gr.render(inputs=text_count)
    def render_count(count):
        boxes = []
        for i in range(count):
            box = gr.Textbox(key=i, label=f"Box {i}")
            boxes.append(box)

        def merge(*args):
            return " ".join(args)
        merge_btn = gr.Button("Merge")
        merge_btn.click(merge, boxes, output)


    output = gr.Textbox(label="Merged Output")

demo.launch()
注意:
box = gr.Textbox(key=i, label=f"Box {i}"),设置key后,会在rerender时保留原来的值。
可以看到,涉及到更新,很自然的使用了gr.State()组件。
3.4.3 Putting it Together
to do list
import gradio as gr

with gr.Blocks() as demo:

    tasks = gr.State([])
    new_task = gr.Textbox(label="Task Name", autofocus=True)

    def add_task(tasks, new_task_name):
        return tasks + [{"name": new_task_name, "complete": False}], ""

    new_task.submit(add_task, [tasks, new_task], [tasks, new_task])

    @gr.render(inputs=tasks)
    def render_todos(task_list):
        complete = [task for task in task_list if task["complete"]]
        incomplete = [task for task in task_list if not task["complete"]]
        gr.Markdown(f"### Incomplete Tasks ({len(incomplete)})")
        for task in incomplete:
            with gr.Row():
                gr.Textbox(task['name'], show_label=False, container=False)
                done_btn = gr.Button("Done", scale=0)
                def mark_done(task=task):
                    task["complete"] = True
                    return task_list
                done_btn.click(mark_done, None, [tasks])

                delete_btn = gr.Button("Delete", scale=0, variant="stop") #variant='stop'表明是红色stop颜色
                def delete(task=task):
                    task_list.remove(task)
                    return task_list
                delete_btn.click(delete, None, [tasks])

        gr.Markdown(f"### Complete Tasks ({len(complete)})")
        for task in complete:
            gr.Textbox(task['name'], show_label=False, container=False)

demo.launch()
在delete后,会自动触发rerender,再执行render_todos函数,就实现了“删除框”的效果。
3.5 Customizing your demo with CSS and Javascript
这里省略,css和javascript使用者可自行查看文档
3.6 Using Gradio Blocks Like Functions
进阶,日后再补


 6万+
6万+

 被折叠的 条评论
为什么被折叠?
被折叠的 条评论
为什么被折叠?
 到【灌水乐园】发言


