


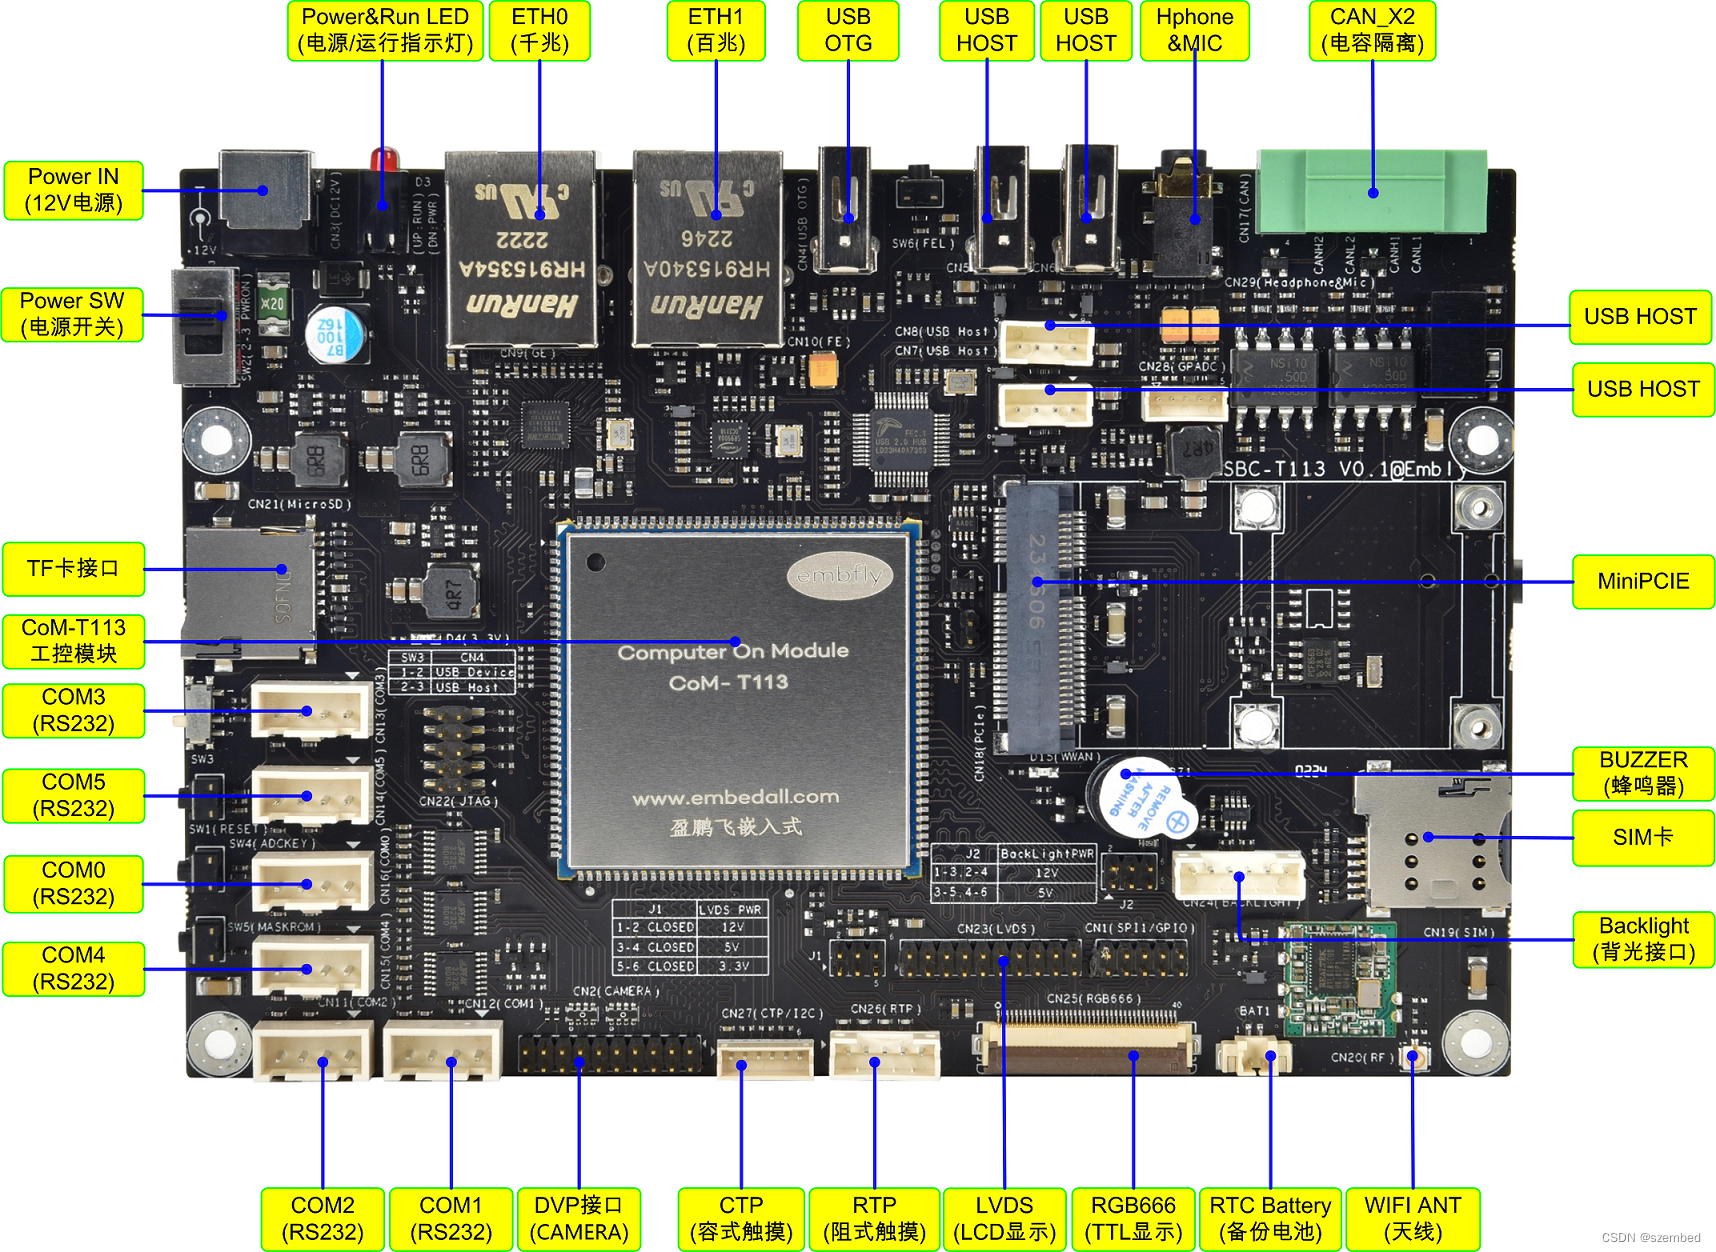
SBC-T113产品特性:
- 采用Allwinner公司Cortex-A7双核T113-i处理器,运行最高速度为1.2GHZ;
- 内置64位玄铁C906 RISC-V CPU和 DSP,提供高效的计算能力;
- 支持1080P 视频编码,多格式1080P 60fps视频解码 (H.265,H.264, MPEG-1/2/4)
- 支持LVDS/MIPI-DSI,分辨率最高1920x1080;
- 支持512-1G Bytes DDR3 SDRAM;
- 支持SPI NAND启动和存储(256MB默认;512MB可选);可选EMMC启动和存储( 4G默认;8GB可选);
- 支持4路USB2.0 HOST和1路OTG,1路I2C,6路UART(RS232), 1路PWM(应用于背光)
- 支持双路CAN BUS通信
- 支持双路以太网,一路10/100M;一路10/100/1000M;
- 标准3.5寸主板, 尺寸为:146*102MM
SBC-T113功能评估图:
配置Buildroot:
如需修改Buildroot配置,请执行如下命令打开Buildroot配置界面。通过读取"out/t113_i/sbc-t113_nand/longan/buildroot/"目录下的.config文件,以图形界面的方式提供文件系统编译配置查看和修改。如无需修改Buildroot配置,可跳过此步骤。
Host$ cd <SDK>/buildroot/buildroot-201902/
其中<SDK>表示的是SDK所在目录
Host$ make menuconfig
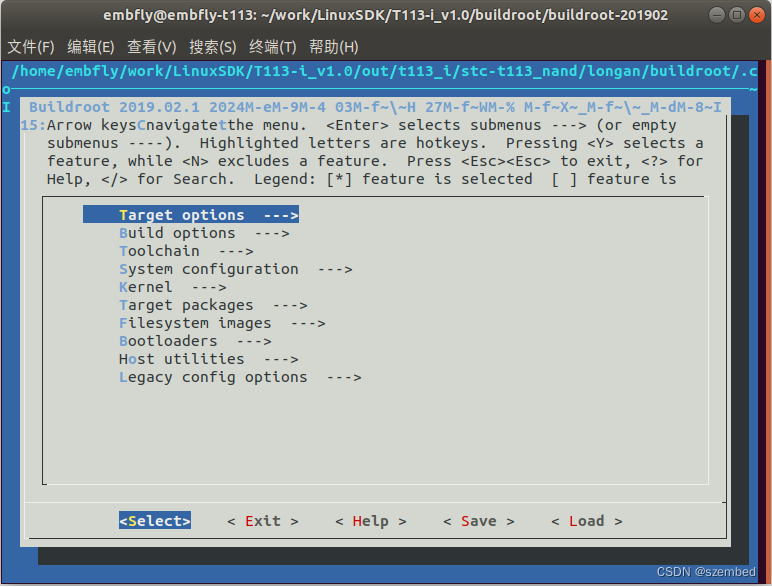
可通过键盘的方向键选中对应菜单栏。在<Select>被选中的情况下,可按Enter键进入子菜单。菜单选项中蓝色高亮的字母代表此菜单选项的快捷键,可在键盘上按下对应的字母快速选中对应的菜单选项。
每个菜单选项前的括号内容表示当前菜单选项的配置状态。选中对应的菜单选项后,按下Y键,会将相应的选项配置编译到Buildroot中,同时菜单选项前面变为<*>。按下N键,不会将相应的选项配置编译到Buildroot中。如需搜索,可按下/键打开搜索框,然后输入要搜索的内容。
配置完成后,选中<Save>,按Enter键保存配置选项。然后选中<Exit>,按Enter键退出。
编译buildroot生成根文件系统:
在T113-i_v1.0目录下执行如下命令,单独编译文件系统。
Host$ ./build.sh buildroot
embfly@embfly-virtual-machine:~/T113/T113-i_v1.0$ ./build.sh buildroot
ACTION List: mkbr;
Execute command: mkbr
INFO: build buildroot
Prepare br toolchain gcc-linaro-5.3.1-2016.05-x86_64_arm-linux-gnueabt.tar.xz
make: Entering directory '/home/embfly/T113/T113-i_v1.0/buildroot/buildroot-201902
>>> Finalizing target directory
# check ftles that are touched by more than one package
./support/scripts/check-uniq-files -t target /home/embfly/T113/T113-i_v1.0/out/t113_i/
sbc-t113_nand/longan/buildroot/build/packages-file-list.txt
Warntng: target ftle "./usr/share/alsa/ucm/GoogleNyan/GoogleNyan.conf" ts touched by more than one package: [u'alsa-lib', u'alsa-utils']
Warning: target file "./usr/share/alsa/cards/YMF744.conf" is touched by more than one package: [u'alsa-lib', u'alsa-utils']
……
table='/home/embfly/T113/T113-i_v1.0/out/t113_i/sbc-t113_nand/longan/buildroot/build
/buildroot-fs/full_devices_table.txt
make: Leaving directory /home/embfly/T113/T113-i_v1.0/buildroot/buildroot-201902
INFO: copy the config files form device ..
make: Entering dtrectory /home/embfly/T113/T113-i_v1.0/platform'
Makefile:35
Makefile:36:/home/embfly/T113/T113-i_v1.0/platform
make: Nothing to be done for 'INSTALL_FILES'
make: Leaving directory '/home/embfly/T113/T113-i_v1.0/platform
INFO: pre gpu Lib...
cp: cannot stat '/home/embfly/T113/T113-i_v1.0/platform/core/graphics/gpu_um_pub/malt
bifrost/fbdev/mali-g31/arm-linux-gnu/lib/*': No such file or directory
cp: cannot stat '/home/embfly/T113/T113-i_v1.0/platform/core/graphtcs/gpu_um_pub/mali-bifrost/fbdev/mali-g31/arm-linux-gnu/lib/*': No such ftle or directory
INFO: build buildroot OK.
embfly@embfly-virtual-machine:~/T113/T113-i_v1.0$
编译完成后,生成根文件系统相关文件在“out/t113_i/stc-t113_nand/longan/buildroot/target”目录下。此时执行./build.sh pack,并不会将最新的根文件系统生成系统镜像。这中间还有一个步骤,这个步骤是./build.sh rootfs,只有通过./build.sh rootfs指令,才会将“out/t113_i/stc-t113_nand/longan/buildroot/target”目录下的文件,转换为根系统镜像文件"out/t113_i/sbc-t113_nand/longan/rootfs.ubifs"和"out/t113_i/sbc-t113_nand/longan/buildroot/images/rootfs.ext4"。
然后执行如下命令,将镜像文件转化为.fex格式,并打包生成新的Linux系统镜像。
Host$ ./build.sh pack
根文件系统镜像的生成:
我们都知道,根文件系统中,一般包括两个部分,一个部分是过buildroot生成根文件系统相关文件,他们在“out/t113_i/stc-t113_nand/longan/buildroot/target”目录下。另外一个部分,是SDK中包含的相关库函数和相关应用程序,例如QT程序等最后也要打包到“out/t113_i/stc-t113_nand/longan/buildroot/target”目录下。那么这些库和应用程序是如何编译和打包的呢?指令如下:
Host$ ./build.sh rootfs
该指令执行了T113-i_v1.0/build/mkcmd.sh脚本中如下内容:
function pack_rootfs()
{
mk_info "pack rootfs ..."
local ROOTFS=${LICHEE_BR_OUT}/target
local INODES=""
local BLOCKS=""
if [ ${LICHEE_PLATFORM} = "3rd" ]; then
ROOTFS=${LICHEE_TOP_DIR}/3rd/u_rootfs
else
ROOTFS=${LICHEE_BR_OUT}/target
fi
mkdir -p ${ROOTFS}/lib/modules
cp -rf ${LICHEE_KERN_DIR}/output/lib/modules/* \
${ROOTFS}/lib/modules/
if [ ${LICHEE_PLATFORM} != "3rd" ]; then
(cd ${ROOTFS}; ln -fs bin/busybox init)
fi
export PATH=$PATH:${LICHEE_BUILD_DIR}/bin
#fakeroot chown -h -R 0:0 ${ROOTFS}
#fakeroot ${LICHEE_BUILD_DIR}/bin/mke2img -d \
#${ROOTFS} -G 4 -R 1 -B 0 -I 0 -o ${LICHEE_PLAT_OUT}/rootfs.ext4
if [ "x${LICHEE_FLASH}" = "xnor" ]; then
echo "skip $LICHEE_PLATFORM_DIR/framework/auto/build.sh for NOR flash"
else
$LICHEE_PLATFORM_DIR/framework/auto/build.sh
fi
case ${LICHEE_BOARD} in
*nor*)
make_squashfs ${ROOTFS}
;;
*nand*)
make_ubifs ${ROOTFS}
;;
*)
if [ "x${LICHEE_FLASH}" = "xnor" ]; then
make_squashfs ${ROOTFS}
else
make_ext4 ${ROOTFS}
fi
;;
esac
#fakeroot ${LICHEE_BUILD_DIR}/bin/mksquashfs \
#${ROOTFS} ${LICHEE_PLAT_OUT}/rootfs.squashfs -root-owned -no-progress -comp xz -noappend
#fakeroot ${LICHEE_BUILD_DIR}/bin/mkfs.ubifs \
# -m 4096 -e 258048 -c 145 -F -x zlib -r ${ROOTFS} -o ${LICHEE_PLAT_OUT}/rootfs.ubifs
mk_info "pack rootfs ok ..."
}
通过该脚本我们分析得知,它一共做了3件事:
- cp -rf ${LICHEE_KERN_DIR}/output/lib/modules/
这个指令是把编译linux内核时,生成的.ko相关驱动拷贝到根文件系统。
2)$LICHEE_PLATFORM_DIR/framework/auto/build.sh
这个脚本是把SDK中相关的库和QT程序以及演示程序进行编译,编译后拷贝到根文件系统“out/t113_i/stc-t113_nand/longan/buildroot/target”目录下。该脚本的内容可自行查看。
3)fakeroot ${LICHEE_BUILD_DIR}/bin/mkfs.ubifs
这个指令是把“out/t113_i/stc-t113_nand/longan/buildroot/target”目录下的内容转换为"out/t113_i/sbc-t113_nand/longan/buildroot/images/“目录下的rootfs.ext4。


 963
963

 被折叠的 条评论
为什么被折叠?
被折叠的 条评论
为什么被折叠?
 到【灌水乐园】发言


