


安装WSL
WSL Windows官方页面:安装 WSL | Microsoft Learn
- 系统要求版本:我的电脑->属性可以查看系统版本,采用内部版本 18362 或更高版本
- 以管理员权限运行 powershell
- 启用Windows10子系统功能,再打开的powershell窗口中输入如下命令
dism.exe /online /enable-feature /featurename:Microsoft-Windows-Subsystem-Linux /all /norestart- 启用虚拟机平台功能,再打开的powershell窗口中输入如下命令
dism.exe /online /enable-feature /featurename:VirtualMachinePlatform /all /norestart- 重启电脑
- 再次打开powershell
- 安装WSL,以管理员权限运行 powershell
wsl --update- 配置为wsl2,注意当你用管理权限打开安装时你也必须用管理员权限开的任务栏的ubuntu系统,请注意权限问题,这里建议下面操作不要用管理员权限
# 设置默认的版本为 wsl2
wsl --set-default-version 2

#查看支持的linux子系统
wsl -l -o

# 安装linux子系统, 期间需要创建账户和密码
wsl --install -d Ubuntu-20.04

#检查安装的linux版本
wsl -l -v
#输出如下信息表示wsl2启动ok
#NAME            STATE           VERSION
#* Ubuntu-20.04    Running         2
配置Linux系统
至此WSL的系统已经完成安装,但是还不能满足需求,比如UI,此篇主要介绍如何配置环境并能运用UI界面
由于在任务栏打开的ubuntu20.04只是一个终端,并不带X11-forwarding (remote display is forwarded through SSH),所以并不能运行带UI的程序
- 配置ssh
sudo apt-get update
sudo apt-get install openssh-server openssh-client net-tools fonts-noto-cjk- 修改ssh的配置文件
在/etc/ssh/sshd_config文件中,将PasswordAuthentication设置为 yes,或直接在 PasswordAuthentication参数前添加井号#
- 启动服务
sudo /etc/init.d/ssh restart- 安装windows mobaxterm工具,并用ssh登入即可,当然你的PC的IP需要满足网络安全的IP要求
https://mobaxterm.mobatek.net/download.html - 这个时候你就可以用check等UI工具了,ubuntu是共享你windows的网卡和IP的
- 还可以将ubuntu的filesystem映射出来以一个盘符的形式存在,打开我的电脑,在最左下角的网络系统映射出来
三. 调试环境配置
到这里后,WSL2已经配置好了,在powershell输入wsl或者在任务栏打开ubuntu20.04都可以进入linux系统
vscode官方配置wsl编译环境为Developing in the Windows Subsystem for Linux with Visual Studio Code,以下为详细流程
- 在windows下安装好vscode
- 进入linux系统,到你想要打开的代码目录,输入
code .** in the terminal. When doing this for the first time, you should see VS Code fetching components needed to run in WSL. This should only take a short while, and is only needed once.
Note: If this command does not work, you may need to restart your terminal or you may not have added VS Code to your path when it was installed.
- 这个时候你会看到一个vscode产生,并产生安装通知,请安装

VS Code will now continue to configure itself in WSL and keep you up to date as it makes progress.
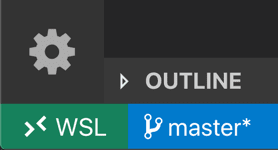
- 上面的通知都安装OK后,你将在左下角看到如下图标,这个时候你就可以正常使用
That's it! Any VS Code operations you perform in this window will be executed in the WSL environment, everything from editing and file operations, to debugging, using terminals, and more.


 9732
9732


 被折叠的 条评论
为什么被折叠?
被折叠的 条评论
为什么被折叠?
 到【灌水乐园】发言


