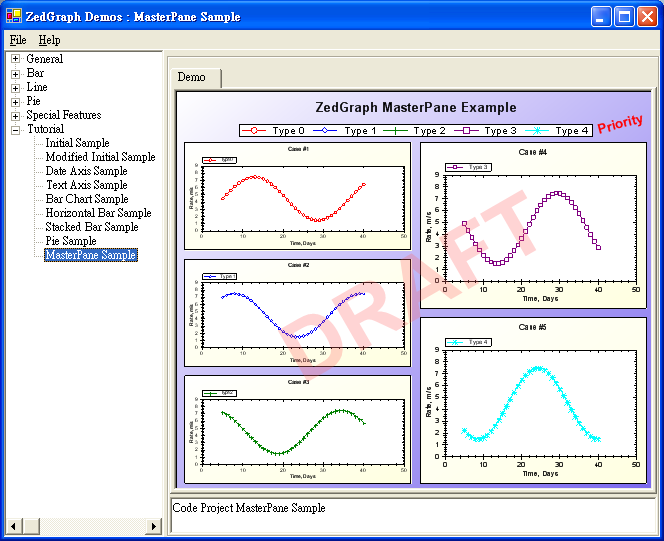
第九节MasterSampleDemo.cs介绍
最近一直挺忙的,都没时间写博客了,好在这是基础篇的最后一篇了,我也可以歇歇了,关于其它的深入章节我会在以后的时间补上的。
先来看看这一节的示图和源代码吧。

using
System;
using
System.Drawing;
using
System.Collections;
using
ZedGraph;
namespace
ZedGraph.Demo
{
///
<summary>
///
Summary description for SimpleDemo.
///
</summary>
public
class MasterSampleDemo : DemoBase
{
public
MasterSampleDemo() : base( "Code Project MasterPane Sample",
"MasterPane Sample", DemoType.Tutorial )
{
MasterPane myMaster = base.MasterPane;
// Remove the default GraphPane that comes with ZedGraphControl
myMaster.PaneList.Clear();
// Set the masterpane title
myMaster.Title = "ZedGraph MasterPane Example";
myMaster.IsShowTitle = true;
// Fill the masterpane background with a color gradient
myMaster.PaneFill = new Fill( Color.White, Color.MediumSlateBlue, 45.0F );
// Set the margins to 10 points
myMaster.MarginAll = 10;
// Enable the masterpane legend
myMaster.Legend.IsVisible = true;
myMaster.Legend.Position = LegendPos.TopCenter;
// Add a priority stamp
TextItem text = new TextItem( "Priority", 0.88F, 0.12F );
text.Location.CoordinateFrame = CoordType.PaneFraction;
text.FontSpec.Angle = 15.0F;
text.FontSpec.FontColor = Color.Red;
text.FontSpec.IsBold = true;
text.FontSpec.Size = 15;
text.FontSpec.Border.IsVisible = false;
text.FontSpec.Border.Color = Color.Red;
text.FontSpec.Fill.IsVisible = false;
text.Location.AlignH = AlignH.Left;
text.Location.AlignV = AlignV.Bottom;
myMaster.GraphItemList.Add( text );
// Add a draf watermark
è
text = new TextItem( "DRAFT", 0.5F, 0.5F );
text.Location.CoordinateFrame = CoordType.PaneFraction;
text.FontSpec.Angle = 30.0F;
text.FontSpec.FontColor = Color.FromArgb( 70, 255, 100, 100 );
text.FontSpec.IsBold = true;
text.FontSpec.Size = 100;
text.FontSpec.Border.IsVisible = false;
text.FontSpec.Fill.IsVisible = false;
text.Location.AlignH = AlignH.Center;
text.Location.AlignV = AlignV.Center;
text.ZOrder = ZOrder.A_InFront;
myMaster.GraphItemList.Add( text );
// Initialize a color and symbol type rotator
ColorSymbolRotator rotator = new ColorSymbolRotator();
// Create some new GraphPanes
for
( int j=0; j<5; j++ )
{
// Create a new graph - rect dimensions do not matter here, since it
// will be resized by MasterPane.AutoPaneLayout()
GraphPane myPane = new GraphPane( new Rectangle( 10, 10, 10, 10 ),
"Case #" + (j+1).ToString(),
"Time, Days",
"Rate, m/s" );
// Fill the GraphPane background with a color gradient
myPane.PaneFill = new Fill( Color.White, Color.LightYellow, 45.0F );
myPane.BaseDimension = 6.0F;
// Make up some data arrays based on the Sine function
PointPairList list = new PointPairLis_u40 ?);
for
( int i=0; i<36; i++ )
{
double
x = (double) i + 5;
double
y = 3.0 * ( 1.5 + Math.Sin( (double) i * 0.2 + (double) j ) );
list.Add( x, y );
}
// Add a curve to the Graph, use the next sequential color and symbol
LineItem myCurve = myPane.AddCurve( "Type " + j.ToString(),
list, ro_u97 ?tor.NextColor, rotator.NextSymbol );
// Fill the symbols with white to make them opaque
myCurve.Symbol.Fill = new Fill( Color.White );
// Add the GraphPane to the MasterPane
myMaster.Add( myPane );
}
Graphics g = this.ZedGraphControl.CreateGraphics();
// Tell ZedGraph to auto layout the new GraphPanes
myMaster.AutoPaneLayout( g, PaneLayout.ExplicitRow32 );
myMaster.AxisChange( g );
g.Dispose();
}
}
}
这一节主要是讲多
pane
的创建方法。里面大部分的方法和属性在以前的章节中已经介绍过了,这里只想讲三个地方:
MasterPane
类、
ColorSymbolRotator
类和
ZOrder
这个属性的用法。
首先就是
MasterPane
类。这个类就是创建多
pane
的类,是一个
GraphPane
类的集合。它里面的大部分属性和方法都继承自
PaneBase
和
Object
。像
.NET
一样,这个类提供了
Item
和
PaneList
属性来设置和获取里面的成员。在程序中我们也看到了,其实
MasterPane
什么也没做,就是把其它的类一项项的
Add
进它的集合中。
ColorSymbolRotator
类就是一个为
GraphPane.AddCurve
方法循环提供不同颜色和符号的类。这个类的东西不多,我个人认为就相当于一个枚举一样,我们可以看到程序中只用到了
rotator.NextColor rotator.NextSymbol
这两个属性,来获取不同的颜色和符号。
最后就是
Zorder
这个属性了,在前面的几节中我们也见过这个属性,可是当时我没有讲,现在我说说。
Zorder
就是图形在
Z
轴的位置。如果我们在平面上把左右看成
X
轴,把上下看成
Y
轴,那么内外就是
Z
轴了,也就是
Zorder
就是图形在内外的位置
(
这个内外是针对其它图形来说的
)
。我们可以看看示图中的
DRAFT
这个水印的效果,这就是
Zorder
的功能。如果你把程序中的
text.ZOrder = ZOrder.A_InFront;
改成
text.ZOrder = ZOrder.G_BehindAll;
那么
DRAFT
就是如下的效果了,
DRAFT
就在各个
Pane
的下面了。
Zorder
是一个枚举共有七个枚举值。分别是
G_BehindAll
、
F_BehindAxisFill
、
E_BehindAxis
、
D_BehindCurves
、
C_BehindAxisBorder
、
B_BehindLegend
和
A_InFront
。具体的解释如
|
Member Name
|
Description
| ||
|
G_BehindAll
| |||
|
F_BehindAxisFill
| |||
|
E_BehindAxis
| |||
|
D_BehindCurves
| |||
|
C_BehindAxisBorder
| |||
|
B_BehindLegend
| |||
|
A_InFront
| |||
|
Member Name
|
Description
|
| |
|
G_BehindAll
|
| ||
|
F_BehindAxisFill
|
| ||
|
E_BehindAxis
|
| ||
|
D_BehindCurves
|
| ||
|
C_BehindAxisBorder
|
| ||
|
B_BehindLegend
|
| ||
|
A_InFront
|
| ||
|
|
|
|
|


 2968
2968

 被折叠的 条评论
为什么被折叠?


