


参数讲解
/** Create a shader that draws a linear gradient along a line.    创建一个shader绘制一条线
        @param x0           The x-coordinate for the start of the gradient line   开始坐标x
        @param y0           The y-coordinate for the start of the gradient line  开始坐标y
        @param x1           The x-coordinate for the end of the gradient line 结束坐标 x
        @param y1           The y-coordinate for the end of the gradient line 结束坐标y
        @param  colors      The colors to be distributed along the gradient line  颜色渐变数组
        @param  positions   May be null. The relative positions [0..1] of  位置是从0到1
                            each corresponding color in the colors array. If this is null,
                            the the colors are distributed evenly along the gradient line.
        @param  tile        The Shader tiling mode 模式 ,比如拉伸模式,重复模式,镜像模式,这个嘛,要给你一个图才能明白吧。
    */

    public LinearGradient(float x0, float y0, float x1, float y1, int colors[], float positions[],
            TileMode tile) {
绘制矩形,实现从左到右的线性渐变
颜色代码
private int[] mColors = {Color.RED,Color.GREEN,Color.BLUE,Color.YELLOW};颜色参数讲解
颜色positions我是不太理解的,只知道参数是4个,而且是0-1 的参数,
下面的代码意思就是从做到有,垂直没有,因为y是0 , 从左边到右发生颜色渐变
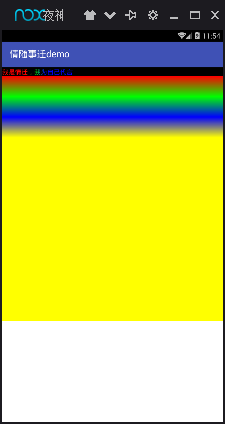
如果填写为null如下面的图1 依次红黄绿蓝,搞不懂为毛最后面还有一点点黄色。。
LinearGradient linearGradient = new LinearGradient( 0, 0,800, 0, mColors, null, Shader.TileMode.CLAMP);
        mPaint.setShader(linearGradient);
        canvas.drawRect(0, 0, 800, 800, mPaint);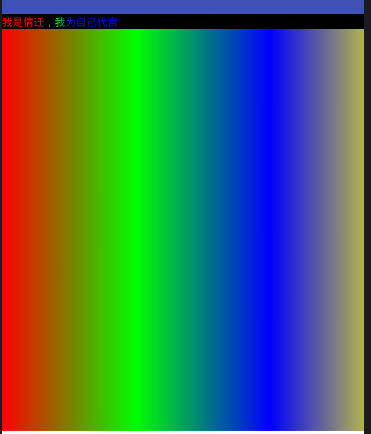
再试试携带颜色参数的。代码如下,如果我直接写成0,那么红色的区域就非常大,虽然不能猜出大概,但是我知道如果把第一个改成1那么就全红了,暂时可以理解为占用整个区域块的百分之几,而且是结束点,
LinearGradient linearGradient = new LinearGradient( 0, 0,800, 0, mColors, new float[]{0.25f,0.5f,0.75f,1.0f}, Shader.TileMode.CLAMP);
但是看图上图好像也不像,把第一个坐标填写小一点。试试改成0.25f,0.5f,0.75f,1.0f}
LinearGradient linearGradient = new LinearGradient( 0, 0,800, 0, mColors, new float[]{0.25f,0.5f,0.75f,1.0f}, Shader.TileMode.CLAMP);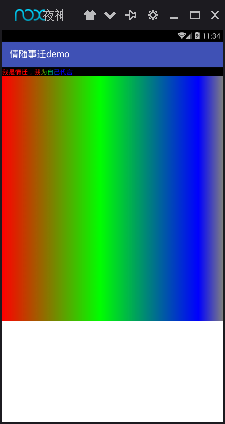
LinearGradient linearGradient = new LinearGradient( 0, 0,800, 0, mColors, new float[]{0f,0.4f,0.8f,1.0f}, Shader.TileMode.CLAMP);这次好像接近原配了吧。 也就是接近默认值,搞不懂这又不能填写起始点也不能填写重点,我怀疑是渐变的百分比划分,然后填写中心点?不过我这里 开始和结束都是最终点。。不太懂只知道大概的调整,精确的切分比例还是不知道哈。
xy起始点和终点讲解
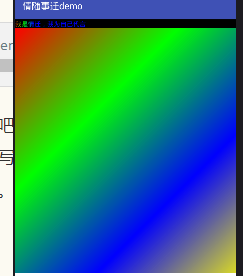
斜向渐变
LinearGradient linearGradient = new LinearGradient( 0, 0,800, 800, mColors, null, Shader.TileMode.CLAMP);效果:
如果x的终点不填写,那么是什么效果我想大家也明白,。好吧,看图
x 如果终点起始点一样,那么就是从上往下进行渐变
如果y终点其实点一样,那么就是从左往右边,
如果x和y从 数字变大,那么 就变成了斜角度的渐变,如果争取的数值一样,刚好是对角的60度
TileMode 平铺模式讲解
为了实现测试,绘制的矩形必须大于渐变的终点的一半才能看到效果
如下代码的代码shader的大小都会比绘制的矩形小
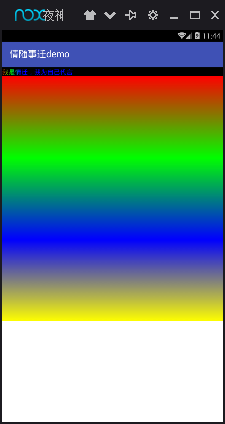
Shader.TileMode.CLAMP
LinearGradient linearGradient = new LinearGradient( 0, 0,0, 200, mColors, null, Shader.TileMode.CLAMP);
        mPaint.setShader(linearGradient);
        canvas.drawRect(0, 0, 800, 800, mPaint);
从下图得出结论,当宽度不够的时候把最后的那个颜色一致填充进去
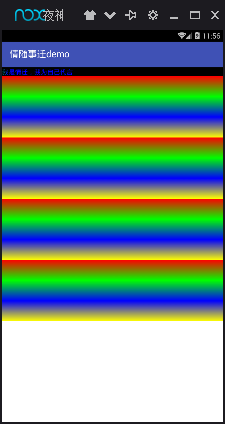
Shader.TileMode.MIRROR
LinearGradient linearGradient = new LinearGradient( 0, 0,0, 200, mColors, null, Shader.TileMode.MIRROR);

        mPaint.setShader(linearGradient);
        canvas.drawRect(0, 0, 800, 800, mPaint);
[图片上传中...(image.png-5bb592-1522166049830-0)]
下面的图就可以明白了吧,意思重复模式是起点->终点 然后从终点反方向到其实点,
红绿蓝黄 -> 黄 蓝 绿 红->红绿蓝黄->黄 蓝 绿 红
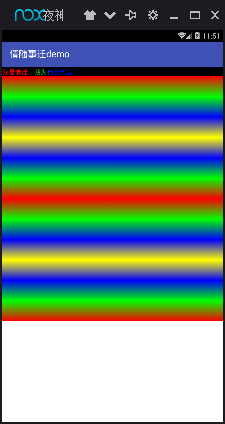
Shader.TileMode.REPEAT
和镜像模式不同,这个不会发生角度的颠覆,而是一致这样 一个一个重复,从上到下 或者从左到右的进行 颜色的重复绘制,这里只展示y坐标,x坐标我相信大家的想象力的哈!
自定义TextView渐变文字动画效果实现
上面还有一个效果就是文字渐变,实现方法
mPaint = getPaint();
        String text = getText().toString();
        float textWith = mPaint.measureText(text);
        // 3个文字的宽度
//       int gradientSize = (int) (textWith / text.length() * 3);
 int gradientSize = (int) (textWith / text.length() * 3);
//textWidth除字体总数就得到了每个字的像素    然后*3 表示3个文字的像素
        // 从左边-gradientSize开始,左边看不见的地方开始,滚动扫描过来,
        Log.w(TAG,"textWidth:"+textWith+",textLength:"+text.length()+",3个文字的宽度:"+gradientSize+",除掉之后:等于一个文字占用多少像素"+(textWith / text.length()));
        mLinearGradient = new LinearGradient(-gradientSize,0,0,0,new int[]{0xffff0000, 0xff00ff00, 0xff0000ff},null, Shader.TileMode.CLAMP
//        mLinearGradient = new LinearGradient(500,0,0,0,new int[]{0x22ffffff, 0xffffffff, 0x22ffffff},null, Shader.TileMode.CLAMP
        );

        mPaint.setShader(mLinearGradient);
    @Override
    protected void onDraw(Canvas canvas) {
        super.onDraw(canvas);
        mTranslate += DELTAX;
        float textWidth = getPaint().measureText(getText().toString());
        if(mTranslate > textWidth + 1 || mTranslate < 1){//如果位置已经移动到了整个文字的地方了那就开始往回滚动。但是如果小于1 了那么又开始递增,走另外一个逻辑
            DELTAX = - DELTAX;
        }

        mMatrix = new Matrix();
        mMatrix.setTranslate(mTranslate, 0);
        mLinearGradient.setLocalMatrix(mMatrix);
        postInvalidateDelayed(50);//paint是textview的所以只需要不断色控制画笔的shader  然后利用矩阵控制位移即可

    }


 1145
1145

 被折叠的 条评论
为什么被折叠?
被折叠的 条评论
为什么被折叠?
 到【灌水乐园】发言


