


 本文详细介绍了PyTorch中卷积操作的实现,包括nn.Conv2d的封装以及如何使用unfold, matmul, fold进行自定义卷积。nn.Unfold将输入张量分解成小块,matmul进行矩阵乘法,fold再将结果还原,整个过程等效于卷积操作。通过实例展示了输入输出的维度变化,并强调了这些操作在实际中的应用。
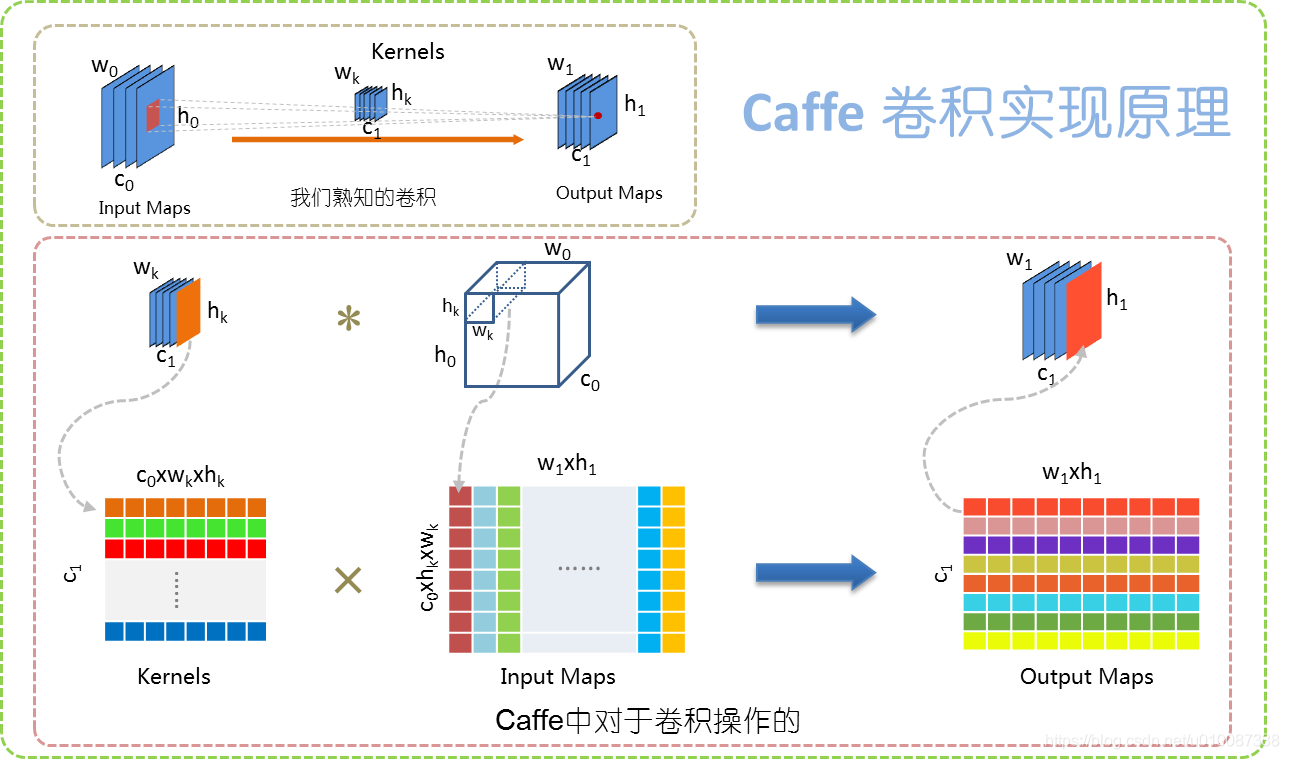
在pytorch中,我们常用的卷积是封装好了的卷积,如nn.Conv2d, 对应到原理图的左上那个子图
但如果封装好的这个卷积操作不能满足我们想要更细粒度的操作的话,pytorch还为我们提供了 unfold , matmul , fold 三个操作(conv = unfold + matmul + fold)
torch.nn.Unfold就是原理图下面中间的那个,也就算把一个立体的tensor(feature)分成 个部分(
个部分(kernel_size-sized block),然后把每一个准备和kernel相乘的部分拉直。该类的构造器的参数有:
torch.nn.Unfold(kernel_size, dilation=1, padding=0, stride=1)我们来看下unfold的输入和输出,其输入形状如: , 输出就是
unfold之后,我们构造 个可以学习的tensor
 作为kernels,并把它像左下图那样展开成
 ,注意这里的是kernel的个数
然后就用pytorch自带的matmul,把kernels 的展开乘unfold 之后的input tensor得到Output Maps,维度为
通过GPU并行加速相乘之后,我们还需要把计算结果Output Maps通过fold把它还原回tensor(feature),此时就需要用的pytorch中提供的
torch.nn.Fold(output_size, kernel_size, dilation=1, padding=0, stride=1)

# Combines an array of sliding local blocks into a large containing tensor.

# output_size (int or tuple) – the shape of the spatial dimensions of the output # (i.e., output.sizes()[2:])

# kernel_size (int or tuple) – the size of the sliding blocks

# stride (int or tuple) – the stride of the sliding blocks in the input spatial # dimensions. Default: 1

# padding (int or tuple, optional) – implicit zero padding to be added on both sides of input. Default: 0

# dilation (int or tuple, optional) – a parameter that controls the stride of elements within the neighborhood. Default: 1
fold的输入是Output Maps,输出是tensor
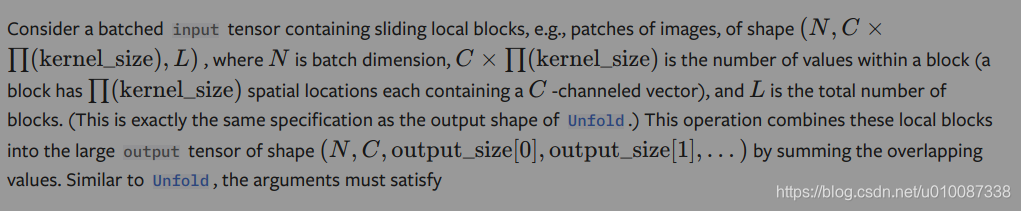
可以看出unfold 和 fold所作的仅仅是对 tensor的reshape而已.
当然实际上的官方文档,输入输出在维度上会在前面多加一个batch_num
实战例子:
输入 theta.shape = torch.Size([4, 256, 64, 64])
这里的
- 输入图片大小 W×W 为(64 * 64)
- Filter大小 F×F为(3*3)
- 步长 S 为 1
- padding的像素数 P 为 1
F.unfold(theta, kernel_size=3, padding=1).shape = {Size: 3} torch.Size([4, 2304, 4096])
2304 = 256 * 3 * 3
64 = (W − F + 2P )/S+1 = (64 - 3 + 2* 1) / 1 + 1
4096 = 64 * 64


 1701
1701

 被折叠的 条评论
为什么被折叠?
被折叠的 条评论
为什么被折叠?
 到【灌水乐园】发言


