


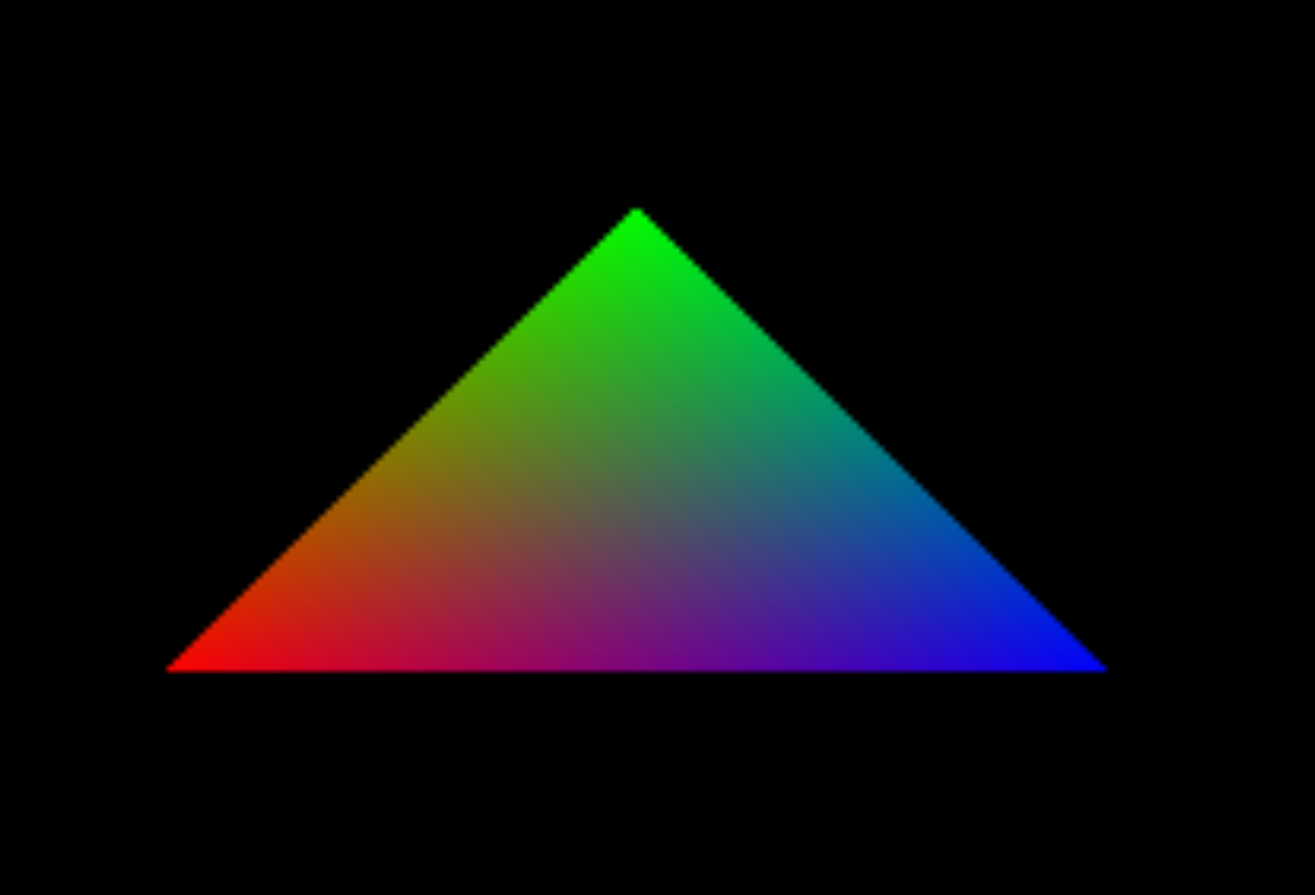
本教程中,我们使用WebGPU实现自己的第一个demo,绘制一个三角形,效果如下。
你的第一个三角形
- WebGPU 初始化
- 获取顶点buffer
- 生成着色器
- 创建渲染管线
- 开始渲染
WebGPU的初始化
if (!navigator.gpu) {
    console.error(
        "WebGPU cannot be initialized - navigator.gpu not found"
    );
    return null;
}
const adapter = await navigator.gpu.requestAdapter();
if (!adapter) {
    console.error("WebGPU cannot be initialized - Adapter not found");
    return null;
}
const device = await adapter.requestDevice();
device.lost.then(() => {
    console.error("WebGPU cannot be initialized - Device has been lost");
    return null;
});

const canvas = document.getElementById("canvas-container");
const context = canvas.getContext("webgpu");
if (!context) {
    console.error(
        "WebGPU cannot be initialized - Canvas does not support WebGPU"
    );
    return null;
}

// ~~ CONFIGURE THE SWAP CHAIN ~~
// https://carmencincotti.com/2022-04-18/drawing-a-webgpu-triangle/#swap-chain

// https://www.w3.org/TR/webgpu/#dom-gpu-getpreferredcanvasformat
const presentationFormat = navigator.gpu.getPreferredCanvasFormat();

context.configure({
    device, // Create link between GPU and canvas.
    format: presentationFormat,
    alphaMode: "opaque"
});
创建顶点buffer
const vertices = new Float32Array([
    -1.0, -1.0, 0, 1, 1, 0, 0, 1, // Bottom left, red
    -0.0, 1.0, 0, 1, 0, 1, 0, 1, // Top, green
    1.0, -1.0, 0, 1, 0, 0, 1, 1, // Bottom right, blue
]);

const vertexBuffer = device.createBuffer({
    size: vertices.byteLength,
    usage: GPUBufferUsage.VERTEX | GPUBufferUsage.COPY_DST,
    mappedAtCreation: true,
});
new Float32Array(vertexBuffer.getMappedRange()).set(vertices);
vertexBuffer.unmap();

const vertexBuffersDescriptors = [
    {
        attributes: [
            {
                shaderLocation: 0,
                offset: 0,
                format: "float32x4",
            },
            {
                shaderLocation: 1,
                offset: 16,
                format: "float32x4",
            },
        ],
        arrayStride: 32,
        stepMode: "vertex",
    },
];
生成着色器
device.createShaderModule({
    code: `
    struct VertexOut {
        @builtin(position) position : vec4<f32>,
        @location(0) color : vec4<f32>,
    };
    @vertex
    fn vertex_main(@location(0) position: vec4<f32>,
                @location(1) color: vec4<f32>) -> VertexOut
    {
        var output : VertexOut;
        output.position = position;
        output.color = color;
        return output;
    }
    @fragment
    fn fragment_main(fragData: VertexOut) -> @location(0) vec4<f32>
    {
        return fragData.color;
    }
`,
});
生成渲染管线
device.createRenderPipeline({
    layout: "auto",
    vertex: {
        module: shader,
        entryPoint: "vertex_main",
        buffers: buffer,
    },
    fragment: {
        module: shader,
        entryPoint: "fragment_main",
        targets: [
            {
                format: format,
            },
        ],
    },
    primitive: {
        topology: "triangle-list",
    },
});
开始渲染
// CREATE RENDER PASS DESCRIPTOR
const renderPassDescriptor = {
    colorAttachments: [
        {
            loadOp: "clear", // Clear image on each load
            clearValue: { r: 0.0, g: 0.0, b: 0.0, a: 1.0 }, // Clear image with this color
            storeOp: "store", // Write result to the view
        },
    ],
};

// Get the latest swap chain image, set as our output color attachment image
renderPassDescriptor.colorAttachments[0].view = context
    .getCurrentTexture()
    .createView();

// Create command encoder to record rendering commands
const commandEncoder = device.createCommandEncoder();

// Pass render pass descriptor to get back a GPURenderPassEncorder
// So that we can record rendering commands
const passEncoder =
    commandEncoder.beginRenderPass(renderPassDescriptor);

// Configure the pass encoder
passEncoder.setPipeline(pipeline);
passEncoder.setVertexBuffer(0, vertexBuffer);

// Draw the triangle
passEncoder.draw(3);

// End the render pass
passEncoder.end();

// Get command buffer to submit to GPU, by calling commandEncoder.finish()
device.queue.submit([commandEncoder.finish()]);
完整代码
<!DOCTYPE html>
<html lang="en">
<head>
    <meta charset="UTF-8">
    <title>Hello Triangle</title>
    <meta http-equiv="origin-trial" content="Aur6816HZSeTSDgWPVZxIbGVORxtV6IpceN0NFyAztIY+7Bm/uFe1AKC+rqXvdhUIUA9+8B7Pw28BVxTxDzsIQoAAABKeyJvcmlnaW4iOiJodHRwOi8vbG9jYWxob3N0OjYzMzQyIiwiZmVhdHVyZSI6IldlYkdQVSIsImV4cGlyeSI6MTY5MTcxMTk5OX0=">

</head>
<body>
<canvas id="canvas-container"></canvas>
<style>
    html, body, #canvas-container {
        margin: 0;
        padding: 0;
        width: 100%;
        height: 100%;
    }

</style>
<script>
    async function main(){

        const {device, context, presentationFormat} = await initWebGPU()

        // 获取顶点数据
        const  {vertexBuffer, vertexBuffersDescriptors} = getVertexData(device);


        // 获取着色器
        const shaderModule = getShader(device)

        // 创建渲染管线
        const pipeline = createPipeLine(device, shaderModule, vertexBuffersDescriptors, presentationFormat)

        // 开始渲染
        render(context, device, pipeline, vertexBuffer)
    }

    main();

    async function initWebGPU(){
        // ~~ INITIALIZE ~~ Make sure we can initialize WebGPU in the browser
        // https://carmencincotti.com/2022-04-18/drawing-a-webgpu-triangle/#adapter-and-device
        if (!navigator.gpu) {
            console.error(
                "WebGPU cannot be initialized - navigator.gpu not found"
            );
            return null;
        }
        const adapter = await navigator.gpu.requestAdapter();
        if (!adapter) {
            console.error("WebGPU cannot be initialized - Adapter not found");
            return null;
        }
        const device = await adapter.requestDevice();
        device.lost.then(() => {
            console.error("WebGPU cannot be initialized - Device has been lost");
            return null;
        });

        const canvas = document.getElementById("canvas-container");
        const context = canvas.getContext("webgpu");
        if (!context) {
            console.error(
                "WebGPU cannot be initialized - Canvas does not support WebGPU"
            );
            return null;
        }

        // ~~ CONFIGURE THE SWAP CHAIN ~~
        // https://carmencincotti.com/2022-04-18/drawing-a-webgpu-triangle/#swap-chain

        // https://www.w3.org/TR/webgpu/#dom-gpu-getpreferredcanvasformat
        const presentationFormat = navigator.gpu.getPreferredCanvasFormat();

        context.configure({
            device, // Create link between GPU and canvas.
            format: presentationFormat,
            alphaMode: "opaque"
        });

        return {device, context, presentationFormat}
    }

    function getVertexData(device){
        const vertices = new Float32Array([
            -0.5, -0.5, 0, 1, 1, 0, 0, 1, // Bottom left, red
            -0.0, 0.5, 0, 1, 0, 1, 0, 1, // Top, green
            0.5, -0.5, 0, 1, 0, 0, 1, 1, // Bottom right, blue
        ]);

        const vertexBuffer = device.createBuffer({
            size: vertices.byteLength,
            usage: GPUBufferUsage.VERTEX | GPUBufferUsage.COPY_DST,
            mappedAtCreation: true,
        });
        new Float32Array(vertexBuffer.getMappedRange()).set(vertices);
        vertexBuffer.unmap();

        const vertexBuffersDescriptors = [
            {
                attributes: [
                    {
                        shaderLocation: 0,
                        offset: 0,
                        format: "float32x4",
                    },
                    {
                        shaderLocation: 1,
                        offset: 16,
                        format: "float32x4",
                    },
                ],
                arrayStride: 32,
                stepMode: "vertex",
            },
        ];

        return {vertexBuffer, vertexBuffersDescriptors}
    }

    function createPipeLine(device, shader, buffer, format){
        return device.createRenderPipeline({
            layout: "auto",
            vertex: {
                module: shader,
                entryPoint: "vertex_main",
                buffers: buffer,
            },
            fragment: {
                module: shader,
                entryPoint: "fragment_main",
                targets: [
                    {
                        format: format,
                    },
                ],
            },
            primitive: {
                topology: "triangle-list",
            },
        });
    }

    function getShader(device){
        return device.createShaderModule({
            code: `
                    struct VertexOut {
                        @builtin(position) position : vec4<f32>,
                        @location(0) color : vec4<f32>,
                    };
                    @vertex
                    fn vertex_main(@location(0) position: vec4<f32>,
                                @location(1) color: vec4<f32>) -> VertexOut
                    {
                        var output : VertexOut;
                        output.position = position;
                        output.color = color;
                        return output;
                    }
                    @fragment
                    fn fragment_main(fragData: VertexOut) -> @location(0) vec4<f32>
                    {
                        return fragData.color;
                    }
                `,
        });
    }

    function render(context, device, pipeline, vertexBuffer) {
        // CREATE RENDER PASS DESCRIPTOR
        const renderPassDescriptor = {
            colorAttachments: [
                {
                    loadOp: "clear", // Clear image on each load
                    clearValue: { r: 0.0, g: 0.0, b: 0.0, a: 1.0 }, // Clear image with this color
                    storeOp: "store", // Write result to the view
                },
            ],
        };

        // Get the latest swap chain image, set as our output color attachment image
        renderPassDescriptor.colorAttachments[0].view = context
            .getCurrentTexture()
            .createView();

        // Create command encoder to record rendering commands
        const commandEncoder = device.createCommandEncoder();

        // Pass render pass descriptor to get back a GPURenderPassEncorder
        // So that we can record rendering commands
        const passEncoder =
            commandEncoder.beginRenderPass(renderPassDescriptor);

        // Configure the pass encoder
        passEncoder.setPipeline(pipeline);
        passEncoder.setVertexBuffer(0, vertexBuffer);

        // Draw the triangle
        passEncoder.draw(3);

        // End the render pass
        passEncoder.end();

        // Get command buffer to submit to GPU, by calling commandEncoder.finish()
        device.queue.submit([commandEncoder.finish()]);

        requestAnimationFrame(render);
    }

</script>
</body>
</html>
Token的申请与使用(开发版本的chrome或者未来的chrome可以忽略该项)
- 申请链接
- 找到WebGPU的Token申请

- 填写信息(请求协议、域名、端口号)
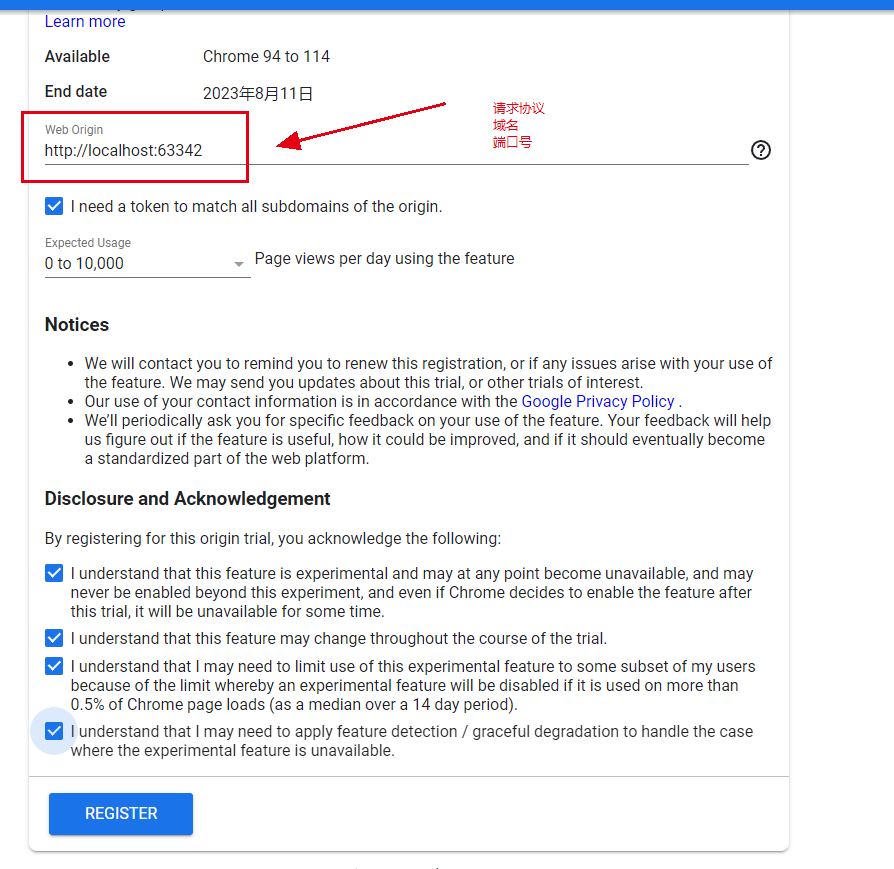
- 在页面中添加token
<meta http-equiv="origin-trial" content="token">


 1388
1388


 被折叠的 条评论
为什么被折叠?
被折叠的 条评论
为什么被折叠?
 到【灌水乐园】发言


