


TableLayout
参考
概述
通过行列进行排列,TableLayout下有几个子视图就有几行。如果子视图不是TableRow,那该视图就独占一行。如果子视图为TableRow,那TableRow里面的视图共占一行。而且所有TableRow子视图的个数的最大值便是Tablelayout的列数。
同一行中,即使将某一列指定为可以伸展,它也不会将同列的其它视图挤出屏幕,类似于将该视图的weight设置为1,但是比设置weight更方便。
它的弊端:没办法进行跨列。而且每一个TableRow子组件的宽高默认时都是wrap_content。当组件直属于TableLayout时,它的宽又是match_parent,无法更改。
属性
stretchColumns:可以进行伸长的列
shrinkColumns:可以进行收缩的列
collapseColumns:可以进行隐藏的列
layout_column:该view属于第几列(TableRow子view可使用,TableLayout子view不可使用)。
layout_span:该view占据几列(同上)
GridLayout
概述
其为4.0之后新添的布局,support-v7包中也有。
与LinearLayout类似,它也需要指定方向,默认是水平,并且用的属性也与LinearLayout一样。水平时,其子View会按水平排列。垂直也类似。
可以使用属性android:columnCount与android:rowCount指定行数和列数,如果想要某个子View显示在固定的行和列,通过layout_column与android:layout_row进行设置,注意这两个值都是从0开始的。如果当前行或者列,放不下要添加的子View,就会自动换行或者换行。默认时,其子控件都是宽高都是wrap_content。
如果想要设置某个子View横跨多个行和列,可以通过layout_rowSpan与layout_columnSpan进行设置。
GridLayout有一个很不方便的地方,每一行的子view进行平分很麻烦。在api21和新版的support-v7中可以通过新添加的layout_columnWeight进行平分。同时还要指定layout_gravity=fill
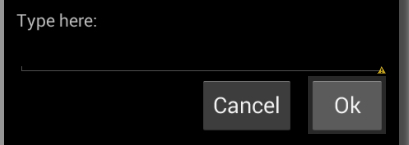
示例:
基本用法
<GridLayout xmlns:android="http://schemas.android.com/apk/res/android"
    android:layout_width="match_parent"
    android:layout_height="wrap_content"
    android:columnCount="4"
    android:orientation="horizontal"
    android:padding="10dip" >

    <TextView android:text="@string/grid_layout_1_instructions" />

    <EditText
        android:layout_column="0"
        android:layout_columnSpan="4"
        android:layout_gravity="fill_horizontal" />

    <Button
        android:layout_column="2"
        android:text="@string/grid_layout_1_cancel" />

    <Button
        android:layout_marginLeft="10dip"
        android:text="@string/grid_layout_1_ok" />

</GridLayout>
计算器布局
<android.support.v7.widget.GridLayout xmlns:android="http://schemas.android.com/apk/res/android"
    xmlns:demo="http://schemas.android.com/apk/res/com.baigle.viewdemo"
    android:layout_width="match_parent"
    android:layout_height="wrap_content"
    android:background="#ffffff"
    demo:columnCount="4"
    demo:orientation="horizontal"
    demo:rowCount="5" >

    <Button
        android:id="@+id/one"
        android:layout_width="0dp"
        demo:layout_columnWeight="1"
        demo:layout_gravity="fill"
        android:text="1" />

    <Button
        android:id="@+id/two"
        android:layout_width="0dp"
        demo:layout_columnWeight="1"
        demo:layout_gravity="fill"
        android:text="2" />

    <Button
        android:id="@+id/three"
        android:layout_width="0dp"
        demo:layout_columnWeight="1"
        demo:layout_gravity="fill"
        android:text="3" />

    <Button
        android:id="@+id/devide"
        android:layout_width="0dp"
        demo:layout_columnWeight="1"
        demo:layout_gravity="fill"
        android:text="/" />

    <Button
        android:id="@+id/zero"
        android:layout_width="0dp"
        demo:layout_columnSpan="2"
        demo:layout_columnWeight="1"
        demo:layout_gravity="fill"
        android:text="0" />

    <Button
        android:id="@+id/point"
        android:layout_width="0dp"
        demo:layout_columnWeight="1"
        demo:layout_gravity="fill"
        android:text="." />

    <Button
        android:id="@+id/plus"
        android:layout_width="0dp"
        demo:layout_columnWeight="1"
        demo:layout_gravity="fill"
        demo:layout_rowSpan="2"
        android:text="+" />

    <Button
        android:id="@+id/equal"
        android:layout_width="0dp"
        demo:layout_columnSpan="3"
        demo:layout_columnWeight="1"
        demo:layout_gravity="fill"
        android:text="=" />

</android.support.v7.widget.GridLayout>
其中最主要的是
        android:layout_width="0dp"
        demo:layout_columnWeight="1"
        demo:layout_gravity="fill"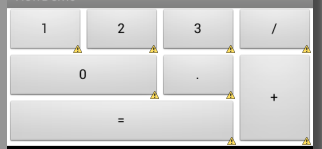


 687
687

 被折叠的 条评论
为什么被折叠?
被折叠的 条评论
为什么被折叠?
 到【灌水乐园】发言


