
既有适合小白学习的零基础资料,也有适合3年以上经验的小伙伴深入学习提升的进阶课程,涵盖了95%以上物联网嵌入式知识点,真正体系化!
由于文件比较多,这里只是将部分目录截图出来,全套包含大厂面经、学习笔记、源码讲义、实战项目、大纲路线、电子书籍、讲解视频,并且后续会持续更新
需要这些体系化资料的朋友,可以加我V获取:vip1024c (备注嵌入式)
	}
	T& operator * ()
	{
		return *_ptr;
	}

	~auto_ptr()
	{
		if (_ptr)
		{
			delete _ptr;
			_ptr = nullptr;
			cout << "auto_ptr->析构了" << endl;
		}
	}
	T* _ptr;
};
## 四: unique\_ptr


* C++11中开始提供更靠谱的unique\_ptr
int main()
{
unique_ptr up(new Date);
// unique_ptr的设计思路非常的粗暴-防拷贝,也就是不让拷贝和赋值。
unique_ptr copy(ap);
return 0;
}
* unique\_ptr的实现原理:简单粗暴的防拷贝


### unique\_ptr 模拟实现
//2.unique_ptr
template
class unique_ptr //取消赋值和拷贝
{
public:
//构造函数
unique_ptr(T* ptr)
:_ptr(ptr)
{}
	unique_ptr(unique_ptr<T>& up) = delete;
	unique_ptr<T>& operator = (unique_ptr<T>& up) = delete;

	T* operator ->()
	{
		return _ptr;
	}
	T& operator * ()
	{
		return *_ptr;
	}

	~unique_ptr()
	{
		if (_ptr)
		{
			delete _ptr;
			_ptr = nullptr;
			cout << "unique_ptr->析构了" << endl;
		}
	}
	T* _ptr;
};
## 五:shared\_ptr


>
> C++11中开始提供更靠谱的并且支持拷贝的shared\_ptr
>
>
>
int main()
{
// shared_ptr通过引用计数支持智能指针对象的拷贝
shared_ptr sp(new Date);
shared_ptr copy(sp);
cout << “ref count:” << sp.use_count() << endl;
cout << “ref count:” << copy.use_count() << endl;
return 0;
}
* hared\_ptr的原理:是通过引用计数的方式来实现多个shared\_ptr对象之间共享资源。
* 例如:老师晚上在下班之前都会通知,让最后走的学生记得把门锁下。


1. shared\_ptr在其内部,**给每个资源都维护了着一份计数,用来记录该份资源被几个对象共享**。
2. 在**对象被销毁时(也就是析构函数调用)**,就说明自己不使用该资源了,对象的引用计数减一。\*\*
3. 如果引用计数是0\*\*,就说明自己是最后一个使用该资源的对象,**必须释放该资源**;\*\*
4. \*\*如果不是0,就说明除了自己还有其他对象在使用该份资源,\*\*不能释放该资源,否则其他对象就成野指
 针了。


### shared\_ptr 模拟实现
template
class shared_ptr
{
public:
//构造函数
shared_ptr(T* ptr)
:_ptr(ptr)
, _count (new int(1))
, _pm(new std::mutex)
{}
	shared_ptr(shared_ptr<T>& sp)
		:_ptr(sp._ptr)
		, _count(sp._count)
		, _pm(sp._pm)
	{
		Add_Count();
	}

	shared_ptr<T>& operator=(const shared_ptr<T>& sp)
	{
		if (_ptr != sp._ptr)
		{
			Release();

			_ptr = sp._ptr;
			_count = sp._count;
			_pm = sp._pm;

			Add_Count();
		}
	}

	//对_count的保护
	void Add_Count()
	{
		_pm->lock();
		(*_count)++;
		_pm->unlock();
	}

	void Release()
	{
		_pm->lock();

		bool flag = false;//判断锁是否释放

		if (--(*_count) == 0 && _ptr)
		{
			delete _ptr;
			delete _count;
			std::cout << "析构了" << std::endl;
			flag = true;
		}

		_pm->unlock();
		if (flag)
			delete _pm;
	}

	//指针
	T& operator*()
	{
		return *_ptr;
	}
	T* operator ->()
	{
		return _ptr;
	}
	//析构函数
	~shared_ptr()
	{
		Release();
	}
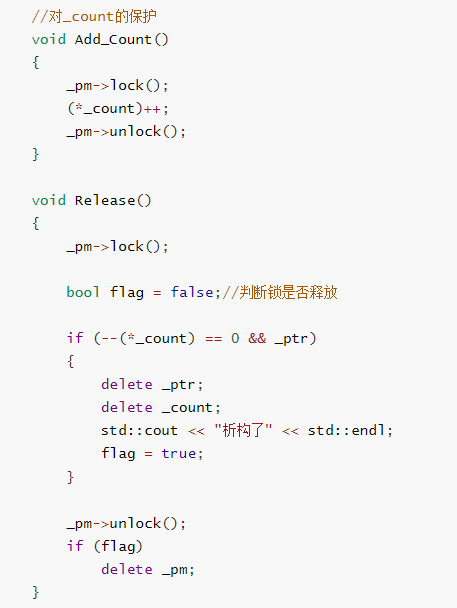
* shared\_ptr的线程安全问题 :
1. 智能指针对象中引用计数是多个智能指针对象共享的,两个线程中智能指针的引用计数同时++或–,这
个操作不是原子的,引用计数原来是1,++了两次,可能还是2.这样引用计数就错乱了。会导致资源未
释放或者程序崩溃的问题。所以只能指针中引用计数++、–是需要加锁的,也就是说引用计数的操作是
线程安全的。
2. 智能指针管理的对象存放在堆上,两个线程中同时去访问,会导致线程安全问题。
>
> 所以我们引入了锁来解决这个问题:
>
>
> 
>
>
>
## 六:weak\_ptr
* shared\_ptr的循环引用 :
struct ListNode
{
int _data;
shared_ptr _prev;
shared_ptr _next;
~ListNode(){ cout << “~ListNode()” << endl;
};
int main()
{
shared_ptr node1(new ListNode);
shared_ptr node2(new ListNode);
cout << node1.use_count() << endl;
cout << node2.use_count() << endl;
node1->_next = node2;
node2->_prev = node1;
cout << node1.use_count() << endl;
cout << node2.use_count() << endl;
return 0;
}
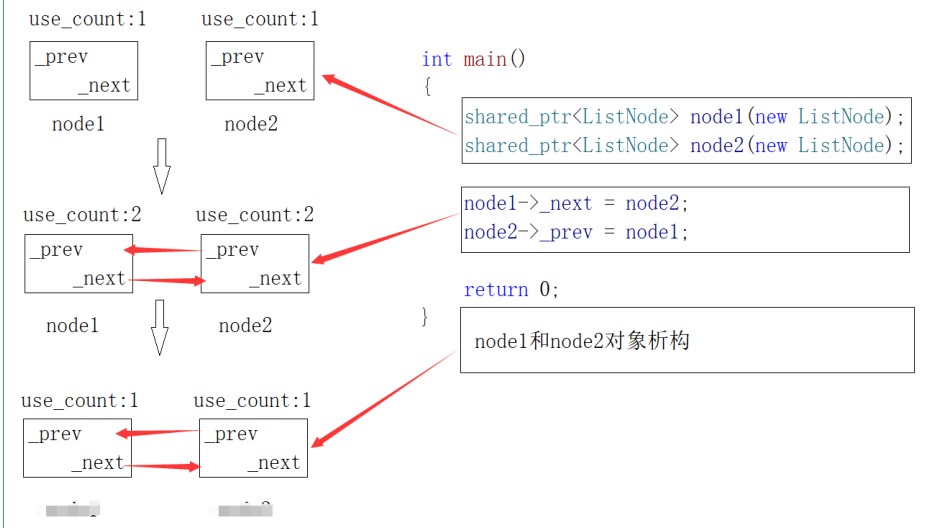
* 循环引用分析:
1. node1和node2两个智能指针对象指向两个节点,引用计数变成1,我们不需要手动delete。
2. node1的\_next指向node2,node2的\_prev指向node1,引用计数变成2。
3. node1和node2析构,引用计数减到1,但是\_next还指向下一个节点。但是\_prev还指向上一个节点。
4. 也就是说\_next析构了,node2就释放了。
5. \_ 也就是说\_prev析构了,node1就释放了。
6. \_ 但是\_next属于node的成员,node1释放了,\_next才会析构,而node1由\_prev管理,\_prev属于node2
成员,所以这就叫循环引用,谁也不会释放。

* 解决方案:
在引用计数的场景下,把节点中的\_prev和\_next改成weak\_ptr就可以了
// 原理就是,node1->_next = node2;和node2->_prev = node1;时weak_ptr的_next和_prev不会增加
node1和node2的引用计数。
struct ListNode
{
int _data;
weak_ptr _prev;
weak_ptr _next;
~ListNode(){ cout << “~ListNode()” << endl; }
};
int main()
{
shared_ptr node1(new ListNode);
shared_ptr node2(new ListNode);
cout << node1.use_count() << endl;
cout << node2.use_count() << endl;
node1->_next = node2;
node2->_prev = node1;
cout << node1.use_count() << endl;
cout << node2.use_count() << endl;
return 0;
}
## 七:删除器


>
> 如果不是new出来的对象如何通过智能指针管理呢?
>
>
> 其实shared\_ptr设计了一个删除器来解决这个问题
>
>
>
// 仿函数的删除器
template
struct FreeFunc {
void operator()(T* ptr)
{
cout << “free:” << ptr << endl;
free(ptr);
}
};
template
struct DeleteArrayFunc {
void operator()(T* ptr)
{
cout << “delete[]” << ptr << endl;
delete[] ptr;
}
};
int main()
{
FreeFunc freeFunc;
shared_ptr sp1((int*)malloc(4), freeFunc);
DeleteArrayFunc deleteArrayFunc;
shared_ptr sp2((int*)malloc(4), deleteArrayFunc);
return 0;
}
## 八:C++11和boost中智能指针的关系


1. C++ 98 中产生了第一个智能指针auto\_ptr.
2. C++ boost给出了更实用的scoped\_ptr和shared\_ptr和weak\_ptr.
3. C++ TR1,引入了shared\_ptr等。不过注意的是TR1并不是标准版。
4. C++ 11,引入了unique\_ptr和shared\_ptr和weak\_ptr。需要注意的是unique\_ptr对应boost的
 scoped\_ptr。并且这些智能指针的实现原理是参考boost中的实现的。


## 九:RAII扩展学习


>
> RAII思想除了可以用来设计智能指针,还可以用来设计守卫锁,防止异常安全导致的死锁问题
>
>
>
#include
#include
// C++11的库中也有一个lock_guard,下面的LockGuard造轮子其实就是为了学习他的原理
template
class LockGuard
{
public:
LockGuard(Mutex& mtx)
:_mutex(mtx)
{
_mutex.lock();
}
~LockGuard()
{
_mutex.unlock();
}
LockGuard(const LockGuard&) = delete;
private:
// 注意这里必须使用引用,否则锁的就不是一个互斥量对象
Mutex& _mutex;
};
mutex mtx;
static int n = 0;
void Func()
{
for (size_t i = 0; i < 1000000; ++i)
{
LockGuard lock(mtx);
++n;
}
}
int main()
{
int begin = clock();
thread t1(Func);
thread t2(Func);
t1.join();
t2.join();
int end = clock();
cout << n << endl;
cout <<“cost time:” <<end - begin << endl;
return 0;
}
## 十:整体代码的展示
#include
#include
#include
#include
using namespace std;
namespace ymh
{
//1.auto_ptr
template
class auto_ptr //交换管理权
{
public:
//构造函数
auto_ptr(T* ptr)
:_ptr(ptr)
{}
	auto_ptr( auto_ptr& ap)
		:_ptr(ap._ptr)
	{
		ap._ptr = nullptr;
	}


既有适合小白学习的零基础资料,也有适合3年以上经验的小伙伴深入学习提升的进阶课程,涵盖了95%以上物联网嵌入式知识点,真正体系化!
由于文件比较多,这里只是将部分目录截图出来,全套包含大厂面经、学习笔记、源码讲义、实战项目、大纲路线、电子书籍、讲解视频,并且后续会持续更新
需要这些体系化资料的朋友,可以加我V获取:vip1024c (备注嵌入式)
tr(T* ptr)
:_ptr(ptr)
{}
	auto_ptr( auto_ptr& ap)
		:_ptr(ap._ptr)
	{
		ap._ptr = nullptr;
	}
[外链图片转存中…(img-sHXRO9VK-1715847212841)]
[外链图片转存中…(img-5nAdH3l7-1715847212841)]
既有适合小白学习的零基础资料,也有适合3年以上经验的小伙伴深入学习提升的进阶课程,涵盖了95%以上物联网嵌入式知识点,真正体系化!
由于文件比较多,这里只是将部分目录截图出来,全套包含大厂面经、学习笔记、源码讲义、实战项目、大纲路线、电子书籍、讲解视频,并且后续会持续更新
需要这些体系化资料的朋友,可以加我V获取:vip1024c (备注嵌入式)


 3万+
3万+

 被折叠的 条评论
为什么被折叠?


