


Pybrain是一个比较有名的Python神经网络库,今天我用它做了一个实验,参考了这篇博客,感谢原作者,给出了具体的实现,代码可以直接拷贝运行。
我们的问题主要如下:

首先我们给出构造生成这个题目要求的数据集的函数
def generate_data():
    """generate original data of u and y"""
    u = np.random.uniform(-1,1,200)
    y=[]
    former_y_value = 0
    for i in np.arange(0,200):
        y.append(former_y_value)
        next_y_value = (29 / 40) * np.sin(
            (16 * u[i] + 8 * former_y_value) / (3 + 4 * (u[i] ** 2) + 4 * (former_y_value ** 2))) \
                       + (2 / 10) * u[i] + (2 / 10) * former_y_value
        former_y_value = next_y_value
    return u,y
这个题目的函数画出来是这样子的:
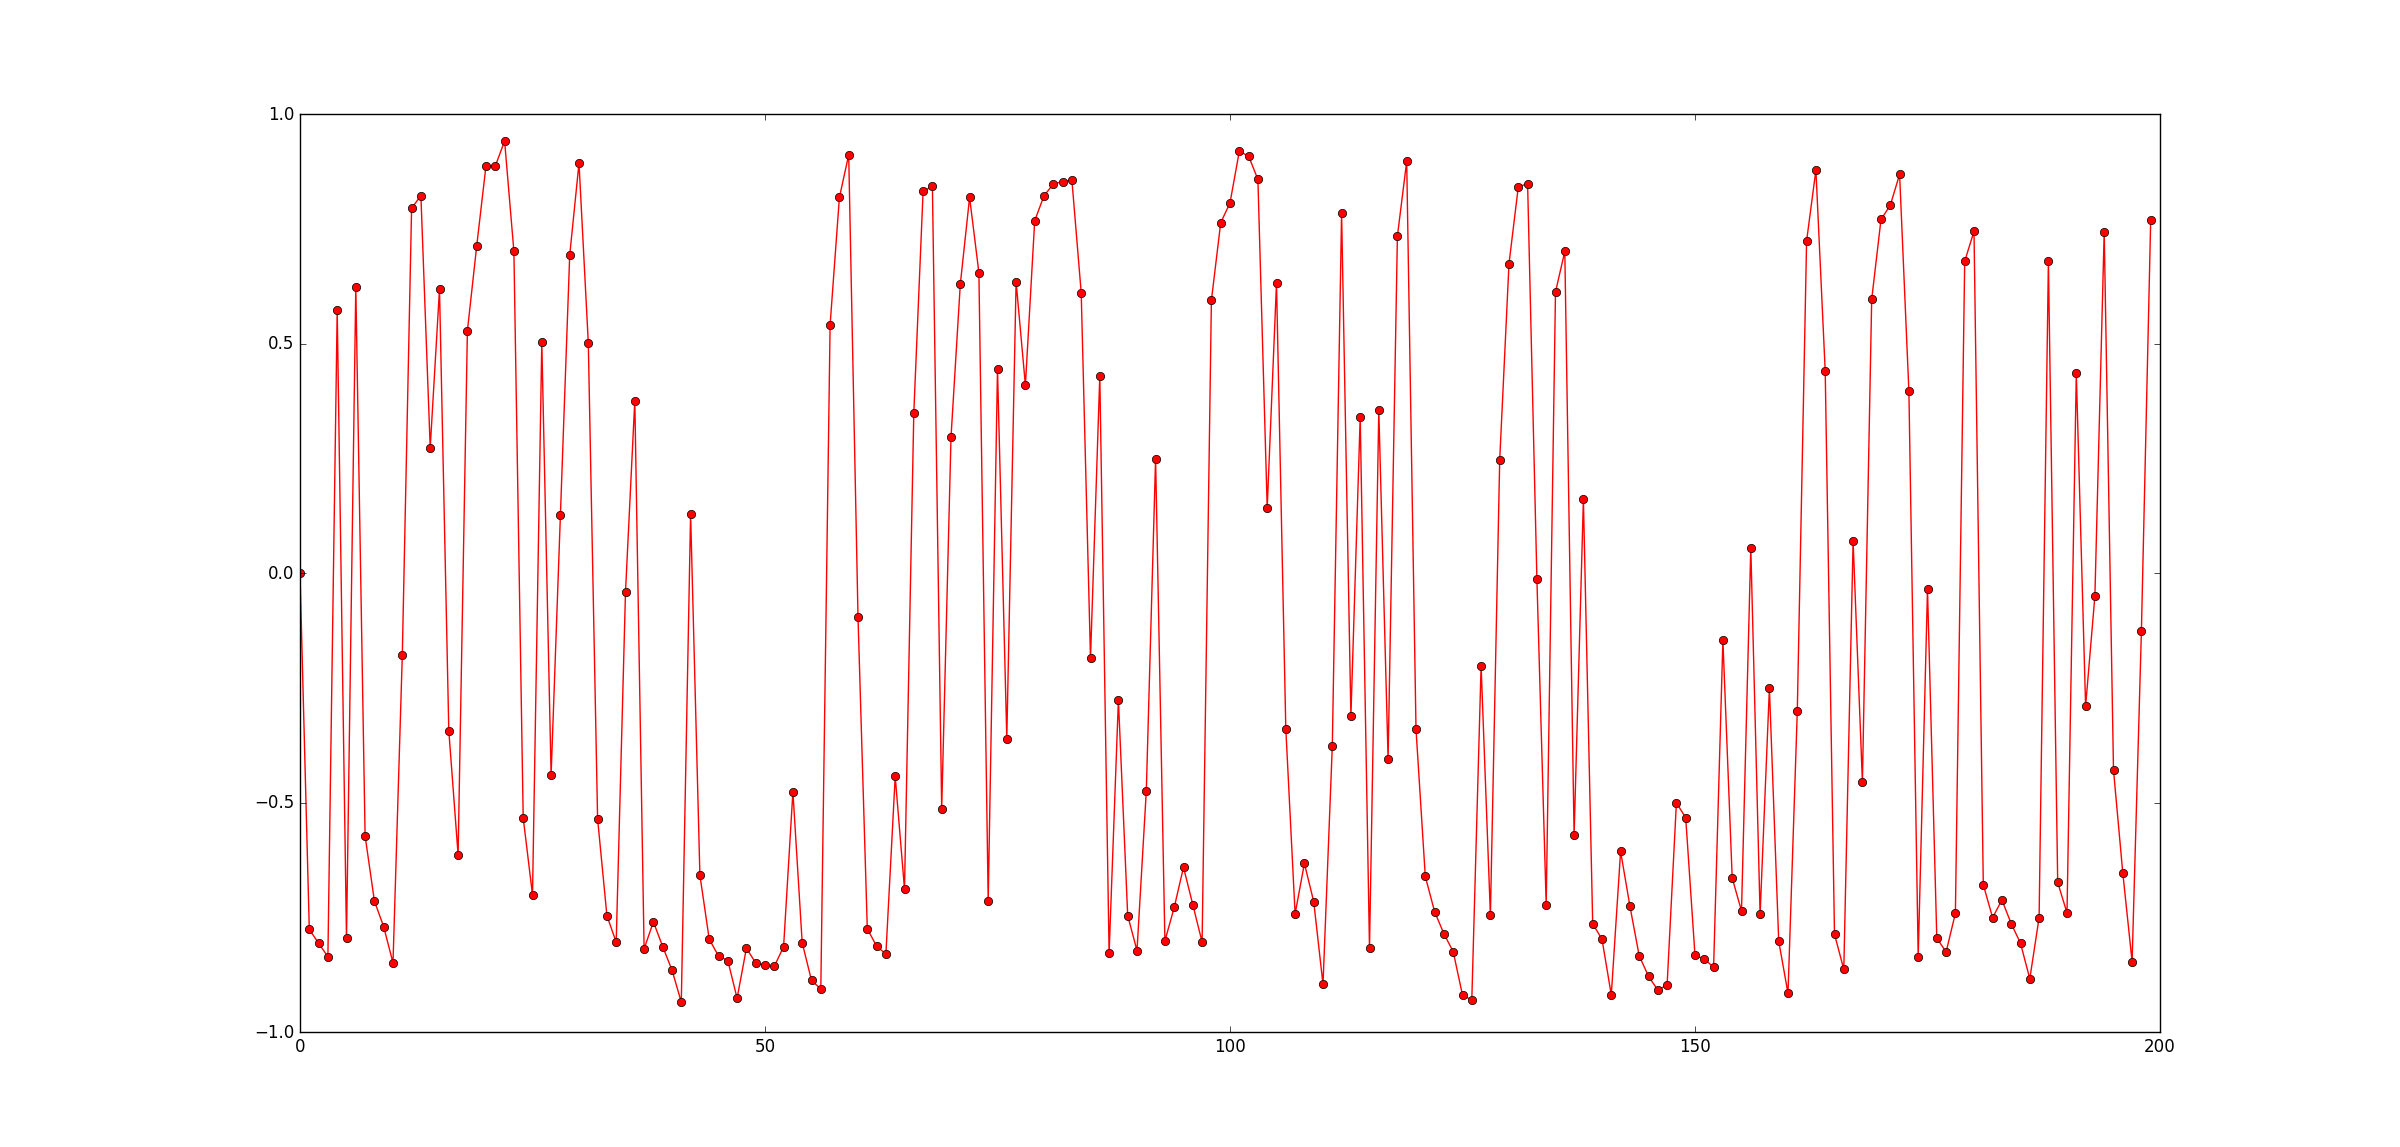
我们的例子,就是用前100个点训练,后100个点作为预测。
构建Pybrain神经网络的基本步骤:
- 构建神经网路
- 构造数据集
- 训练神经网络
- 结果可视化
- 验证和分析
构造神经网路
构建神经网络的过程非常清晰,设置几个层次,几个节点,都简单明了,看一次就会了。
import numpy as np
import matplotlib.pyplot as plt

from pybrain.structure import *
from pybrain.datasets import SupervisedDataSet
from pybrain.supervised.trainers import BackpropTrainer

# createa neural network
fnn = FeedForwardNetwork()

# create three layers, input layer:2 input unit; hidden layer: 10 units; output layer: 1 output
inLayer = LinearLayer(2, name='inLayer')
hiddenLayer0 = SigmoidLayer(10, name='hiddenLayer0')
outLayer = LinearLayer(1, name='outLayer')

# add three layers to the neural network
fnn.addInputModule(inLayer)
fnn.addModule(hiddenLayer0)
fnn.addOutputModule(outLayer)

# link three layers
in_to_hidden0 = FullConnection(inLayer,hiddenLayer0)
hidden0_to_out = FullConnection(hiddenLayer0, outLayer)

# add the links to neural network
fnn.addConnection(in_to_hidden0)
fnn.addConnection(hidden0_to_out)

# make neural network come into effect
fnn.sortModules()
构建数据集
我们选择2输入1输出,80%用于训练,20%用于预测
# definite the dataset as two input , one output
DS = SupervisedDataSet(2,1)

# add data element to the dataset
for i in np.arange(199):
    DS.addSample([u[i],y[i]],[y[i+1]])

# you can get your input/output this way
X = DS['input']
Y = DS['target']

# split the dataset into train dataset and test dataset
dataTrain, dataTest = DS.splitWithProportion(0.8)
xTrain, yTrain = dataTrain['input'],dataTrain['target']
xTest, yTest = dataTest['input'], dataTest['target']
训练神经网路
我们暂且让他迭代1000次
# train the NN
# we use BP Algorithm
# verbose = True means print th total error
trainer = BackpropTrainer(fnn, dataTrain, verbose=True,learningrate=0.01)
# set the epoch times to make the NN  fit
trainer.trainUntilConvergence(maxEpochs=1000)
结果可视化
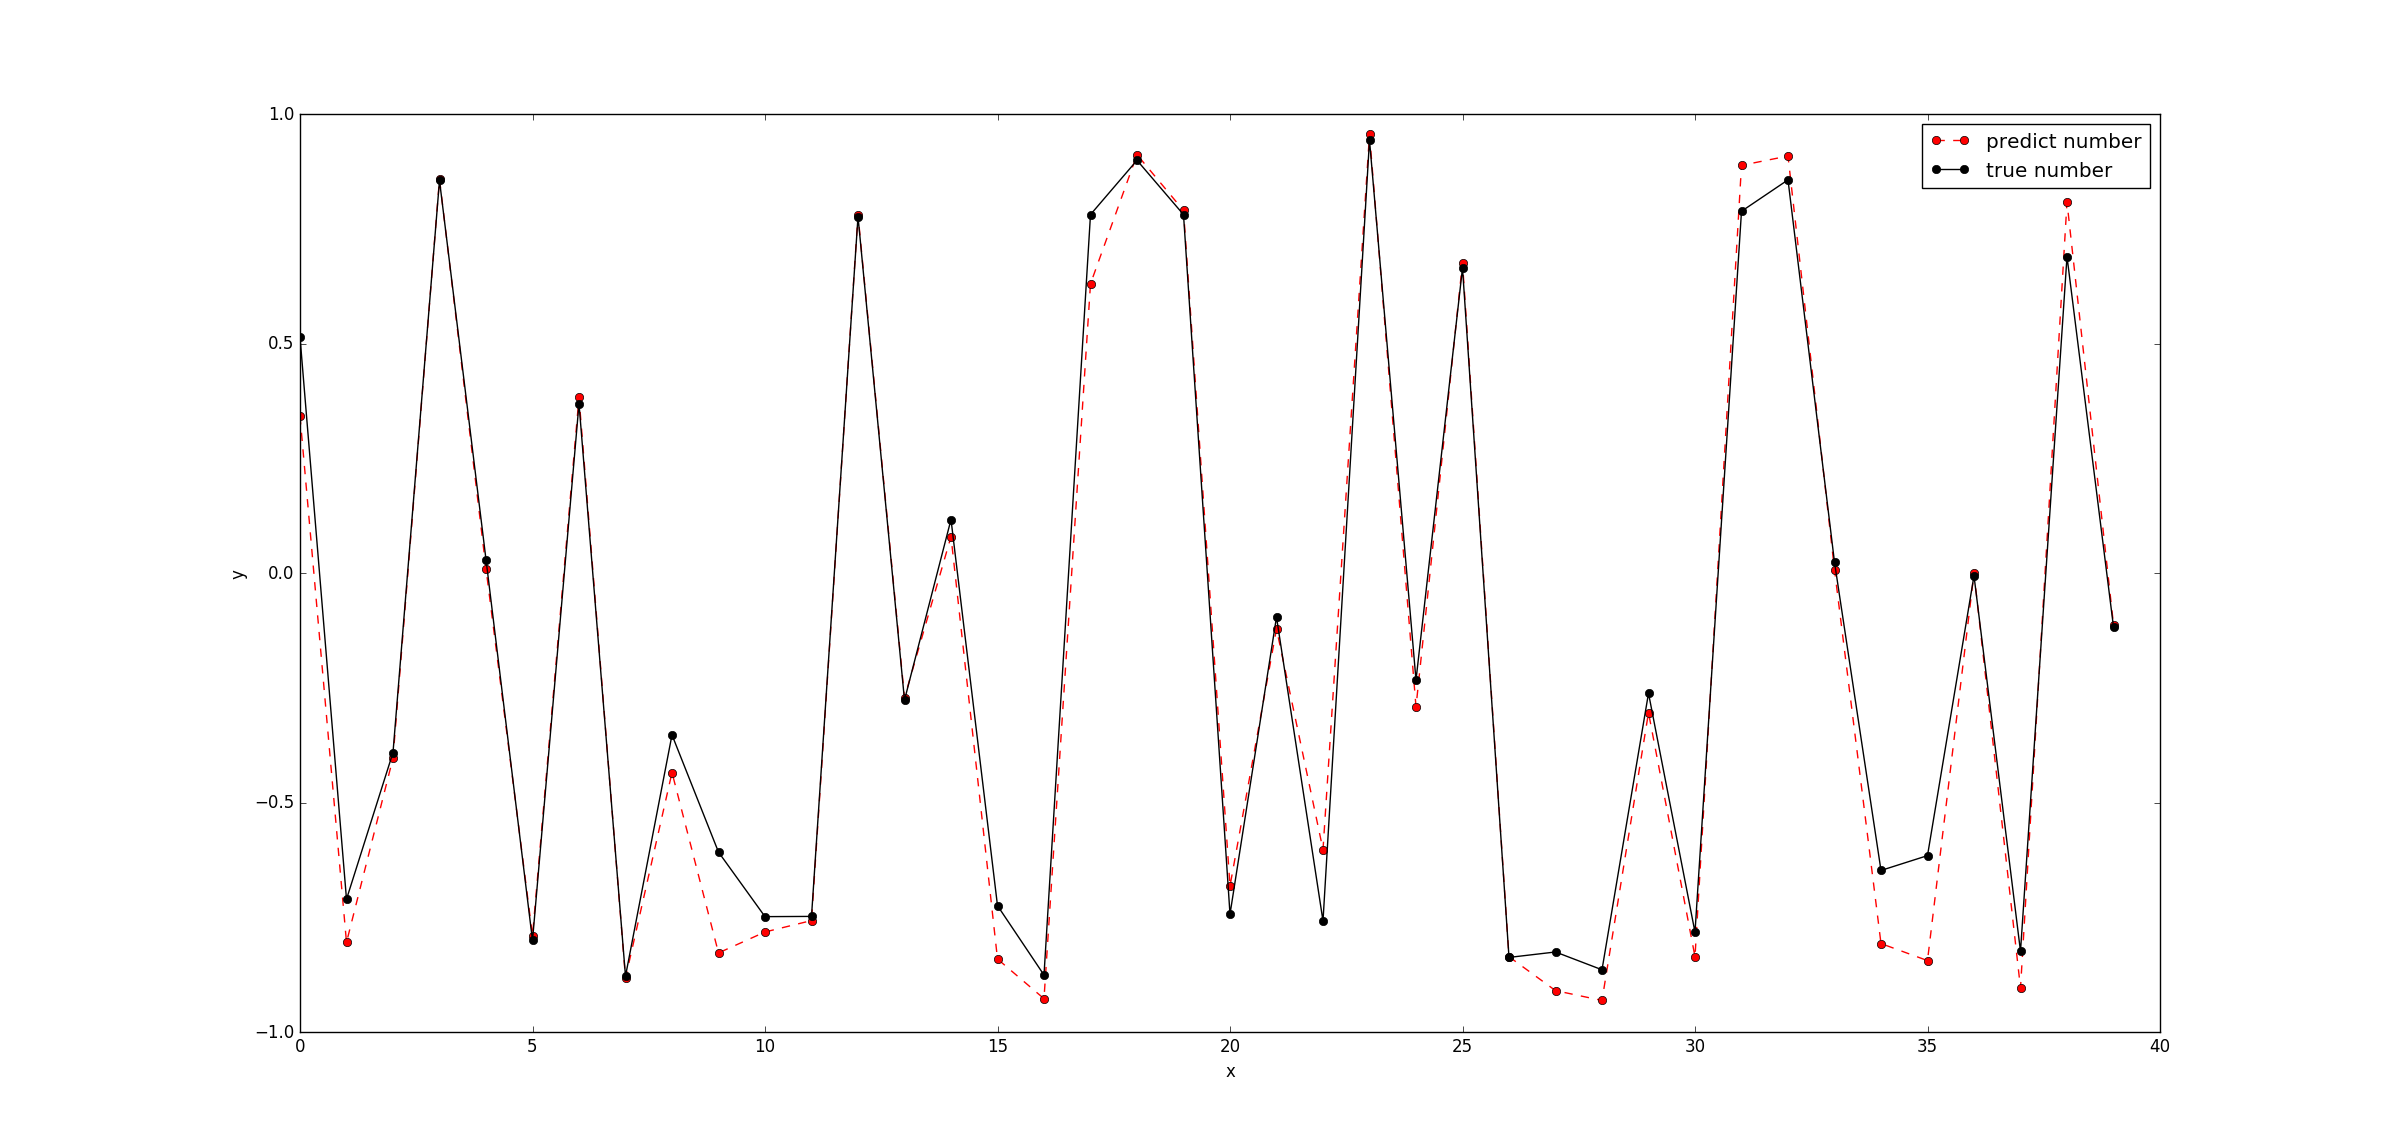
我们用matlibplot画出来这个预测值和实际值
predict_resutl=[]
for i in np.arange(len(xTest)):
    predict_resutl.append(fnn.activate(xTest[i])[0])
print(predict_resutl)

plt.figure()
plt.plot(np.arange(0,len(xTest)), predict_resutl, 'ro--', label='predict number')
plt.plot(np.arange(0,len(xTest)), yTest, 'ko-', label='true number')
plt.legend()
plt.xlabel("x")
plt.ylabel("y")

plt.show()
我们拿这个题目来做一下预测,画出来的图形如下
分析
for mod in fnn.modules:
  print ("Module:", mod.name)
  if mod.paramdim > 0:
    print ("--parameters:", mod.params)
  for conn in fnn.connections[mod]:
    print ("-connection to", conn.outmod.name)
    if conn.paramdim > 0:
       print ("- parameters", conn.params)
  if hasattr(fnn, "recurrentConns"):
    print ("Recurrent connections")
    for conn in fnn.recurrentConns:
       print ("-", conn.inmod.name, " to", conn.outmod.name)
       if conn.paramdim > 0:
          print ("- parameters", conn.params)
它可以打印出来神经网络的具体信息,结果如下:
Module: hiddenLayer0
-connection to outLayer
- parameters [-0.48485978  1.94439991 -1.1686299  -1.01764515 -1.04221    -0.78088745
  0.27321985 -1.76426041  2.0747614   1.98425053]
Module: inLayer
-connection to hiddenLayer0
- parameters [ 1.48125364 -0.97942827  4.7258546   2.08059918 -1.96960441 -0.03098871
  0.52430318  1.64983933  0.43738152  1.95122015  0.81952423 -0.24019787
 -0.86026329  0.63505556  0.53870484  0.94078527  1.42263437  1.87720358
 -1.12582038  0.70344489]
Module: outLayer
完整的代码
最后,我把完整的代码贴出来,注意,你要先安装pybrain才行
import numpy as np
import matplotlib.pyplot as plt

from pybrain.structure import *
from pybrain.datasets import SupervisedDataSet
from pybrain.supervised.trainers import BackpropTrainer

def generate_data():
    """generate original data of u and y"""
    u = np.random.uniform(-1,1,200)
    y=[]
    former_y_value = 0
    for i in np.arange(0,200):
        y.append(former_y_value)
        next_y_value = (29 / 40) * np.sin(
            (16 * u[i] + 8 * former_y_value) / (3 + 4 * (u[i] ** 2) + 4 * (former_y_value ** 2))) \
                       + (2 / 10) * u[i] + (2 / 10) * former_y_value
        former_y_value = next_y_value
    return u,y


# obtain the original data
u,y = generate_data()

# createa neural network
fnn = FeedForwardNetwork()

# create three layers, input layer:2 input unit; hidden layer: 10 units; output layer: 1 output
inLayer = LinearLayer(2, name='inLayer')
hiddenLayer0 = SigmoidLayer(10, name='hiddenLayer0')
outLayer = LinearLayer(1, name='outLayer')

# add three layers to the neural network
fnn.addInputModule(inLayer)
fnn.addModule(hiddenLayer0)
fnn.addOutputModule(outLayer)

# link three layers
in_to_hidden0 = FullConnection(inLayer,hiddenLayer0)
hidden0_to_out = FullConnection(hiddenLayer0, outLayer)

# add the links to neural network
fnn.addConnection(in_to_hidden0)
fnn.addConnection(hidden0_to_out)

# make neural network come into effect
fnn.sortModules()

# definite the dataset as two input , one output
DS = SupervisedDataSet(2,1)

# add data element to the dataset
for i in np.arange(199):
    DS.addSample([u[i],y[i]],[y[i+1]])

# you can get your input/output this way
X = DS['input']
Y = DS['target']

# split the dataset into train dataset and test dataset
dataTrain, dataTest = DS.splitWithProportion(0.8)
xTrain, yTrain = dataTrain['input'],dataTrain['target']
xTest, yTest = dataTest['input'], dataTest['target']

# train the NN
# we use BP Algorithm
# verbose = True means print th total error
trainer = BackpropTrainer(fnn, dataTrain, verbose=True,learningrate=0.01)
# set the epoch times to make the NN  fit
trainer.trainUntilConvergence(maxEpochs=1000)

# prediction = fnn.activate(xTest[1])
# print("the prediction number is :",prediction," the real number is:  ",yTest[1])
predict_resutl=[]
for i in np.arange(len(xTest)):
    predict_resutl.append(fnn.activate(xTest[i])[0])
print(predict_resutl)

plt.figure()
plt.plot(np.arange(0,len(xTest)), predict_resutl, 'ro--', label='predict number')
plt.plot(np.arange(0,len(xTest)), yTest, 'ko-', label='true number')
plt.legend()
plt.xlabel("x")
plt.ylabel("y")

plt.show()

for mod in fnn.modules:
  print ("Module:", mod.name)
  if mod.paramdim > 0:
    print ("--parameters:", mod.params)
  for conn in fnn.connections[mod]:
    print ("-connection to", conn.outmod.name)
    if conn.paramdim > 0:
       print ("- parameters", conn.params)
  if hasattr(fnn, "recurrentConns"):
    print ("Recurrent connections")
    for conn in fnn.recurrentConns:
       print ("-", conn.inmod.name, " to", conn.outmod.name)
       if conn.paramdim > 0:
          print ("- parameters", conn.params)
文章引用:
[1]用Pybrain库进行神经网络拟合


 6475
6475


 被折叠的 条评论
为什么被折叠?
被折叠的 条评论
为什么被折叠?
 到【灌水乐园】发言


