


Introduction to gaussian filter
我尝试尽可能低门槛的介绍这些好玩的东东~这里仅仅需要正态分布函数作为基础即可开始玩图像的高斯滤波了. Don't panic !
在通常的图像中,像素点都很多,很多情况都是很多一大块像素点记录某一个场景区域,那么这就数字离散环境下模拟出了实际生活中颜色变化连续性的事实(注意,计算机的离散环境都是对真实的模拟.)
高斯滤波是怎么回事捏?一句话的事情,就是利用高斯函数取权值,在一个区域内进行加权平均!
简单的事情永远别搞复杂了。工程师的定义是什么,就是把复杂问题简单化的人. 越简单越好. 世界上本没有很困难的问题,只是阐述的人说的不够直白而已.
公式就在这里,怎么做?下面通过程序实现来“体会”并领悟高斯滤波. 不信我扯不清楚
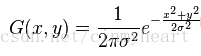
x y 代表距离中心点的距离
这里先给出最简单的单通道黑白图像处理的函数(足够短小,能够说明算法即可,后面会给出彩色图像的实现函数,为了把程序算法便于理解,我尽量不调用matlab的API,使用C语言的风格编写demo程序).
下面的程序没有经过任何优化
(担心优化之后程序便于和原来算法对照理解...所以当用户把kernel窗口调的比较大的时候(Kernel_size > 11的时候),程序会比较慢)
%***********************************************************
% code writer   : EOF
% code file     :  gaussian_filter_for_dark_Image.m
% code date     : 2014.10.25
% e-mail        : jasonleaster@gmail.com
%
% Code Description:
%
%        Here is my implementation of gaussian filter which
% is only work for single channel image.
%
%       If you find something wrong with my code ,please touch
% me by e-mail.
%**************************************************************

function Output = gaussian_filter_for_dark_Image(Image,Kernel_size,epsilon)

    if size(Image,3) ~= 1
        fprintf('Hey guys, please input a single channel image.\n');
    end


    Location_X = zeros(Kernel_size,Kernel_size);
    Location_Y = zeros(Kernel_size,Kernel_size);

    %% Initialization for original Location.
    for row = 1 : Kernel_size
        for col = 1 : Kernel_size
            Location_X(row ,col) = (col -1) - floor(Kernel_size/2);
            Location_Y(row ,col) = (row -1) - floor(Kernel_size/2);
        end
    end

    Kernel = zeros(Kernel_size,Kernel_size);

    for row = 1 : Kernel_size
        for col = 1 : Kernel_size

            % Oh , Attention. Here we are gonna to compute the Kernel of
            % our filter.
            Kernel(row,col) = (1/(2*pi*(epsilon.^2))) * ...
            exp( - (Location_X(row,col).^2 + Location_Y(row,col).^2)./(2* (epsilon.^2) ));

        end
    end

    sum_of_Kernel = sum(Kernel(:));

    Image_Height = size(Image,1);
    Image_Width  = size(Image,2);

    Output = zeros(Image_Height,Image_Width);

    for row = 1: Image_Height
        for col = 1: Image_Width

            sum_value = 0;

            % Set the patch start location and end location.
            Kernel_row_start = row - floor(Kernel_size/2);
            Kernel_col_start = col - floor(Kernel_size/2);
            Kernel_row_end   = row + floor(Kernel_size/2);
            Kernel_col_end   = col + floor(Kernel_size/2);

            for Kernel_row = Kernel_row_start : Kernel_row_end
                for Kernel_col = Kernel_col_start : Kernel_col_end

                    %% Sum all weighted neighboring pixel by gaussian distribution.

                    if Kernel_row > 0 && Kernel_col > 0 && ...
                       Kernel_row <= Image_Height && Kernel_col <= Image_Width

                       sum_value = sum_value + ...
                       Kernel(Kernel_row - Kernel_row_start  + 1,...
                              Kernel_col - Kernel_col_start  + 1) *...
                       Image(Kernel_row,Kernel_col);
                    end
                end
            end

            Output(row,col) = sum_value/sum_of_Kernel;

        end
    end

end
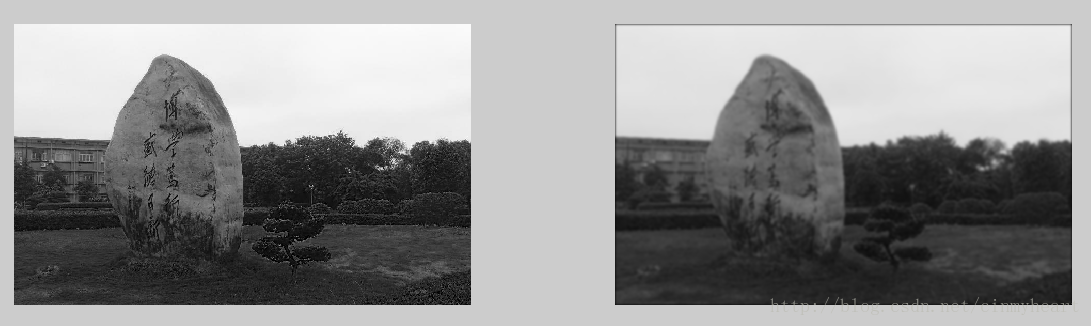
参数:Kernel_size = 11, epsilon = 2.5
左图为输入图像,右边是得到的滤波结果.
如果你仔细分析过Kernel_size得到的高斯权重的话就会发现,其实Kernel_size过大是没有什么实际意义的.影响不大,一般7 和11得到的结果都很接近,真正影响模糊效果的是epsilon, 这里epsilon取值为2.5,如果你取值小一点,图像的模糊程度就会弱(即,清晰)
既然完成了单通道图像的高斯滤波,彩色图片的高斯滤波就变得顺理成章了,很简单.
这里我整合了单通道和三通道的图片高斯滤波,写成一个函数(嘿嘿,I love robust)
为嘛三通道的就这么久捏....感觉跑好久...以后还是要优化一下
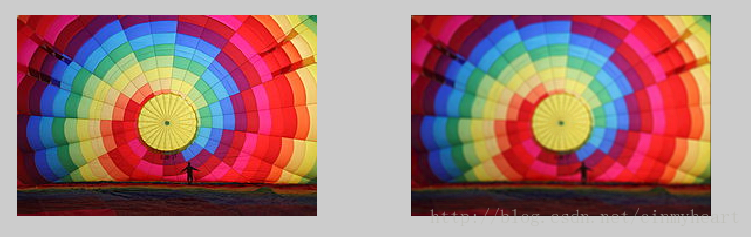
下面是用Kernel_win_size = 3, epsilon = 1.5的输出效果
左边是原图,右边是滤波后的结果.
%***********************************************************
% code writer   : EOF
% code file     :  gaussian_filter_for_Image.m
% code date     : 2014.10.25
% e-mail        : jasonleaster@gmail.com
%
% Code Description:
%
%        Here is my implementation of gaussian filter .
%
%        Parameter @Image is the inputed image, @Kernel_size
% describe the size of filter kernel and @epsilon is the
% parameter in normal-distribution which you are familiar with.
%
%       If you find something wrong with my code ,please touch
% me by e-mail.
%**************************************************************

function Output = gaussian_filter_for_Image(Image,Kernel_size,epsilon)

    if size(Image,3) ~= 1 && size(Image,3) ~= 3
        fprintf('Hey guys, please input a single or three channel image.\n');
    end

        Location_X = zeros(Kernel_size,Kernel_size);
        Location_Y = zeros(Kernel_size,Kernel_size);

        %% Initialization for original Location.
        for row = 1 : Kernel_size
            for col = 1 : Kernel_size
                Location_X(row ,col) = (col -1) - floor(Kernel_size/2);
                Location_Y(row ,col) = (row -1) - floor(Kernel_size/2);
            end
        end

        Kernel = zeros(Kernel_size,Kernel_size);

        for row = 1 : Kernel_size
            for col = 1 : Kernel_size

                % Oh , Attention. Here we are gonna to compute the Kernel of
                % our filter.
                Kernel(row,col) = (1/((2*pi*(epsilon.^2)))) * ...
                exp( - (Location_X(row,col).^2 + Location_Y(row,col).^2)./(2* (epsilon.^2) ));

            end
        end

        sum_of_Kernel = sum(Kernel(:));

        Image_Height = size(Image,1);
        Image_Width  = size(Image,2);

        if size(Image,3) == 1
            Output = zeros(Image_Height,Image_Width);
        else
            Output = zeros(Image_Height,Image_Width,3);
        end

        for row = 1: Image_Height
            for col = 1: Image_Width


                % Set the patch start location and end location.
                Kernel_row_start = row - floor(Kernel_size/2);
                Kernel_col_start = col - floor(Kernel_size/2);
                Kernel_row_end   = row + floor(Kernel_size/2);
                Kernel_col_end   = col + floor(Kernel_size/2);


                for channel = 1: size(Image,3)

                    sum_value = 0;
                    for Kernel_row = Kernel_row_start : Kernel_row_end
                        for Kernel_col = Kernel_col_start : Kernel_col_end
                            %% Sum all weighted neighboring pixel by gaussian distribution.

                            if Kernel_row > 0 && Kernel_col > 0 && ...
                               Kernel_row <= Image_Height && Kernel_col <= Image_Width

                               sum_value = sum_value + ...
                               Kernel(Kernel_row - Kernel_row_start  + 1,...
                                      Kernel_col - Kernel_col_start  + 1) *...
                               Image(Kernel_row,Kernel_col,channel);
                            end

                        end
                    end

                    %%
                    % Never forget to divide 'sum_of_kernel', otherwise your outputed image
                    % would looks like more dark than original image.
                    Output(row,col,channel) = sum_value/sum_of_Kernel;
                end
            end
        end


end
解惑:
之前你可能遇到过下面这样的“高斯滤波核”
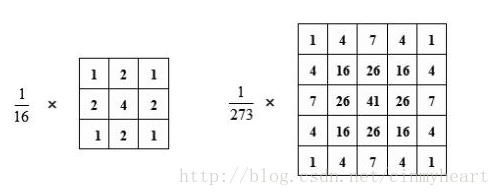
其实,这就是别人已经算好的分布数据,然后直接用了。
而我们这里采用的是高度可定制的窗口大小Kernel_size。
本质是一样的
Don't panic :)


 2756
2756

 被折叠的 条评论
为什么被折叠?
被折叠的 条评论
为什么被折叠?
 到【灌水乐园】发言


