1 安装所需要的软件 安装所需要的软件 安装所需要的软件
1.1 下载 Microsoft visual Stdudio 2013: en_visual_studio_ultimate_2013_x86_dvd_3009107.iso
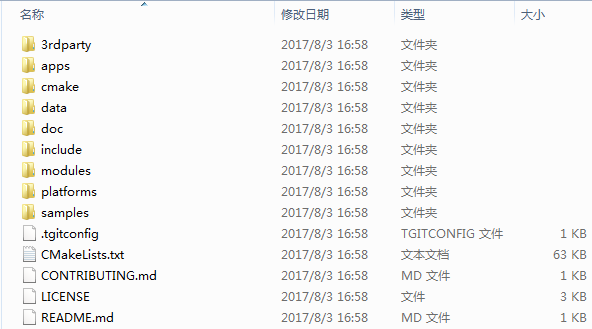
1.2 下载OpenCV3: opencv-3.3.0.zip(本文配置所用版本),可到官网 ttp://opencv.org/下载,解压后如下右图。

1.3 安装CMake: https://cmake.org/download/
2 用 CMake 导出 VC++ 项目文件
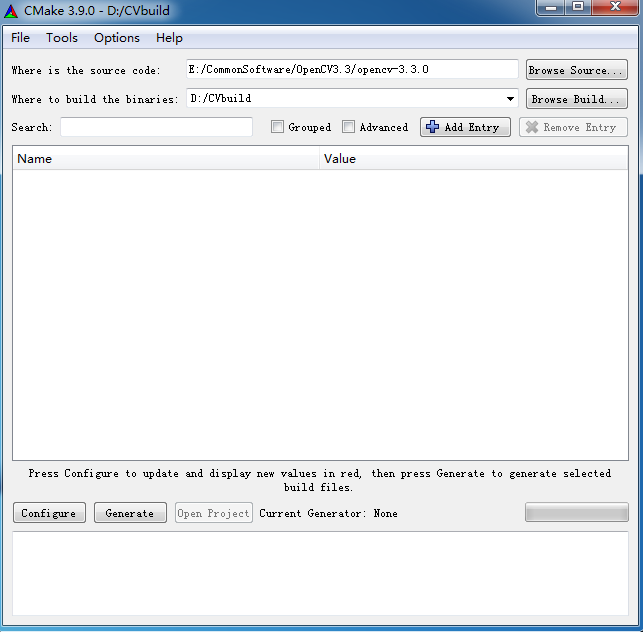
步骤 1:在 CMake的界面中输入源码路径( Where is the source code )该路径中一定要含有CMakeLists.txt文件。因为 cmake命令后面需以含CMakeLists.txt文件的源码目录路径为参数 , 否则会出错CMake Error: The source directory "/ opencv " does not appear to contain " CMakeLists.txt.
最后设置目标路径( where to build the binarieswhere to build the binaries ),最好不同于源码路径,同路径也没什么问题,具体如下图所示:
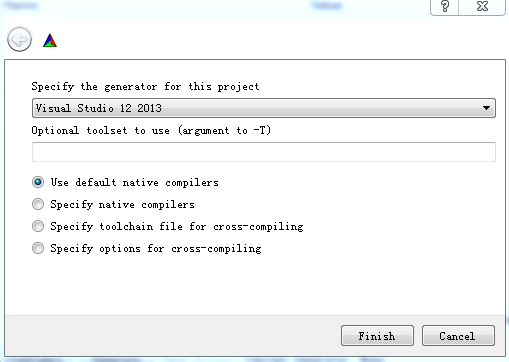
步骤2:点击【Configure】按钮,在弹出的对话框中选择编译软件,如VS2013,并根据需要选择X64或ARM等。
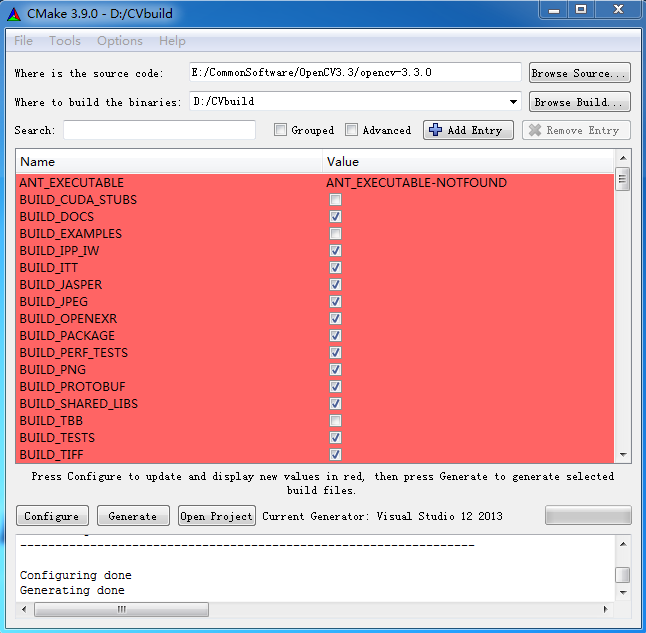
步骤3:点击图中【Generate】开始编译,编译结果如下:
步骤4:再次点击【Configure】,红色消失,结束画面如下,此后便可关闭Cmake界面。
3 编译OpenCV Debug 与Release版本库
完成以上步骤后会在目标路径D:\CVbuild(本文)下生成 OpenCV.sln文件,用VS2013打开。
然后执行以下步骤:
步骤1:在Debug下选择Solution Explorer里的Solution OpenCV,右键点击,运行"Rebuild Solution"。
步骤2:如编译无误,再选择"Configure Manager...",勾选INSTALL,然后“Build Solution”。
然后是编译Release版本库,同Debug版本的步骤一样,至此,OpenCV编译完成,下面进行相关的配置。
4 设置Windows环境变量,只需将目标路径下D:\CVbuild(本文)下的bin\Release与bin\Debug加入环境变量下的Path变量下即可,路径之间用英文下的分号,具体如下图所示:
5 OpenCV的VS2013配置
打开或新建一个VC++项目,在该项目上右键点击,设置"Properties",如下图所示:
在“Include Directories”中加入D:\CVbuild\install\include(针对本文)
在"Library Directories"中加入
D:\CVbuild\lib
D:\CVbuild\lib\Debug
D:\CVbuild\lib\Release
然后在Input下的"Additional Dependencies"中加入
opencv_calib3d330d.lib
opencv_core330d.lib
opencv_dnn330d.lib
opencv_features2d330d.lib
opencv_flann330d.lib
opencv_highgui330d.lib
opencv_imgcodecs330d.lib
opencv_imgproc330d.lib
opencv_ml330d.lib
opencv_objdetect330d.lib
opencv_photo330d.lib
opencv_shape330d.lib
opencv_stitching330d.lib
opencv_superres330d.lib
opencv_ts330d.lib
opencv_video330d.lib
opencv_videoio330d.lib
opencv_videostab330d.lib
opencv_calib3d330.lib
opencv_core330.lib
opencv_dnn330.lib
opencv_features2d330.lib
opencv_flann330.lib
opencv_highgui330.lib
opencv_imgcodecs330.lib
opencv_imgproc330.lib
opencv_ml330.lib
opencv_objdetect330.lib
opencv_photo330.lib
opencv_shape330.lib
opencv_stitching330.lib
opencv_superres330.lib
opencv_ts330.lib
opencv_video330.lib
opencv_videoio330.lib
opencv_videostab330.lib
至此,VS2013配置OpenCV3完成,为了验证是否完成,可以运行一下示例。
#include "opencv2/core/utility.hpp"
#include "opencv2/imgproc.hpp"
#include "opencv2/imgcodecs.hpp"
#include "opencv2/highgui.hpp"
#include <stdio.h>
using namespace cv;
using namespace std;
int edgeThresh = 1;
int edgeThreshScharr = 1;
Mat image, gray, blurImage, edge1, edge2, cedge;
const char* window_name1 = "Edge map : Canny default (Sobel gradient)";
const char* window_name2 = "Edge map : Canny with custom gradient (Scharr)";
// define a trackbar callback
static void onTrackbar(int, void*)
{
blur(gray, blurImage, Size(3, 3));
// Run the edge detector on grayscale
Canny(blurImage, edge1, edgeThresh, edgeThresh * 3, 3);
cedge = Scalar::all(0);
image.copyTo(cedge, edge1);
imshow(window_name1, cedge);
/// Canny detector with scharr
Mat dx, dy;
Scharr(blurImage, dx, CV_16S, 1, 0);
Scharr(blurImage, dy, CV_16S, 0, 1);
Canny(dx, dy, edge2, edgeThreshScharr, edgeThreshScharr * 3);
/// Using Canny's output as a mask, we display our result
cedge = Scalar::all(0);
image.copyTo(cedge, edge2);
imshow(window_name2, cedge);
}
static void help()
{
printf("\nThis sample demonstrates Canny edge detection\n"
"Call:\n"
" /.edge [image_name -- Default is ../data/fruits.jpg]\n\n");
}
const char* keys =
{
"{help h||}{@image |../data/fruits.jpg|input image name}"
};
int main(int argc, const char** argv)
{
help();
image = imread("cv01.jpg", IMREAD_COLOR);
if (image.empty())
{
printf("Cannot read image file\n");
help();
return -1;
}
cedge.create(image.size(), image.type());
cvtColor(image, gray, COLOR_BGR2GRAY);
// Create a window
namedWindow(window_name1, 1);
namedWindow(window_name2, 1);
// create a toolbar
createTrackbar("Canny threshold default", window_name1, &edgeThresh, 100, onTrackbar);
createTrackbar("Canny threshold Scharr", window_name2, &edgeThreshScharr, 400, onTrackbar);
// Show the image
onTrackbar(0, 0);
// Wait for a key stroke; the same function arranges events processing
waitKey(0);
return 0;
}
若配置没问题,上例可以运行,运行结果如下图:


 1万+
1万+

 被折叠的 条评论
为什么被折叠?


