


参考链接:
使用 resnet50 网络训练多分类模型完整代码_悄悄地努力的博客-CSDN博客_resnet50代码
pytorch_grad_cam——pytorch下的模型特征(Class Activation Mapping, CAM)可视化库_万里鹏程转瞬至的博客-CSDN博客
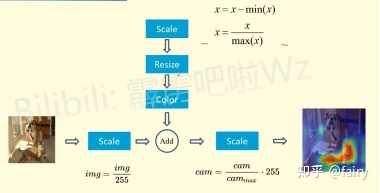
其中原图主要是做简单的转换,即将像素值由256 转入到0-1之间。
from pytorch_grad_cam import GradCAM, HiResCAM, ScoreCAM, GradCAMPlusPlus, AblationCAM, XGradCAM, EigenCAM, FullGrad
from pytorch_grad_cam.utils.model_targets import ClassifierOutputTarget
from pytorch_grad_cam.utils.image import show_cam_on_image
from torchvision.models import resnet50

model = resnet50(pretrained=True)
target_layers = [model.layer4[-1]]
input_tensor = # Create an input tensor image for your model..
# Note: input_tensor can be a batch tensor with several images!

# Construct the CAM object once, and then re-use it on many images:
cam = GradCAM(model=model, target_layers=target_layers, use_cuda=args.use_cuda)

# You can also use it within a with statement, to make sure it is freed,
# In case you need to re-create it inside an outer loop:
# with GradCAM(model=model, target_layers=target_layers, use_cuda=args.use_cuda) as cam:
#   ...

# We have to specify the target we want to generate
# the Class Activation Maps for.
# If targets is None, the highest scoring category
# will be used for every image in the batch.
# Here we use ClassifierOutputTarget, but you can define your own custom targets
# That are, for example, combinations of categories, or specific outputs in a non standard model.

targets = None # 选择最大置信度的类进行热力图展示。本例281 指的就是标签id [ClassifierOutputTarget(281)]

# You can also pass aug_smooth=True and eigen_smooth=True, to apply smoothing.
grayscale_cam = cam(input_tensor=input_tensor, targets=targets)

# In this example grayscale_cam has only one image in the batch:
grayscale_cam = grayscale_cam[0, :]
#rgb_img 需要传入

visualization = show_cam_on_image(rgb_img, grayscale_cam, use_rgb=True)


 3658
3658


 被折叠的 条评论
为什么被折叠?
被折叠的 条评论
为什么被折叠?
 到【灌水乐园】发言


