


前言
尺子在客户端开发中有一定的应用场景,比如厘米尺、白板的画线尺、视频剪辑的时间尺。一般可以采用用户控件通过自绘的方式实现,但今天我要讲一个不一样的方法,不使用自定义控件也不用用户控件,只需要ListBox即能实现一把尺子。
一、如何实现?
1、设置横向ListBox
我们实现一把水平的尺子,所以需要让ListBox横向显示
<ListBox.ItemsPanel>
    <ItemsPanelTemplate>
        <VirtualizingStackPanel Orientation="Horizontal"></VirtualizingStackPanel>
    </ItemsPanelTemplate>
</ListBox.ItemsPanel>
2、Item设为刻度样式
一个Item就是一个刻度,我们通过ItemTemplate的方式设置样式。
<ListBox.ItemTemplate>
    <DataTemplate>
        <StackPanel Width="10" Height="46" Orientation="Vertical" Background="Transparent">
            <TextBlock x:Name="text" Margin="0,6,0,6" HorizontalAlignment="Center"  FontSize="16"  Text="{Binding Number}" Foreground="#ffffff"  Visibility="{Binding NumberVisibility}"></TextBlock>
            <Line x:Name="line"  HorizontalAlignment="Center" Height="20" Width="5" X1="2.5" Y1="0" X2="2.5" Y2="25" StrokeThickness="1" Stroke="#aaaaaa"></Line>
        </StackPanel>
</ListBox.ItemTemplate>
3、绑定数据源
由于ListBox是基于数据集合来显示控件的,我们通过绑定数据源让其显示刻度。
<ListBox ItemsSource="{Binding Chips}">
public class RulerChip
{
    public double Number { get; set; }
    public Visibility NumberVisibility { get; set; }

}
public List<RulerChip> Chips { get; set; }=new List<RulerChip>();
二、完整代码
MainWindow.xaml
<Window x:Class="WpfApp7.MainWindow"
        xmlns="http://schemas.microsoft.com/winfx/2006/xaml/presentation"
        xmlns:x="http://schemas.microsoft.com/winfx/2006/xaml"
        xmlns:d="http://schemas.microsoft.com/expression/blend/2008"
        xmlns:mc="http://schemas.openxmlformats.org/markup-compatibility/2006"
        xmlns:local="clr-namespace:WpfApp7"
        mc:Ignorable="d"
        Title="MainWindow" Height="450" Width="800">
    <Grid>
        <ListBox  Background="#333333" Height="50" ItemsSource="{Binding Chips}" ScrollViewer.HorizontalScrollBarVisibility="Disabled" >
            <ListBox.ItemContainerStyle>
                <Style  TargetType="{x:Type ListBoxItem}">
                    <Setter Property="Template">
                        <Setter.Value>
                            <ControlTemplate TargetType="{x:Type ListBoxItem}">
                                <ContentPresenter
                                                  Content="{TemplateBinding Content}"
                                                   ContentStringFormat="{TemplateBinding ContentStringFormat}"
                                                   ContentTemplate="{TemplateBinding ContentTemplate}" />
                            </ControlTemplate>
                        </Setter.Value>
                    </Setter>
                </Style>
            </ListBox.ItemContainerStyle>
            <ListBox.ItemsPanel>
                <ItemsPanelTemplate>
                    <VirtualizingStackPanel Orientation="Horizontal"></VirtualizingStackPanel>
                </ItemsPanelTemplate>
            </ListBox.ItemsPanel>
            <ListBox.ItemTemplate>
                <DataTemplate>
                    <StackPanel Width="10" Height="46" Orientation="Vertical" Background="Transparent">
                        <TextBlock x:Name="text" Margin="0,6,0,6" HorizontalAlignment="Center"  FontSize="16"  Text="{Binding Number}" Foreground="#ffffff"  Visibility="{Binding NumberVisibility}"></TextBlock>
                        <Line x:Name="line"  HorizontalAlignment="Center" Height="20" Width="5" X1="2.5" Y1="0" X2="2.5" Y2="25" StrokeThickness="1" Stroke="#aaaaaa"></Line>
                    </StackPanel>
                    <DataTemplate.Triggers>
                        <DataTrigger Binding="{Binding NumberVisibility}" Value="Hidden">
                            <Setter TargetName="line" Property="Y1" Value="3" />
                        </DataTrigger>
                        <Trigger Property="IsMouseOver" Value="True">
                            <Setter TargetName="line" Property="Stroke" Value="RoyalBlue" />
                            <Setter TargetName="text" Property="Foreground" Value="RoyalBlue" />
                        </Trigger>
                    </DataTemplate.Triggers>
                </DataTemplate>
            </ListBox.ItemTemplate>
        </ListBox>
    </Grid>
</Window>
MainWindow.xaml.cs
using System.Collections.Generic;
using System.Windows;
namespace WpfApp7
{
    public class RulerChip
    {
        public double Number { get; set; }
        public Visibility NumberVisibility { get; set; }

    }
    /// <summary>
    /// Interaction logic for MainWindow.xaml
    /// </summary>
    public partial class MainWindow : Window
    {

        public List<RulerChip> Chips { get; set; }=new List<RulerChip>();
        public MainWindow()
        {
            InitializeComponent();
            DataContext = this;
            for (int i = 0; i < 100; i++)
            {
                Chips.Add(new RulerChip() { Number=i/10.0, NumberVisibility = (i%10==0)?Visibility.Visible:Visibility.Hidden});
            }
        }
    }
}
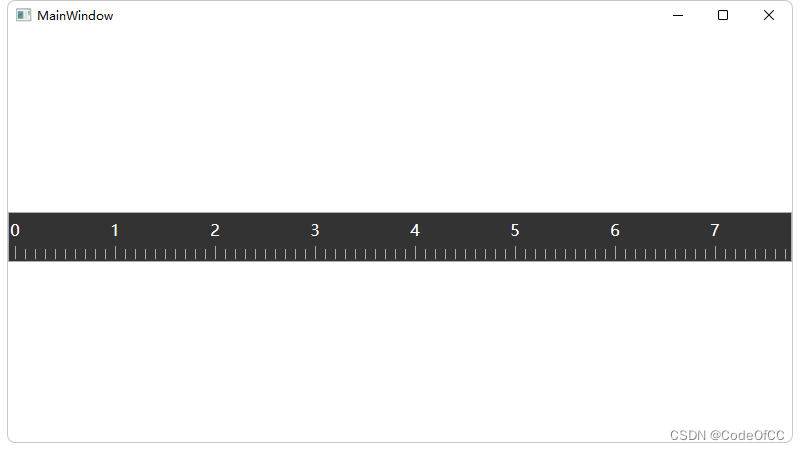
三、效果预览
总结
以上就是今天要讲的内容,本文仅仅简单介绍了ListBox实现尺子控件的方法,很容易实现。而且因为使用了虚拟化容器理论上性能很好,就算是几百万刻度绘制也估计不会卡顿。所以在此基础上可以进行一定的拓展,比如利用dpi实现物理尺子,以及实现时间尺的缩放功能等。总的来说,这是一个易于实现且拓展性也不错的尺子实现方案。


 785
785


 被折叠的 条评论
为什么被折叠?
被折叠的 条评论
为什么被折叠?
 到【灌水乐园】发言


