


1. 路由简介
什么是路由?
-
路由就是通过互联的网络把信息从源地址传送到目的地的活动
-
路由提供了两种机制:路由和传送
- 路由是决定数据包从来源到目的地的路径
- 转送就是将数据转移
-
路由表
- 路由表本质就是一个映射表,决定了数据包的指向
2. 前端/后端路由
- 后端渲染(服务端渲染)
jsp技术
后端路由,后端处理URL和页面映射关系,例如springmvc中的@requestMapping注解配置的URL地址,映射前端页面 - 前后端分离(ajax请求数据)
后端只负责提供数据
静态资源服务器(html+css+js)
ajax发送网络请求后端服务器,服务器回传数据
js代码渲染dom - 单页面富应用(SPA页面)
前后端分离加上前端路由,前端路由的url映射表不会向服务器请求,是单独url的的页面自己的ajax请求后端,后端只提供api负责响应数据请求。改变url,页面不进行整体的刷新。
整个网站只有一个html页面。
3. URL的hash和HTML5的history
3.1 URL的hash
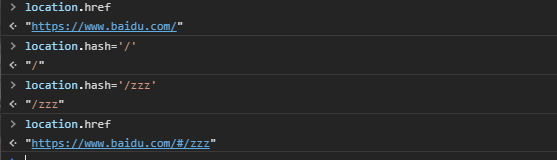
- URL的hash是通过锚点(#),其本质上改变的是window.location的href属性。
- 可以通过直接赋值location.hash来改变href,但是页面并不会发生刷新。
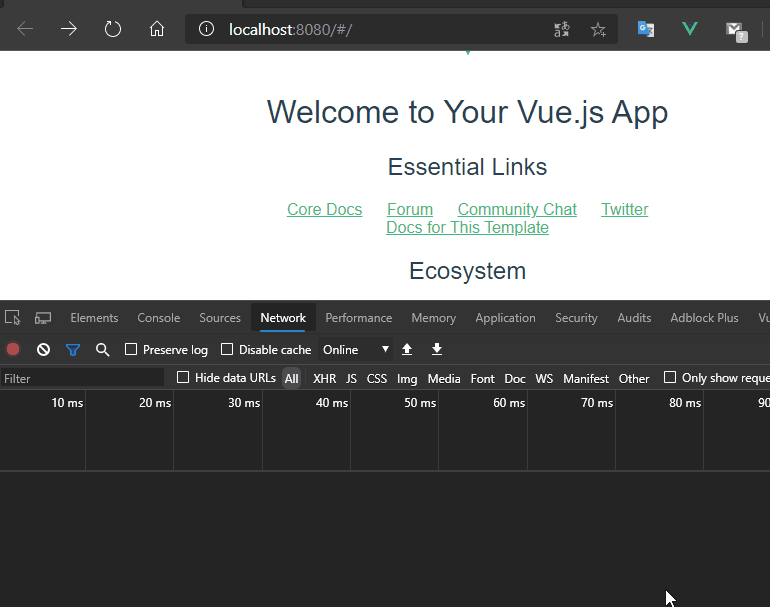
使用命令vue init webpack 01-vue-router-vuecli2创建新的vuecli2工程,等待创建完成后,使用npm run dev启动服务器,在浏览器通过 http://localhost:8080 进入工程主页。 测试通过改变hash,查看是否会刷新页面,浏览器的url地址是否改变。
结论
测试发现url的地址栏改变了变成了http://localhost:8080/#/zty ,通过查看network发现只有favicon.ico资源重新请求了,这个是工程的logo图标,其他资源都未请求。可以通过改变hash改变url,此时页面是未刷新的。
vue-router其实用的就是这样的机制,改变url地址,这个url地址存在一份路由映射表里面,比如/user代表要请求用户页面,只要配置了这个路由表(路由关系),就可以前端跳转而不刷新页面,所有的数据请求都走ajax。
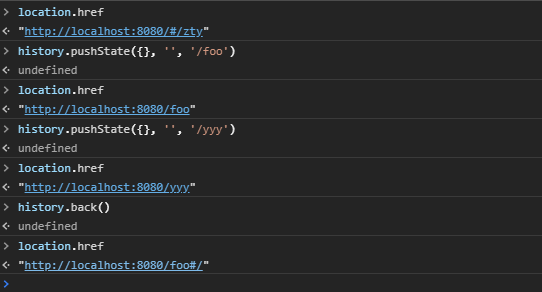
3.2 HTML5的history模式
pushState
同样的使用HTML5的history模式也是不会刷新页面的,history对象栈结构,先进后出,pushState类似压入栈中,back是回退。
hristory.pushState({}, '', '/foo')
history.back()
replaceState
replaceState模式与pushState模式区别在于replaceState模式浏览器没有返回只是替换,不是压入栈中。
history.replaceState({}, '', 'home')

go
go只能在pushState模式中使用,go是前进后退到哪个历史页面。
history.go(-1)//回退一个页面
history.go(1)//前进一个页面
history.forward()//等价于go(1)
history.back()//等价于go(-1)
4. vue-router的安装配置
-
使用
npm install vue-router --save来安装vue-router插件模块 -
在模块化工程中使用他(因为是一个插件,所以可以通过Vue.user来安装路由功能)
- 在src下创建一个router文件夹(一般安装vue-router时候会自动创建)用来存放vue-router的路由信息导入路由对象,并且调用Vue.use(VueRouter)
- 创建路由实例,并且传入路由映射配置
- 在vue实例中挂载创建的路由实例对象
router文件夹中的index.js
/**
 * 配置路由相关信息
 * 1.先导入vue实例和vue-router实例
 */
import Vue from 'vue'
import Router from 'vue-router'
import HelloWorld from '@/components/HelloWorld'

// 2. 通过Vue.use(插件),安装插件
Vue.use(Router)
//3. 创建 router路由对象
const routes = [
  //配置路由和组件之间的对应关系
  {
    path: '/',//url
    name: 'HelloWorld',
    component: HelloWorld //组件名
  }
]
const router = new Router({
  //配置路由和组件之间的应用关系
  routes
})
//4.导出router实例
export default router
main.js中挂载router对象
/* eslint-disable no-new */
new Vue({
  el: '#app',
  router,//使用路由对象,简写对象增强写法
  render: h => h(App)
})
5. vue-router的使用
5.1 创建路由组件
在components文件夹下创建2个组件。
Home组件
<template>
  <div class="page-contianer">
    <h2>这是首页</h2>
    <p>我是首页的内容,123456.</p>
  </div>
</template>
<script type="text/ecmascript-6">
export default {
  name: 'Home'
}
</script>
<style scoped>
</style>
About组件
<template>
  <div class="page-contianer">
    <h2>这是关于页面</h2>
    <p>我是关于页面的内容,about。</p>
  </div>
</template>
<script type="text/ecmascript-6">
export default {
  name: 'About'
}
</script>
<style scoped>
</style>
5.2 配置路由映射:组件和路径映射关系
在路由与组件对应关系配置在routes中。
修改index.js
import Vue from 'vue'
import Router from 'vue-router'
import Home from '@/components/Home'

// 2. 通过Vue.use(插件),安装插件
Vue.use(Router)
//3. 创建 router路由对象
const routes = [
  //配置路由和组件之间的对应关系
  {
    path: '/home',//home  前端路由地址
    name: 'Home',
    component: Home //组件名
  },
  {
    path: '/about',//about 前端路由地址
    name: 'About',
    component: () => import('@/components/About') //懒加载组件
  }
]
const router = new Router({
  //配置路由和组件之间的应用关系
  routes
})
//4.导出router实例
export default router
5.3 使用路由:通过<router-link>和<router-view>
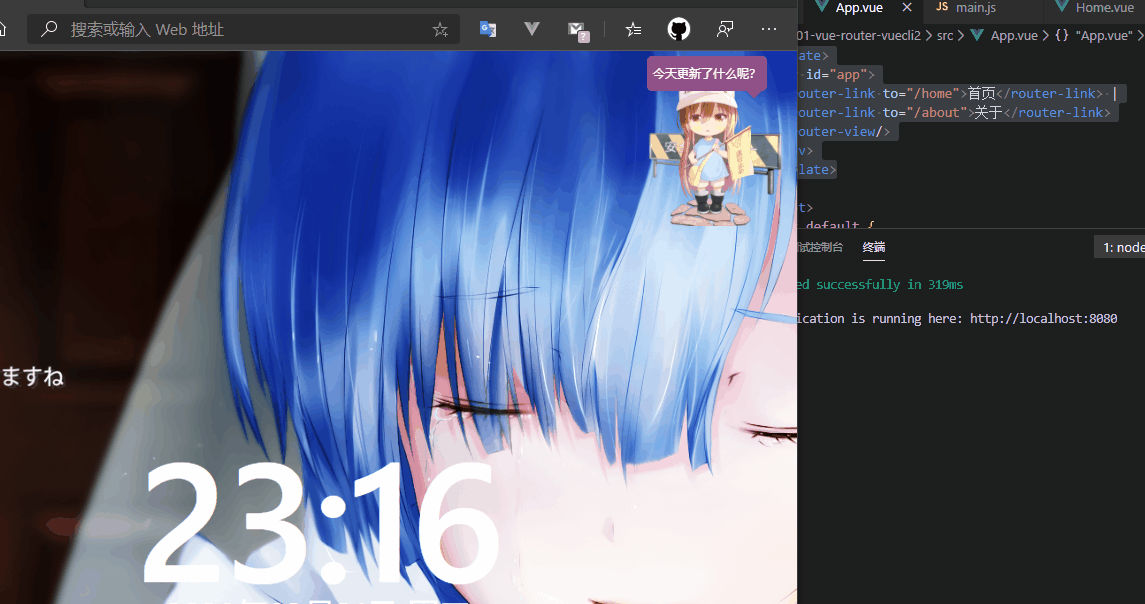
在app.vue中使用<router-link>和<router-view> 两个全局组件显示路由。
<router-link>是全局组件,最终被渲染成a标签,但是<router-link>只是标记路由指向类似一个a标签或者按钮一样,但是我们点击a标签要跳转页面或者要显示页面,所以就要用上<router-view>。
<router-view>是用来占位的,就是路由对应的组件展示的地方,该标签会根据当前的路径,动态渲染出不同的组件。路由切换的时候切换的是
<router-view>挂载的组件,其他不会发生改变。
<router-view>默认使用hash模式,可以在index.js中配置修改为history模式。
app.vue修改template
<template>
  <div id="app">
    <router-link to="/home">首页</router-link> |
    <router-link to="/about">关于</router-link>
    <router-view/>
  </div>
</template>
使用npm run dev启动项目,此时<router-view>在<router-link>下面,那渲染页面就在下面,此时未配置路由的默认值,所以第一次进入网页的时候<router-view>占位的地方是没有内容的。
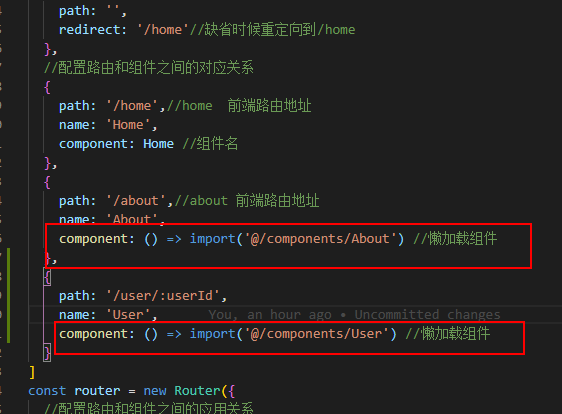
5.4 路由的默认值和history模式
路由的默认值,修改index.js的routes
const routes = [
  {
    path: '',
    redirect: '/home'//缺省时候重定向到/home
  },
  //配置路由和组件之间的对应关系
  {
    path: '/home',//home  前端路由地址
    name: 'Home',
    component: Home //组件名
  },
  {
    path: '/about',//about 前端路由地址
    name: 'About',
    component: () => import('@/components/About') //懒加载组件
  }
]
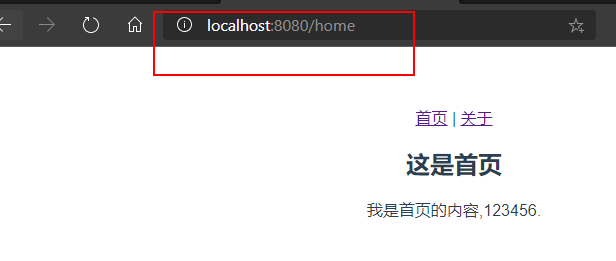
添加缺省值,并重定向到/home路径,此时打开http://localhost:8080 ,直接显示home组件内容。
修改hash模式为history模式,修改index.js的router对象
const router = new Router({
  //配置路由和组件之间的应用关系
  routes,
  mode: 'history'//修改模式为history
})
此时发现浏览器地址栏的URL是没有#的。
5.5 <router-link>的其他属性
-
to属性:用于跳转到指定路径。 -
tag属性:可以指定<router-link>之后渲染成什么组件使用<router-link to='/home' tag='button'>会被渲染成一个按钮,而不是a标签。 -
relapce属性:在history模式下指定<router-link to='/home' tag='button' replace>使用replaceState而不是pushState,此时浏览器的返回按钮是不能使用的。 -
active-class属性:当<router-link>对应的路由匹配成功的时候,会自动给当前元素设置一个router-link-active的class,设置active-class可以修改默认的名称。-
在进行高亮显示的导航菜单或者底部tabbar时,会用到该属性
-
但是通常不会修改类的属性,会直接使用默认的
router-link-active -
<router-link to='/home' tag='button' active-class='active'>此时被选中的<router-link>就会有active的class。 -
如果每个
<router-link>都要加上active-class='active',那就在路由里面统一更改。
const router = new Router({
  //配置路由和组件之间的应用关系
  routes,
  mode: 'history',//修改模式为history
  linkActiveClass: 'active'
})
<template> <div id="app"> <router-link to="/home" tag='button' replace active-class='active'>首页</router-link> | <router-link to="/about" active-class='active'>关于</router-link> <router-view/> </div> </template> <script> export default { name: 'App' } </script> <style> #app { font-family: 'Avenir', Helvetica, Arial, sans-serif; -webkit-font-smoothing: antialiased; -moz-osx-font-smoothing: grayscale; text-align: center; color: #2c3e50; margin-top: 60px; } .active { color: red; } </style>修改app.vue文件此时被选中的
<router-link>就有了active属性,给active的class加上字体变红的css。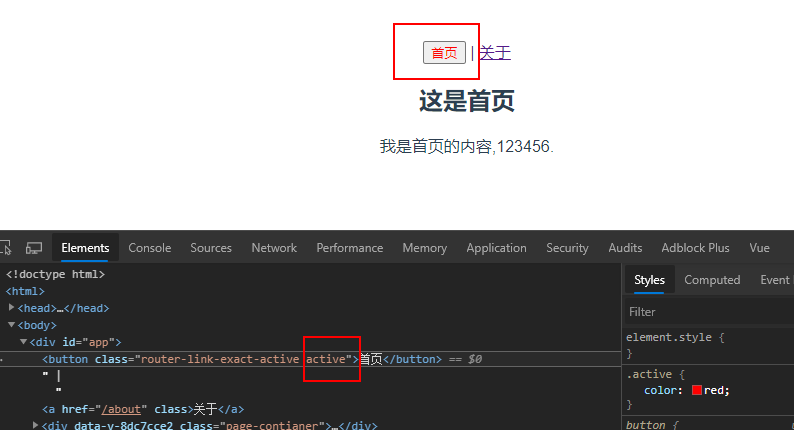
-
5.6 通过代码修改路由跳转
$router属性
<template>
  <div id="app">
    <!-- <router-link to="/home" tag='button' replace active-class='active'>首页</router-link> |
    <router-link to="/about" active-class='active'>关于</router-link> -->
    <button @click="homeClick">首页</button>|
    <button @click="aboutClick">关于</button>
    <router-view/>
  </div>
</template>

<script>
export default {
  name: 'App',
  methods: {
    homeClick() {//通过代码的路径修改路由
      this.$router.push('/home')//push 等价于pushState
      // this.$router.replace('/home')//replace 等价于replaceState
      console.log("homeClick")
    },
    aboutClick() {
      this.$router.push('/about')
      // this.$router.replace('/about')//replace 等价于replaceState
      console.log("aboutClick")
    }
  }
}
</script>

<style>
#app {
  font-family: 'Avenir', Helvetica, Arial, sans-serif;
  -webkit-font-smoothing: antialiased;
  -moz-osx-font-smoothing: grayscale;
  text-align: center;
  color: #2c3e50;
  margin-top: 60px;
}
.active {
  color: red;
}
</style>
修改app.vue,将<router-link>换成button等任何组件,添加上点击事件,并写好点击事件响应方法,此时使用this.$router.push('/home'),push方法 等价于pushState方法,replace 方法等价于replaceState方法。
6. vue-router深入
6.1 vue-router的动态路由
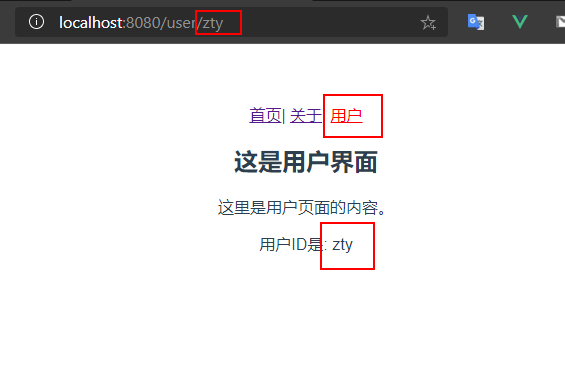
一个页面的path路径可能是不确定的,例如可能有/user/aaaa或者/user/bbbb,除了/user之外,后面还跟上了用户ID/user/123等。这种path和component的匹配关系,叫动态路由。
新建一个User组件
<template>
  <div class="page-contianer">
    <h2>这是用户界面</h2>
    <p>这里是用户页面的内容。</p>
    <p>用户ID是: {{ userId }}</p>
  </div>
</template>
<script type="text/ecmascript-6">
export default {
  name: 'User',
  computed:{
    userId() {
      return this.$route.params.userId
    }
  }
}
</script>
<style scoped>
</style>
该组件定义一个计算属性,通过this.$route.params.userId获取处于激活状态的路由参数userId。
配置路由参数index.js
  {
    path: '/user/:userId',
    name: 'User',
    component: () => import('@/components/User') //懒加载组件
  }
使用:userId指定动态路由参数userId。
app.vue中添加user页面的
<router-link>,并添加userId变量
<router-link :to="/user/ + userId">用户</router-link>
  data (){
    return {
      userId: 'zty'
    }
启动项目,点击用户。
总结
$route是代表处于激活状态的路由,这里指的也就是
  {
    path: '/user/:userId',
    name: 'User',
    component: () => import('@/components/User')
  }
通过$route.params获取 $route 所有的参数,$route.params.userId,获取所有参数中的名字叫userId的属性,此时可以在User组件中动态获取路由参数,也就可以在app.vue中动态设置路由中的userId,其他属性请参考 $route 。
6.2 vue-router的打包文件解析
问题:打包时候js太大,页面响应缓慢
如果组件模块化了,当路由被访问的时候才开始加载被选中的组件,这样就是懒加载,前面也介绍过。
component: () => import('@/components/User')
使用npm run build命令将之前创建的项目打包,打开dist文件夹,器目录结构如下:
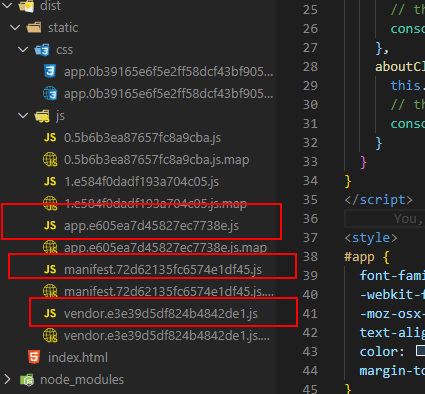
- app.xxx.js是我们自己编写的业务代码
- vendor.xxx.js是第三方框架,例如vue/vue-router/axios等
- mainfest.xxx.js是为了打包的代码做底层支持的,一般是webpack帮我们做一些事情
- 除了这三个还多了2个js,这2个js文件(0.5bxxx.js和1.e5xxx.js)分别是About和User组件,因为这2个组件是懒加载的所以被分开打包了。
此时因为是懒加载,需要用到这个组件的时候才会加载,所以不会一次性请求所有js。
6.3 嵌套路由
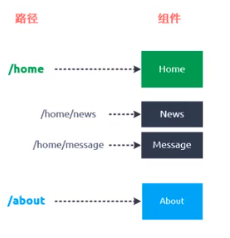
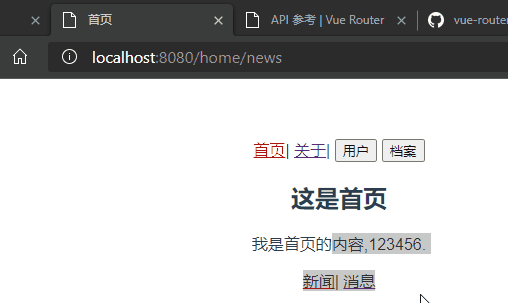
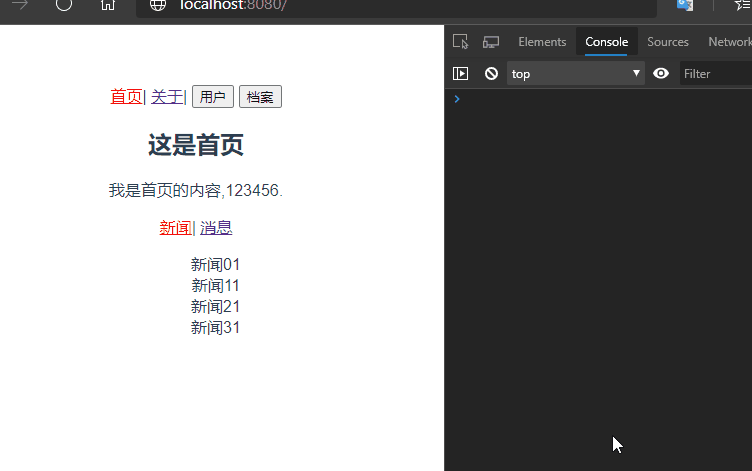
平常在一个home页面中,我们可能需要/home/news和/home/message访问一些内容,一个路由映射一个组件就像后端一个api对应一个controller的一个requestMapping一样,访问两个路由也会分别渲染这两个组件。
要实现嵌套路由:
-
创建对应的子组件,并且在路由映射(
router/index.js)中配置对应的子路由。 -
在组件内部使用
<router-view>标签来占位。新建2个组件HomeNews和HomeMessage
<template>
  <div class="page-contianer">
    <ul>
      <li v-for="(item, index) in list" :key="index">{{ item + index + 1 }}</li>
    </ul>
  </div>
</template>
<script type="text/ecmascript-6">
export default {
  name: 'HomeNews',
  data() {
    return {
      list: ['新闻', '新闻', '新闻', '新闻']
    }
  }
}
</script>
<style scoped></style>
<template>
  <div class="page-contianer">
    <ul>
      <li v-for="(item, index) in list" :key="index">{{ item + index + 1 }}</li>
    </ul>
  </div>
</template>
<script type="text/ecmascript-6">
export default {
  name: 'HomeMessage',
  data() {
    return {
      list: ['消息', '消息', '消息', '消息']
    }
  }
}
</script>
<style scoped></style>
配置嵌套路由
  {
    path: '/home',//home  前端路由地址
    name: 'Home',
    component: Home, //组件名
    children: [
      {
        path: '',
        redirect: '/home/news'//缺省时候重定向到/home/news
      },
      {
        path: 'news',//子嵌套路由 无须加/
        name: 'News',
        component: () => import('@/components/HomeNews') //懒加载组件
      },
      {
        path: 'message',
        name: 'Message',
        component: () => import('@/components/HomeMessage') //懒加载组件
      }
    ]
  },
修改Home.vue组件加上
<router-link>和<router-view/>
<template>
  <div class="page-contianer">
    <h2>这是首页</h2>
    <p>我是首页的内容,123456.</p>
    <router-link to="/home/news">新闻</router-link>|
    <router-link to="/home/message">消息</router-link>
    <router-view/>
  </div>
</template>

6.4 vue-router的参数传递
之前的动态路由说的userId也是参数传递的方式的一种,准备新建一个Profile.vue组件,并配置路由映射,添加指定的<router-link>。
<template>
  <div class="page-contianer">
    <h2>这是档案界面</h2>
    <p>这里是档案页面的内容。</p>
    <p>档案的名字是: {{ profileInfo.name }}</p>
    <p>档案的年龄是: {{ profileInfo.age }}</p>
    <p>档案的身高是: {{ profileInfo.height }}</p>
  </div>
</template>
<script type="text/ecmascript-6">
export default {
  name: 'Profile',
  computed: {
    profileInfo() {
      return this.$route.query.profileInfo
    }
  }
}
</script>
<style scoped></style>
  {
    path: '/profile',
    name: 'Profile',
    component: () => import('@/components/Profile')
  }
<router-link :to="{ path: '/profile', query: { profileInfo } }">档案</router-link>
在app.vue中设置初始的对象profileInfo
  data (){
    return {
      userId: 'zty',
      profileInfo: {
        name: "zty",
        age: 24,
        height: 177
      }
    }
  }
传递参数主要有两种类型:params和query
params的类型也就是动态路由形式
- 配置路由的格式:
/user/:userId - 传递的方式:在path后面跟上对应的userId
- 传递形成的路径:
/user/123,/user/xxx - 通过
$route.params.userId获取指定userId
query的类型
- 配置路由的格式:
/profile,也就是普通的配置 - 传递的方式:对象中使用query的key作为传递的方式
- 传递形成的路径:
/profile?name=zty&age=24&height=177(这个传递的是三个键值对),/profile?profileInfo=%5Bobject%20Object%5D(这个query传递的是一个对象的键值对,key为profileInfo,value是一个对象)

使用代码编写传递数据,使用button代替<router-link>,并添加点击事件。
    <button @click="userClick">用户</button>
    <button @click="profileClick">档案</button>
    userClick() {
      this.$router.push('/user/' + this.userId)
      console.log("userClick")
    },
    profileClick() {
      let profileInfo = this.profileInfo
      this.$router.push({
        path: '/profile',
        query: {
          profileInfo
        }
      })
      console.log("profileClick")
    }
6.5 router和route的由来
vue全局对象this.$router与main.js导入的router对象是一个对象,也就是我们router/index.js导出的对象router。
new Vue({
  el: '#app',
  router,//使用路由对象
  render: h => h(App)
})
//4.导出router实例
export default router
this.$route对象是当前处于活跃的路由,有params和query属性可以用来传递参数。
查看vue-router源码,在我们项目中的router/index.js中,vue 对于插件必须要使用Vue.use(Router),来安装插件,也就是执行vue-router的install.js。
在vue-router的github源码中查看src结构如下:
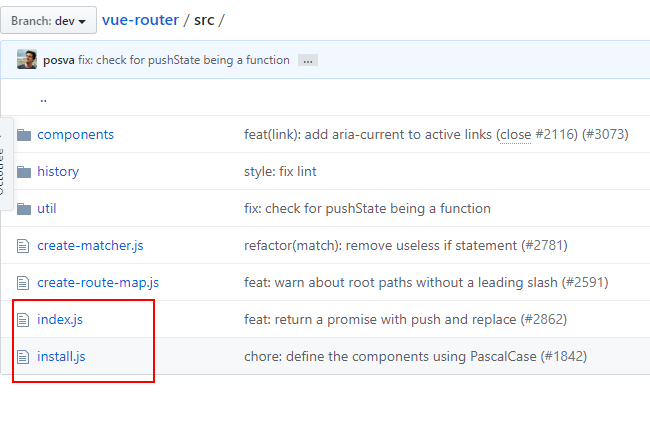
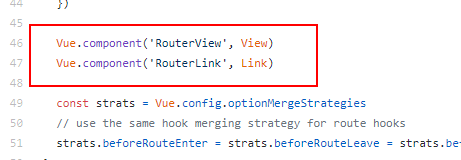
其中index.js是入口文件,入口js文件就是导入并执行了install.js文件。
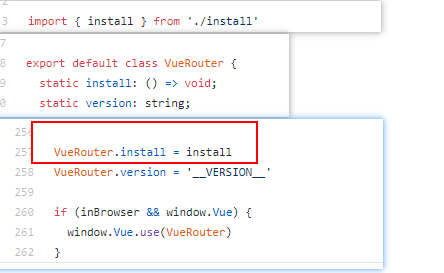
发现
install.js中有注册2个全局组件RouterView和RouterLink,所以我们能使用<router-view>和<router-link>组件。
r o u t e r 和 router和 router和route是继承自vue的原型
怎么理解原型?学过Java 的都知道有父类和子类,子类也可以有自己的子类,但是他们都有一个处于最顶层的类Object(所有类的父类)。在Vue中就有那一个Vue类似Object,在java中在Object中定义的方法,所有的类都可以使用可以重写,类似的Vue.prototype(Vue的原型)定义的属性方法,他的原型链上的对象都可以使用,而$router和$route都在Vue的原型链上。
在main.js入口文件中在vue的原型上定义一个方法test,然后在User组件中尝试调用。
import Vue from 'vue'
import App from './App'
import router from './router'

//在vue的原型上添加test方法
Vue.prototype.test = function () {
  console.log("test")
}
Vue.config.productionTip = false

/* eslint-disable no-new */
new Vue({
  el: '#app',
  router,//使用路由对象
  render: h => h(App)
})
<template>
<div class="page-contianer">
<h2>这是用户界面</h2>
<p>这里是用户页面的内容。</p>
<p>用户ID是: {{ userId }}</p>
<button @click="btnClick">按钮</button>
</div>
</template>
<script type="text/ecmascript-6">
export default {
name: 'User',
computed:{
userId() {
return this.$route.params.userId
}
},
methods: {
btnClick() {
//所有组件都继承自vue的原型
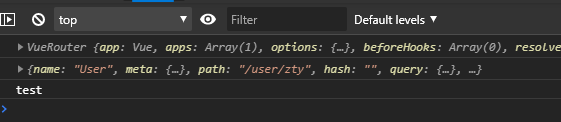
console.log(this.$router)
console.log(this.$route)
//调用vue原型的test
this.test()
}
}
}
</script>
<style scoped>
</style>
启动项目点击User页面上的按钮,打开浏览器控制台查看日志发现test方法被执行了,而User组件中并未定义test方法,却可以调用。
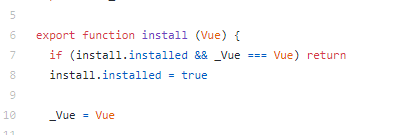
继续来读install.js,install.js中一开始就将Vue这个类当参数传入了install方法中,并把Vue赋值给_Vue。
继续读install.js发现以下代码
  Object.defineProperty(Vue.prototype, '$router', {
    get () { return this._routerRoot._router }
  })
//Object.defineProperty用来定义属性
  Object.defineProperty(Vue.prototype, '$route', {
    get () { return this._routerRoot._route }
  })
Object.defineProperty用来定义属性,以上代码就是给Vue.prototype(Vue原型)添加$router和$route属性并给属性赋值,等价于
Vue.prototype.$router = {
    get () { return this._routerRoot._router }
}
Vue.prototype.$router = {
  get () { return this._routerRoot._router }
}
也就是在Vue的原型上添加$router和$route属性,再查看get()返回值this._routerRoot._router
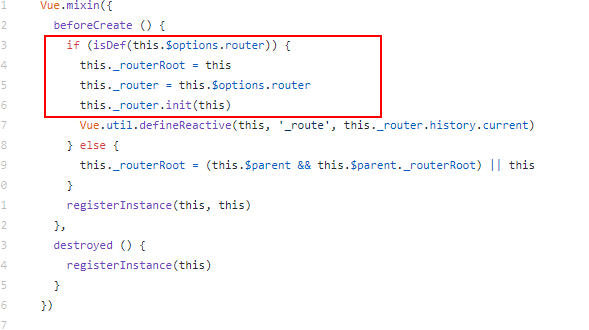
这里的this.$options.router就是我们main.js入口文件传入的参数router,也就是router/index.js导出的router对象。
new Vue({
  el: '#app',
  router,//使用路由对象
  render: h => h(App)
})
7. vue-router其他
7.1 vue-router的导航守卫
问题:我们经常需要在路由跳转后,例如从用户页面跳转到首页,页面内容虽然可以自己定义,但是只有一个html文件,也只有一个title标签,我们需要改变标题。
可以使用js去修改title,可以使用vue的生命周期函数在组件被创建的时候修改title标签内容。
created() {
	//创建的时候修改title
    document.title = '关于'
}
mounted() {
    //数据被挂载到dom上的时候修改title
}
update() {
    //页面刷新的时候修改
}
当然不能每个组件去写生命周期函数,如果我们能监听路由的变化(了解路由从哪来往哪里跳转),那我们就能在跳转中修改title标签,这就是导航守卫能做的事情。
修改router/index.js
/**
 * 前置钩子:从from跳转到to
 * from 来的路由
 * to 要去的路由
 */
router.beforeEach((to, from, next) => {
  document.title = to.matched[0].meta.title //给目标路由的页面的title赋值
  next()//必须调用,不调用不会跳转
})
router.beforeEach()称为前置钩子(前置守卫),顾名思义,跳转之前做一些处理。
当然每个路由配置上也要加上meta属性,不然就取不到了,为什么要使用matched[0],因为如果你是嵌套路由,有没有给子路由添加meta(元数据:描述数据的数据)属性,就会显示undefined,使用matched[0]表示取到匹配的第一个就会找到父路由的meta属性。
  //配置路由和组件之间的对应关系
  {
    path: '/home',//home  前端路由地址
    name: 'Home',
    component: Home, //组件名
    meta: {
      title: '首页'
    },
    children: [
      {
        path: '',
        redirect: '/home/news'//缺省时候重定向到/home/news
      },
      {
        path: 'news',//子嵌套路由 无须加/
        name: 'News',
        component: () => import('@/components/HomeNews') //懒加载组件
      },
      {
        path: 'message',
        name: 'Message',
        component: () => import('@/components/HomeMessage') //懒加载组件
      }
    ]
  },
启动服务发现功能已经实现。
7.2 导航守卫补充
前面说了前置守卫router.beforeEach(),相对的应该也存在后置守卫(后置钩子)。
/**
 * 后置钩子
 */
router.afterEach((to, from) => {
  console.log('后置钩子调用了----')
})
顾名思义,也就是在跳转之后的回调函数。
路由独享守卫,路由私有的
  {
    path: '/about',//about 前端路由地址
    name: 'About',
    component: () => import('@/components/About'),
    beforeEnter: (to, from, next) => {
      console.log('来自' + from.path + ',要去' + to.path)
      next()
    },
    meta: {
      title: '关于'
    }
  },
beforeEnter的参数与全局守卫一样,修改about路由的参数,添加路由独享守卫,此时只有跳转到about路由,才会打印日志。

组件内的守卫,直接在组件中定义的属性
beforeRouteEnterbeforeRouteUpdate(2.2 新增)beforeRouteLeave
const Foo = {
  template: `...`,
  beforeRouteEnter (to, from, next) {
    // 在渲染该组件的对应路由被 confirm 前调用
    // 不!能!获取组件实例 `this`
    // 因为当守卫执行前,组件实例还没被创建
  },
  beforeRouteUpdate (to, from, next) {
    // 在当前路由改变,但是该组件被复用时调用
    // 举例来说,对于一个带有动态参数的路径 /foo/:id,在 /foo/1 和 /foo/2 之间跳转的时候,
    // 由于会渲染同样的 Foo 组件,因此组件实例会被复用。而这个钩子就会在这个情况下被调用。
    // 可以访问组件实例 `this`
  },
  beforeRouteLeave (to, from, next) {
    // 导航离开该组件的对应路由时调用
    // 可以访问组件实例 `this`
  }
}
beforeRouteEnter 守卫 不能 访问 this,因为守卫在导航确认前被调用,因此即将登场的新组件还没被创建。
不过,你可以通过传一个回调给 next来访问组件实例。在导航被确认的时候执行回调,并且把组件实例作为回调方法的参数。
beforeRouteEnter (to, from, next) {
  next(vm => {
    // 通过 `vm` 访问组件实例
  })
}
注意 beforeRouteEnter 是支持给 next 传递回调的唯一守卫。对于 beforeRouteUpdate 和 beforeRouteLeave 来说,this 已经可用了,所以不支持传递回调,因为没有必要了。
beforeRouteUpdate (to, from, next) {
  // just use `this`
  this.name = to.params.name
  next()
}
这个离开守卫通常用来禁止用户在还未保存修改前突然离开。该导航可以通过 next(false) 来取消。
beforeRouteLeave (to, from , next) {
  const answer = window.confirm('Do you really want to leave? you have unsaved changes!')
  if (answer) {
    next()
  } else {
    next(false)
  }
}
7.3 完整的导航解析流程
- 导航被触发。
- 在失活的组件里调用离开守卫。
- 调用全局的
beforeEach守卫。 - 在重用的组件里调用
beforeRouteUpdate守卫 (2.2+)。 - 在路由配置里调用
beforeEnter。 - 解析异步路由组件。
- 在被激活的组件里调用
beforeRouteEnter。 - 调用全局的
beforeResolve守卫 (2.5+)。 - 导航被确认。
- 调用全局的
afterEach钩子。 - 触发 DOM 更新。
- 用创建好的实例调用
beforeRouteEnter守卫中传给next的回调函数。
8. keep-alive
先给Home组件加上created()和destoryed()2个生命周期函数。
<script type="text/ecmascript-6">
export default {
  name: 'Home',
  created() {
    console.log('Home组件被创建了')
  },
  destoryed() {
    console.log('Home组件被销毁了')
  }
}
</script>
启动项目,某些时候可能有这样的需求,如图所示:

分析
在首页和关于组件之间路由跳转的时候,Home组件一直重复创建和销毁的过程,每次创建都是新的Home组件,但是我有这样的需求。当我点击首页消息页面,随后跳转到关于页面,又跳转到首页,此时我希望显示的是首页的消息页面而不是默认的新闻页面,此时就需要keep-alive来使组件保持状态,缓存起来,离开路由后,Home组件生命周期的destroyed()不会被调用,Home组件不会被销毁。
keep-alive是Vue内置的一个组件,可以使被包含的组件保留状态,或者避免重新渲染。router-view也是一个组件,如果用<keep-alive><router-vie/></keep-alive>,将其包起来,所有路径匹配到的视图组件都会被缓存。
修改app.vue代码
    <keep-alive>
      <router-view/>
    </keep-alive>
再次启动项目,发现还是新闻页面?难道是keep-alive无效?
仔细看控制台发现,在跳转关于页面的时候Home组件并没有被销毁,说明keep-alive生效了。仔细查看路由配置发现,/home被默认重定向到了/home/news。所以在访问/home的时候每次出来的都是新闻。
思路
-
将默认的重定向去掉,但是第一次进入首页,那新闻页面内容又不会显示了。
// { // path: '', // redirect: '/home/news'//缺省时候重定向到/home/news // }, -
为了第一次能使新闻页面内容显示,可以使用
created(),将路由用代码的方式手动重定向,也就是push。created() { console.log('Home组件被创建了') this.$router.push('/home/news') }, -
由于
keep-alive组件只创建一次,第一次进入Home组件的时候,新闻页面显示正常,当第二次跳转首页的时候,因为不会再调用created(),所以新闻页面又不会显示了。 -
为了解决问题,在Home组件中引入
activated()和deactivated()两个函数,这2个函数与keep-alive有关,不使用keep-alive的这两个函数无效。activated()当组件属于进入活跃状态的时候调用deactivated()当组件属于退出活跃状态的时候调用(此时路由已经跳转,所以不能在此方法中修改路由,因为修改的是to路由)
-
为了使第二次进入首页新闻页面可以生效,使用
activated()在Home组件使活跃状态时候就重定向data() { return { path: '/home/news' } }, activated(){ console.log('调用actived') this.$router.push(this.path)//在活跃的时候将保存的路由给当前路由 }, deactivated(){ console.log('调用actived') console.log(this.$route.path) this.path = this.$route.path//变成不活跃状态,将最后的路由保存起来 } -
发现还是不行,由于
deactivated()调用的时候,此时路由已经跳转,所以不能在此方法中修改路由,因为修改的是to路由。 -
使用路由守卫(组件内守卫),
beforeRouteLeave (to, from , next)在离开路由的时候将当前的路由赋值给path并保存起来。activated(){ console.log('调用actived') this.$router.push(this.path) }, // deactivated(){ // console.log('调用actived') // console.log(this.$route.path) // this.path = this.$route.path // }, beforeRouterLeave(to, from, next) { console.log(this.$route.path) this.path = this.$route.path next() }此时问题完全解决了。

keep-alive的属性
    <keep-alive>
      <router-view/>
    </keep-alive>
我们将<router-view/>包起来,那所有的组件都会缓存,都只会创建一次,如果我们需要某一个组件每次都创建销毁,就需要使用exclude属性。
<keep-alive exclude='Profile,User'>
   <router-view/>
</keep-alive>
此时Profile和User组件(这里组件需要有name属性,分别为Profile和User)就被排除在外,每次都会创建和销毁。相对应的也有include属性,顾名思义就是包含,只有选中的才有keep-alive。
<keep-alive include='Profile,User'>
   <router-view/>
</keep-alive>
include和exclude都是使用字符串和正则表达式,使用字符串的时候,注意“,”之后之前都别打空格。


 518
518


 被折叠的 条评论
为什么被折叠?
被折叠的 条评论
为什么被折叠?
 到【灌水乐园】发言


