


参考文档
如下;
- https://notes.burke.libbey.me/ansi-escape-codes/
- https://handwiki.org/wiki/ANSI_escape_code
1. ansi escape code简介
1.1. 为什么要说这个内容
在命令行终端中的内容通常会是黑底白字,但是有的时候我们会看到一些写的好的命令行工具,它们会输出各种的颜色的提示信息,尤其是绿色的Success与红色的Failed, 这对我们了解程序运行状态来说,有着很好的帮助。
你可能也会好奇它们是怎么实现的,本文想要说明的就是这个问题。
1.2. 名字的由来
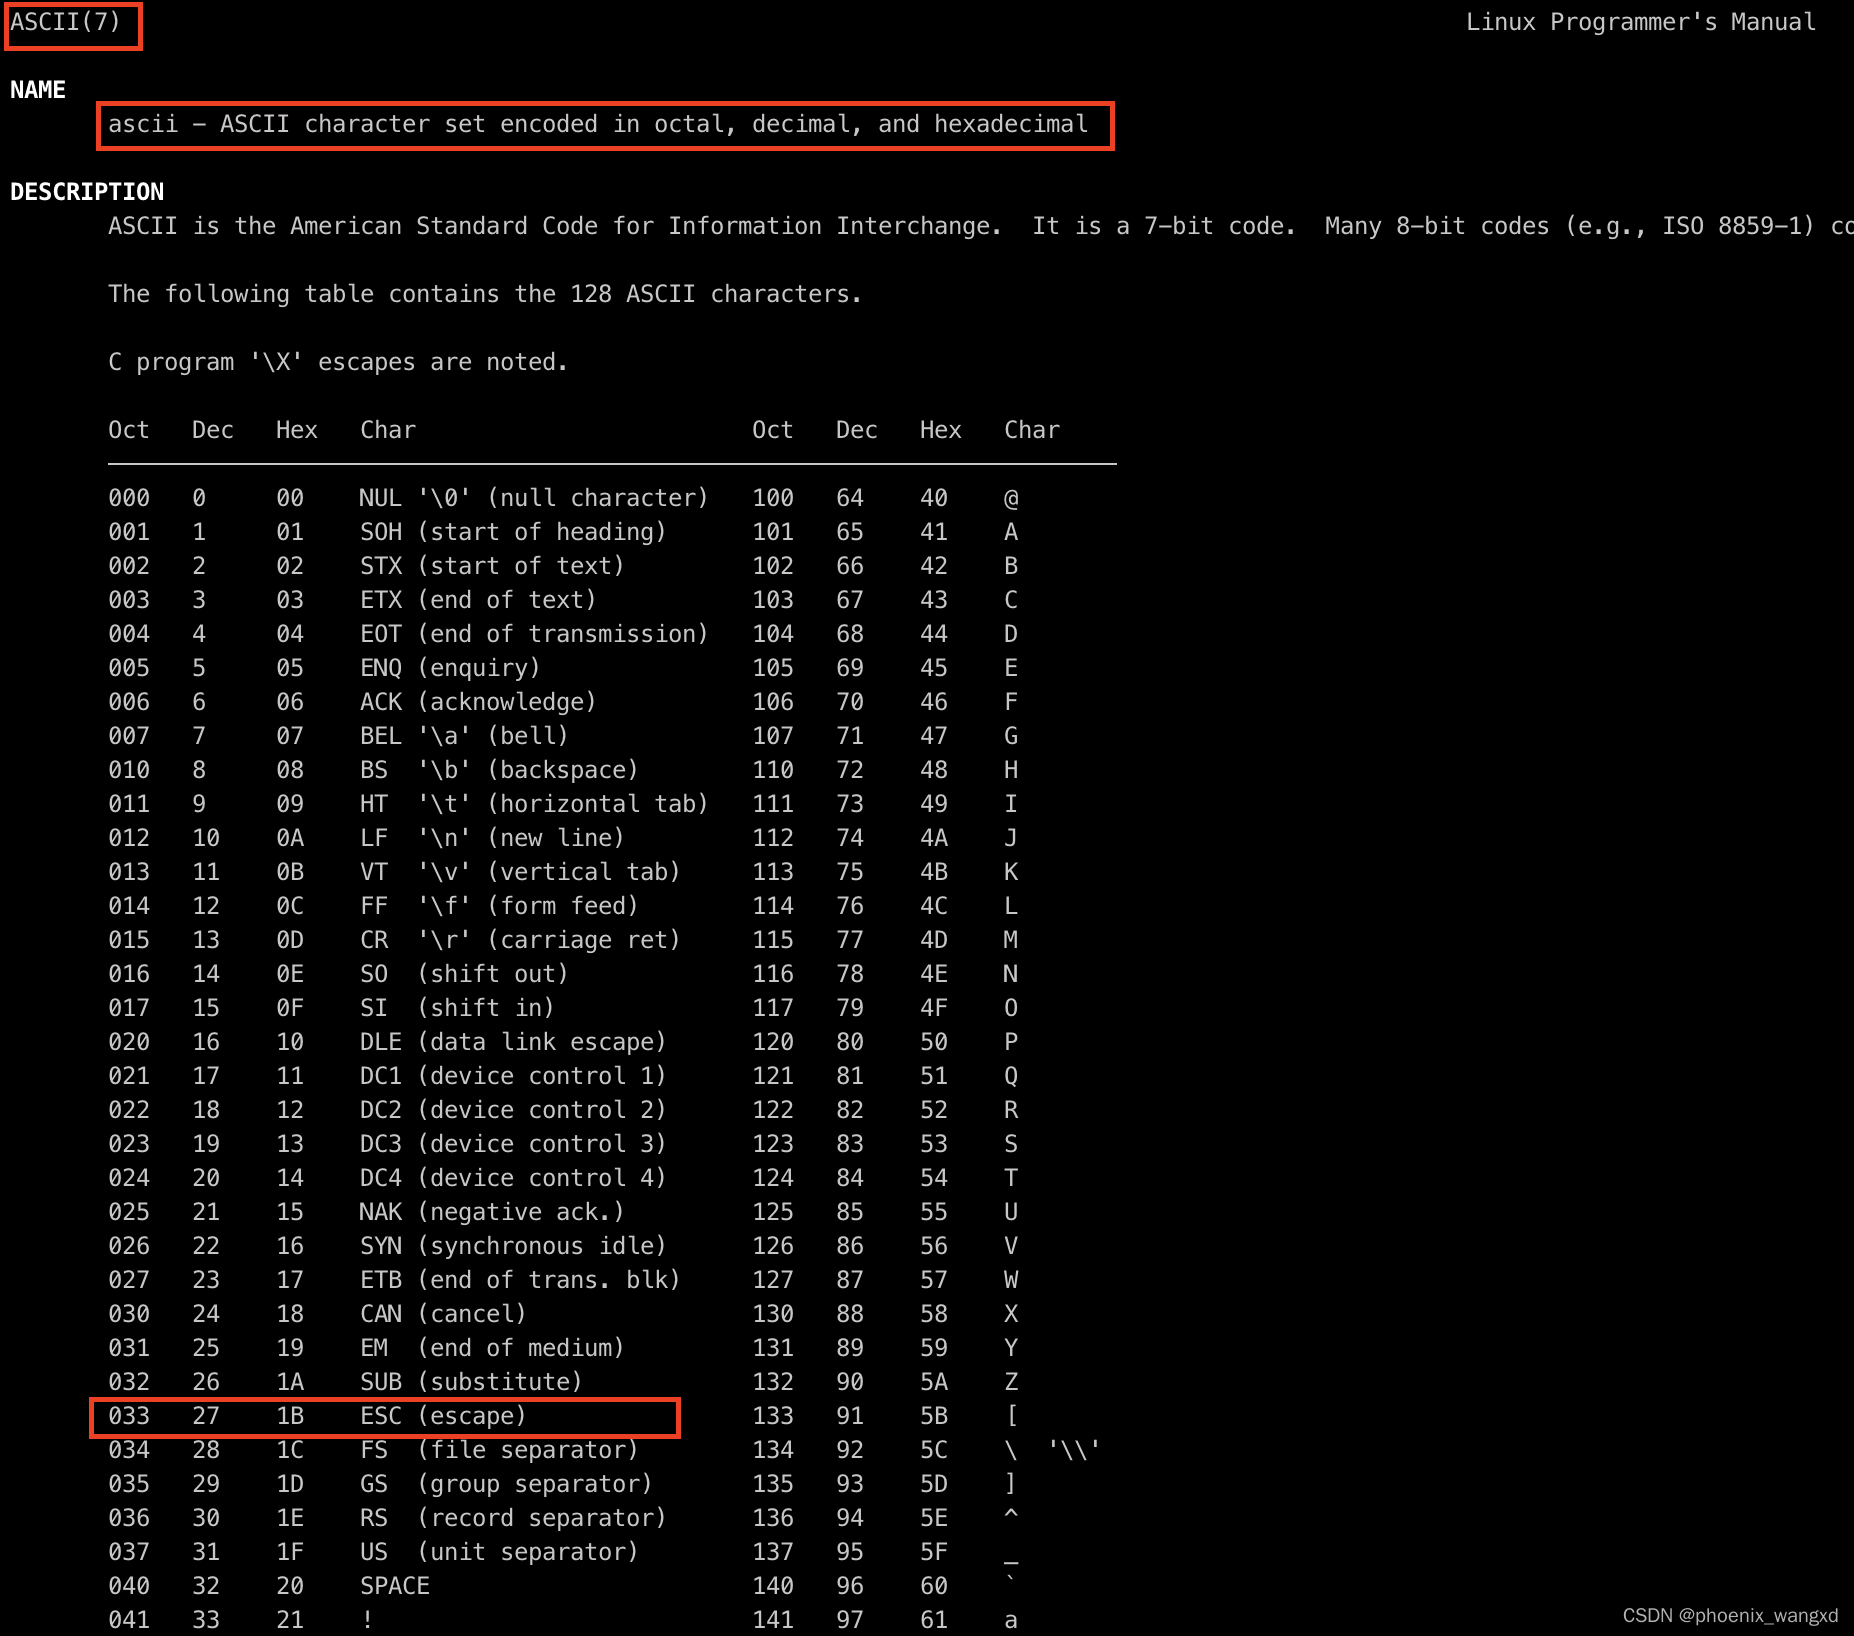
ansi escape code始终以\x1b或者\033开头,这两个的作用一样的:它们只是将ACSII序号27插入这里的不同方法。如果你看一个ASCII表,0x1b的字面意思是ESC,这就是为什么叫做ansi escape code 。
我将部分的ASCII表结果摘录如下:
1.3. 介绍CSI (Control Sequence Introducer)
上面我们已经说明了\x1b的含义,再加上一个左中括号: [,他们一起组成的部分通常被称为CSI (Control Sequence Introducer)
我们为什么说这个? 因为大部分情况下,你见到的ANSI转义代码(ansi escape code)都是以\x1b[开头的。
补充说明:
除了CSI, ansi escape code还有很多其他的功能,本文我们暂时不讲。
2. ansi escape code日常用法
ansi escape code 其实比较复杂,但是我们本文不会叙述,这里只介绍了一些日常的用法。
2.1. 常用语法格式
常用的ansi escape code的语法看起如下:
0x1B + "[" + <zero or more numbers, separated by ";"> + <a letter>
加号将语法分为了几部分,阅读语法的方式:
- 最前面的
0x1B是ansi escape code开始的标准 - 接着的
[已经说过了,是CSI (Control Sequence Introducer) - 中间部分的
<zero or more numbers, separated by ";">由0个或者多个数字组成,是函数的参数,多个参数之间由分号进行分割。 - 最终部分的
<a letter>是一个字母,是ansi escape code需要调用的函数名
CSI (Control Sequence Introducer) 各部分的字符范围如下(简单了解即可):
| 组成部分 | 字符范围 | ASCII |
|---|---|---|
| 参数字节 | 0x30–0x3F | 0–9:;<=>? |
| 中间字节 | 0x20–0x2F | 空格、!"#$%&’()*+,-./ |
| 最终字节 | 0x40–0x7E | @A–Z[]^_`a–z{ |
如果您看到\x1b[0;1;34m,您可以这样阅读:
\x1b[  # call a CSI function
0;1;34 # function arguments (0, 1, 34)
m      # function name
因此: 上面这句话可以理解为m(0, 1, 34); 同样,\x1b[A 可以理解为: A()。
这个函数
m是极其重要的,后面会重点介绍的
2.2. 可用的函数
上面介绍了一个函数m, 那还有那些函数可以使用呢?
| name | signature | description | |
|---|---|---|---|
| A | Cursor Up | (n=1) | Move cursor up by n 【将光标向上移动n行】 |
| B | Cursor Down | (n=1) | Move cursor down by n 【将光标向下移动n行】 |
| C | Cursor Forward | (n=1) | Move cursor forward by n 【将光标向前移动n个字符】 |
| D | Cursor Back | (n=1) | Move cursor back by n 【将光标向后移动n个字符】 |
| E | Cursor Next Line | (n=1) | Move cursor to the beginning of the line n lines down【将光标向下移到到n行的行首】 |
| F | Cursor Previous Line | (n=1) | Move cursor to the beginning of the line n lines up【将光标向上移到到n行的行首】 |
| G | Cursor Horizontal Absolute | (n=1) | Move cursor to the the column nwithin the current row 【将光标移动到当前行中的第n列】 |
| H | Cursor Position | (n=1, m=1) | Move cursor to row n, column m, counting from the top left corner |
| J | Erase in Display | (n=0) | Clear part of the screen. 0, 1, 2, and 3 have various specific functions |
| K | Erase in Line | (n=0) | Clear part of the line. 0, 1, and 2 have various specific functions |
| S | Scroll Up | (n=1) | Scroll window up by n lines 【将窗口向上滚动到n行】 |
| T | Scroll Down | (n=1) | Scroll window down by n lines 【将窗口向下滚动到n行】 |
| s | Save Cursor Position | () | Save current cursor position for use with u |
| u | Restore Cursor Position | () | Set cursor back to position last saved by s |
| f | … | … | (same as G) |
| m | SGR | (*) | Set graphics mode. More below |
看完这个表,你可能会疑惑,函数(m)说的这个**SGR(Set graphics mode)**又是什么功能??下面我们单独介绍。
2.3. 单独介绍SGR(Set graphics mode)
SGR(Set graphics mode)函数(m)的功能比其他功能复杂得多。SGR简单说明:
| value | name / description |
|---|---|
| 0 | Reset: turn off all attributes 【重置:关闭所有属性】 |
| 1 | Bold (or bright, it’s up to the terminal and the user config to some extent) 【粗体】 |
| 3 | Italic 【斜体】 |
| 4 | Underline 【下划线】 |
| 30–37 | Set text colour from the basic colour palette of 0–7 【从0-7的基本颜色板中设置文本颜色,即前景色】 |
| 38;5;n | Set text colour to index n in a 256-colour palette(e.g. \x1b[38;5;34m)【前景色】 |
| 38;2;r;g;b | Set text colour to an RGB value (e.g. \x1b[38;2;255;255;0m)【前景色】 |
| 40–47 | Set background colour 【从0-7的基本颜色板中设置背景色】 |
| 48;5;n | Set background colour to index n in a 256-colour palette 【背景色】 |
| 48;2;r;g;b | Set background colour to an RGB value 【背景色】 |
| 90–97 | Set text colour from the bright colour palette of 0–7 |
| 100–107 | Set background colour from the bright colour palette of 0–7 |
可以看到还有很多其他的值没有列,有两个原因:
- 很多其他的值不常用
- 很多其他的值,只限于很少的特殊终端支持。
多个SGR参数总是可以使用另一个参数; 进行串联,它们将按照遇到的先后顺序依次进行应用。
在其他参数之前看到0;尤其常见,以便在应用我们自己的参数之前重置状态。
2.4. 基本颜色面板 Colour Palettes
上面的表格中30–37说的基本颜色面板,我们在这里进行介绍。 基本的颜色面板中有8个颜色项目:
- 0: black【黑色】 —>颜色代码30
- 1: red【红色】 —>颜色代码31
- 2: green【绿色】 —>颜色代码32
- 3: yellow【黄色】 —>颜色代码33
- 4: blue【蓝色】 —>颜色代码34
- 5: magenta【洋红色】—>颜色代码35
- 6: cyan【青色】 —>颜色代码36
- 7: white【白色】 —>颜色代码37
如何记忆这些颜色条目? 这里有一个简单的思路:
- 首先是这里一共有8个条目,简单理解为一个字节的8位,每个颜色使用了Byte中的一个Bit。
- 0【黑色】,这是我们在写代码的时候最常用的默认值,一般不会单独设置这个
- 1【红色】, 红色通常是严重的错误,所以重要性最高,因此是第1个
- 2【绿色】, 绿色通常是重要的成功,所以重要性次高,因此是第2个
- 3【黄色】,用于告警。 后面的几个颜色重要性依次递减
- 7【白色】, 白色同黑色一样很少专门使用,因为他们又可能会和前景色或者背景色重合导致界面无法阅读
2.4.1. 举例1
下面是我在终端中,使用不同的颜色代码测试的结果:
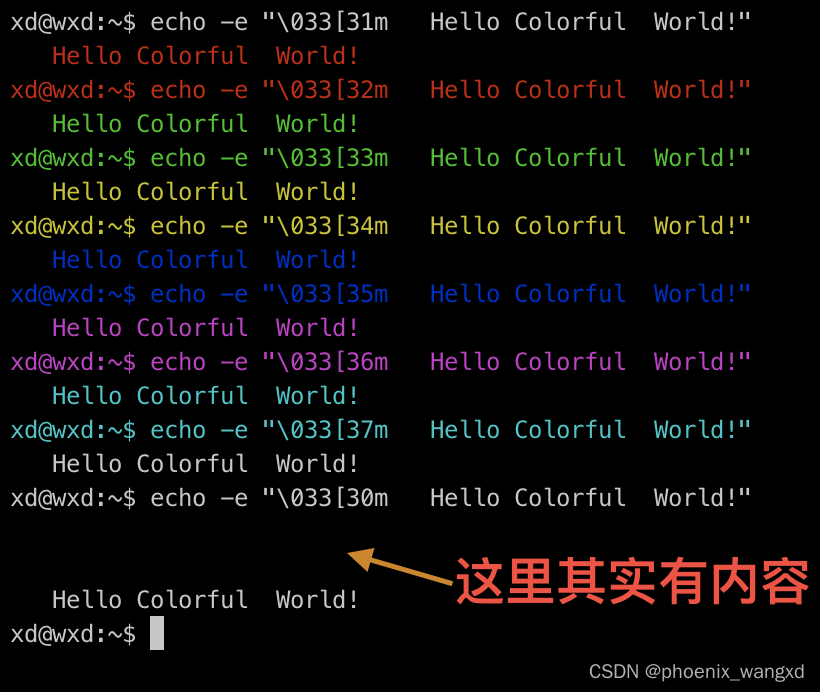
黑色的部分是因为文本的颜色与背景黑色重叠了,因此看到似乎是没有内容,其实光标选中可以看到内容。
2.4.2. 举例2
可能你也看到了,在前面的例子中设置完颜色后,如果不进行重置,会影响到下面的行的显示效果。
这是我们显示完后,重置颜色的示例:
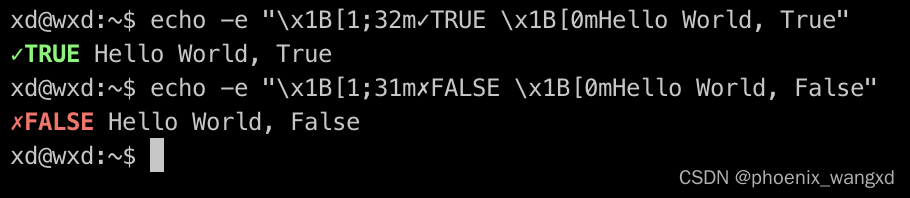
另外,为了防止别的设置对现在的设置进行干扰,可以将第一个参数设置为0,如下:

3. 其他有用的转义
另一对有用的转义是\x1b[?25h和\x1b[?25l, 这两个作用分别显示光标和隐藏光标。
如何理解这个语法:
?25意味着与光标(cursor)有关h和l代表“高(high)”和“低(low)”:想象一下,假设让你用1bit指示光标是否应该可见,那么 “高(high)”值(1)表示“显示”;“低(low)”值(0)表示“隐藏”, 也会是一个最自然的选择。
当您要绘制一些会导致光标疯狂跳动的东西时,显示/隐藏非常有用,例如,重新绘制最后几行以更新新内容。
我们经常使用的另外一件事是\r或Carriage Return(回车),它的功能与\x1b[1G相似或相同,它只是将光标移动到行的开头。
4. 补充
补充一段来自https://handwiki.org/wiki/ANSI_escape_code 的介绍:
ANSI escape sequences are a standard for in-band signaling to control cursor location, color, font styling, and other options on video text terminals and terminal emulators. Certain sequences of bytes, most starting with an ASCII escape character and a bracket character, are embedded into text. The terminal interprets these sequences as commands, rather than text to display verbatim.
ANSI sequences were introduced in the 1970s to replace vendor-specific sequences and became widespread in the computer equipment market by the early 1980s. They are used in development, scientific, commercial text-based applications as well as bulletin board systemsto offer standardized functionality.
Although hardware text terminals have become increasingly rare in the 21st century, the relevance of the ANSI standard persists because a great majority of terminal emulators and command consoles interpret at least a portion of the ANSI standard.


 1654
1654

 被折叠的 条评论
为什么被折叠?
被折叠的 条评论
为什么被折叠?
 到【灌水乐园】发言


