


PyTorch确实比TensorFlow更好用,现在很多RL库也是基于PyTorch的,所以还是得学习一下。
本文主要记录下其特性、要点,以及速查链接。
简介 & 特性
PyTorch主要提供两大功能:张量(tensor)计算和自动微分(autograd)。这两个功能是深度学习的基础,TensorFlow也是以这两大功能为支点的。
PyTorch 和 TensorFlow 的关键差异是它们执行代码的方式。
TensorFlow遵循“数据即代码,代码即数据”的理念。在TensorFlow中,你可以在模型能够运行之前静态地定义图。与外部世界的所有通信都通过tf.Session对象和tf.Placeholder来执行,这两个张量在运行时会被外部数据替代。我们无法在定义图的代码中,进行诸如直接打印某些变量的值的操作,因为这些值必须在tf.Session运行时才能获取,不是很方便。
在PyTorch中,图的定义则更为重要和动态化:你可以随时定义、随时更改、随时执行节点,并且没有特殊的会话接口或占位符。总体而言,该框架与Python语言集成地更为紧密,并且在大多数时候用起来感觉更加本地化。当然,这也使得PyTorch的性能比TensorFlow可能差了一些,但是并没有很大差距。
以上差别导致了调试方法的不同。由于PyTorch中的计算图是在运行的时候定义的,因此你可以使用任何调试工具;而TensorFlow的调试则只能使用tfdbg工具,这就很不方便。
实际上,TensorFlow 后来也引入了 eager 模式,也逐渐支持了动态图,但是现在很多研究人员都已经转移到 PyTorch 上了,而且 TensorFlow 的内容太杂了,API 有很多套,让人感到混乱;PyTorch 就很单一,比较容易掌握,目前使用 PyTorch 的研究人员明显在赶超 TensorFlow。
其实,TensorFlow 目前还是有优势的,比如它更容易部署。但是 PyTorch 现在也开始支持 C++ 前端,C++模型调用等功能了,而且还在继续发展,感觉转向 PyTorch 是大势所趋了。
安装
PyTorch的安装是比较简单的。建议使用 Linux 环境。这里只考虑使用 cpu 的情况,如果需要使用 cuda,可以搜索如何配置 cuda 环境。
首先,最好使用 Anaconda 环境管理器,这样很多库已经内置了,而且便于我们管理多个环境。
Anaconda 安装后,首先换源,然后我们创建一个专门的环境:
conda create -n torch python=3.8.2
进入环境:
conda activate torch
根据官网,选择适合自己需求的安装指令,执行即可。

例子:CIFAR-10
按照教程,发现数据集下载太慢太慢了,我们下面首先给出代码,然后介绍下如何手动下载数据集:
# 是否训练
M_TRAIN = True
# 训练轮数
M_EPOCHES = 10
# 每批大小
M_BATCHSIZE = 100
# 保存位置
M_SAVEPATH = './ImageClassification/PyTorch/cifar_net.pth'
# 是否画图
M_IMAGE = False

######## 0.检测是否有GPU设备 #########
import torch
device = torch.device("cuda:0" if torch.cuda.is_available() else "cpu")
print('device:', device)
# 也支持多 gpu 操作,具体参考

######## 1.数据载入和预处理 #########
import torchvision                          # pytorch的一个图形库
import torchvision.transforms as transforms # torchvision.transforms主要是用于常见的一些图形变换
## 下载很慢,我们采取特殊办法 ##
## 从网上找到数据集直接下载下来,然后修改torchvision.datasets.CIFAR10源代码中的 URL,改为本地地址 ##
## 修改时候注意和数据文件夹保持一致 ##
transform = transforms.Compose(             # 一系列图像预处理
    [transforms.ToTensor(),                                     # 首先把PIL/numpy.ndarray转换为tensor
     transforms.Normalize((0.5, 0.5, 0.5), (0.5, 0.5, 0.5))])   # 然后把调整三个通道,把数据从[0,1]映射到[-1,1]。output[channel] = (input[channel] - mean[channel]) / std[channel]。
trainset = torchvision.datasets.CIFAR10(root='./_data/cifar', train=True,
                                        download=True, transform=transform)
trainloader = torch.utils.data.DataLoader(trainset, batch_size=M_BATCHSIZE,
                                          shuffle=True, num_workers=4)
testset = torchvision.datasets.CIFAR10(root='../_data/cifar', train=False,
                                       download=True, transform=transform)
testloader = torch.utils.data.DataLoader(testset, batch_size=M_BATCHSIZE,
                                         shuffle=False, num_workers=4)
classes = ('plane', 'car', 'bird', 'cat',
           'deer', 'dog', 'frog', 'horse', 'ship', 'truck')
# show image size
dataiter = iter(trainloader)
images, labels = dataiter.next()
print('image_batch_size:', images.size())
print('label_batch_size:', labels.size())
# 显示四张图片看看
import matplotlib.pyplot as plt
import numpy as np
def imshow(img):
    img = img / 2 + 0.5                         # [-1, 1]->[0, 1],tensor->numpy
    npimg = img.numpy()
    plt.imshow(np.transpose(npimg, (1, 2, 0)))  # 维度重置,因为 torch 中,维度顺序为:
        #(channels,imagesize,imagesize),在 plt 中则为(imagesize,imagesize,channels)
    plt.show()
# get some random training images
images, labels = dataiter.next()
# print labels
print(' '.join('%5s' % classes[labels[j]] for j in range(M_BATCHSIZE)))
# show images
if M_IMAGE:
    imshow(torchvision.utils.make_grid(images))

######## 2.搭建分类网络 #########
# build the network
import torch.nn as nn
import torch.nn.functional as F
class Net(nn.Module):
    def __init__(self):
        super(Net, self).__init__()
        self.conv1 = nn.Conv2d(3, 16, kernel_size=5, stride=1, padding=2)
        self.conv2 = nn.Conv2d(16, 32, kernel_size=5, stride=1, padding=2)
        self.conv3 = nn.Conv2d(32, 64, kernel_size=5, stride=1, padding=2)
        self.pool = nn.MaxPool2d(kernel_size=2, stride=2)
        self.fc1 = nn.Linear(64 * 4 * 4, 1024)
        self.fc2 = nn.Linear(1024, 124)
        self.fc3 = nn.Linear(124, 10)
    def forward(self, x):
        # 网络分析,网络大小和最终的效果也有很大关系,网络大一些能够达到更好的效果
        # 因此没必要自己设计,直接去找好的网络结构即可
        # 输入图片尺寸为[batch_num, 3, 32, 32],网络输出为[batch_num, 10]
        x = self.pool(F.relu(self.conv1(x)))
        x = self.pool(F.relu(self.conv2(x)))
        x = self.pool(F.relu(self.conv3(x)))
        x = x.view(-1, 64 * 4 * 4)
        x = F.relu(self.fc1(x))
        x = F.relu(self.fc2(x))
        x = self.fc3(x)
        # 不需要 softmax,因为 crossentropy 损失已经内部计算了
        # !!最好认真研究下常见的随时函数
        # x = F.softmax(self.fc3(x), dim=1)
        return x
net = Net()
net.to(device)
# show net structure
data = dataiter.next()
images, labels = data[0].to(device), data[1].to(device)
print('net_structure:', net)
print('net_output_structure:', net(images).size())

######## 3.损失函数 #########
import torch.optim as optim
# 注意 criterion 的第一个参数是 one_hot,第二个参数则是数字
criterion = nn.CrossEntropyLoss()
optimizer = optim.SGD(net.parameters(), lr=0.05, momentum=0.9)

######## 4.训练 #########
# 如果网络已经保存过,就加载进来
import os
if os.path.exists(M_SAVEPATH):
    print('Loading model')
    net = Net()
    net.load_state_dict(torch.load(M_SAVEPATH))
    net.to(device)
if M_TRAIN:
    for epoch in range(M_EPOCHES):  # loop over the dataset multiple times
        running_loss = 0.0
        for i, data in enumerate(trainloader, 0):
            # get the inputs; data is a list of [inputs, labels]
            inputs, labels = data[0].to(device), data[1].to(device)
            # zero the parameter gradients
            optimizer.zero_grad()
            # forward + backward + optimize
            outputs = net(inputs)
            loss = criterion(outputs, labels)
            loss.backward()
            optimizer.step()
            # print statistics
            running_loss += loss.item()
            # 输出间隔
            OUTINFO_INTERVAL = 60000 / M_BATCHSIZE / 10
            if i % OUTINFO_INTERVAL == OUTINFO_INTERVAL - 1:    # print every 2000 mini-batches
                print('[%d, %5d] loss: %.3f' %
                    (epoch + 1, (i + 1)*M_BATCHSIZE, running_loss / OUTINFO_INTERVAL))
                running_loss = 0.0
    # 保存网络
    print('Finished Training')
    torch.save(net.state_dict(), M_SAVEPATH)

######## 5.测试 #########
dataiter = iter(testloader)
# 显示几个结果看看
data = dataiter.next()
images, labels = data[0].to(device), data[1].to(device)
outputs = net(images)
_, predicted = torch.max(outputs, 1)
print('Ground_tr: ', ' '.join('%5s' % classes[labels[j]] for j in range(M_BATCHSIZE)))
print('Predicted: ', ' '.join('%5s' % classes[predicted[j]] for j in range(M_BATCHSIZE)))
# 计算总正确率
correct = 0
total = 0
with torch.no_grad():
    for data in testloader:
        images, labels = data[0].to(device), data[1].to(device)
        outputs = net(images)
        _, predicted = torch.max(outputs.data, 1)
        total += labels.size(0)
        correct += (predicted == labels).sum().item()
print('Accuracy of the network on the 10000 test images: %d %%' % (
    100 * correct / total))
# 计算各个类的正确率
class_correct = list(0. for i in range(10))
class_total = list(0. for i in range(10))
with torch.no_grad():
    for data in testloader:
        images, labels = data[0].to(device), data[1].to(device)
        outputs = net(images)
        _, predicted = torch.max(outputs, 1)
        c = (predicted == labels).squeeze()
        for i in range(M_BATCHSIZE):
            label = labels[i]
            class_correct[label] += c[i].item()
            class_total[label] += 1
for i in range(10):
    print('Accuracy of %5s : %2d %%' % (
        classes[i], 100 * class_correct[i] / class_total[i]))
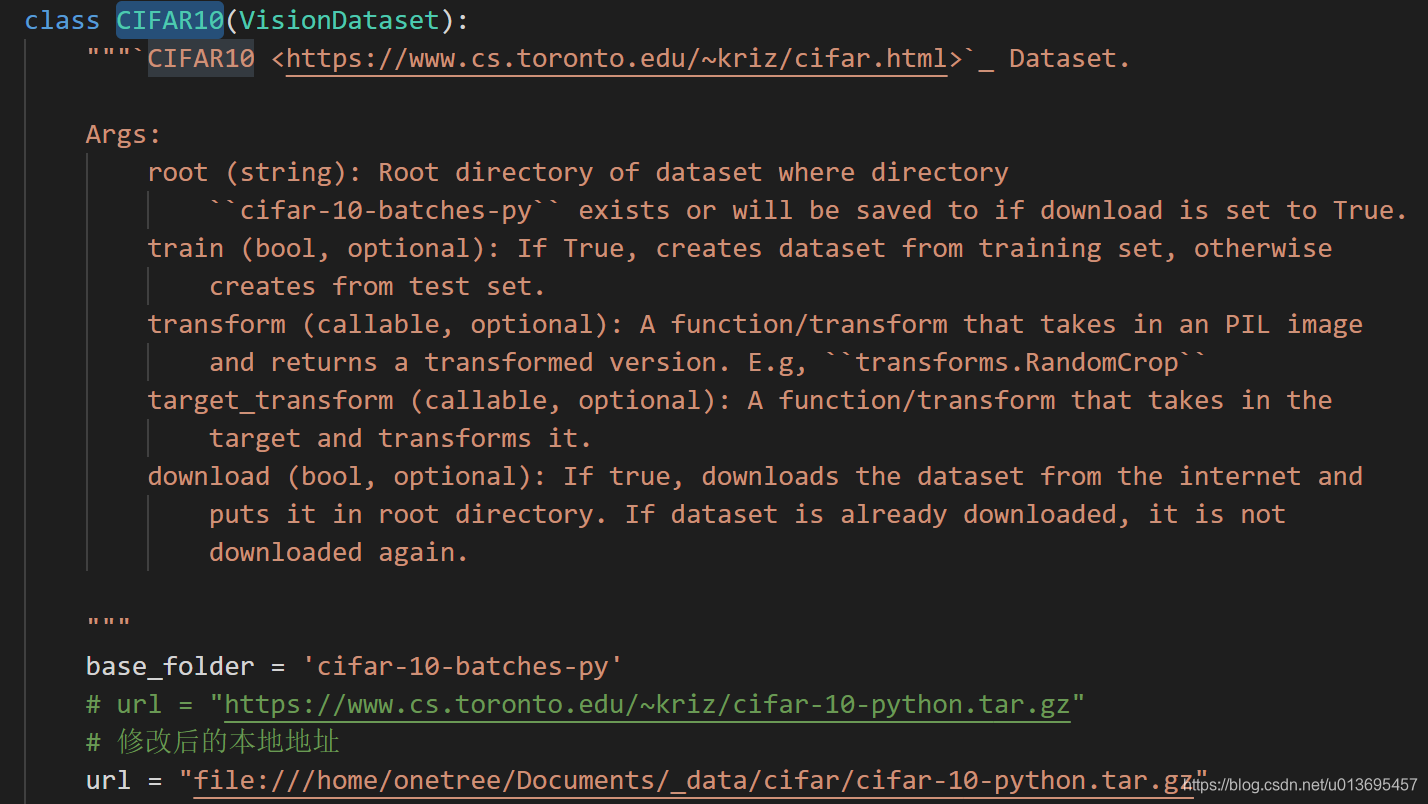
手动数据集下载:
根据这篇文章把cifar数据集下载好,然后根据这篇文章。修改torchvision中的url,具体为:打开torchvision/datasets/cifar.py文件,在CIFAR10类的比较靠前的部分找到 url 并修改为本地地址:
深入学习 & 代码片段
这里主要想记录下一些比较重要的代码片段:
自定义自动微分函数
如果我们希望引入自己的特殊函数,那么需要我们自己实现自动微分,例如我们实现一个 ReLU 函数:
# -*- coding: utf-8 -*-
import torch
class MyReLU(torch.autograd.Function):	# 必须继承 torch.autograd.Function
    """
    We can implement our own custom autograd Functions by subclassing
    torch.autograd.Function and implementing the forward and backward passes
    which operate on Tensors.
    """
    @staticmethod
    def forward(ctx, input):
        """
        In the forward pass we receive a Tensor containing the input and return
        a Tensor containing the output. ctx is a context object that can be used
        to stash information for backward computation. You can cache arbitrary
        objects for use in the backward pass using the ctx.save_for_backward method.
        """
        ctx.save_for_backward(input)	# input保存到ctx中以备使用
        return input.clamp(min=0)		# 自定义函数的 forward
    @staticmethod
    def backward(ctx, grad_output):
        """
        In the backward pass we receive a Tensor containing the gradient of the loss
        with respect to the output, and we need to compute the gradient of the loss
        with respect to the input.
        """
        input, = ctx.saved_tensors		# 把ctx记录的数据取出来
        grad_input = grad_output.clone()
        grad_input[input < 0] = 0		# 自定义函数的 backward
        return grad_input
串行模型
类似 Keras,可以方便地定义串行网络模型:
model = torch.nn.Sequential(
    torch.nn.Linear(D_in, H),
    torch.nn.ReLU(),
    torch.nn.Linear(H, D_out),
)
自定义网络模块
对于复杂网络,可能不仅仅包含串行结构,那么需要我们自己定义网络模块,上面给出的 cirar10 的例子中已经使用了这种写法了:
class TwoLayerNet(torch.nn.Module):	# 必须继承 torch.nn.Module 模块
    def __init__(self, D_in, H, D_out):
        """
        In the constructor we instantiate two nn.Linear modules and assign them as
        member variables.
        """
        super(TwoLayerNet, self).__init__()
        self.linear1 = torch.nn.Linear(D_in, H)
        self.linear2 = torch.nn.Linear(H, D_out)
    def forward(self, x):	# 只需要定义前向通道即可
        """
        In the forward function we accept a Tensor of input data and we must return
        a Tensor of output data. We can use Modules defined in the constructor as
        well as arbitrary operators on Tensors.
        """
        h_relu = self.linear1(x).clamp(min=0)
        y_pred = self.linear2(h_relu)
        return y_pred


 423
423


 被折叠的 条评论
为什么被折叠?
被折叠的 条评论
为什么被折叠?
 到【灌水乐园】发言


