


VLLM 离线推理
https://docs.vllm.ai/en/latest/getting_started/quickstart.html
文中使用的版本是VLLM 0.7.2 V1版本的离线推理过程,模型为Qwen2.5-1.5B-Instruct。
在0.8版本之前使用V1要设置环境变量:
export VLLM_USE_V1=1
from vllm import LLM, SamplingParams
prompts = [
    "Hello, my name is",
    "The president of the United States is",
    "Write a poem about China:",
    "Who won the world series in 2020?",
]
sampling_params = SamplingParams(temperature=0.8, top_p=0.95)

llm = LLM(model="Qwen2.5-1.5B-Instruct")

outputs = llm.generate(prompts, sampling_params)

for output in outputs:
    prompt = output.prompt
    generated_text = output.outputs[0].text
    print(f"Prompt: {prompt!r}, Generated text: {generated_text!r}")
LLM类创建了一个self.llm_engine,V1版本就是vllm\v1\engine\llm_engine.py的LLMEngine
LLM.generate执行流程
LLM.generate->
LLM._validate_and_add_requests -> _add_request -> llm_engine.add_request->scheduler.add_request(req)
outputs = LLM._run_engine() <- llm_engine.step() <-model_executor.execute_model(scheduler.schedule())
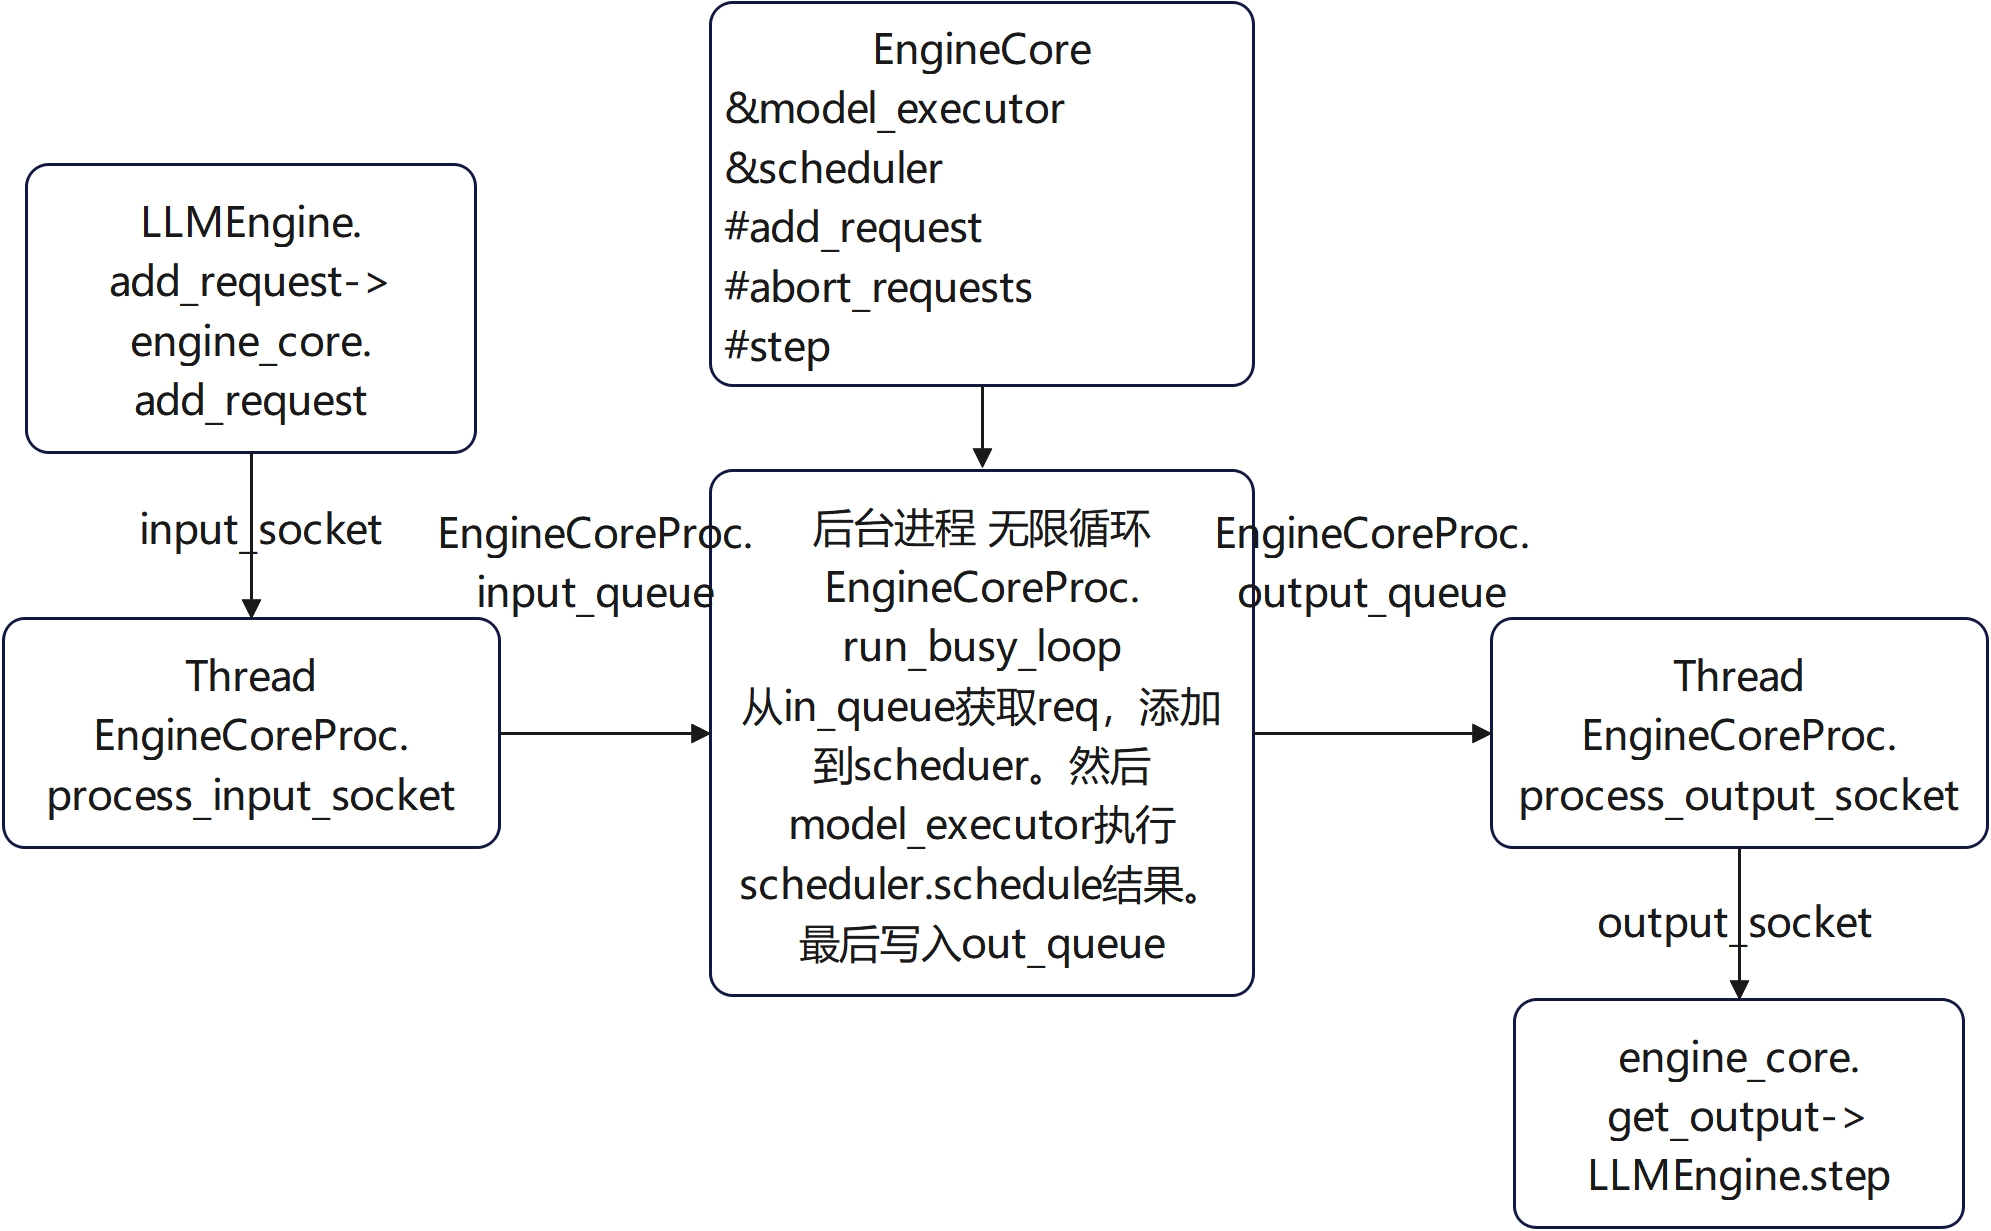
整个流程图如下
V1 LLMEngine
主要成员
        self.tokenizer = init_tokenizer_from_configs(
            model_config=vllm_config.model_config,
            scheduler_config=vllm_config.scheduler_config,
            parallel_config=vllm_config.parallel_config,
            lora_config=vllm_config.lora_config)
        self.tokenizer.ping()

        # Processor (convert Inputs --> EngineCoreRequests)
        self.processor = Processor(model_config=vllm_config.model_config,
                                   cache_config=vllm_config.cache_config,
                                   lora_config=vllm_config.lora_config,
                                   tokenizer=self.tokenizer,
                                   input_registry=input_registry,
                                   mm_registry=mm_registry)

        # OutputProcessor (convert EngineCoreOutputs --> RequestOutput).
        self.output_processor = OutputProcessor(self.tokenizer, log_stats=False)

        # EngineCore (gets EngineCoreRequests and gives EngineCoreOutputs)
        self.engine_core = EngineCoreClient.make_client(
            multiprocess_mode=multiprocess_mode,
            asyncio_mode=False,
            vllm_config=vllm_config,
            executor_class=executor_class)
engine_core是一个vllm.v1.engine.core_client.SyncMPClient,继承自MPClient
    MPClient: base client for multi-proc EngineCore.
        EngineCore runs in a background process busy loop, getting
        new EngineCoreRequests and returning EngineCoreOutputs

        * pushes EngineCoreRequests via input_socket
        * pulls EngineCoreOutputs via output_socket

        * AsyncMPClient subclass for AsyncLLM usage
        * SyncMPClient subclass for LLM usage
MPClient创建了两个通信socket,启动了一个后端进程创建了一个EngineCoreProc
    self.output_socket = make_zmq_socket(self.ctx, output_path, zmq.constants.PULL)
    self.input_socket = make_zmq_socket(self.ctx, input_path, zmq.constants.PUSH)

    # Start EngineCore in background process.
    self.proc_handle = BackgroundProcHandle(
        input_path=input_path, output_path=output_path, process_name="EngineCore",
        target_fn=EngineCoreProc.run_engine_core, process_kwargs)
llm_engine与后端engine_core进程通过zmq socket通信。
LLMEngine.add_request
        # 1) Process raw inputs into the request.
        request = self.processor.process_inputs(request_id, prompt, params)

        # 2) Make a new RequestState and queue.
        self.output_processor.add_request(request)

        # 3) Add the request to EngineCore.
self.engine_core.add_request(request)LLM._run_engine->llm_engine.step()->engine_core.get_output()
    def _run_engine(
            self, *, use_tqdm: bool
    ) -> List[Union[RequestOutput, PoolingRequestOutput]]:
        # Run the engine.
        outputs: List[Union[RequestOutput, PoolingRequestOutput]] = []

        while self.llm_engine.has_unfinished_requests():
            step_outputs = self.llm_engine.step()
            for output in step_outputs:
                if output.finished:
                    outputs.append(output)

        return sorted(outputs, key=lambda x: int(x.request_id))
llm_engine的step:
    def step(self) -> List[RequestOutput]:
        # 1) Get EngineCoreOutput from the EngineCore.
        outputs = self.engine_core.get_output()

        # 2) Process EngineCoreOutputs.
        processed_outputs = self.output_processor.process_outputs(outputs.outputs)

        # 3) Abort any reqs that finished due to stop strings.
        self.engine_core.abort_requests(processed_outputs.reqs_to_abort)

        return processed_outputs.request_outputs
engine_core.get_output()通常是输出多个token。
但是output_processor.process_outputs处理后会把还没有结束的存起来,而不会给出结果。只有finish generate的output_processor.process_outputs才会输出非空结果。从而LLM里面step_outputs = self.llm_engine.step()要么得到是空结果,要么是结束生成的最终结果。
engine_core的后端进程
比较核心的模块:vllm\v1\engine\core.py
EngineCore: Inner loop of vLLM's Engine.
EngineCoreProc继承自EngineCore: ZMQ-wrapper for running EngineCore in background process.
# Start EngineCore in background process.
self.proc_handle = BackgroundProcHandle(
    input_path=input_zmq_path,
    output_path=output_zmq_path,
    process_name="EngineCore",
    target_fn=EngineCoreProc.run_engine_core,
    process_kwargs={
        "vllm_config": vllm_config,
        "executor_class": executor_class,
        "log_stats": log_stats,
    })
engine_core_client调用这个方法创建了一个进程调用EngineCoreProc.run_engine_core,在这个进程里面创建了EngineCoreProc对象并且进入无限循环run_busy_loop:
            engine_core = EngineCoreProc(*args, **kwargs)
            engine_core.run_busy_loop()
EngineCoreProc在创建时还启动了两个线程,用来从zmq input socket获取输入到input_queue,以及从output_queue获取数据输出到zmq output socket。用于配合run_busy_loop进行输入获取和输出。
threading.Thread(target=self.process_input_socket, args=(input_path, ), daemon=True).start()
threading.Thread(target=self.process_output_socket, args=(output_path, ), daemon=True).start()
EngineCore主要对象和方法
class EngineCore:
    """Inner loop of vLLM's Engine."""
    def __init__(self, vllm_config: VllmConfig, executor_class: Type[Executor]):
        # Setup Model.
        self.model_executor = executor_class(vllm_config)

        # Setup KV Caches and update CacheConfig after profiling.
        num_gpu_blocks, num_cpu_blocks = self._initialize_kv_caches(vllm_config)
        vllm_config.cache_config.num_gpu_blocks = num_gpu_blocks
        vllm_config.cache_config.num_cpu_blocks = num_cpu_blocks

        # Setup scheduler.
        self.scheduler = Scheduler(
            scheduler_config=vllm_config.scheduler_config,
            model_config=vllm_config.model_config,
            cache_config=vllm_config.cache_config,
            lora_config=vllm_config.lora_config,
        )

        self.mm_input_mapper_server = MMInputMapperServer(vllm_config.model_config)

    def _initialize_kv_caches(self, vllm_config: VllmConfig) -> Tuple[int, int]:

    def add_request(self, request: EngineCoreRequest):
        """Add request to the scheduler."""
        req = Request.from_engine_core_request(request)
        self.scheduler.add_request(req)

    def abort_requests(self, request_ids: List[str]):
        """Abort requests from the scheduler."""
        self.scheduler.finish_requests(request_ids, RequestStatus.FINISHED_ABORTED)

    def step(self) -> EngineCoreOutputs:
        """Schedule, execute, and make output."""

        if not self.scheduler.has_unfinished_requests():
            return EngineCoreOutputs(
                outputs=[], scheduler_stats=self.scheduler.make_stats())

        scheduler_output = self.scheduler.schedule()
        output = self.model_executor.execute_model(scheduler_output)
        engine_core_outputs = self.scheduler.update_from_output(
            scheduler_output, output)
        return engine_core_outputs

    def profile(self, is_start: bool = True):
        self.model_executor.profile(is_start)

    def reset_prefix_cache(self):
        self.scheduler.reset_prefix_cache()
model_executor: vllm.v1.executor.abstract.UniProcExecutor for Qwen2.5-1.5B-Instruct
EngineCoreProc.run_busy_loop
    def run_busy_loop(self):
        """Core busy loop of the EngineCore."""

        # Loop until process is sent a SIGINT or SIGTERM
        while True:
            # 1) Poll the input queue until there is work to do.
            if not self.scheduler.has_unfinished_requests():
                while True:
                    try:
                        req = self.input_queue.get(timeout=POLLING_TIMEOUT_S)
                        self._handle_client_request(req)
                        break
                    except queue.Empty:
                        logger.debug("EngineCore busy loop waiting.")
                        # Break out the loop so we can log_stats in step().
                        if self.log_stats:
                            break
                    except BaseException:
                        raise

            # 2) Handle any new client requests (Abort or Add).
            while not self.input_queue.empty():
                req = self.input_queue.get_nowait()
                self._handle_client_request(req)

            # 3) Step the engine core.
            outputs = self.step()

            # 5) Put EngineCoreOutputs into the output queue.
            self.output_queue.put_nowait(outputs)
基本思想:
如果scheduler没有任务时,就以timeout的方式从input queue获取输入,从而避免while一直以非等待方式频繁调用queue.get。否则直接以非等待方式拿取queue的输入。然后_handle_client_request把request添加给scheduler。拿到queue所有输入后,调用step进行计算,最后结果发送到output queue。
step函数执行逻辑
    def step(self) -> EngineCoreOutputs:
        """Schedule, execute, and make output."""

        if not self.scheduler.has_unfinished_requests():
            return EngineCoreOutputs(
                outputs=[], scheduler_stats=self.scheduler.make_stats())

        scheduler_output = self.scheduler.schedule()
        output = self.model_executor.execute_model(scheduler_output)
        engine_core_outputs = self.scheduler.update_from_output(
            scheduler_output, output)
        return engine_core_outputs
step的输出样例
EngineCoreOutputs(
	outputs=[
		EngineCoreOutput(request_id='0', new_token_ids=[975], finished=True, finish_reason=<FinishReason.LENGTH: 1>, stop_reason=None),
		EngineCoreOutput(request_id='1', new_token_ids=[6872], finished=False, finish_reason=None, stop_reason=None),
		EngineCoreOutput(request_id='2', new_token_ids=[11], finished=False, finish_reason=None, stop_reason=None),
		EngineCoreOutput(request_id='3', new_token_ids=[11], finished=False, finish_reason=None, stop_reason=None)],
	scheduler_stats=SchedulerStats(num_running_reqs=3, num_waiting_reqs=0, gpu_cache_usage=9.787353434387303e-05))


 147
147

 被折叠的 条评论
为什么被折叠?
被折叠的 条评论
为什么被折叠?
 到【灌水乐园】发言


