


1、 list_head之前(链表归整)
1.1、 单向链表
原型:struct simplex
{
Int value;
<span style="white-space:pre"> </span>struct simplex *next;
};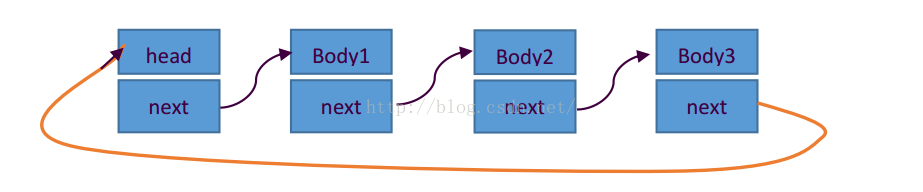
特点是单向只能从前往后查找,橙色线代表单向循环链表相较于单向链表所多出来的线
1.2、 双向链表
原型:struct bothlist
{
struct bothlist *next;
struct bothlist *prev;
};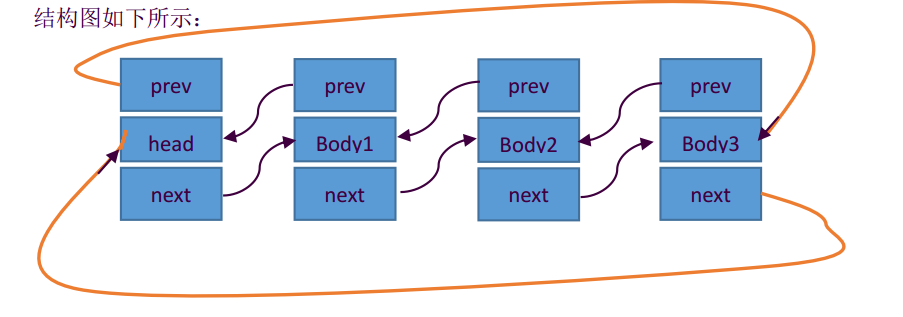
特点是双向,从前往后,从后往前都可以查询,橙色线是双向循环链表相较双向链表所多出来的两条线
2、 list_head结构体
2.1、简介
原型:struct list_head {
struct list_head *next, *prev;
};此结构体所构成的链表如上面的双向循环链表图示
此结构体在linux内核中被大量的引用,几乎所有内核当中需要构成链表结构的地方都用到了这个结构体。例如内核的总线设备就用到了这个结构体
2.2、此结构体的作用
例如现在有任意给定的一个结构体需要组成一个双向链表,则可以在此结构体当中加入list_head结构体用来进行链表的构建,例如结构体原型如下struct test_list
{
unsigned char *name;
struct list_head test;
int value;
};下面是根据此结构体以及list_head文件中的函数编写的测试文件,使用GCC4.8.1进行编译
#include <stdio.h>
//#include "list.h"
struct list_head {
	struct list_head *next, *prev;
};
struct test_list
{
	unsigned char *name;
	struct list_head test;
	int value;
};
static struct test_list lists[] = {
[0] = {
.value = 0,
.name = "hehe"
},
[1] = {
.value = 1,
},
[2] = {
.value = 2,
},
[3] = {
.value = 3,
.name = "test"
},
[4] = {
.value = 4,
}
};
struct list_head head = {
&(head), &(head)
};
static void __list_add_tail(struct list_head *new, struct list_head *prev, struct list_head *next)
{
new->next = next;
new->prev = prev;
prev->next = new;
next->prev = new;
}
void mlist_add_tail(struct list_head *new, struct list_head *head)
{
__list_add_tail(new, head->prev, head);
}
#define mlist_entry(list_head, type, member_name) \
(type *)((unsigned int)list_head - (unsigned int)(&(((type*)(0))->member_name)))
#define mlist_for_each(pos, head) \
			for(pos = (head)->prev; pos != head; pos = pos->prev)
int main(int argv, char *argc[])
{
struct list_head *mod;
unsigned int i = 0;
mlist_add_tail(&lists[0].test, &head);
mlist_add_tail(&lists[1].test, &head);
mlist_add_tail(&lists[2].test, &head);
mlist_add_tail(&lists[3].test, &head);
mlist_add_tail(&lists[4].test, &head);
mlist_for_each(mod, &head)
{
struct test_list *inode;
inode = mlist_entry(mod, struct test_list, test);
printf("%d %s\n", inode->value, inode->name);
}
getchar();
return 0;
}4 (null)
3 test
2 (null)
1 (null)
0 hehe
后经修改
#define mlist_for_each(pos, head) \
for(pos = (head)->prev; pos != head; pos = pos->prev)#define mlist_for_each(pos, head) \
for(pos = (head)->next; pos != head; pos = pos->next)0 hehe
1 (null)
2 (null)
3 test
4 (null)
由此可以得知此链表的结构为一个双向链表。
2.3、实现方法
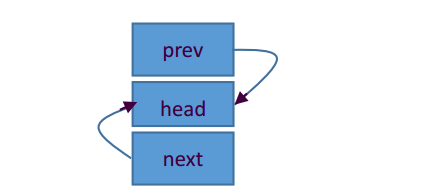
首先是头结点的创建以及初始化struct list_head head = {
&(head), &(head)
};此时head的结构体成员均指向自己,形如
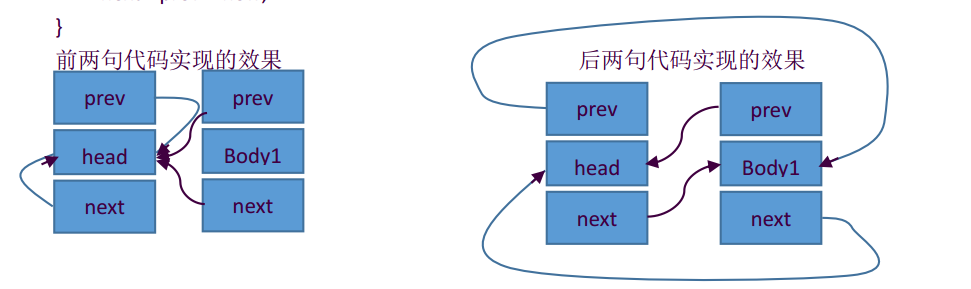
链表的添加过程
static void __list_add_tail(struct list_head *new, struct list_head *prev, struct list_head *next)
{
	new->next = next;
	new->prev = prev;
	prev->next = new;
	next->prev = new;
}
由结构体内部的list_head结构体得到结构体所在的位置
#define mlist_entry(list_head, type, member_name) \
			(type *)((unsigned int)list_head - (unsigned int)(&(((type*)(0))->member_name)))
反映到代码 mlist_entry(mod, struct test_list, test)得到
(struct test_list *)((unsigned int)mod - (unsigned int)(&((( struct test_list *)(0))-> test)))
分层次解析
((( struct test_list *)(0))-> test) 定义一个test_list结构体变量0,使其指向其中的test成员。
(&((( struct test_list *)(0))-> test))) 取此成员所在的地址,由于起始为0地址,所以现在获得的地址就是test_list结构体开始到其test成员的偏移值,将其强制转换为unsigned int型变量
((unsigned int)mod - (unsigned int)(&((( struct test_list *)(0))-> test)))拿取得的list_head结构体mod的位置减去偏移值得到当前mod所在的test_list结构体的起始位置,最后将这个值强制转换为test_list结构体指针,之后就得到一个test_list的地址,也就是当前list_head结构体所在的那个test_list。
其余诸如链表的删除等等操作相对容易理解,不再赘述


 943
943


 被折叠的 条评论
为什么被折叠?
被折叠的 条评论
为什么被折叠?
 到【灌水乐园】发言


