1. Essence of Method
要测试对H.264文件的解码时间,可以使用FFmpeg进行操作。FFmpeg是一个开源的多媒体处理工具,可以用来处理视频和音频文件,包括解码H.264文件。以下是使用FFmpeg的命令行来测试解码时间的方法:
ffmpeg -i input.h264 -f null -
这个命令会将输入的input.h264文件解码到空输出,通过查看FFmpeg的输出信息,可以得到解码的耗时信息。
在FFmpeg中,-i选项用于指定输入文件,后面跟着输入文件的路径。例如,-i input.h264表示将input.h264作为输入文件。
-f选项用于指定输出格式。在上面的示例中,-f null表示将输出格式设置为null,这意味着不生成任何输出文件,仅仅执行解码操作。
2. Can the FFmpeg be Used Normally?
要检查是否安装了FFmpeg,并查看其版本号,可以在命令行中运行以下命令:
ffmpeg -version
如果安装了FFmpeg,将会显示版本信息。如果未安装,系统可能会显示命令未找到或类似的消息。要安装FFmpeg,请参考官方文档。
PS C:\Users\Administrator> ffmpeg  -version
ffmpeg version 2022-09-22-git-af919cf780-essentials_build-www.gyan.dev Copyright (c) 2000-2022 the FFmpeg developers
built with gcc 12.1.0 (Rev2, Built by MSYS2 project)
configuration: --enable-gpl --enable-version3 --enable-static --disable-w32threads --disable-autodetect --enable-fontconfig --enable-iconv --enable-gnutls --enable-libxml2 --enable-gmp --enable-bzlib --enable-lzma --enable-zlib --enable-libsrt --enable-libssh --enable-libzmq --enable-avisynth --enable-sdl2 --enable-libwebp --enable-libx264 --enable-libx265 --enable-libxvid --enable-libaom --enable-libopenjpeg --enable-libvpx --enable-mediafoundation --enable-libass --enable-libfreetype --enable-libfribidi --enable-libvidstab --enable-libvmaf --enable-libzimg --enable-amf --enable-cuda-llvm --enable-cuvid --enable-ffnvcodec --enable-nvdec --enable-nvenc --enable-d3d11va --enable-dxva2 --enable-libmfx --enable-libgme --enable-libopenmpt --enable-libopencore-amrwb --enable-libmp3lame --enable-libtheora --enable-libvo-amrwbenc --enable-libgsm --enable-libopencore-amrnb --enable-libopus --enable-libspeex --enable-libvorbis --enable-librubberband
libavutil      57. 36.102 / 57. 36.102
libavcodec     59. 44.100 / 59. 44.100
libavformat    59. 32.100 / 59. 32.100
libavdevice    59.  8.101 / 59.  8.101
libavfilter     8. 49.100 /  8. 49.100
libswscale      6.  8.112 /  6.  8.112
libswresample   4.  9.100 /  4.  9.100
libpostproc    56.  7.100 / 56.  7.100
3. How?
在FFmpeg输出信息中,可以看到解码过程的耗时信息。怎么看解码耗时多久?
可以找到类似以下格式的行,其中包含了解码过程的耗时信息:
frame= 250 fps=0.0 q=0.0 size=N/A time=00:00:10.00 bitrate=N/A speed=19.6x
在这个例子中,time=00:00:10.00表示解码了10秒钟的视频。可以根据这个信息计算解码的平均速度。
在这个例子中,各个字段的含义如下:
frame: 已解码的帧数。fps: 每秒钟解码的帧数,即帧率。q: 压缩质量指标,一般不关注。size: 输出文件大小。time: 已解码的时间。bitrate: 比特率,表示每秒传输的数据量。speed: 解码速度,表示相对于实时播放速度的倍数。
4. Basic Examples
Example 1:有一组H.264文件若干个,测试解码完这些文件耗时。import subprocess
import time
# H.264文件列表
file_list = ['file1.h264', 'file2.h264', 'file3.h264']
# 开始计时
start_time = time.time()
# 解码每个文件
for file in file_list:
subprocess.run(['ffmpeg', '-i', file, '-f', 'null', '-'])
# 计算总耗时
end_time = time.time()
total_time = end_time - start_time
print(f"解码耗时: {total_time} 秒")
这个脚本会逐个解码文件,并计算整个过程的总耗时。
Example 2: 在Android手机设备上怎么测试H.264的解码时间
在Android手机设备上测试H.264的解码时间可以使用Android的MediaCodec API。这个API可以用来解码视频,并提供了一些回调函数来监测解码进度。
import android.media.MediaCodec;
import android.media.MediaExtractor;
import android.media.MediaFormat;
import android.os.Bundle;
import android.os.Environment;
import android.support.v7.app.AppCompatActivity;

import java.io.IOException;
import java.nio.ByteBuffer;

public class MainActivity extends AppCompatActivity {

    @Override
    protected void onCreate(Bundle savedInstanceState) {
        super.onCreate(savedInstanceState);
        setContentView(R.layout.activity_main);

        new Thread(new Runnable() {
            @Override
            public void run() {
                long startTime = System.currentTimeMillis();

                MediaExtractor extractor = new MediaExtractor();
                try {
                    extractor.setDataSource(Environment.getExternalStorageDirectory().getPath() + "/test.h264");
                } catch (IOException e) {
                    e.printStackTrace();
                }

                MediaFormat format = extractor.getTrackFormat(0);
                String mime = format.getString(MediaFormat.KEY_MIME);

                MediaCodec codec = MediaCodec.createDecoderByType(mime);
                codec.configure(format, null, null, 0);
                codec.start();

                ByteBuffer[] inputBuffers = codec.getInputBuffers();
                ByteBuffer[] outputBuffers = codec.getOutputBuffers();
                MediaCodec.BufferInfo info = new MediaCodec.BufferInfo();
                boolean isEOS = false;
                long time = 0;

                while (!isEOS) {
                    int inputBufferIndex = codec.dequeueInputBuffer(10000);
                    if (inputBufferIndex >= 0) {
                        ByteBuffer inputBuffer = inputBuffers[inputBufferIndex];
                        int sampleSize = extractor.readSampleData(inputBuffer, 0);
                        if (sampleSize < 0) {
                            codec.queueInputBuffer(inputBufferIndex, 0, 0, 0, MediaCodec.BUFFER_FLAG_END_OF_STREAM);
                            isEOS = true;
                        } else {
                            time = extractor.getSampleTime();
                            codec.queueInputBuffer(inputBufferIndex, 0, sampleSize, time, 0);
                            extractor.advance();
                        }
                    }

                    int outputBufferIndex = codec.dequeueOutputBuffer(info, 10000);
                    if (outputBufferIndex >= 0) {
                        ByteBuffer outputBuffer = outputBuffers[outputBufferIndex];
                        codec.releaseOutputBuffer(outputBufferIndex, true);
                    }
                }

                codec.stop();
                codec.release();

                long endTime = System.currentTimeMillis();
                long elapsedTime = endTime - startTime;
                System.out.println("解码耗时:" + elapsedTime + "毫秒");
            }
        }).start();
    }
}
5. Practical Examples

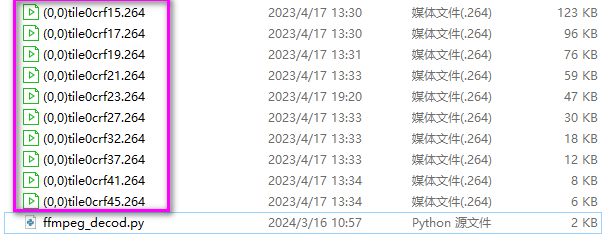
有一个文件目录里都是H.264的文件。文件名字是“(0,0)tile0crf15.264”,“(0,0)tile0crf17.264”,“(0,0)tile0crf19.264”,“(0,0)tile0crf21.264”,和 (0,0)tile0crf23.264等等共10000个文件。 写一个脚本,自动读取这个目录的文件,会根据文件名中的CRF值将文件分类,并使用FFmpeg解码每个文件,然后计算每个CRF值的平均解码时间。比如测试解码文件为xxxcrf17.264的平均时间是多少,测试解码文件为xxxcrf19.264的平均时间是多少,测试解码文件为xxxcrf21.264的平均时间是多少。
import os
import subprocess

# H.264文件所在目录
directory = 'files/'

# 不同crf值的文件名列表
crf_files = {
    15: [],
    17: [],
    19: [],
    21: [],
    23: [],
    32: [],
    37: []
}

# 根据文件名分类
for filename in os.listdir(directory):
    if filename.endswith(".264"):
        crf = int(filename.split('crf')[1].split('.')[0])
        crf_files[crf].append(filename)

# 解码每个文件并计算平均时间
for crf, files in crf_files.items():
    total_time = 0
    for file in files:
        command = ['ffmpeg', '-i', os.path.join(directory, file), '-f', 'null', '-']
        process = subprocess.Popen(command, stderr=subprocess.PIPE)
        for line in iter(process.stderr.readline, b''):
            line = line.decode('utf-8')
            if 'time=' in line:
                time_str = line.split('time=')[1].split()[0]
                time = float(time_str.replace(':', ''))
                total_time += time
                print(f"解码文件 {file} 的进度: {time_str}")

        process.communicate()
        process.wait()

    avg_time = total_time / len(files) if len(files) > 0 else 0
    print(f"测试解码文件为xxxcrf{crf}.264的平均时间是 {avg_time} 秒")
解码文件 (0,0)tile0crf15.264 的进度: 00:00:00.04
测试解码文件为xxxcrf15.264的平均时间是 0.04 秒
解码文件 (0,0)tile0crf17.264 的进度: 00:00:00.04
测试解码文件为xxxcrf17.264的平均时间是 0.04 秒
解码文件 (0,0)tile0crf19.264 的进度: 00:00:00.04
测试解码文件为xxxcrf19.264的平均时间是 0.04 秒
解码文件 (0,0)tile0crf21.264 的进度: 00:00:00.04
测试解码文件为xxxcrf21.264的平均时间是 0.04 秒
解码文件 (0,0)tile0crf23.264 的进度: 00:00:00.04
测试解码文件为xxxcrf23.264的平均时间是 0.04 秒
解码文件 (0,0)tile0crf27.264 的进度: 00:00:00.04
测试解码文件为xxxcrf27.264的平均时间是 0.04 秒
解码文件 (0,0)tile0crf32.264 的进度: 00:00:00.04
测试解码文件为xxxcrf32.264的平均时间是 0.04 秒
解码文件 (0,0)tile0crf37.264 的进度: 00:00:00.04
测试解码文件为xxxcrf37.264的平均时间是 0.04 秒
解码文件 (0,0)tile0crf41.264 的进度: 00:00:00.04
测试解码文件为xxxcrf41.264的平均时间是 0.04 秒
解码文件 (0,0)tile0crf45.264 的进度: 00:00:00.04
测试解码文件为xxxcrf45.264的平均时间是 0.04 秒
对于质量相同但内容不同的H.264文件,解码时间可能会有一些差别,但差别通常不会很大。质量相同的文件表示它们在编码时使用的压缩参数相似,因此解码时的工作量也应该相似。然而,由于视频内容的不同可能会导致一些微小的差异,例如帧类型的分布、运动复杂度等,这些差异可能会导致解码时间略有不同。
总的来说,对于质量相同但内容不同的H.264文件,解码时间的差别通常不会很大,但可能会有一些轻微的变化。
对于内容相同但质量不同的H.264文件,解码时间可能会有一些特性,具体取决于编码时所使用的压缩参数和视频内容的复杂性。一般来说,质量较高的H.264文件(即低压缩率、较高码率)可能会导致解码时间稍长,因为解码器需要更多的计算来恢复更精细的图像质量。
另一方面,质量较低的H.264文件(即高压缩率、较低码率)可能会解码得更快,因为解码器需要处理的数据量更少。
但在某些情况下,质量较低的文件可能会因为压缩算法的特性而导致解码时间略有增加,例如出现了更多的预测误差或者需要更多的解码步骤来恢复图像细节。


 1万+
1万+


 被折叠的 条评论
为什么被折叠?


