


首先我先介绍一下我们主界面的xml的实现,因为用碎片替代了tabhost,所以底部的功能分类界面和点击跳转就需要我们通过xml文件和代码自己实现,好,话不多说,上代码:
<LinearLayout xmlns:android="http://schemas.android.com/apk/res/android"
    android:id="@+id/bashLinearLayout"
    android:layout_width="match_parent"
    android:layout_height="match_parent"
    android:orientation="vertical" >

    <FrameLayout
        android:id="@+id/content"
        android:layout_width="match_parent"
        android:layout_height="0dp"
        android:layout_weight="1" >
    </FrameLayout>

    <LinearLayout
        android:id="@+id/tabwidget"
        android:layout_width="match_parent"
        android:layout_height="60dp"
        android:background="@drawable/tab_bg"
        android:orientation="horizontal" >

        <RelativeLayout
            android:id="@+id/page1"
            android:layout_width="0dp"
            android:layout_height="match_parent"
            android:layout_weight="1" >

            <LinearLayout
                android:layout_width="match_parent"
                android:layout_height="match_parent"
                android:layout_centerVertical="true"
                android:orientation="vertical" >

                <ImageView
                    android:id="@+id/page1_image"
                    android:layout_width="wrap_content"
                    android:layout_height="wrap_content"
                    android:layout_gravity="center_horizontal"
                    android:src="@drawable/message_unselected" />

                <TextView
                    android:id="@+id/page1_text"
                    android:layout_width="wrap_content"
                    android:layout_height="wrap_content"
                    android:layout_gravity="center_horizontal"
                    android:text="page1"
                    android:textColor="#82858b" />
            </LinearLayout>
        </RelativeLayout>

        <RelativeLayout
            android:id="@+id/page2"
            android:layout_width="0dp"
            android:layout_height="match_parent"
            android:layout_weight="1" >

            <LinearLayout
                android:layout_width="match_parent"
                android:layout_height="match_parent"
                android:layout_centerVertical="true"
                android:orientation="vertical" >

                <ImageView
                    android:id="@+id/page2_image"
                    android:layout_width="wrap_content"
                    android:layout_height="wrap_content"
                    android:layout_gravity="center_horizontal"
                    android:src="@drawable/contacts_unselected" />

                <TextView
                    android:id="@+id/page2_text"
                    android:layout_width="wrap_content"
                    android:layout_height="wrap_content"
                    android:layout_gravity="center_horizontal"
                    android:text="page2"
                    android:textColor="#82858b" />
            </LinearLayout>
        </RelativeLayout>

        <RelativeLayout
            android:id="@+id/page3"
            android:layout_width="0dp"
            android:layout_height="match_parent"
            android:layout_weight="1" >

            <LinearLayout
                android:layout_width="match_parent"
                android:layout_height="match_parent"
                android:layout_centerVertical="true"
                android:orientation="vertical" >

                <ImageView
                    android:id="@+id/page3_image"
                    android:layout_width="wrap_content"
                    android:layout_height="wrap_content"
                    android:layout_gravity="center_horizontal"
                    android:src="@drawable/news_unselected" />

                <TextView
                    android:id="@+id/page3_text"
                    android:layout_width="wrap_content"
                    android:layout_height="wrap_content"
                    android:layout_gravity="center_horizontal"
                    android:text="page3"
                    android:textColor="#82858b" />
            </LinearLayout>
        </RelativeLayout>

        <RelativeLayout
            android:id="@+id/page4"
            android:layout_width="0dp"
            android:layout_height="match_parent"
            android:layout_weight="1" >

            <LinearLayout
                android:layout_width="match_parent"
                android:layout_height="match_parent"
                android:layout_centerVertical="true"
                android:orientation="vertical" >

                <ImageView
                    android:id="@+id/page4_image"
                    android:layout_width="wrap_content"
                    android:layout_height="wrap_content"
                    android:layout_gravity="center_horizontal"
                    android:src="@drawable/setting_unselected" />

                <TextView
                    android:id="@+id/page4_text"
                    android:layout_width="wrap_content"
                    android:layout_height="wrap_content"
                    android:layout_gravity="center_horizontal"
                    android:text="page4"
                    android:textColor="#82858b" />
            </LinearLayout>
        </RelativeLayout>
    </LinearLayout>

</LinearLayout>
这个代码实现的效果就是:
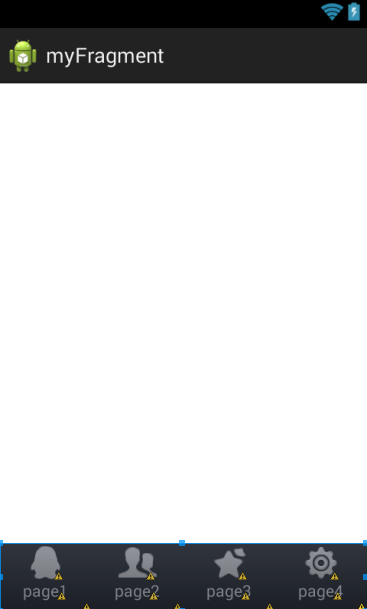
这个xml的实现原理大概是这样的:根布局用的事linearlayout,这个linearlayout布局中包含了一个FrameLayout和LinearLayout,FrameLayout用来当做主界面,LinearLayout用来实现功能选择栏,这两个界面的比例控制是通过layout_weight这个参数实现(将主界面的layout_weight的设为1,功能选择栏不设置,默认为0)。下面我们就可以来实现底部功能栏了,很明显这个底部功能栏的根布局用一个LinearLayout,如何里面再包一层relativeLayout,用来实现单个功能,通过将每一个relativeLayout的layout_weight=1,就可以实现每个功能界面占用的大小相同。大致实现就是这样的了。
看到这里,你可能在想终于可以进入代码部分了,哈哈,想多了吧,我们还需要弄四个xml当做跳转的主界面尼,下面就简单的给一个就行。secondfragment.xml
<?xml version="1.0" encoding="utf-8"?>
<LinearLayout xmlns:android="http://schemas.android.com/apk/res/android"
    android:layout_width="match_parent"
    android:layout_height="match_parent"
    android:orientation="vertical" >
    <TextView
        android:id="@+id/second_text"
        android:layout_width="wrap_content"
        android:layout_height="wrap_content"
        android:text="second_text"
        android:layout_gravity="center_vertical|center_horizontal"
        />

</LinearLayout>
下面正式进入代码部分,说了我们使用Fragment实现tabhost,所以Fragment才是重点,下面我们就构造一个Fragment类
public class secondFragment extends Fragment {
    public View onCreateView(LayoutInflater inflater, ViewGroup container,
            Bundle savedInstanceState) {
        // TODO Auto-generated method stub
        View v=inflater.inflate(R.layout.secondfragment, container,false);
        return v;
}
}
这个主要需要重写的函数是onCreateView函数,在这个方法中通过LayoutInflater的inflate()方法将上面的R.layout.secondfragment布局动态加载进来.
另外三个碎片和这个方法一模一样,就不在赘述了,
下面进入MainActivity
public class MainActivity extends Activity implements OnClickListener {
    //定义四个碎片
    private firstFragment first;
    private secondFragment second;
    private thirdFragment third;
    private fourthFragment fourth;
    //定义四个视图对象,用来加载四个功能界面的relativeLayout,并添加点击事件,实现点击跳转
    private View first_layout;
    private View second_layout;
    private View third_layout;
    private View fourth_layout;

    private ImageView first_image;
    private ImageView second_image;
    private ImageView third_image;
    private ImageView fourth_image;

    private TextView first_text;
    private TextView second_text;
    private TextView third_text;
    private TextView fourth_text;
    //Fragment管理类,可以通过getfragmentManager得到
    private FragmentManager fragmentmanager;

    @Override
    protected void onCreate(Bundle savedInstanceState) {
        super.onCreate(savedInstanceState);
        requestWindowFeature(Window.FEATURE_NO_TITLE);
        setContentView(R.layout.activity_main);
        init();
        first_layout.setOnClickListener(this);
        second_layout.setOnClickListener(this);
        third_layout.setOnClickListener(this);
        fourth_layout.setOnClickListener(this);

    }

      void init() {
        first_layout = findViewById(R.id.page1);
        second_layout = findViewById(R.id.page2);
        third_layout = findViewById(R.id.page3);
        fourth_layout = findViewById(R.id.page4);
        first_image = (ImageView) findViewById(R.id.page1_image);
        second_image = (ImageView) findViewById(R.id.page2_image);
        third_image = (ImageView) findViewById(R.id.page3_image);
        fourth_image = (ImageView) findViewById(R.id.page4_image);
        first_text = (TextView) findViewById(R.id.page1_text);
        second_text = (TextView) findViewById(R.id.page2_text);
        third_text = (TextView) findViewById(R.id.page3_text);
        fourth_text = (TextView) findViewById(R.id.page4_text);
    }

    @Override
    public void onClick(View v) {
        // TODO Auto-generated method stub
        clearview();
        fragmentmanager = getFragmentManager();
        //通过FragmentManager得到FragmentTransaction事务
        FragmentTransaction fragment = fragmentmanager.beginTransaction();
        switch (v.getId()) {
        case R.id.page1:
            first_image.setImageResource(R.drawable.message_selected);
            first_text.setTextColor(Color.parseColor("#ffffff"));
            hideFragments(fragment);
            if(first==null)
            {
                first=new firstFragment();
                fragment.add(R.id.content, first);
                Log.i("123", "123");
            }else
            {
                fragment.show(first);
            }
            break;

        case R.id.page2:
            clearview();
            second_image.setImageResource(R.drawable.contacts_selected);
            second_text.setTextColor(Color.parseColor("#ffffff"));
            hideFragments(fragment);
            if(second!=null)
            {
                fragment.show(second);
            }
            else
            {
                second=new secondFragment();
                fragment.add(R.id.content, second);
            }
            break;

        case R.id.page3:
            clearview();
            third_image.setImageResource(R.drawable.news_selected);
            third_text.setTextColor(Color.parseColor("#ffffff"));
            hideFragments(fragment);
            if(third!=null)
            {
                fragment.show(third);
            }
            else
            {
                third=new thirdFragment();
                fragment.add(R.id.content, third);
            }
            break;

        case R.id.page4:
            clearview();
            fourth_image.setImageResource(R.drawable.setting_selected);
            fourth_text.setTextColor(Color.parseColor("#ffffff"));
            hideFragments(fragment);
            if(fourth!=null)
            {
                fragment.show(fourth);
            }
            else
            {
                fourth=new fourthFragment();
                fragment.add(R.id.content, fourth);
            }
            break;
        }
        fragment.commit();

    }

    public void clearview() {
        first_image.setImageResource(R.drawable.message_unselected);
        first_text.setTextColor(Color.parseColor("#82858b"));
        second_image.setImageResource(R.drawable.contacts_unselected);
        second_text.setTextColor(Color.parseColor("#82858b"));
        third_image.setImageResource(R.drawable.news_unselected);
        third_text.setTextColor(Color.parseColor("#82858b"));
        fourth_image.setImageResource(R.drawable.setting_unselected);
        fourth_text.setTextColor(Color.parseColor("#82858b"));

    }

    private void hideFragments(FragmentTransaction transaction) {
        if (first != null) {
            transaction.hide(first);
        }
        if (second != null) {
            transaction.hide(second);
        }
        if (third != null) {
            transaction.hide(third);
        }
        if (fourth != null) {
            transaction.hide(fourth);
        }
    }
}
上面的代码还是很简单的,我就不一一赘述了,不懂可以看看注释,自己试着理解理解。
代码下载地址:
http://download.csdn.net/detail/u014316462/9113429


 501
501

 被折叠的 条评论
为什么被折叠?
被折叠的 条评论
为什么被折叠?
 到【灌水乐园】发言


