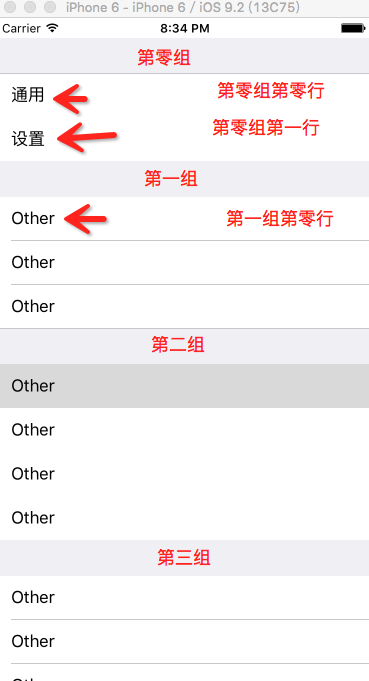
分组也就是类似设置界面中的界面展示
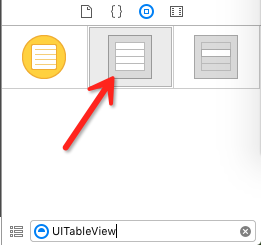
1.首先在Storyboard中拖一个UITableView
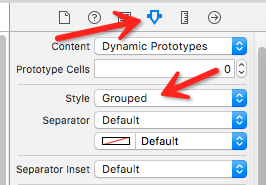
2.其次设置分组属性默认是Plain我们选择Grouped
3.最后在将控件拖到代码中设置代理如下代码:
#import "ViewController.h"
@interface ViewController ()<UITableViewDataSource>
@property (weak, nonatomic) IBOutlet UITableView *tableView;
@end
@implementation ViewController
- (void)viewDidLoad {
[super viewDidLoad];
_tableView.dataSource = self;
}
#pragma mark - UITableViewDataSource代理方法
- (NSInteger)numberOfSectionsInTableView:(UITableView *)tableView {
return 4;
}
- (NSInteger)tableView:(UITableView *)tableView numberOfRowsInSection:(NSInteger)section {
if (section == 0) {
return 2;
} else if (section == 1) {
return 3;
} else if (section == 2) {
return 4;
} else {
return 5;
}
}
- (UITableViewCell *)tableView:(UITableView *)tableView cellForRowAtIndexPath:(NSIndexPath *)indexPath {
UITableViewCell *cell = [[UITableViewCell alloc] init];
NSInteger section = indexPath.section;
NSInteger row = indexPath.row;
if (section == 0) {
if (row == 0) {
cell.textLabel.text = @"通用";
} else if(row == 1) {
cell.textLabel.text = @"设置";
}
} else {
cell.textLabel.text = @"Other";
}
return cell;
}
@end


 907
907

 被折叠的 条评论
为什么被折叠?
被折叠的 条评论
为什么被折叠?
 到【灌水乐园】发言


