New UI-布局之TableLayout(表格布局)详解

New UI-布局之TableLayout(表格布局)详解

 ——转载请注明出处:coder-pig,欢迎转载,请勿用于商业用途!


小猪Android开发交流群已建立,欢迎大家加入,无论是新手,菜鸟,大神都可以,小猪一个人的

力量毕竟是有限的,写出来的东西肯定会有很多纰漏不足,欢迎大家指出,集思广益,让小猪的博文

更加的详尽,帮到更多的人,O(∩_∩)O谢谢!

小猪Android开发交流群:小猪Android开发交流群群号:421858269

新Android UI实例大全目录:http://blog.csdn.net/coder_pig/article/details/42145907


本节引言:

前面我们已经学习了平时实际开发中用得较多的线性布局(LinearLayout)与相对布局(RelativeLayout),

其实学完这两个基本就够用了,笔者在实际开发中用得比较多的也是这两个,当然作为一个好学的程序猿,

都是喜欢刨根问题的,所以虽说用得不多,但是还是有必要学习一下基本的用法的,说不定哪一天能用得上呢!

你说是吧,学多点东西没什么的,又不吃亏!好了,扯淡就扯到这里,开始这一节的学习吧,这一节我们会学习

Android中的第三个布局:TableLayout(表格布局)


1)本节学习路线图:


路线图分析:

从上面的路线图,可以看出TableLayout的用法还是很简单的,无非就是确定表格的行数,以及使用

那三个属性来设置每一行中的第某列的元素隐藏,拉伸,或者收缩即可!


2)TableLayout的介绍:

相信学过HTML的朋友都知道,我们可以通过<table><tr><td>就可以生成一个HTML的表格,

而Android中也允许我们使用表格的方式来排列组件,就是行与列的方式,就说我们这节的TableLayout!

但却不像我们后面会讲到的Android 4.0后引入的GridLayout(网格)布局一样,直接就可以设置多少行与多少列!


3)如何确定行数与列数

①如果我们直接往TableLayout中添加组件的话,那么这个组件将占满一行!!!

②如果我们想一行上有多个组件的话,就要添加一个TableRow的容器,把组件都丢到里面!

③tablerow中的组件个数就决定了该行有多少列,而列的宽度由该列中最宽的单元格决定

④tablerow的layout_width属性,默认是fill_parent的,我们自己设置成其他的值也不会生效!!!

但是layout_height默认是wrapten——content的,我们却可以自己设置大小!

⑤整个表格布局的宽度取决于父容器的宽度(占满父容器本身)

⑥有多少行就要自己数啦,一个tablerow一行,一个单独的组件也一行!多少列则是看tableRow中

的组件个数,组件最多的就是TableLayout的列数


4)三个常用的属性:

android:collapseColumns:设置需要被隐藏的列的序号
android:shrinkColumns:设置允许被收缩的列的列序号
android:stretchColumns:设置运行被拉伸的列的列序号
以上这三个属性的列号都是从0开始算的,比如shrinkColunmns = "2",对应的是第三列!

可以设置多个,用逗号隔开比如"0,2",如果是所有列都生效,则用"*"号即可

除了这三个常用属性,还有两个属性,分别就是跳格子以及合并单元格,这和HTML中的Table类似:
android:layout_column="2":表示的就是跳过第二个,直接显示到第三个格子处,从1开始算的!
android:layout_span="4":表示合并4个单元格,也就说这个组件占4个单元格


属性演示:

①collapseColumns(隐藏列)

流程:在TableRow中定义5个按钮后,接着在最外层的TableLayout中添加以下属性:

android:collapseColumns = "0,2",就是隐藏第一与第三列,代码如下:

[html]   view plain copy print ? 在CODE上查看代码片 派生到我的代码片
  1. <TableLayout  
  2.         android:id="@+id/TableLayout2"  
  3.         android:layout_width="fill_parent"  
  4.         android:layout_height="wrap_content"  
  5.         android:collapseColumns="0,2" >  
  6.   
  7.         <TableRow>  
  8.   
  9.             <Button  
  10.                 android:layout_width="wrap_content"  
  11.                 android:layout_height="wrap_content"  
  12.                 android:text="one" />  
  13.   
  14.             <Button  
  15.                 android:layout_width="wrap_content"  
  16.                 android:layout_height="wrap_content"  
  17.                 android:text="two" />  
  18.   
  19.             <Button  
  20.                 android:layout_width="wrap_content"  
  21.                 android:layout_height="wrap_content"  
  22.                 android:text="three" />  
  23.   
  24.             <Button  
  25.                 android:layout_width="wrap_content"  
  26.                 android:layout_height="wrap_content"  
  27.                 android:text="four" />  
  28.   
  29.             <Button  
  30.                 android:layout_width="wrap_content"  
  31.                 android:layout_height="wrap_content"  
  32.                 android:text="five" />  
  33.         </TableRow>  
  34.     </TableLayout>  
运行效果图:


②stretchColumns(拉伸列)

流程:在TableLayout中设置了四个按钮,接着在最外层的TableLayout中添加以下属性:
android:stretchColumns = “1”
设置第二列为可拉伸列,让该列填满这一行所有的剩余空间,代码如下:

[html]   view plain copy print ? 在CODE上查看代码片 派生到我的代码片
  1. <TableLayout    
  2.     android:id="@+id/TableLayout2"    
  3.     android:layout_width="fill_parent"    
  4.     android:layout_height="wrap_content"    
  5.     android:stretchColumns="1" >    
  6.     
  7.     <TableRow>    
  8.     
  9.         <Button    
  10.             android:layout_width="wrap_content"    
  11.             android:layout_height="wrap_content"    
  12.             android:text="one" />    
  13.     
  14.         <Button    
  15.             android:layout_width="wrap_content"    
  16.             android:layout_height="wrap_content"    
  17.             android:text="two" />    
  18.     
  19.         <Button    
  20.             android:layout_width="wrap_content"    
  21.             android:layout_height="wrap_content"    
  22.             android:text="three" />    
  23.     
  24.         <Button    
  25.             android:layout_width="wrap_content"    
  26.             android:layout_height="wrap_content"    
  27.             android:text="four" />                 
  28.     </TableRow>    
  29. </TableLayout>    

运行效果图:


③shrinkColumns(收缩列)

步骤:这里为了演示出效果,设置了5个按钮和一个文本框,在最外层的TableLayout中添加以下属性:
android:shrinkColumns =  "1"
设置第二个列为可收缩列,代码如下:

[html]   view plain copy print ? 在CODE上查看代码片 派生到我的代码片
  1. <TableLayout  
  2.         android:id="@+id/TableLayout2"  
  3.         android:layout_width="fill_parent"  
  4.         android:layout_height="wrap_content"  
  5.         android:shrinkColumns="1" >  
  6.   
  7.         <TableRow>  
  8.   
  9.             <Button  
  10.                 android:layout_width="wrap_content"  
  11.                 android:layout_height="wrap_content"  
  12.                 android:text="one" />  
  13.   
  14.             <Button  
  15.                 android:layout_width="wrap_content"  
  16.                 android:layout_height="wrap_content"  
  17.                 android:text="two" />  
  18.   
  19.             <Button  
  20.                 android:layout_width="wrap_content"  
  21.                 android:layout_height="wrap_content"  
  22.                 android:text="three" />  
  23.   
  24.             <Button  
  25.                 android:layout_width="wrap_content"  
  26.                 android:layout_height="wrap_content"  
  27.                 android:text="four" />  
  28.   
  29.             <Button  
  30.                 android:layout_width="wrap_content"  
  31.                 android:layout_height="wrap_content"  
  32.                 android:text="five" />  
  33.   
  34.             <TextView  
  35.                 android:layout_width="wrap_content"  
  36.                 android:layout_height="wrap_content"  
  37.                 android:text="文本XX" />  
  38.         </TableRow>  
  39.     </TableLayout>  

运行截图:


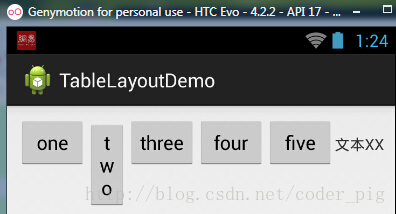
从图中我们可以看到two这个按钮被挤压成条条状,这个就是收缩,为了保证表格能适应

父容器的宽度!

至于另外两个属性就不讲解了,用法和HTML相同!有兴趣的可以研究下!


5)使用实例:

使用TableLayout来完成简单的登录界面:

运行效果图:


流程解析:

流程解释:
①调用gravity属性,设置为center_vertical,让布局里面的组件在竖直方向上居中
②将TableLayout中的第一和第四列设置为可拉伸
③在每个TableRow中添加两个TextView,用于拉伸填满该行,这样可以让表格水平居中
android:stretchColumns="0,3" 设置为0.3,是为了让两边都充满,那么中间部分就可以居中了


详细代码如下:

[html]   view plain copy print ? 在CODE上查看代码片 派生到我的代码片
  1. <TableLayout xmlns:android="http://schemas.android.com/apk/res/android"    
  2.     xmlns:tools="http://schemas.android.com/tools"    
  3.     android:id="@+id/TableLayout1"    
  4.     android:layout_width="match_parent"    
  5.     android:layout_height="match_parent"    
  6.     tools:context=".MainActivity"     
  7.     android:stretchColumns="0,3"    
  8.     android:gravity="center_vertical"    
  9.     android:background="#66FF66"    
  10.     >    
  11.         
  12.     <TableRow>    
  13.         <TextView />    
  14.         <TextView     
  15.             android:layout_width="wrap_content"    
  16.             android:layout_height="wrap_content"    
  17.             android:text="用户名:"        
  18.         />    
  19.         <EditText     
  20.             android:layout_width="wrap_content"    
  21.             android:layout_height="wrap_content"    
  22.             android:minWidth="150dp"        
  23.         />    
  24.         <TextView />    
  25.     </TableRow>    
  26.         
  27.     <TableRow>    
  28.         <TextView />    
  29.         <TextView     
  30.             android:layout_width="wrap_content"    
  31.             android:layout_height="wrap_content"    
  32.             android:text="密  码:"        
  33.         />    
  34.         <EditText     
  35.             android:layout_width="wrap_content"    
  36.             android:layout_height="wrap_content"    
  37.             android:minWidth="150dp"        
  38.         />    
  39.         <TextView />    
  40.     </TableRow>    
  41.         
  42.     <TableRow>    
  43.         <TextView />    
  44.         <Button     
  45.             android:layout_width="wrap_content"    
  46.             android:layout_height="wrap_content"    
  47.             android:text="登陆"        
  48.         />    
  49.         <Button    
  50.             android:layout_width="wrap_content"    
  51.             android:layout_height="wrap_content"    
  52.             android:text="退出"       
  53.         />    
  54.         <TextView />    
  55.     </TableRow>    
  56.         
  57. </TableLayout>    


6.一些问题

①相信大家在使用这个这TableLayout的TableRow的时候会遇到这个警告:


当然,程序还是可以运行的,不过或许你是强迫症患者,看到黄色感叹号你就不爽的话!

而解决这个警告的方法也是很奇葩的:只要你的TableLayout里面有2个或以上的TableRow就可以了!害羞


好了本节就到这里,大部分还是以前那篇TableLayout的内容,如果在阅读本文中发现有什么纰漏,

或者写得不好的地方,欢迎指出,万分感激!(*^__^*) 嘻嘻…

  • 0
    点赞
  • 0
    收藏
    觉得还不错? 一键收藏
  • 0
    评论
下面是一个使用表格布局TableLayout)来搭建计算器界面的源代码,简单地实现了加减乘除四则运算功能。 请注意,这个代码仅仅是一个基本的示例,仅包含了布局和基本的运算功能,并未添加任何错误处理或其他功能。例如,没有包含输入验证,可以输入数字和运算符的长度、类型等都没有做判断。 ```java import android.os.Bundle; import android.view.Gravity; import android.view.View; import android.widget.Button; import android.widget.TableLayout; import android.widget.TableRow; import android.widget.TextView; import androidx.appcompat.app.AppCompatActivity; public class CalculatorActivity extends AppCompatActivity implements View.OnClickListener { private TextView resultTextView; // 显示计算结果的TextView private String currentNumber; // 当前输入的数字 private String currentOperator; // 当前选择的运算符 @Override protected void onCreate(Bundle savedInstanceState) { super.onCreate(savedInstanceState); setContentView(R.layout.activity_calculator); resultTextView = findViewById(R.id.result_text_view); currentNumber = ""; currentOperator = ""; // 获取TableLayout布局对象 TableLayout tableLayout = findViewById(R.id.table_layout); // 设置TableLayout的属性 tableLayout.setStretchAllColumns(true); tableLayout.setShrinkAllColumns(true); // 创建一个2D数组表示表格布局 String[][] buttonTexts = { {"7", "8", "9", "+"}, {"4", "5", "6", "-"}, {"1", "2", "3", "x"}, {"0", ".", "=", "/"} }; // 遍历2D数组,动态创建并添加Button到TableLayout中 for (int row = 0; row < buttonTexts.length; row++) { TableRow tableRow = new TableRow(this); for (int col = 0; col < buttonTexts[row].length; col++) { Button button = new Button(this); button.setText(buttonTexts[row][col]); button.setOnClickListener(this); button.setPadding(16, 16, 16, 16); TableRow.LayoutParams layoutParams = new TableRow.LayoutParams( TableRow.LayoutParams.WRAP_CONTENT, TableRow.LayoutParams.WRAP_CONTENT ); layoutParams.gravity = Gravity.CENTER; tableRow.addView(button, layoutParams); } tableLayout.addView(tableRow); } } @Override public void onClick(View view) { // 获取点击的按钮的文本 String buttonText = ((Button) view).getText().toString(); // 判断按钮的类型 try { int number = Integer.parseInt(buttonText); currentNumber += buttonText; resultTextView.setText(currentNumber); } catch (NumberFormatException e) { // 按钮不是数字,是运算符或其他特殊符号 switch (buttonText) { case "+": case "-": case "x": case "/": currentOperator = buttonText; break; case "=": calculateResult(); break; } } } private void calculateResult() { int result = 0; // 根据运算符进行四则运算 switch (currentOperator) { case "+": result = Integer.parseInt(currentNumber) + Integer.parseInt(resultTextView.getText().toString()); break; case "-": result = Integer.parseInt(currentNumber) - Integer.parseInt(resultTextView.getText().toString()); break; case "x": result = Integer.parseInt(currentNumber) * Integer.parseInt(resultTextView.getText().toString()); break; case "/": result = Integer.parseInt(currentNumber) / Integer.parseInt(resultTextView.getText().toString()); break; } // 更新显示结果 resultTextView.setText(String.valueOf(result)); currentNumber = ""; currentOperator = ""; } } ``` 上述代码通过TableLayout布局来创建一个4行4列的计算器界面,并通过点击按钮的事件监听来处理按钮的点击事件。可以输入整数和小数点,选择运算符并进行运算,最后在TextView中显示计算结果。 注意:上述代码只是一个简化的示例,未考虑实际使用中可能遇到的各种情况和异常处理。真实的计算器应该有更多的功能和错误处理。

“相关推荐”对你有帮助么?

  • 非常没帮助
  • 没帮助
  • 一般
  • 有帮助
  • 非常有帮助
提交
评论
添加红包

请填写红包祝福语或标题

红包个数最小为10个

红包金额最低5元

当前余额3.43前往充值 >
需支付:10.00
成就一亿技术人!
领取后你会自动成为博主和红包主的粉丝 规则
hope_wisdom
发出的红包
实付
使用余额支付
点击重新获取
扫码支付
钱包余额 0

抵扣说明:

1.余额是钱包充值的虚拟货币,按照1:1的比例进行支付金额的抵扣。
2.余额无法直接购买下载,可以购买VIP、付费专栏及课程。

余额充值