


图像波动及破碎消失效果
1.随机
shader中,通过fract()和sin()的结合,可以得到一个有一定规律但被打乱的曲线,如下图:
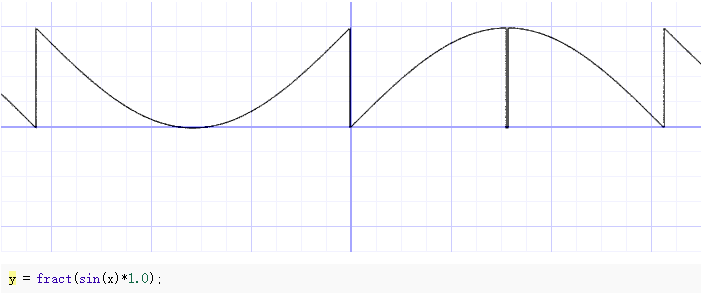
上面例子中,提取了sin函数波形的小数部分,x在[-1,1]之间时返回0到1之间的正值。
通过在sin(x)的值上乘以大些的数(如:100000),这时再也区分不出sin的波形了,小数部分的粒度将sin的循环变成了伪随机的混沌。如下图:
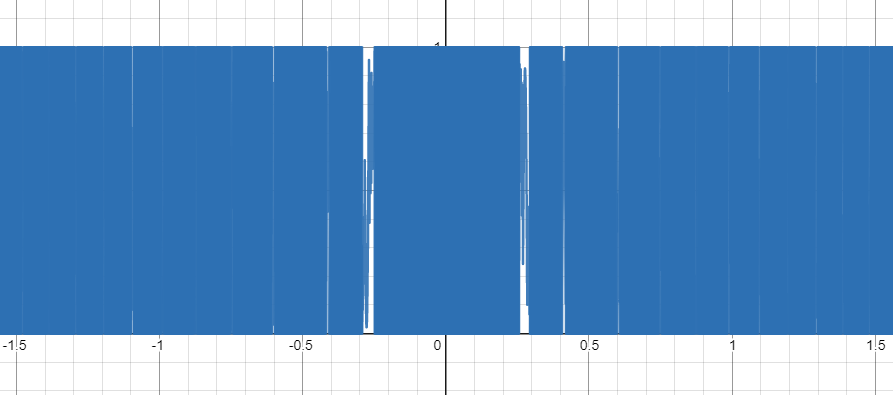
y = fract(sin(x)*100000.0)
-
二维随机
对于二维坐标,我们需要将其转换成一维浮点数,这里使用dot()函数,其作用是根据两个向量返回一个0到1之间的值。最终二维随机函数如下:
float rand(vec2 n) {
    return fract(sin(dot(n, vec2(12.9898, 78.233))) * 43758.5453);
}
2.Value Noise
-
简介
Value Noise是最简单的噪声算法,其主要思路是定义若干顶点且每个顶点含有一个随机值,这些顶点会根据自己的随机值对周围坐标产生影响,越靠近顶点则越容易受该顶点影响。当需求某个坐标的输出值是,需要将该坐标附近的各个顶点所造成的影响值进行叠加,从而得到一个总值并输出。
-
原理
- 首先定义一个晶格结构,每个晶格的顶点有一个伪随机值(Value)。对于二维的Value噪声来说,晶格结构就是一个平面网格(通常是正方形)。
- 输入一个点(二维坐标),找到和他相邻的那些晶格顶点(4个顶点),得到这些顶点的伪随机值。
- 使用缓和曲线来计算这些伪随机值的权重和。原始的噪声使用的缓和曲线是s(t)=3t²-2t³。
-
理解
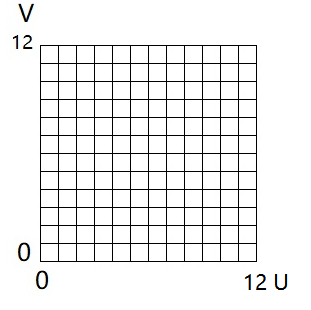
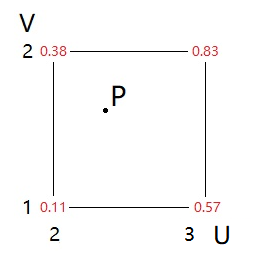
- 设想有如下纹理,uv范围为0~1,通常我们需要对uv乘上一个大一点的值,使网格数量多一些,例如乘以12,图像如下:
2. 现在将晶格中的每一个顶点都计算出一个随机值,用于后续的噪声计算:
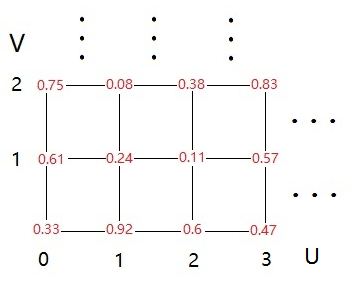
3. 如果我们要取出uv坐标为(2.3, 1.6)处点P的值:
4. 根据P的坐标,即对当前晶格下侧的uv(2,1)到uv(3,1)求一个插值A,再对晶格上侧的uv(2,2)到uv(3,2)求一个插值B,最后在AB间求插值P即可。如下图:
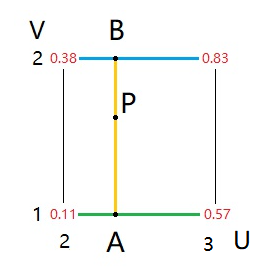
5. 这里我们使用线性插值:
A = 0.11 * 0.7 + 0.57 * 0.3 = 0.248;
B = 0.38 * 0.7 + 0.83 * 0.3 = 0.515;
P = 0.248 * 0.4 + 0.515 * 0.6 = 0.4082;
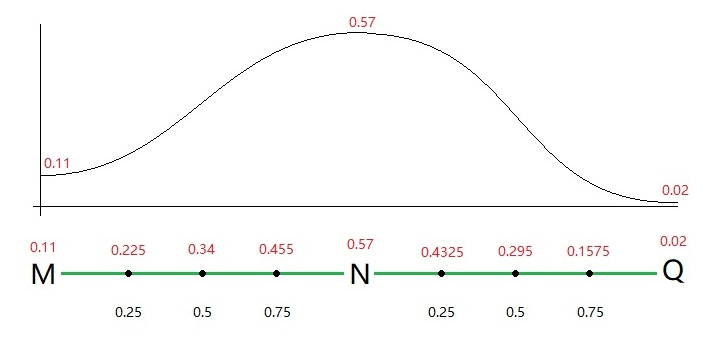
- 使用线性插值,点之间的过渡虽然平滑了,但是晶格间的过渡比较生硬。如上图所示,假设上图0.11为点M,0.57为点N。如果后面还有个点为Q,且其随机值为0.02,则这些值形成的连续图像如下:
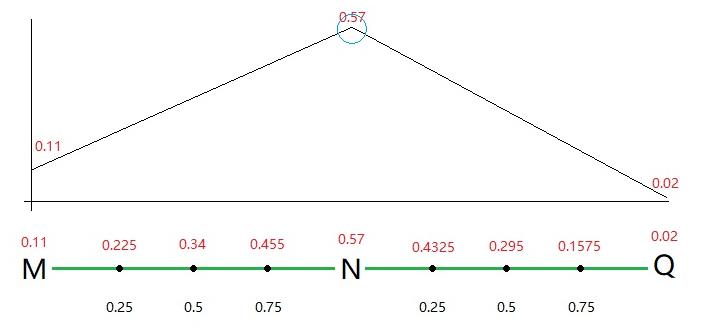
7. 从上图中可以明显看到晶格的交界处过渡生硬,所以柏林噪声之父提出了缓和曲线计算插值, 函数及其图像如下:
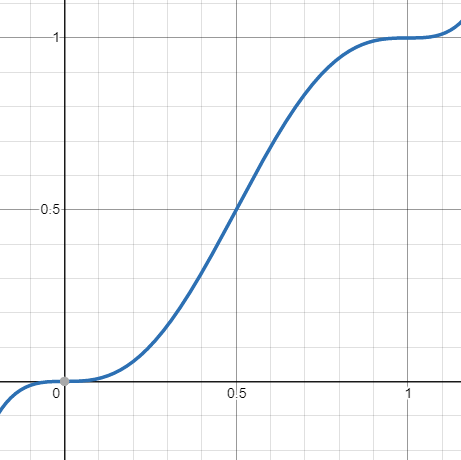
y = 6x^5 - 15x^4 + 10x^3;

// 2002年以前使用下面这种缓和曲线,后更新为上面的曲线
// 一般情况下使用下面这种即可,可提升计算效率,上面的曲线过渡更加平滑,计算量也更大
// y = 3x^2 - 2x^3;
- 使用缓和曲线计算插值之后,形成的连续图像如下:
9. 最终使用到的二维噪声算法如下:
float noise(vec2 p){
    //坐标的整数部分可看作晶格的顶点坐标
    //坐标的小数部分可看作晶格内的偏移坐标
    //取出坐标的整数部分
    vec2 ip = floor(p);
    //取出坐标的小数部分
    vec2 t = fract(p);
    //原始噪声使用的缓和曲线是s(t)=3t²-2t³
    // t = t * t * (3.0 - 2.0 * t);
    //使用缓和曲线对小数部分坐标进行内插
    t = t * t * t * (t * (6.0 * t - 15.0) + 10.0);

    //对A和B在v方向上内插得到最终值
    float res = mix(
        //对晶格下侧u方向进行内插得到A值
        mix(rand(ip), rand(ip + vec2(1.0,0.0)), t.x),
        //对晶格上侧u方向进行内插得到B值
        mix(rand(ip + vec2(0.0,1.0)), rand(ip + vec2(1.0,1.0)), t.x)
        ,t.y
    );
    return res;
}
3.图像破碎效果
- 创建three对象,并传入shader
const uniforms = {
    u_time: { value: 0.0 },
    //u_texture是传入shader中的纹理
    u_texture: { value: texture },
    //u_opacity设置图像透明度
    u_opacity: { value: 1.0 },
    u_amp: { value: 0.006 },
    //u_range用来放大uv坐标
    u_range: { value: 300 },
}
const geo = new THREE.PlaneBufferGeometry(1, 1, 1, 1);
const mat = new THREE.ShaderMaterial({
    vertexShader: vs,
    fragmentShader: fs,
    uniforms: uniforms,
    transparent: true,
    side: THREE.DoubleSide,
});
const shape = new THREE.Mesh(geo, mat);
scene.add(shape);
- shader部分主要代码
void main() {
    vec2 uv = v_uv;
    float speed = 0.1;
    //通过噪声算法获取到随机数加到uv的偏移上
    //通过u_range放大uv坐标的范围
    //noise()的值的范围是0~1,这里减去0.5保证随机值的范围在-0.5~0.5
    //通过增大u_amp实现偏移值整体放大,像素坐标错位增大,达到图片破碎的效果
    uv.x += (noise(uv * u_range + u_time * speed) - 0.5) * u_amp;
    uv.y += (noise(uv * u_range + u_time * speed) - 0.5) * u_amp;
    vec4 color = texture2D(u_texture, uv);
    //通过u_opacity控制图像的透明度
    color.a = color.a * u_opacity;

    gl_FragColor = color;
}
效果如下:
- 图像破碎消失效果:
function hide() {
    //修改u_amp使得uv偏移值增大,达到破碎效果
    TweenMax.to(uniforms.u_amp, 2, { value: 0.3 });
    //修改u_range放大uv坐标,破碎时变得更细腻
    TweenMax.to(uniforms.u_range, 0.1, { value: 400 });
    //修改u_opacity改变透明度,隐藏图像
    TweenMax.to(uniforms.u_opacity, 2, { delay: 1, value: 0.0 });
}
效果如下:


 923
923


 被折叠的 条评论
为什么被折叠?
被折叠的 条评论
为什么被折叠?
 到【灌水乐园】发言


