


 本文介绍了如何利用Threejs、CSS3DRenderer和Tween.js库,结合Vue3搭建基础场景,创建512个粒子小球并实现四种不同的动画效果:曲面、立方体、随机和圆球。通过定义不同变化的坐标,利用Tween函数控制小球的位置变化,实现复杂的3D动画效果。
今天我们使用CSS3DRenderer+Tween.js实现Threejs官方示例中的粒子小球按规律变化的效果,先看下最终实现的效果
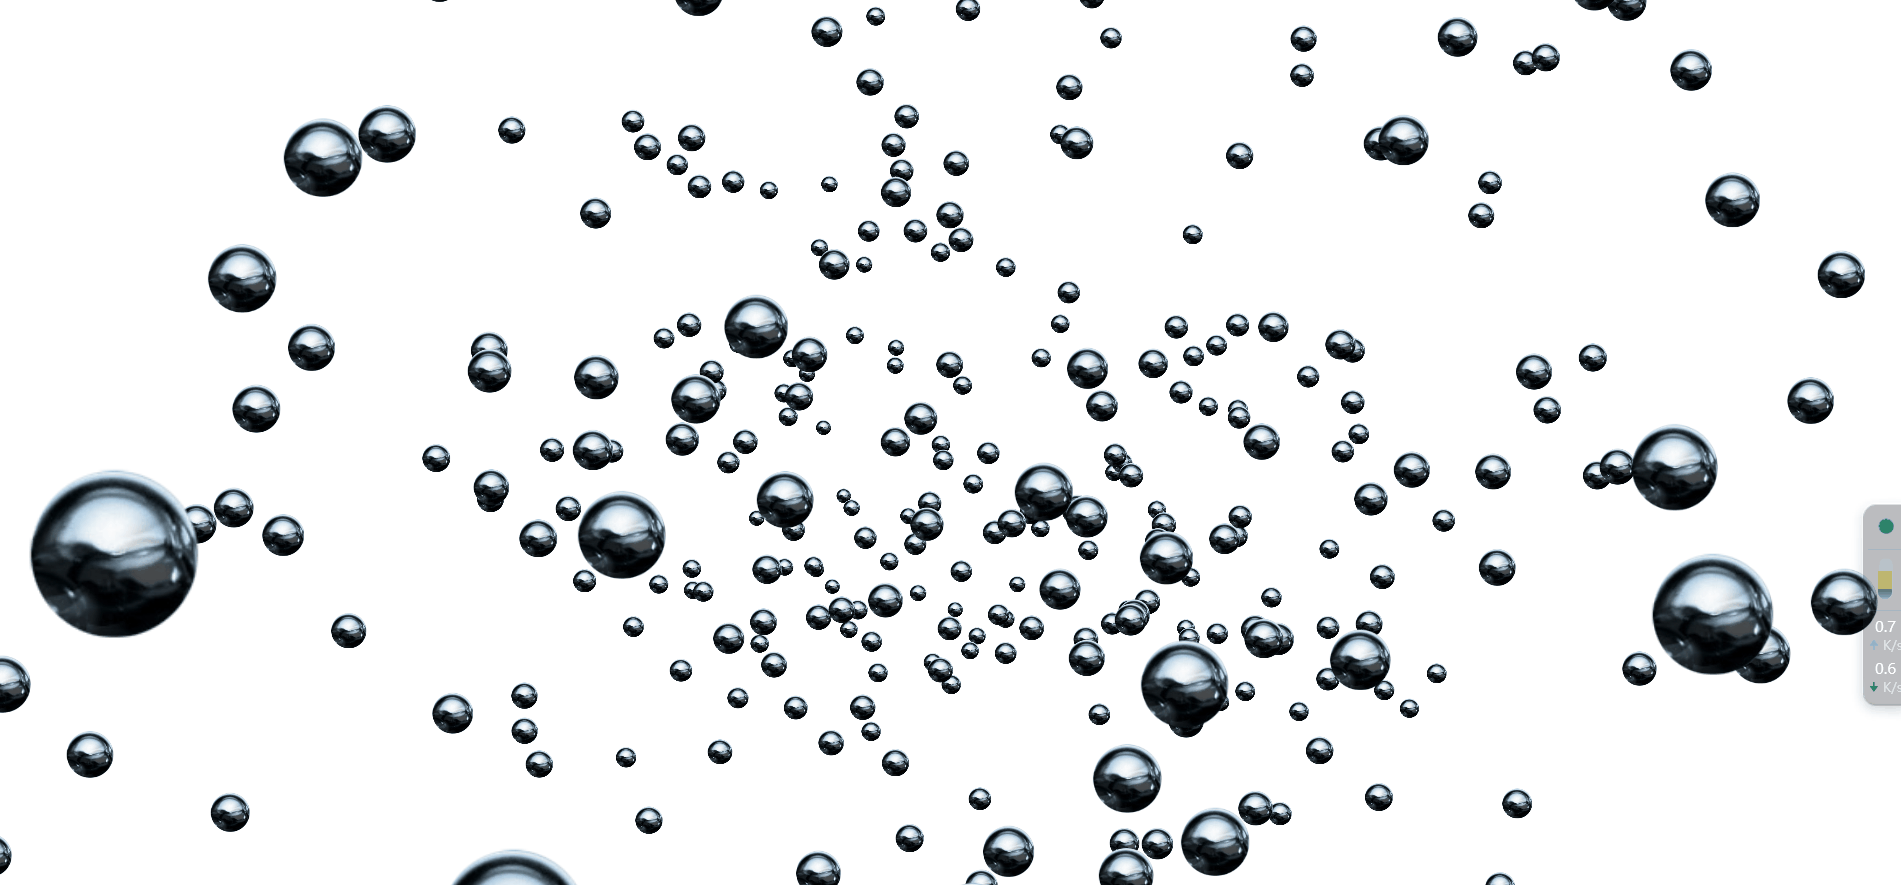
先来分析下,这个页面的动画效果是由512个小球组合起来的四种不同变化,分别是曲面、立方体、随机和圆球四种变化;下面我们来实现下这个效果
初始化页面
老套路,要实现上面的效果之前,我们需要先将Threejs的基础场景搭建起来,这个是老生常谈的事情了,不在赘述,不知道怎么创建的小伙伴请参考我前面的博客文章基于vite+vue3+threejs构建三维场景这里直接上代码
<template>
  <div id="scene"></div>
</template>
<script setup>
import * as THREE from 'three'
import { OrbitControls } from 'three/examples/jsm/controls/OrbitControls'
import { onMounted } from 'vue';
let camera,scene,renderer
let controls
onMounted(()=>{
  init()
})
function init() {
  initScene()
  initCamera()
  initMesh()
  initCss3DRenderer()
  initControls()
  animate()
  window.addEventListener('resize',onWindowResize)
}
function initScene() {
  scene = new THREE.Scene()
  scene.background = new THREE.Color(0x808080)
}
function initCamera() {
  camera = new THREE.PerspectiveCamera(75,window.innerWidth / window.innerHeight,1,5000)
  camera.position.set(600,400,1500)
  camera.lookAt(0,0,0)
}
function initControls() {
  controls = new OrbitControls(camera,renderer.domElement)
}
function onWindowResize() {
  camera.aspect = window.innerWidth / window.innerHeight
  camera.updateProjectionMatrix()
  renderer.setSize(window.innerWidth,window.innerHeight)
}
function animate() {
  requestAnimationFrame(animate)
  renderer.render(scene,camera)
}
</script>
<style lang='scss' scoped>
</style>
创建小球
上面的小球其实是一张png格式的图片,为了保证我们旋转相机时图片始终朝向屏幕,我们考虑将其转换为精灵图,使用CSS3DSprite可以将其作为参数传递进去,使其变为精灵图;另外,我们需要512个这样的精灵图,所以,我们定义一个变量,使其值为512,然后用for循环遍历,设置其位置随机变化,并添加到屏幕上;代码如下
引入CSS3DRenderer和CSS3DSprite
import { CSS3DRenderer, CSS3DSprite } from 'three/examples/jsm/renderers/CSS3DRenderer';
定义变量并遍历生成小球
1、定义变量:
定义小球总量用于遍历;定义objects 数组用于存储创建的每个小球对象;定义positions 数组用于存储每次变化时的每个小球的位置
2、创建img标签:
使用document.createElement('img')创建image标签,并使用image.src = '../../public/textures/sprite.png'加载图片
3、监听image的load事件
监听image的load事件,并在其回调函数中使用for循环创建CSS3DSprite对象,同时给每个创建的对象指定x,y,z坐标位置,位置在-2000到2000之间随机分布,将其添加到scene和objects中
const particlesTotal = 512 // 小球数量
const positions = [] //位置坐标数组
const objects = [] //物体数组
let current = 0
function initMesh() {
  // 创建image标签
  const image = document.createElement('img')
  image.src = '../../public/textures/sprite.png'
  // image监听load事件
  image.addEventListener('load',function() {
    // 遍历  创建CSS3DSprite
    for(let i = 0; i < particlesTotal; i++ ) {
      const object = new CSS3DSprite( image.cloneNode())
      object.position.x = Math.random() * 4000 - 2000
      object.position.y = Math.random() * 4000 - 2000
      object.position.z = Math.random() * 4000 - 2000
      scene.add(object)
      objects.push(object)
    }
  })
}
这里在创建CSS3DSprite是使用了HTML DOM cloneNode(deep) 方法
cloneNode(deep) 方法 拷贝所有属性和值。
deep参数是可选值,该方法将复制并返回调用它的节点的副本。如果传递给它的参数是 true,它还将递归复制当前节点的所有子孙节点。否则,它只复制当前节点。
定义曲面
观察上面曲面的变化,我们发现其是在xoz平面上沿x轴波浪起伏变化的,我们可以考虑使用正弦函数,使其达到起伏变化的效果;
1、定义小球
小球总量是512个,我们设置x轴每行16个,z轴每行32个,小球间隔150
2、计算x轴总长和z轴总长
通过上小球每行的总数和小球间隔,计算出x轴总长和z轴总长
3、循环遍历每个小球,计算每个小球的位置坐标
通过for循环遍历每个小球,计算出每个小球的x,y,z坐标,并将其存储在positions数组中
// Plane
  const amountX = 16  //x 轴上的数量
  const amountZ = 32 // z 轴上的数量
  const separationPlane = 150 //间隔
  const offsetX = ((amountX - 1 ) * separationPlane) / 2 //x轴总长
  const offsetZ = ((amountZ - 1 ) * separationPlane) / 2 //z轴总长
  for(let i = 0; i < particlesTotal; i++) {
    const x = (i % amountX) * separationPlane
    const z = Math.floor(i / amountX) * separationPlane
    const y = (Math.sin(x * 0.5) + Math.sin(z * 0.5)) * 200
    positions.push(x-offsetX,y,z-offsetZ) //每个小球的坐标
  }
定义立方体
定义立方体的方法和上面类似,这里不再赘述,直接上代码
// Cube
  const amount = 8 //数量
  const separationCube = 150  //间隔
  const offset = ((amount - 1 ) * separationCube ) /2 //长度
  for(let i = 0; i < particlesTotal; i ++ ) {
    const x = (i % amount) * separationCube
    const y = Math.floor( ( i / amount ) % amount ) * separationCube;
		const z = Math.floor( i / ( amount * amount ) ) * separationCube;
		positions.push( x - offset, y - offset, z - offset );
  }
定义随机变化位置
定义每个小球随机变化的位置,只需要调用Math.random()函数就可以了,将x,y,z的随机位置存入positions数组中
 // Random
  for ( let i = 0; i < particlesTotal; i ++ ) {
    positions.push(
      Math.random() * 4000 - 2000,
      Math.random() * 4000 - 2000,
      Math.random() * 4000 - 2000
    );
  }
定义圆形
定义圆形,我们先定义一个半径,然后遍历每个小球,定义其在圆上的位置,这里我们用到了极坐标的知识,不了解的执行百度
// Sphere
  const radius = 750 //半径
  for ( let i = 0; i < particlesTotal; i ++ ) {
    const phi = Math.acos( - 1 + ( 2 * i ) / particlesTotal );
    const theta = Math.sqrt( particlesTotal * Math.PI ) * phi;

    positions.push(
      radius * Math.cos( theta ) * Math.sin( phi ),
      radius * Math.sin( theta ) * Math.sin( phi ),
      radius * Math.cos( phi )
    );
  }
定义变化函数
上面我们定义好了各个变化的坐标,接着我们就可以Tween函数来指定动画了
上面我们将每种变化的位置坐标都放在了positions数组中,里面对应每一个球的x,y,z的坐标,通过在for循环中使用Tween.to()方法达到动画效果
function transition() {
  const offset = current * particlesTotal * 3;// 要切换到每种类型变化位置的偏移量
	const duration = 2000;//动画时长
  for(let i = 0, j = offset; i < particlesTotal; i++, j+=3){
    const object = objects[ i ]
    new TWEEN.Tween(object.position)//每个小球的位置变化
      .to({
        x:positions[ j ],
        y:positions[ j + 1 ],
        z:positions[ j + 2 ],
      },Math.random()*duration + duration)
      .easing(TWEEN.Easing.Exponential.InOut)
      .start()
  }
  //定时切换 这里使用tween的to方法传递一个空的对象,定义事件来完成定时,相当于一个定时器
  new TWEEN.Tween( this )
		.to( {}, duration * 3 )
		.onComplete( transition )
		.start();

	current = ( current + 1 ) % 4;
}
调用transition()方法
在图像加载监听器的回调函数中调用transition(),达到动画效果
image.addEventListener('load',function() {
    // 遍历  创建CSS3DSprite
    for(let i = 0; i < particlesTotal; i++ ) {
      const object = new CSS3DSprite( image.cloneNode())
      object.position.x = Math.random() * 4000 - 2000
      object.position.y = Math.random() * 4000 - 2000
      object.position.z = Math.random() * 4000 - 2000
      scene.add(object)
      objects.push(object)
    }
    transition()
  })
至此,我们就实现了上面的动画效果
核心代码如下
<template>
  <div id="scene"></div>
</template>
<script setup>
import * as THREE from 'three'
import * as  TWEEN   from '@tweenjs/tween.js'
import { OrbitControls } from 'three/examples/jsm/controls/OrbitControls'
import { onMounted } from 'vue';
import { CSS3DRenderer, CSS3DSprite } from 'three/examples/jsm/renderers/CSS3DRenderer';

let camera,scene,renderer
let controls
const particlesTotal = 512 // 小球数量
const positions = [] //位置坐标数组
const objects = [] //物体数组
let current = 0
onMounted(()=>{
  init()
})
function init() {
  initScene()
  initCamera()
  initMesh()
  initCss3DRenderer()
  initControls()
  animate()
  window.addEventListener('resize',onWindowResize)
}
function initScene() {
  scene = new THREE.Scene()
  scene.background = new THREE.Color(0x808080)
}
function initCamera() {
  camera = new THREE.PerspectiveCamera(75,window.innerWidth / window.innerHeight,1,5000)
  camera.position.set(600,400,1500)
  camera.lookAt(0,0,0)
}
function initCss3DRenderer() {
  renderer = new CSS3DRenderer()
  renderer.setSize(window.innerWidth,window.innerHeight)
  document.querySelector('#scene').appendChild(renderer.domElement)
}
function initControls() {
  controls = new OrbitControls(camera,renderer.domElement)
}
function onWindowResize() {
  camera.aspect = window.innerWidth / window.innerHeight
  camera.updateProjectionMatrix()
  renderer.setSize(window.innerWidth,window.innerHeight)
}
function animate() {
  requestAnimationFrame(animate)
  TWEEN.update();
  renderer.render(scene,camera)
}
function initMesh() {
  // 创建image标签
  const image = document.createElement('img')
  image.src = '../../public/textures/sprite.png'
  // image监听load事件
  image.addEventListener('load',function() {
    // 遍历  创建CSS3DSprite
    for(let i = 0; i < particlesTotal; i++ ) {
      const object = new CSS3DSprite( image.cloneNode())
      object.position.x = Math.random() * 4000 - 2000
      object.position.y = Math.random() * 4000 - 2000
      object.position.z = Math.random() * 4000 - 2000
      scene.add(object)
      objects.push(object)
    }
    transition()
  })


  // Plane
  const amountX = 16  //x 轴上的数量
  const amountZ = 32 // z 轴上的数量
  const separationPlane = 150 //间隔
  const offsetX = ((amountX - 1 ) * separationPlane) / 2 //x轴总长
  const offsetZ = ((amountZ - 1 ) * separationPlane) / 2 //z轴总长
  for(let i = 0; i < particlesTotal; i++) {
    const x = (i % amountX) * separationPlane
    const z = Math.floor(i / amountX) * separationPlane
    const y = (Math.sin(x * 0.5) + Math.sin(z * 0.5)) * 200

    positions.push(x-offsetX,y,z-offsetZ) //每个小球的坐标
  }

  // Cube
  const amount = 8 //数量
  const separationCube = 150  //间隔
  const offset = ((amount - 1 ) * separationCube ) /2 //偏移量
  for(let i = 0; i < particlesTotal; i ++ ) {
    const x = (i % amount) * separationCube
    const y = Math.floor( ( i / amount ) % amount ) * separationCube;
		const z = Math.floor( i / ( amount * amount ) ) * separationCube;

		positions.push( x - offset, y - offset, z - offset );
  }

  // Random
  for ( let i = 0; i < particlesTotal; i ++ ) {
    positions.push(
      Math.random() * 4000 - 2000,
      Math.random() * 4000 - 2000,
      Math.random() * 4000 - 2000
    );
  }

  // Sphere
  const radius = 750 //半径
  for ( let i = 0; i < particlesTotal; i ++ ) {
    const phi = Math.acos( - 1 + ( 2 * i ) / particlesTotal );
    const theta = Math.sqrt( particlesTotal * Math.PI ) * phi;

    positions.push(
      radius * Math.cos( theta ) * Math.sin( phi ),
      radius * Math.sin( theta ) * Math.sin( phi ),
      radius * Math.cos( phi )
    );
  }
}
function transition() {
  const offset = current * particlesTotal * 3;// 要切换到每种类型变化位置的偏移量
	const duration = 2000;//动画时长
  for(let i = 0, j = offset; i < particlesTotal; i++, j+=3){
    const object = objects[ i ]
    new TWEEN.Tween(object.position)//每个小球的位置变化
      .to({
        x:positions[ j ],
        y:positions[ j + 1 ],
        z:positions[ j + 2 ],
      },Math.random()*duration + duration)
      .easing(TWEEN.Easing.Exponential.InOut)
      .start()
  }
  //定时切换 这里使用tween的to方法传递一个空的对象,定义事件来完成定时,相当于一个定时器
  new TWEEN.Tween( this )
		.to( {}, duration * 3 )
		.onComplete( transition )
		.start();

	current = ( current + 1 ) % 4;
}
</script>
<style lang='scss' scoped>
</style>
今天就到这里吧,喜欢的小伙伴点赞关注收藏哦!!


 7048
7048

 被折叠的 条评论
为什么被折叠?
被折叠的 条评论
为什么被折叠?
 到【灌水乐园】发言


