[This post is by David Chandler, Android Developer Advocate — Tim Bray]
[本文由Android Developer的支持者 David Chandler发布---- Tim Bray]
Honeycomb introduced Fragments to support reusing portions of UI and logic across multiple activities in an app. In parallel, the showDialog / dismissDialog methods in Activity are being deprecated in favor of DialogFragments.
为了提供可重用的组件,并且让一个App内部的逻辑可以很方便地在多个Activity中使用,Android Honeycomb (注:Android 3.0)引入了 Fragment。
In this post, I’ll show how to use DialogFragments with the v4 support library (for backward compatibility on pre-Honeycomb devices) to show a simple edit dialog and return a result to the calling Activity using an interface. For design guidelines around Dialogs, see the Android Design site.
在本文中,我会向你展示如何使用 Android-support-v4 库中提供的DialogFragment 来显示一个简单的可编辑对话框,并且通过接口向调用该对话框的Activity返回结果(这里使用Android-support-v4 库是为了兼容3.0以前的设备)。关于使用dialog的设计指导,请参考 Android Design (注:链接http://developer.android.com/design/building-blocks/dialogs.html)。
The Layout
Here’s the layout for the dialog in a file named fragment_edit_name.xml.
以下是对话框的布局文件,文件名为:fragment_edit_name.xml.
<LinearLayout xmlns:android="http://schemas.android.com/apk/res/android"
    android:id="@+id/edit_name"
    android:layout_width="wrap_content" android:layout_height="wrap_content"
    android:layout_gravity="center" android:orientation="vertical"  >

    <TextView
        android:id="@+id/lbl_your_name" android:text="Your name"
        android:layout_width="wrap_content" android:layout_height="wrap_content" />

    <EditText
        android:id="@+id/txt_your_name"
        android:layout_width="match_parent"  android:layout_height="wrap_content"
        android:inputType=”text”
        android:imeOptions="actionDone" />
</LinearLayout>
Note the use of two optional attributes. In conjunction with android:inputType=”text”,android:imeOptions=”actionDone” configures the soft keyboard to show a Done key in place of the Enter key.
注意,这里使用了两个可选的参数:android:inputType="text", android:imeOptions=”actionDone”;这两个参数指明软键盘上的Enter键名字改为Done(注:第一个参数是指定输入类型为文本,第二个参数修改了Enter键的名字为 “Done”)。
The Dialog Code
The dialog extends DialogFragment, and since we want backward compatibility, we’ll import it from the v4 support library. (To add the support library to an Eclipse project, right-click on the project and choose Android Tools | Add Support Library...).
自定义的对话框继承于 DialogFragment;由于我们要兼容之前的设备,所以这里import进来的是 android-support-v4 库中的类(要将 android-support-v4库添加到Eclipse项目,右键点击项目名,然后选择Android Tools-->Add Support Library)。(注:现在自动创建的项目都会自动引入这个库;另外虽然说Android 3.0后的版本都说已经内置Fragment类库,我试过几次找不到类的对应类情况,最后还是只能使用Android-support-v4)。
import android.support.v4.app.DialogFragment;
// ...

public class EditNameDialog extends DialogFragment {

    private EditText mEditText;

    public EditNameDialog() {
        // Empty constructor required for DialogFragment
    }

    @Override
    public View onCreateView(LayoutInflater inflater, ViewGroup container,
            Bundle savedInstanceState) {
        View view = inflater.inflate(R.layout.fragment_edit_name, container);
        mEditText = (EditText) view.findViewById(R.id.txt_your_name);
        getDialog().setTitle("Hello");

        return view;
    }
}
The dialog extends DialogFragment and includes the required empty constructor. Fragments implement theonCreateView() method to actually load the view using the provided LayoutInflater.
继承于DialogFragment的对话框使用了默认的构造函数;这个Fragment重载了 onCreateView()函数,这个函数才是实际使用LayoutInflater载入view的函数。
Showing the Dialog
Now we need some code in our Activity to show the dialog. Here is a simple example that immediately shows the EditNameDialog to enter the user’s name. On completion, it shows a Toast with the entered text.
现在我们需要在Activity中添加一些代码来显示对话框。以下是一个简单的示例:显示对话框让用户输入用户名;最后,使用Toast显示用户输入的文字。
import android.support.v4.app.FragmentActivity;
import android.support.v4.app.FragmentManager;
// ...

public class FragmentDialogDemo extends FragmentActivity implements EditNameDialogListener {

    @Override
    public void onCreate(Bundle savedInstanceState) {
        super.onCreate(savedInstanceState);
        setContentView(R.layout.main);
        showEditDialog();
    }

    private void showEditDialog() {
        FragmentManager fm = getSupportFragmentManager();
        EditNameDialog editNameDialog = new EditNameDialog();
        editNameDialog.show(fm, "fragment_edit_name");
    }

    @Override
    public void onFinishEditDialog(String inputText) {
        Toast.makeText(this, "Hi, " + inputText, Toast.LENGTH_SHORT).show();
    }
}
There are a few things to notice here. First, because we’re using the support library for backward compatibility with the Fragment API, our Activity extends FragmentActivity from the support library. Because we’re using the support library, we call getSupportFragmentManager() instead of getFragmentManager().
这里有一些细节需要注意。首先,因为我们使用了Android-support-v4依赖库解决兼容问题,我们的Activity也继承了依赖库中的FragmentActivity(注:不能使用SDK中的FragmentActivity);其次,(还是)因为使用了依赖库,所以调用 getSupportFragmentManager()而不能是 getFragmentManager()。
After loading the initial view, the activity immediately shows the EditNameDialog by calling its show() method. This allows the DialogFragment to ensure that what is happening with the Dialog and Fragment states remains consistent. By default, the back button will dismiss the dialog without any additional code.
载入初始化的view之后,Activity马上调用了自定义对话框的 show()函数来显示对话框。这让DialogFragment确定当前Dialog的状态。默认情况下,按下返回按钮会释放这个对话框,而不需要对于的代码。
Using the Dialog
Next, let’s enhance EditNameDialog so it can return a result string to the Activity.
接下来,让我们来改进自定义对话框,让它可以向调用的Activity返回结果。
import android.support.v4.app.DialogFragment;
// ...
public class EditNameDialog extends DialogFragment implements OnEditorActionListener {

    public interface EditNameDialogListener {
        void onFinishEditDialog(String inputText);
    }

    private EditText mEditText;

    public EditNameDialog() {
        // Empty constructor required for DialogFragment
    }

    @Override
    public View onCreateView(LayoutInflater inflater, ViewGroup container,
            Bundle savedInstanceState) {
        View view = inflater.inflate(R.layout.fragment_edit_name, container);
        mEditText = (EditText) view.findViewById(R.id.txt_your_name);
        getDialog().setTitle("Hello");

        // Show soft keyboard automatically
        mEditText.requestFocus();
        getDialog().getWindow().setSoftInputMode(
                LayoutParams.SOFT_INPUT_STATE_VISIBLE);
        mEditText.setOnEditorActionListener(this);

        return view;
    }

    @Override
    public boolean onEditorAction(TextView v, int actionId, KeyEvent event) {
        if (EditorInfo.IME_ACTION_DONE == actionId) {
            // Return input text to activity
            EditNameDialogListener activity = (EditNameDialogListener) getActivity();
            activity.onFinishEditDialog(mEditText.getText().toString());
            this.dismiss();
            return true;
        }
        return false;
    }
}
For user convenience, we programmatically focus on the EditText with mEditText.requestFocus(). Alternatively, we could have used the <requestFocus/> tag in the layout XML to do this; however, in some cases it’s preferable to request focus programmatically. For example, an OnFocusChangeListener added in the Fragment’s onCreateView() method won’t get called if you request focus in the layout XML.
为了方便用户,我们在代码中调用mEditText.requestFocus()让EditText自动获取焦点。另外,自动获取焦点也能在xml中添加<requestFocus/>标签(tag)实现。不过,某些情况下使用代码实现更好一点,例如, 当在xml中设置自动获取焦点的时候,在 Fragment的onCreateView()中添加的 OnFocusChangeListener 会无法生效。
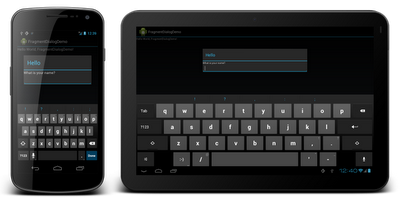
If the user focuses on an EditText, the soft keyboard will automatically appear. In order to force this to happen with our programmatic focus, we call getDialog().getWindow().setSoftInputMode(). Note that many Window operations you might have done previously in a Dialog can still be done in a DialogFragment, but you have to call getDialog().getWindow()instead of just getWindow(). The resulting dialog is shown on both a handset and tablet (not to scale):
当用户选中一个EditText的时候,软键盘会自动出现。为了强制显示软键盘,在这里调用了getDialog().getWindow().setSoftInputMode()。注意,之前Dialog中关于window的操作,在DialogFragment中一样可以使用;不过要使用getDialog().getWindow()而不是getWindow().这个对话框同时在手机和平板上显示(并且不会被拉伸)。

The onEditorAction() method handles the callback when the user presses the Done key. It gets invoked because we’ve set an OnEditorActionListener on the EditText. It calls back to the Activity to send the entered text. To do this, EditNameDialog declares an interface EditNameDialogListener that is implemented by the Activity. This enables the dialog to be reused by many Activities. To invoke the callback method onFinishEditDialog(), it obtains a reference to the Activity which launched the dialog by calling getActivity(), which all Fragments provide, and then casts it to the interface type. In MVC architecture, this is a common pattern for allowing a view to communicate with a controller.
因为我们前面对 EditText设置了OnEditorActionListener,所以onEditorActioin()函数会在用户按下 Done 键(前面提到把Enter键名字改为Done)时被调用。EditNameDialog 声明了 EditNameDialogListener, 内部有一个函数叫 onFinishEditDialog().;Activity实现了这个接口。通过getActivity()函数,可以获取创建对话框的Activity实例,并将其转换成 OnEditorActionListener接口实例,然后调用onFinishEditDialog()函数向Activity传递数据。这是基于 MVC 体系架构,借用这种模式可以让view和控制器(controller)之间通信,并且让对话框可以在不同的Activity中被重用。
We can dismiss the dialog one of two ways. Here we are calling dismiss() within the Dialog class itself. It could also be called from the Activity like the show() method.
有两种方法释放对话框;这里我们在对话框类内部调用了dismiss()函数,这个函数也可以在外部被调用。
Hopefully this sheds some more light on Fragments as they relate to Dialogs. You can find the sample code in this blog post on Google Code.
希望这篇文章可以让你更加了解如何使用Fragment实现对话框。你可以在Google Code上面找到源码(链接:http://code.google.com/p/dialogfragmentdemo/)。
References for learning more about Fragments:


 619
619

 被折叠的 条评论
为什么被折叠?


