


2016年年底的时候给女朋友说,2017年的目标是看源码,然而各种缘由(主要是太懒)下来,没能实现目录,2018年又是到年底了,就继续吧。好了,这都是废话。
1、为什么要研究PhoneWindow?
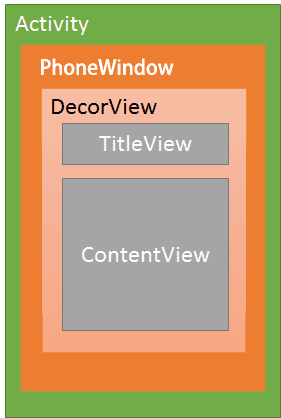
简单梳理一下PhoneWindow和Activity以及整个屏幕是什么样的一个关系?先看下面这个图(从别人博客拿过来的)
下面根据这个图去找相关代码,佐证一下这个图的正确性。
//Activity#setContentView源码
public void setContentView(@LayoutRes int layoutResID) {
    getWindow().setContentView(layoutResID);
   initWindowDecorActionBar();
}
上面这句话,就是我们在Activity#onCreate中添加布局的代码,基本上天天都在用。继续向下看getWindow。
final void attach(Context context, ActivityThread aThread,
       Instrumentation instr, IBinder token, int ident,
        Application application, Intent intent, ActivityInfo info,
        CharSequence title, Activity parent, String id,
        NonConfigurationInstances lastNonConfigurationInstances,
        Configuration config, String referrer, IVoiceInteractor voiceInteractor,
        Window window, ActivityConfigCallback activityConfigCallback) {
        ....
    mWindow = new PhoneWindow(this, window, activityConfigCallback);
    mWindow.setWindowControllerCallback(this);
    mWindow.setCallback(this);
    mWindow.setOnWindowDismissedCallback(this);
    mWindow.getLayoutInflater().setPrivateFactory(this);
   .....
}
好了,我们看到getWindow直接上返回的是PhoneWindow的实例。而在Window的官方文档中已经说明,The only existing implementation of this abstract class is android.view.PhoneWindow,PhoneWindow是目前Window的唯一实现类。从上面的代码可以确定一点我们在activity中使用setContentView实际上是将布局填充到了PhoneWindow的setContentView方法中去了。
// This is the top-level view of the window, containing the window decor.
    private DecorView mDecor;
而在DecorView的备注中说明了,DecorView是Window的顶级布局,所以实际上是在PhoneWindow中作为顶级布局填充的。
至于TitleView和ContentView在后续会慢慢讲到。
2、 DecorView的创建以及ContentView、TitleView的创建过程分析
从上面我们已经知道Activity#setContentView实际上是调用了PhoneWindow#setContentView的代码。
还是接着看setContentView的源码部分
public void setContentView(int layoutResID) {
    // Note: FEATURE_CONTENT_TRANSITIONS may be set in the process of installing the window
    // decor, when theme attributes and the like are crystalized. Do not check the feature
    // before this happens.
    //这里的mContentParent是DecorView  或者DecorView的子布局
    if (mContentParent == null) {
        installDecor();
        //这里的Window.FEATURE_ACTIVITY_TRANSITIONS是用来设置启用transition api的,
        //是5.0之后的转场动画相关api
    } else if (!hasFeature(FEATURE_CONTENT_TRANSITIONS)) {
        mContentParent.removeAllViews();
    }

    if (hasFeature(FEATURE_CONTENT_TRANSITIONS)) {
        final Scene newScene = Scene.getSceneForLayout(mContentParent, layoutResID,
                getContext());
        transitionTo(newScene);
    } else {
        mLayoutInflater.inflate(layoutResID, mContentParent);
    }
    //这是与fitSystemWindow相关的操作
    mContentParent.requestApplyInsets();
    //窗口相关的回调
    final Callback cb = getCallback();
    if (cb != null && !isDestroyed()) {
    	//在调用了setContentView之后会触发这个回调
        cb.onContentChanged();
    }
    mContentParentExplicitlySet = true;
}
以上代码我们目前不去关心FEATURE_CONTENT_TRANSITIONS相关的
如果mContentParent为空,也就是DecorView还没有创建,则调用installDecor去创建DecorView对象,接下来调用了mLayoutInflater.inflate(layoutResID, mContentParent);,将我们传入的R.layout.xxx布局xml文件进行构建绑定,LayoutInflater.inflate实际上是一个递归解析xml创建view相关对象的过程。最后解析的对象父节点设置给了mContentParent。这里猜测mContentParent就是上面图片上的ContentView,也就是我们大部分时候布局填充的界面部分。
接着在看installDecor方法。
private void installDecor() {
        mForceDecorInstall = false;
        if (mDecor == null) {
            mDecor = generateDecor(-1);
           ...
        } else {
           // 将PhoneWindow与DecorView的window关联
            mDecor.setWindow(this);
        }

        if (mContentParent == null) {
            mContentParent = generateLayout(mDecor);
            ...
            final DecorContentParent decorContentParent = (DecorContentParent) mDecor.findViewById(
                    R.id.decor_content_parent);

            if (decorContentParent != null) {
                mDecorContentParent = decorContentParent;
                ...
                if (mDecorContentParent.getTitle() == null) {
                    mDecorContentParent.setWindowTitle(mTitle);
                }
                ...
            } else {
                mTitleView = findViewById(R.id.title);
                if (mTitleView != null) {
                    if ((getLocalFeatures() & (1 << FEATURE_NO_TITLE)) != 0) {
                        final View titleContainer = findViewById(R.id.title_container);
                        ...
                    } else {
                        mTitleView.setText(mTitle);
                    }
                }
            }
	    ....
            if (hasFeature(FEATURE_ACTIVITY_TRANSITIONS)) {
          	..... //省略了转场动画相关属性
            }
        }
    }
上面的代码主要是如果DecorView为空的话,创建出来DecorView对象。
接着看generateDecor方法。
...
ViewGroup contentParent = (ViewGroup)findViewById(ID_ANDROID_CONTENT);
 if (contentParent == null) {
   throw new RuntimeException("Window couldn't find content container view");
}
...
主要只要关注这一句代码就行了,可以发现mContentParent实际上就是android.R.id.content这个id所在布局。
然后回头在看PhoneWindoe#setContentView中的mLayoutInflater.inflate(layoutResID, mContentParent);,可以大体分析出来Activity–> PhoneWindow -->DecorView -->ContentView这样一个层级关系了。
接下来我们看看TitleView是怎么创建出来的。
不知道大家还记不记得刚开始的时候在分析Activity#setContentView的时候的第二行代码,也就是initWindowDecorActionBar,根据名字我们知道是初始化ActionBar,而我们开发中,顶部的标题栏名字也叫ActionBar,感觉是不是和整个布局对上了,接下来看看ActionBar是如何创建的,并且怎么设置到DecorView中的。
private void initWindowDecorActionBar() {
    Window window = getWindow();
    //如果DecorView没有创建,就创建出来
    window.getDecorView();
    //如果我们设置不需要ActionBar,则直接return,也就不会再去创建了
    if (isChild() || !window.hasFeature(Window.FEATURE_ACTION_BAR) || mActionBar != null) {
        return;
    }
    //主角出现了,创建ActionBar实例。
    mActionBar = new WindowDecorActionBar(this);
    //设置返回按钮、设置图标,都是很熟悉的操作了。
    mActionBar.setDefaultDisplayHomeAsUpEnabled(mEnableDefaultActionBarUp);
    mWindow.setDefaultIcon(mActivityInfo.getIconResource());
    mWindow.setDefaultLogo(mActivityInfo.getLogoResource());
}
再来看看WindowDecorActionBar是如何操作的。
public WindowDecorActionBar(Activity activity) {
    mActivity = activity;
    Window window = activity.getWindow();
    View decor = window.getDecorView();
    boolean overlayMode = mActivity.getWindow().hasFeature(Window.FEATURE_ACTION_BAR_OVERLAY);
    init(decor);
    if (!overlayMode) {
        mContentView = decor.findViewById(android.R.id.content);
    }
}
主要关注init(decor)做了什么。
mDecorToolbar = getDecorToolbar(decor.findViewById(com.android.internal.R.id.action_bar));
好了,看到通过decor获取到toolbar。ToolBar是不是很熟悉。在找找有没有我们熟悉的操作。
public void setTitle(CharSequence title) {
   mDecorToolbar.setTitle(title);
}

@Override
public void setLogo(int resId) {
    mDecorToolbar.setLogo(resId);
}
到此,总算把上面的图片将清楚了。


 392
392


 被折叠的 条评论
为什么被折叠?
被折叠的 条评论
为什么被折叠?
 到【灌水乐园】发言


