


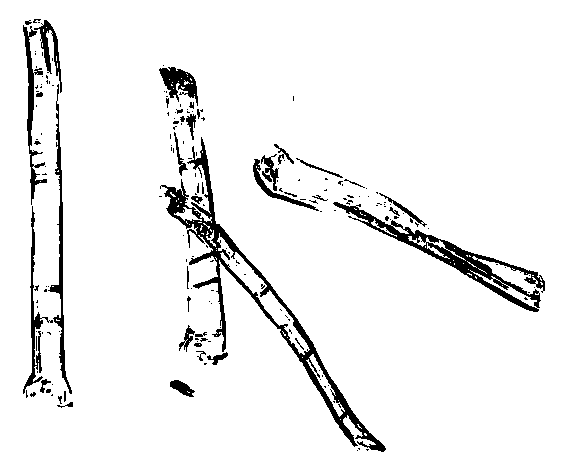
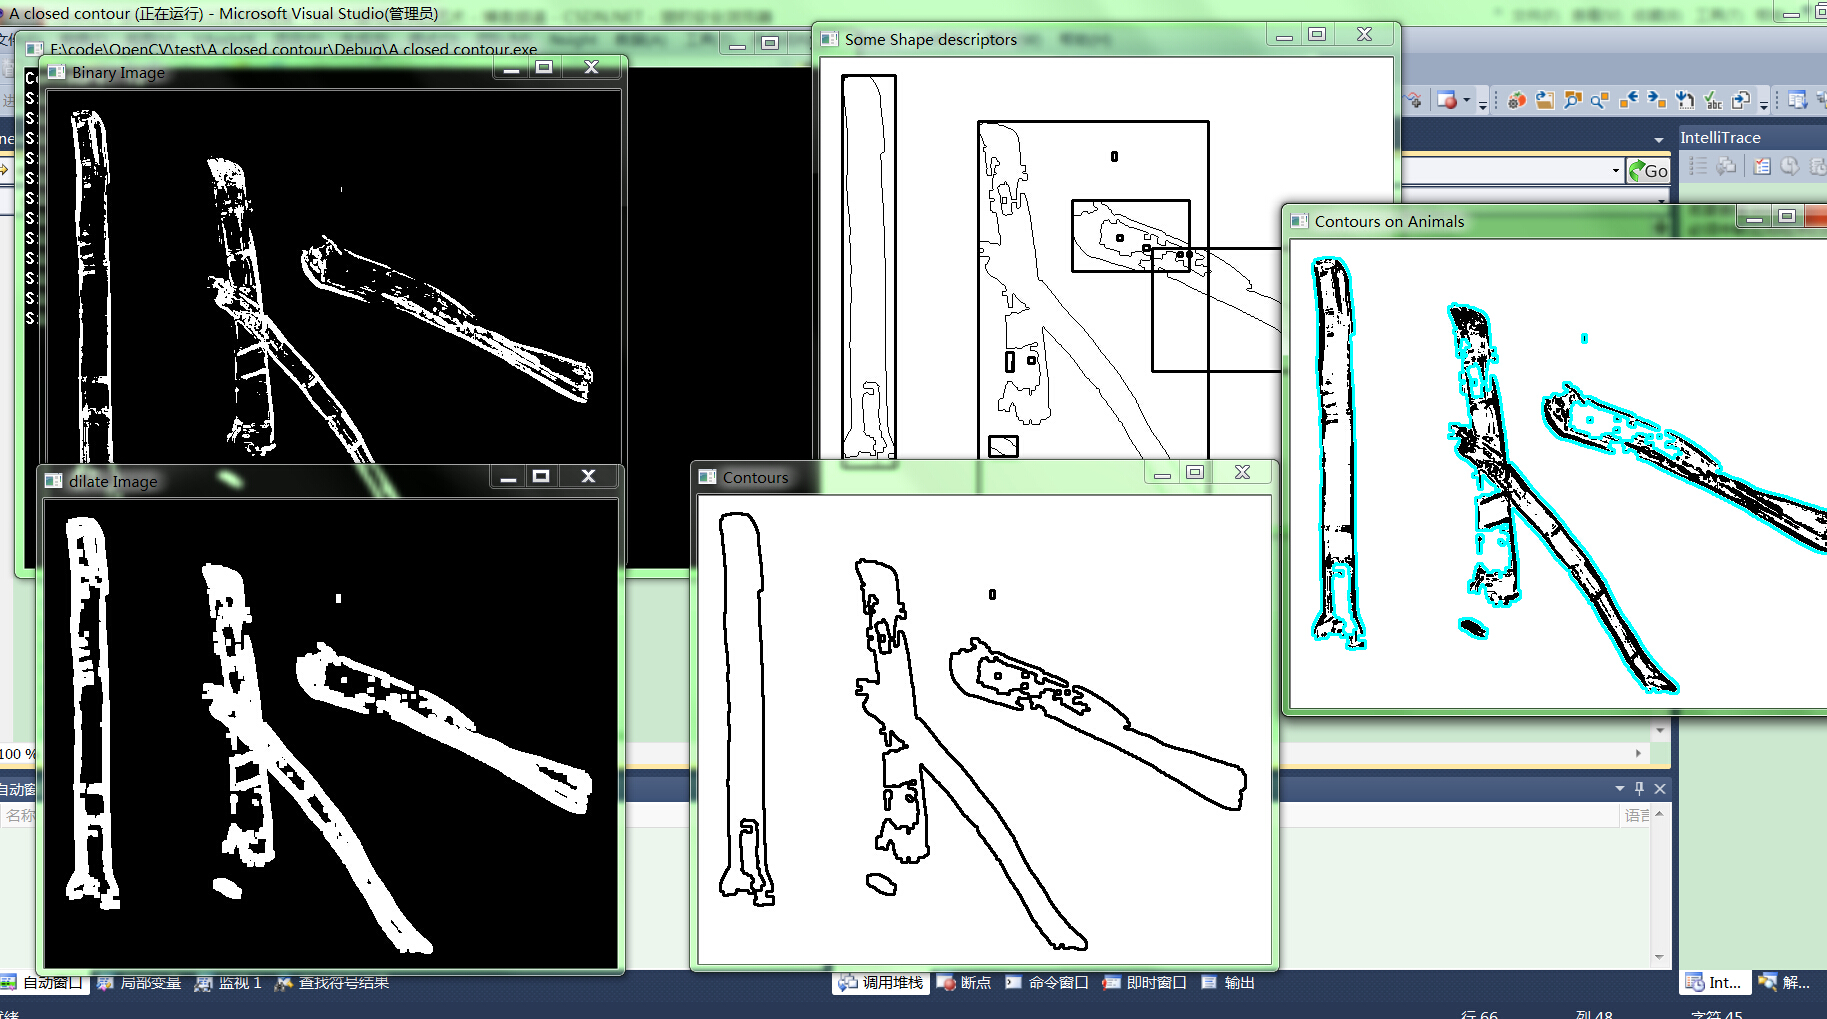
这个好像是骨头什么的,但是要求轮廓闭合,于是对图片进行一下膨胀操作,再次检测轮廓就好了。
// A closed contour.cpp : 定义控制台应用程序的入口点。
//

#include "stdafx.h"


// FindRotation-angle.cpp : 定义控制台应用程序的入口点。
//

// findContours.cpp : 定义控制台应用程序的入口点。
//

#include "stdafx.h"


#include <iostream>
#include <vector>
#include <opencv2/opencv.hpp>
#include <opencv2/core/core.hpp>
#include <opencv2/imgproc/imgproc.hpp>
#include <opencv2/highgui/highgui.hpp>
//#include "highlight"
//#include "highgui.h"


#pragma comment(lib,"opencv_core2410d.lib")
#pragma comment(lib,"opencv_highgui2410d.lib")
#pragma comment(lib,"opencv_imgproc2410d.lib")

#define PI 3.1415926

using namespace std;
using namespace cv;

int main()
{
	// Read input binary image

	char *image_name = "test.bmp";
	cv::Mat image = cv::imread(image_name);
	if (!image.data)
		return 0;


	// 从文件中加载原图
	  // IplImage *pSrcImage = cvLoadImage(image_name, CV_LOAD_IMAGE_UNCHANGED);
	  Mat gray(image.size(),CV_8U);

	  cvtColor(image,gray,CV_BGR2GRAY);
		 // 转为2值图
	 threshold(gray,gray,145,255,cv::THRESH_BINARY_INV);
	//cvThreshold(pSrcImage,pSrcImage,145,255,cv::THRESH_BINARY_INV);


	   //image = gray;

	   cv::namedWindow("Binary Image");
	   cv::imshow("Binary Image",gray);


	   cv::Mat element(5,5,CV_8U,cv::Scalar(255));

	   cv::dilate(gray,gray,element);
	   //cv::erode(image,image,element);

	   cv::namedWindow("dilate Image");
	   cv::imshow("dilate Image",gray);


	// Get the contours of the connected components
	std::vector<std::vector<cv::Point>> contours;

	cv::findContours(gray,
		contours, // a vector of contours
		CV_RETR_EXTERNAL , // retrieve the external contours
		CV_CHAIN_APPROX_NONE); // retrieve all pixels of each contours

	// Print contours' length
	std::cout << "Contours: " << contours.size() << std::endl;
	std::vector<std::vector<cv::Point>>::const_iterator itContours= contours.begin();
	for ( ; itContours!=contours.end(); ++itContours)
	{

		std::cout << "Size: " << itContours->size() << std::endl;
	}

	// draw black contours on white image
	cv::Mat result(image.size(),CV_8U,cv::Scalar(255));
	cv::drawContours(result,contours,
		-1, // draw all contours
		cv::Scalar(0), // in black
		2); // with a thickness of 2

	cv::namedWindow("Contours");
	cv::imshow("Contours",result);


	// Eliminate too short or too long contours

	/*
	int cmin= 100;  // minimum contour length
	int cmax= 1000; // maximum contour length
	std::vector<std::vector<cv::Point>>::const_iterator itc= contours.begin();
	while (itc!=contours.end()) {

		if (itc->size() < cmin || itc->size() > cmax)
			itc= contours.erase(itc);
		else
			++itc;
	}

	*/

	// draw contours on the original image
	cv::Mat original= cv::imread(image_name);
	cv::drawContours(original,contours,
		-1, // draw all contours
		cv::Scalar(255,255,0), // in white
		2); // with a thickness of 2

	cv::namedWindow("Contours on Animals");
	cv::imshow("Contours on Animals",original);


	// Let's now draw black contours on white image
	result.setTo(cv::Scalar(255));
	cv::drawContours(result,contours,
		-1, // draw all contours
		cv::Scalar(0), // in black
		1); // with a thickness of 1
	image= cv::imread("binary.bmp",0);

	// testing the bounding box


	std::vector<std::vector<cv::Point>>::const_iterator itc_rec= contours.begin();
	while (itc_rec!=contours.end())
	{
		cv::Rect r0= cv::boundingRect(cv::Mat(*(itc_rec)));
		cv::rectangle(result,r0,cv::Scalar(0),2);
			++itc_rec;
	}

	/*
	// testing the enclosing circle
	float radius;
	cv::Point2f center;
	cv::minEnclosingCircle(cv::Mat(contours[1]),center,radius);
	cv::circle(result,cv::Point(center),static_cast<int>(radius),cv::Scalar(0),2);

	//	cv::RotatedRect rrect= cv::fitEllipse(cv::Mat(contours[1]));
	//	cv::ellipse(result,rrect,cv::Scalar(0),2);

	// testing the approximate polygon
	std::vector<cv::Point> poly;
	cv::approxPolyDP(cv::Mat(contours[2]),poly,5,true);

	std::cout << "Polygon size: " << poly.size() << std::endl;

	// Iterate over each segment and draw it
	std::vector<cv::Point>::const_iterator itp= poly.begin();
	while (itp!=(poly.end()-1)) {
		cv::line(result,*itp,*(itp+1),cv::Scalar(0),2);
		++itp;
	}
	// last point linked to first point
	cv::line(result,*(poly.begin()),*(poly.end()-1),cv::Scalar(20),2);

	// testing the convex hull
	std::vector<cv::Point> hull;
	cv::convexHull(cv::Mat(contours[3]),hull);

	// Iterate over each segment and draw it
	std::vector<cv::Point>::const_iterator it= hull.begin();
	while (it!=(hull.end()-1)) {
		cv::line(result,*it,*(it+1),cv::Scalar(0),2);
		++it;
	}
	// last point linked to first point
	cv::line(result,*(hull.begin()),*(hull.end()-1),cv::Scalar(20),2);

	// testing the moments

	// iterate over all contours
	itc= contours.begin();
	while (itc!=contours.end()) {

		// compute all moments
		cv::Moments mom= cv::moments(cv::Mat(*itc++));

		// draw mass center
		cv::circle(result,
			// position of mass center converted to integer
			cv::Point(mom.m10/mom.m00,mom.m01/mom.m00),
			2,cv::Scalar(0),2); // draw black dot
	}

	*/

	cv::namedWindow("Some Shape descriptors");
	cv::imshow("Some Shape descriptors",result);


	cv::waitKey();
	return 0;


}
实现效果:


 389
389

 被折叠的 条评论
为什么被折叠?
被折叠的 条评论
为什么被折叠?
 到【灌水乐园】发言


