


OpenCV框架与图像插值算法
首先感谢Datawhale组织这次学习,提供一个好的交流平台以及好的学习参考资料,在此表示感谢!
所有资料可以参考(包含平台配置方法及学习资料):
https://github.com/datawhalechina/team-learning/blob/master/%E8%AE%A1%E7%AE%97%E6%9C%BA%E8%A7%86%E8%A7%89%E5%9F%BA%E7%A1%80%EF%BC%9A%E5%9B%BE%E5%83%8F%E5%A4%84%E7%90%86%EF%BC%88%E4%B8%8A%EF%BC%89/readme.md
一、简介
在图像处理中,平移变换、旋转变换以及放缩变换是一些基础且常用的操作。这些几何变换并不改变图像的像素值,只是在图像平面上进行像素的重新排列。在一幅输入图像 [ u , v ] [u,v] [u,v]中,灰度值仅在整数位置上有定义。然而,输出图像[x,y]的灰度值一般由处在非整数坐标上的 ( u , v ) (u,v) (u,v)值来决定。这就需要插值算法来进行处理,常见的插值算法有最近邻插值、双线性插值和三次样条插值。
二 内容介绍
1)、插值算法原理介绍
最近邻插值算法
双线性插值算法
2)OpenCV代码实践
cv.resize()各项参数及含义
3) 动手实现(由读者自己完成)
三 算法理论介绍与推荐
3.1 最近邻插值算法原理
最近邻插值,是指将目标图像中的点,对应到源图像中后,找到最相邻的整数点,作为插值后的输出。

如上图所示,目标图像中的某点投影到原图像中的位置为点P,此时易知,
f
(
P
)
=
f
(
Q
11
)
f(P) = f(Q11)
f(P)=f(Q11).
一个例子:
如下图所示,将一幅3X3的图像放大到4X4,用 f ( x , y ) f(x, y) f(x,y)表示目标图像, h ( x , y ) h(x, y) h(x,y)表示原图像,我们有如下公式:
f ( d s t X , d s t Y ) = h ( d s t X s r c W i d t h d s t W i d t h , d s t Y s r c H e i g h t d s t H e i g h t ) \begin{array}{c} f(dst_{X}, dst_{Y}) = h(\frac{dst_{X}src_{Width}} {dst_{Width}}, \frac{dst_{Y}src_{Height}} {dst_{Height}}) \end{array} f(dstX,dstY)=h(dstWidthdstXsrcWidth,dstHeightdstYsrcHeight)
f ( 0 , 0 ) = h ( 0 , 0 ) f ( 0 , 1 ) = h ( 0 , 0.75 ) = h ( 0 , 1 ) f ( 0 , 2 ) = h ( 0 , 1.50 ) = h ( 0 , 2 ) f ( 0 , 3 ) = h ( 0 , 2.25 ) = h ( 0 , 2 ) . . . \begin{array}{c} f(0,0)=h(0,0) \ f(0,1)=h(0,0.75)=h(0,1) \ f(0,2)=h(0,1.50)=h(0,2) \ f(0,3)=h(0,2.25)=h(0,2) \ ...\ \end{array} f(0,0)=h(0,0) f(0,1)=h(0,0.75)=h(0,1) f(0,2)=h(0,1.50)=h(0,2) f(0,3)=h(0,2.25)=h(0,2) ...
s r c W i d t h src_{Width} srcWidth 表示原图像的宽度

缺点: 用该方法作放大处理时,在图象中可能出现明显的块状效应

3.2 双线性插值
在讲双线性插值之前先看以一下线性插值,线性插值多项式为:
f ( x ) = a 1 x + a 0 f(x)=a_{1} x+a_{0} f(x)=a1x+a0

y
=
y
0
+
(
x
−
x
0
)
y
1
−
y
0
x
1
−
x
0
=
y
0
+
(
x
−
x
0
)
y
1
−
(
x
−
x
0
)
y
0
x
1
−
x
0
y=y_{0}+\left(x-x_{0}\right) \frac{y_{1}-y_{0}}{x_{1}-x_{0}}=y_{0}+\frac{\left(x-x_{0}\right) y_{1}-\left(x-x_{0}\right) y_{0}}{x_{1}-x_{0}}
y=y0+(x−x0)x1−x0y1−y0=y0+x1−x0(x−x0)y1−(x−x0)y0
双线性插值就是线性插值在二维时的推广,在两个方向上做三次线性插值,具体操作如下图所示:

令
f
(
x
,
y
)
f(x,y)
f(x,y)为两个变量的函数,其在单位正方形顶点的值已知。假设我们希望通过插值得到正方形内任意点的函数值。则可由双线性方程:
f
(
x
,
y
)
=
a
x
+
b
y
+
c
x
y
+
d
f(x, y)=a x+b y+c x y+d
f(x,y)=ax+by+cxy+d
来定义的一个双曲抛物面与四个已知点拟合。
首先对上端的两个顶点进行线性插值得:
f ( x , 0 ) = f ( 0 , 0 ) + x [ f ( 1 , 0 ) − f ( 0 , 0 ) ] f(x, 0)=f(0,0)+x[f(1,0)-f(0,0)] f(x,0)=f(0,0)+x[f(1,0)−f(0,0)]
类似地,再对底端的两个顶点进行线性插值有: f ( x , 1 ) = f ( 0 , 1 ) + x [ f ( 1 , 1 ) − f ( 0 , 1 ) ] f(x, 1)=f(0,1)+x[f(1,1)-f(0,1)] f(x,1)=f(0,1)+x[f(1,1)−f(0,1)]
最后,做垂直方向的线性插值,以确定:
f ( x , y ) = f ( x , 0 ) + y [ f ( x , 1 ) − f ( x , 0 ) ] f(x, y)=f(x, 0)+y[f(x, 1)-f(x, 0)] f(x,y)=f(x,0)+y[f(x,1)−f(x,0)]
整理得:
f ( x , y ) = [ f ( 1 , 0 ) − f ( 0 , 0 ) ] x + [ f ( 0 , 1 ) − f ( 0 , 0 ) ] y + [ f ( 1 , 1 ) + f ( 0 , 0 ) − f ( 0 , 1 ) − f ( 1 , 0 ) ] x y + f ( 0 , 0 ) \begin{array}{l} f(x, y)=[f(1,0)-f(0,0)] x+[f(0,1)-f(0,0)] y \ +[f(1,1)+f(0,0)-f(0,1)-f(1,0)] x y+f(0,0) \end{array} f(x,y)=[f(1,0)−f(0,0)]x+[f(0,1)−f(0,0)]y +[f(1,1)+f(0,0)−f(0,1)−f(1,0)]xy+f(0,0)
四、 基于OpenCV的实现
4.1 C++
函数原型:
void cv::resize(InputArray src, OutputArray dst, Size dsize, double fx=0, double fy=0, int interpolation=INTER_LINEAR )
src:输入图像
dst:输出图像
dsize:输出图像尺寸
fx、fy:x,y方向上的缩放因子
INTER_LINEAR:插值方法,总共五种
    1. INTER_NEAREST - 最近邻插值法
    2. INTER_LINEAR - 双线性插值法(默认)
    3. INTER_AREA - 基于局部像素的重采样(resampling using pixel area relation)。对于图像抽取(image decimation)来说,这可能是一个更好的方法。但如果是放大图像时,它和最近邻法的效果类似。
    4. INTER_CUBIC - 基于4x4像素邻域的3次插值法
    5. INTER_LANCZOS4 - 基于8x8像素邻域的Lanczos插值
代码实践:
#include <opencv2/opencv.hpp>
#include <iostream>

using namespace cv;
using namespace std;

int main(int argc, char* argv[])
{
	Mat img = imread("D:/image/yuner.jpg");
	if (img.empty())
	{
		cout << "无法读取图像" << endl;
		return 0;
	}

	int height = img.rows;
	int width = img.cols;
	// 缩小图像,比例为(0.2, 0.2)
	Size dsize = Size(round(0.2 * width), round(0.2 * height));
	Mat shrink;
    //使用双线性插值
	resize(img, shrink, dsize, 0, 0, INTER_LINEAR);

	// 在缩小图像的基础上,放大图像,比例为(1.5, 1.5)
	float fx = 1.5;
	float fy = 1.5;
	Mat enlarge1, enlarge2;
	resize(shrink, enlarge1, Size(), fx, fy, INTER_NEAREST);
	resize(shrink, enlarge2, Size(), fx, fy, INTER_LINEAR);

	// 显示
	imshow("src", img);
	imshow("shrink", shrink);
	imshow("INTER_NEAREST", enlarge1);
	imshow("INTER_LINEAR", enlarge2);
	waitKey(0);
    return 0;
}
4.2 Python
函数原型:
cv2.resize(src, dsize[, dst[, fx[, fy[, interpolation]]]])
参数:
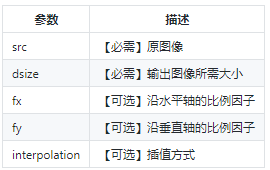
插值方式:
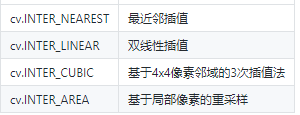
**注:**通常,缩小使用cv.INTER_AREA,放缩使用cv.INTER_CUBIC(较慢)和cv.INTER_LINEAR(较快效果也不错)。默认情况下,所有的放缩都使用cv.INTER_LINEAR。
代码实践:
import cv2

if __name__ == "__main__":
    img = cv2.imread('D:/CV/image/yuner.jpg', cv2.IMREAD_UNCHANGED)   #将图片读入,返回一个np.ndarry数组

    print('Original Dimensions : ', img.shape)

    scale_percent = 30  # percent of original size
    width = int(img.shape[1] * scale_percent / 100)       #宽度缩小到0.3倍
    height = int(img.shape[0] * scale_percent / 100)       #高度缩小到0.3倍
    dim = (width, height)                                  #将宽度和高度组成元组
    #print(type(dim))
    # resize image
    resized = cv2.resize(img, dim, interpolation=cv2.INTER_LINEAR)  #用双线性差值缩小
    #print(type(resized))
    fx = 1.5   #水平方向比例因子
    fy = 1.5   #垂直方向比例因子

    #resized1 = cv2.resize(resized, dsize=None, fx=fx, fy=fy, interpolation=cv2.INTER_NEAREST)  #最近邻插值
    #resized2 = cv2.resize(resized, dsize=None, fx=fx, fy=fy, interpolation=cv2.INTER_LINEAR)    #双线性邻插值
    resized3 = cv2.resize(img, dsize=None, fx=fx, fy=fy, interpolation=cv2.INTER_NEAREST)
    resized4 = cv2.resize(img, dsize=None, fx=fx, fy=fy, interpolation=cv2.INTER_NEAREST)
    print('Resized Dimensions : ', resized.shape)
    # print('Resized Dimensions : ', resized1.shape)
    # print('Resized Dimensions : ', resized2.shape)
    print('Resized Dimensions : ', resized3.shape)
    print('Resized Dimensions : ', resized4.shape)

    cv2.imshow("Resized image", resized)
    # cv2.imshow("INTER_NEAREST image", resized1)
    # cv2.imshow("INTER_LINEAR image", resized2)
    cv2.imshow("INTER_NEAREST image", resized3)
    cv2.imshow("INTER_LINEAR image", resized4)
    cv2.waitKey(0)
    cv2.destroyAllWindows()


 203
203


 被折叠的 条评论
为什么被折叠?
被折叠的 条评论
为什么被折叠?
 到【灌水乐园】发言


