


绑定事件
- asserts下创建脚本
- 为节点添加脚本组件
cc.Class({
    extends: cc.Component,
    properties: {
    },

    onLoad () {
    	//点击事件
        this.node.on(cc.Node.EventType.TOUCH_START,function () {
            cc.log('touch me')
        },this)
        //键盘事件
        cc.systemEvent.on(cc.SystemEvent.EventType.KEY_DOWN,function (e){
            cc.log('key down ',e.keyCode)
            switch (e.keyCode){
                case cc.macro.KEY.space:
                    cc.log('space down');break;
            }
        },this)
        //监听自定义事件
        this.node.on('fire',function (msg) {
            cc.log('fire',msg)
        },this)
    },
    update (dt) {//每一帧都触发
        //emit方式
       //this.node.emit('fire','emit')

        //dispatchEvent 方式
        //自定义事件,事件名fire,允许冒泡
        let dispatchEvent = new cc.Event.EventCustom("fire",true);
        //定义参数
        dispatchEvent.detail = "fire away"
        this.node.dispatchEvent(dispatchEvent)
    },
});
为编辑器添加提示
我绑定的为idea,需要在打开脚本文件时,打开对应工程目录
图片
添加图片资源,可以直接拖拽到assets目录中(png,jpg)
图集需要将png及plist一起拖入目录(使用TexturePackerGUI制作图集)
音频
可以直接将mp3文件拖入asserts目录进行管理
通过在cocos编辑器内拖拽到场景Canvas中进行引入AudioSource;在AudioSource中可以按需勾选loop循环播放、play on load加载后播放、mute静音播放。在浏览器打开时需要点击一下项目范围区域。
点击assets中的音频资源,在右侧属性检查其中可以查看、修改加载模式。建议使用webaudio。
预制体
创建:直接将节点拖拽到assets中,对应目录下生成.prefab文件。
使用:再将 assets 中生成的预制体 拖拽到 canvas 下,或需要使用的节点下
字体
将ttf字体资源拖拽到 assets 目录下进行管理动态字体
将 assets 目录中的字体 拖拽到 label 的 font 属性中使用
位图字体:
将 png 文件和 fnt 文件同时拖到 assets 目录下
使用:再将 assets 中BF缩略图资源 拖拽到 label 的 font 属性中使用
粒子
使用方法如上面的其他资源,将plist粒子文件拖拽到assets管理,拖拽到canvas使用;
也可以通过层级管理器右键新建 渲染节点 粒子
地图
导入:将存放tmx文件的文件夹及存放小图png的文件夹同时拖拽到assets中。
使用:将tms文件对应的资源托到场景或者层级管理器中
骨骼
导入:将.json/.skel 骨骼数据、.png 图集纹理、.txt/.atlas 图集数据的文件同时拖拽到assets中。
使用:将son文件对应的资源拖到场景或者层级管理器中
脚本
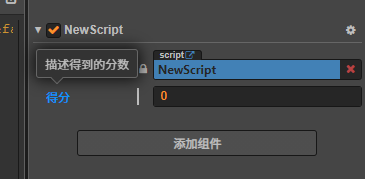
定义属性
cc.Class({
    extends: cc.Component,
    properties: {
        score:{
            default:0,				//默认值
            type:cc.String,			//类型
            displayName:'得分',		//属性区域展示的名称
            tooltip:'描述得到的分数'	//鼠标停留时的提示内容
        }
    },
})
下面是常用参数:
- default: 设置属性的默认值,这个默认值仅在组件第一次添加到节点上时才会用到
- type: 限定属性的数据类型
- visible: 设为 false 则不在 属性检查器 面板中显示该属性
- serializable: 设为 false 则不序列化(保存)该属性
- displayName: 在 属性检查器 面板中显示成指定名字
- tooltip: 在 属性检查器 面板中添加属性的 Tooltip
生命周期函数
目前提供给用户的生命周期回调函数主要有:
- onLoad
- onEnable:第一次加载onLoad 后,start前;或者每次激活时
- start:
- update:每次刷新帧时
- lateUpdate:在update后执行
- onDisable:节点取消激活时
- onDestroy
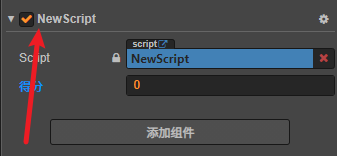
此处取消勾选后,将不会触发 onEnable 函数。
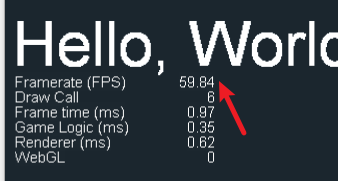
模拟器运行的FPS显示的是当前的帧数,即每秒钟页面刷新的次数。
update 接受一个 dt 参数,表示距离上一帧的时间。60帧时,dt约等于0.0167。
获取节点
let node = this.node; 				//获取当前节点
 let label = this.getComponent(cc.Label)		//获取当前节点中的label控件
let children = this.node.children				//获取所有的子节点
for(var i = 0; i < children.length;i++){
	cc.log('name=',children[i].name)
}
this.node.getChildByName("Cannon");			//通过名称获取子节点
cc.find("Cannon/Sub", this.node);			//通过层次结构获取子节点,当前节点为Cannon的父节点,指明起始节点为当前节点;不指名起始节点则从根节点开始查找
引入其他组件
// Cannon.js

let Player = require("Player");//引入Player.js

cc.Class({
    extends: cc.Component,
    properties: {
        // 声明 player 属性,这次直接是组件类型,可以通过界面拖拽player.js被绑定的节点到player属性值里
        player: {
            default: null,
            type: Player
        }
    },

    start: function () {
        let playerComp = this.player;
        player.fire();//可以直接调用player.js 的方法
    },

    // ...
});
激活状态修改
this.node.active = false
更改父节点
let node = cc.find('Canvas');
this.node.parent = node
更改节点的变换
//修改节点坐标(坐标相对于父节点)
this.node.x = 100;
this.node.y = 100;
//修改节点旋转(逆时针)
this.node.rotation = 90
//修改节点缩放
this.node.scaleX = 2;
//修改节点尺寸
this.node.width = 100;
//修改节点锚点
this.node.anchorx = 1;
关于锚点,理解为,节点的坐标 都是 节点的锚点 相对于父节点进行移动;
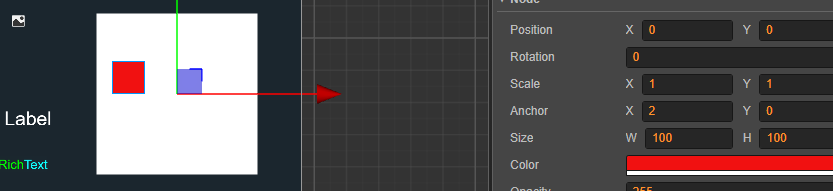
当锚点x为2,意思为原本红色小方块应该在紫色的位置,但是设置了锚点x为2,所有红色方块向左移动了2倍的自身宽度的距离,即100*2。
//修改节点颜色
this.node.color = cc.Color.RED;
//修改节点透明度
this.node.opacity = 100;
创建节点
所有通过 cc.loader.loadRes动态加载的资源,必须放置在resource文件夹或者他的子文件夹下,如果资源不是直接通过 cc.loader.loadRes加载,仅仅是被resources中的其他资源依赖,不需要放在resources文件夹中。
在assets文件中创建一个名为 resources 的文件夹。
加载路径相对于 resources 而言,如果文件直接放在 resources 下面,可以
let self = this
cc.loader.loadRes('sheep',cc.SpriteFrame,function(err,spriteFrame){
	let node = new cc.Node("sprite");
    let sp = node.addComponent(cc.Sprite);
    sp.spriteFrame = spriteFrame;
    node.parent = self.node;
    node.setContentSize(100,100);
});
克隆节点
var node = cc.instantiate(this.target);
    node.parent = this.node;
    node.setPosition(0, 0);
this.node 是一个已经存在的节点对象
加载资源
需要将Player预制体放到resources文件夹中,后缀可以省略,路径相对 resources 目录。
let self = this;
// 加载 Prefab
cc.loader.loadRes("Player", function (err, prefab) {
    let newNode = cc.instantiate(prefab);
    self.node.addChild(newNode);
    cc.loader.releaseRes("Player");
});
基本动作
// 创建一个移动动作
let action = cc.moveTo(2, 100, 100);//移动到100,100坐标处
let action2 = cc.moveBy(2, 100, 100);//相对移动,向右向上移动100
// 执行动作
this.node.runAction(action);
// 停止一个动作
this.node.stopAction(action);
// 停止所有动作
this.node.stopAllActions();
容器动作
 // 让节点左右来回移动, sequence 顺序执行
 let seq = cc.sequence(cc.moveBy(0.5, 200, 0), cc.moveBy(0.5, -200, 0));
 this.node.runAction(seq);

  // 让节点在向上移动的同时缩放,spawn 同步执行
 let spawn = cc.spawn(cc.moveBy(0.5, 0, 50), cc.scaleTo(0.5, 0.8, 1.4));
 node.runAction(spawn);

 // 让节点左右来回移动,并重复5次,repeat 重复执行
 let seq = cc.repeat(
             cc.sequence(
                 cc.moveBy(2, 200, 0),
                 cc.moveBy(2, -200, 0)
             ), 5);
 node.runAction(seq);

 // 让节点左右来回移动并一直重复,repeatForever 不停重复执行
 let seq = cc.repeatForever(
             cc.sequence(
                 cc.moveBy(2, 200, 0),
                 cc.moveBy(2, -200, 0)
             ));
动作回调
//动作回调可以用以下的方式声明:
let finished = cc.callFunc(function(target, score) {
    cc.log("动作回调");
}, this, 100);

let myAction = cc.sequence(cc.moveBy(1, cc.v2(0, 100)), cc.fadeOut(1), finished);
this.node.runAction(myAction );
UI系统
精灵组件
Sprite(精灵)是 2D 游戏中最常见的显示图像的方式,在节点上添加 Sprite 组件,就可以在场景中显示项目资源中的图片。
游戏案例
assets下面建立三个文件夹scenes,scripts,res分别存储场景,脚本,图片。
调整尺寸为640*960 :项目 → 项目设置 → 项目预览 设计分辨率,还有canvas的尺寸
- 创建精灵节点命名为
bg_sprite,将背景图片拖拽到Sprite Frame。 bg_sprite下创建button节点命名为capture_btn,删除节点下的label节点(不需要文字),将按钮图片资源拖拽到capture_btn中的Sprite Frame,然后调整大小。
奔跑的牛
- 创建 sprite精灵节点命名为
cow,默认图片随便托一个图片 - 新建一个cow.js脚本,关联到cow节点。
//牛皮肤类
const cow_skin = new cc.Class({
    name:'cow_skin',
    properties:{
        cows:{
            default:[],
            type:[cc.SpriteFrame]
        }
    }
})

cc.Class({
    extends: cc.Component,
    properties: {
        cow_set:{
            default: [],
            type:[cow_skin]
        }
    },
});
- 保存后,回到编辑器,设置cow_set属性长度为3,依次拖入三种牛的奔跑图片。
- 完善代码实现固定皮肤牛的原地换图
onLoad () {
        this.intervalTime = 0
        this.type = 0
    },

    start () {

    },

    update (dt) {
    //    间隔时间
        this.intervalTime += dt
        // 每隔0.2秒更换皮肤
        let index  = Math.floor(this.intervalTime / 0.2);
        // 获取精灵组件
        let sprite = this.node.getComponent(cc.Sprite);
        // let spriteFrame = sprite.spriteFrame;
        // 获取牛的类型
        let cowSet = this.cow_sets[this.type];
        // 如果最后一个 重置index
        if (index > cowSet.cows.length -1) {
            index = 0;
            // 重置计时参数
            this.intervalTime = 0;
        }
        // 设置皮肤
        sprite.spriteFrame = cowSet.cows[index]
    },
- assets下新建 animition Clip命名为
runcow,cow节点添加animition组件,拖拽runcow到default clip中,编辑runcow,设置添加 x property,设置屏幕右侧的牛为起始帧,移动到屏幕左侧为结束帧,4秒左右时间,设置为循环,完成牛的跑动。
预制体
将 cow节点拖拽到assets中,形成预制体,方便后续使用直接拖拽,也可以此时删除cow节点,直接使用预制体。
套绳
修改按钮normal 和 pressed的图片为默认和按下去对应的图片。
-
在
bg_sprite下新建使用套绳图片的精灵渲染节点rope -
scripts文件夹中新建game.js绑定到convas中,设置默认active为隐藏

-
game中创建一个函数
clickCapture处理点击事件;在按钮中点击事件中增加一个成员,依次选择 Canvas节点,game,clickCapture。 -
game脚本中增加一个
rope_node属性(cc.Node类型),绑定按钮节点。 -
完善点击事件处理函数
clickCapture实现套绳动画
//    按钮点击事件
    clickCapture(event,eventDate){
        cc.log('come in',eventDate)
        //设置绳子在父节点中的顺序
        this.rope_node.setSiblingIndex(100);
        this.rope_node.active = true
        //绳子的起始位置
        this.rope_node.y = -480
        //设置移动
        let action = cc.moveTo(0.2,this.rope_node.x,-200)
        this.rope_node.runAction(action)

    },
- 增加
cow_ins属性(cc.Node类型),绑定cow节点,用于获取牛的位置,判断是否套中,最好修改cow图片的锚点为牛头的位置,方便判断。
//设置移动
        let action = cc.moveTo(0.2,this.rope_node.x,-200)
        //判断结果
        let result = cc.callFunc( ()=>{
            //当前牛的位置
            let current = this.cow_ins.x
            if(current > -100 && current <100){
            //    捕捉成功
                cc.log('success')
            }
        })
        let sequence = cc.sequence(action,result)
        this.rope_node.runAction(sequence)
- 增加
rope_imgs属性(cc.Sprite类型),用于绑定套绳的图片,在拉回套绳时更换图片。
//    捕捉成功,更换绳子
let ropType = this.cow_ins.getComponent('cow').type + 1//存在默认绳子,所以+1
this.rope_node.getComponent(cc.Sprite).spriteFrame = this.rope_imgs[ropType]
- 增加
cow_prefab属性(cc.Prefab类型),用于绑定cow预制体,每次套中后,删除cow,同时使用预制体添加一个cow
//判断结果
        let result = cc.callFunc( ()=>{
            //当前牛的位置
            let current = this.cow_ins.x
            if(current > -100 && current <100){
                //移除牛
                let bgNode = this.node.getChildByName('bg_sprite')
                bgNode.removeChild(this.cow_ins)
                //    捕捉成功,更换绳子
                let ropType = this.cow_ins.getComponent('cow').type + 1//存在默认绳子,所以+1
                this.rope_node.getComponent(cc.Sprite).spriteFrame = this.rope_imgs[ropType]

                this.cow_ins = cc.instantiate(this.cow_prefab);
                bgNode.addChild(this.cow_ins)
            }else{

            }
        },this)
- 在bg_sprite节点下增加 渲染label节点,重名命为score,并为label添加字体。在套到牛之后,给全局成员变量score赋值,同时更改得分
et finish = cc.callFunc(()=>{
            //设置绳子的图片
            this.rope_node.getComponent(cc.Sprite).spriteFrame = this.rope_imgs[0]
            if(this.isSuccess){
                this.score+=1
                this.isSuccess = false
                let scoreLabel = cc.find('Canvas/bg_sprite/score').getComponent(cc.Label)
                scoreLabel.string = 'score:' + this.score
            }

},this)

let sequence = cc.sequence(action,result,pull,finish)
- 在bg_sprite节点下增加 渲染label节点,重名命为count_down,并为label添加字体。增加time成员,作为倒计时时间
    start () {
        let countDownLable = cc.find('Canvas/bg_sprite/count_down').getComponent(cc.Label)
        countDownLable.string = this.time + 's'
        this.schedule(function () {
            this.time--
            countDownLable.string = this.time + 's'
        },1)
    },
-
在Canvas节点下增加渲染精灵节点,重名命为 result,选好背景图后,设置Type为Slice,然后编辑sprite frame可缩放区域,然后修改尺寸

-
在result节点下增加两个label节点(显示标题title和得分content)和一个关闭按钮精灵节点。并隐藏result节点。在时间为0时进行渲染内容。
-
close节点增加button组件,绑定game.js中新增的关闭弹窗事件处理函数
closeBtn,重新启动游戏

涉及的game.js
cc.Class({
    extends: cc.Component,

    properties: {
        rope_node:{
            default:null,
            type:cc.Node
        },
        cow_ins:{
            default:null,
            type:cc.Node
        },
        rope_imgs:{
            default:[],
            type:[cc.SpriteFrame]
        },
        cow_prefab:{
            default:null,
            type:cc.Prefab
        },
        time:60
    },
    // LIFE-CYCLE CALLBACKS:
    onLoad () {
        this.isSuccess = false
        this.score = 0
    },
    start () {
        let countDownLable = cc.find('Canvas/bg_sprite/count_down').getComponent(cc.Label)
        countDownLable.string = this.time + 's'
        this.schedule(function () {
            this.time--
            countDownLable.string = this.time + 's'
            if(this.time == 0){
                //弹窗节点
                let resultNode = cc.find("Canvas/result")
                //标题和内容节点
                let titleNode = resultNode.getChildByName("title")
                let contentNode = resultNode.getChildByName("content")
                titleNode.getComponent(cc.Label).string = "最终得分" + this.score
                let contentLable = contentNode.getComponent(cc.Label)
                switch (true) {
                    case this.score <= 3:
                        contentLable.string = "套牛青铜"
                        break
                    case this.score < 6:
                        contentLable.string = "套牛高手"
                        break
                    case this.score >= 6:
                        contentLable.string = "套牛王者"
                        break
                }
                resultNode.active=true
                //暂停游戏
                cc.director.pause()
            }
        },1)
    },
    //关闭按钮
    closeBtn(){
        cc.director.resume()
        cc.director.loadScene('game')
    },
//    按钮点击事件
    clickCapture(event,eventDate){
        //设置绳子在父节点中的顺序
        this.rope_node.setSiblingIndex(100);
        this.rope_node.active = true

        //绳子的起始位置
        this.rope_node.y = -480
        //设置移动
        let action = cc.moveTo(0.2,this.rope_node.x,-200)
        //判断结果
        let result = cc.callFunc( ()=>{
            //当前牛的位置
            let current = this.cow_ins.x
            if(current > -100 && current <100){
                //移除牛
                let bgNode = this.node.getChildByName('bg_sprite')
                bgNode.removeChild(this.cow_ins)
                //    捕捉成功,更换绳子
                let ropType = this.cow_ins.getComponent('cow').type + 1//存在默认绳子,所以+1
                this.rope_node.getComponent(cc.Sprite).spriteFrame = this.rope_imgs[ropType]

                this.cow_ins = cc.instantiate(this.cow_prefab);
                bgNode.addChild(this.cow_ins)
                this.isSuccess = true
            }else{

            }
        },this)
        //往回拉
        let pull = cc.moveTo(0.2,this.rope_node.x,-800)
        let finish = cc.callFunc(()=>{
            //设置绳子的图片
            this.rope_node.getComponent(cc.Sprite).spriteFrame = this.rope_imgs[0]
            if(this.isSuccess){
                this.score+=1
                this.isSuccess = false
                let scoreLabel = cc.find('Canvas/bg_sprite/score').getComponent(cc.Label)
                scoreLabel.string = 'score:' + this.score
            }

        },this)
        let sequence = cc.sequence(action,result,pull,finish)
        this.rope_node.runAction(sequence)
    },
});
cow.js
//牛皮肤类
const cow_skin = new cc.Class({
    name:'cow_skin',
    properties:{
        cows:{
            default:[],
            type:[cc.SpriteFrame]
        }
    }
})

cc.Class({
    extends: cc.Component,

    properties: {
        cow_sets:{
            default: [],
            type:[cow_skin]
        }
    },

    onLoad () {
        this.intervalTime = 0
        this.type = Math.floor(Math.random()*3)
    },

    start () {

    },
    update (dt) {
    //    间隔时间
        this.intervalTime += dt
        // 每隔0.2秒更换皮肤
        let index  = Math.floor(this.intervalTime / 0.2);
        // 获取精灵组件
        let sprite = this.node.getComponent(cc.Sprite);
        // let spriteFrame = sprite.spriteFrame;
        // 获取牛的类型
        let cowSet = this.cow_sets[this.type];
        // 如果最后一个 重置index
        if (index > cowSet.cows.length -1) {
            index = 0;
            // 重置计时参数
            this.intervalTime = 0;
        }
        // 设置皮肤
        sprite.spriteFrame = cowSet.cows[index]
    },
});
发布到微信小游戏
在cocos编辑器中,选择 偏好设置 → 原生开发环境 中配置 微信开发者工具的路径。
然后选择 项目 → 构建发布,选择 微信小游戏,填写 AppID,然后构建,运行。
微信开发者平台设置(小程序的AppID不用用于小游戏,所以得重新申请一个)

获取用户信息
设置完全透明的方式
let sysInfo = wx.getSystemInfoSync();
//获取微信界面大小
let width = sysInfo.screenWidth;
let height = sysInfo.screenHeight;

let button = window.wx.createUserInfoButton({
    type: 'text',
    text: '',
    style: {
        left: 0,
        top: 0,
        width: width,
        height: height,
        backgroundColor: '#00000000',//最后两位为透明度
        color: '#ffffff',
        fontSize: 20,
        textAlign: "center",
        lineHeight: height,
    }
});
在主界面显示用户头像和昵称(如何加载网络头像)
// 获取微信用户信息
let userInfo = res.userInfo;
// 获取头像组件
let icon = cc.find("Canvas/bg_sprite/icon").getComponent(cc.Sprite);
cc.loader.load({url:userInfo.avatarUrl,type:"png"},function (err,text) {
    icon.spriteFrame = new cc.SpriteFrame(text);
})
分享功能
wx.shareAppMessage({
    title: "用户点击按钮转发!",
    imageUrl: "http://img.zhubohome.com.cn/game_share.png",
    success(res) {
        console.log(res)
    },
    fail(res) {
        console.log(res)
    }
});
广告位
let bannerAd = wx.createBannerAd({
    adUnitId: 'XXX',
    style: {
        left: 27.5,
        top: 80,
        width: 320
    }
});
bannerAd.onError(err => {
    console.log(err)
});

bannerAd.show();
前后台交互及发布暂时没做


 443
443


 被折叠的 条评论
为什么被折叠?
被折叠的 条评论
为什么被折叠?
 到【灌水乐园】发言


