


前言
模型部署的过程中,不同的硬件可能支持不同的模型框架,通过onnx可以实现模型在多种框架之间进行转换,简化从研究到产品化的过程。本文以pytorch模型为例介绍训练模型转换为.onnx格式的实现过程,以及对转换后的onnx模型进行加载和使用onnxruntime进行模型推理。
(一)什么是onnx
ONNX(Open Neural Network Exchange)是一个开放的生态系统,它允许人工智能开发者在不同的框架和工具之间轻松地移动模型。这意味着,一个用PyTorch或TensorFlow训练的模型可以被转换成ONNX模型,然后在不同的框架中部署和运行,如TensorRT或TVM。ONNX充当了一个中间层,使得模型转换和部署变得更加灵活和方便。
ONNX模型的优势
-
框架无关性:ONNX提供了一种在不同深度学习框架之间迁移模型的标准方式。
-
支持多种工具和库:许多工具和库都支持ONNX,这使得模型的部署和优化变得更加容易。
-
可视化和调试:工具如Netron可以用来可视化ONNX模型,这有助于理解模型结构和调试。
(二)Pytorch分类模型转onnx
实验环境:Pytorch2.0 + Ubuntu20.04
2.1 Pytorch模型之保存和加载
2.1.1 保存和加载整个模型
# Save:
torch.save(model_object, 'best.pt')
# Load:
model = torch.load('best.pt')
model.eval()
2.1.2 仅保存和加载模型参数(推荐使用)
# Save:
torch.save(model.state_dict(), 'best.pth')
# Load:
model = Model(*args, **kwargs)
model.load_state_dict(torch.load('best.pth'))
model.eval()注意:
1)必须调用model.eval(),以便在运行推断之前将dropout和batch规范化层设置为评估模式。如果不这样做,将会产生不一致的推断结果。
2)在保存用于推理或恢复训练的通用检查点时,必须保存模型的state_dict。
2.2 Pytorch分类模型转onnx
我的模型是调用resnet50训练的20分类模型,训练过程调用gpu,转换过程如下:
2.2.1 如果保存的是整个模型
import torch

device = torch.device("cuda" if torch.cuda.is_available() else "cpu")

model = torch.load("best.pt") # pytorch模型加载
model.eval()  # set the model to inference mode

batch_size = 1  # 批处理大小
input_shape = (3, 224, 224)   # 输入数据,改成自己的输入shape

x = torch.randn(batch_size, *input_shape)   # 生成张量
x = x.to(device)
export_onnx_file = "best.onnx"  # 目标ONNX文件名
torch.onnx.export(model,
                    x,
                    export_onnx_file,
                    opset_version=10,
                    do_constant_folding=True, # 是否执行常量折叠优化
                    input_names=["input"],    # 输入名
                    output_names=["output"],  # 输出名
                    dynamic_axes={            # variable Length axes,specifies which dimensions of the input/output tensor are dynamic
                        input_names: {0: 'batch_size', 2 : 'in_width', 3: 'int_height'},
                        output_names: {0: 'batch_size', 2: 'out_width', 3:'out_height'}})
2.2.2 如果保存的是模型参数
import torch
import torchvision.models as models

model_dict = torch.load("best.pth") # pytorch模型加载

model = models.resnet50()
model.fc = torch.nn.Linear(2048, 20)
model.load_state_dict(model_dict)
model.eval()  # set the model to inference mode

batch_size = 1  # 批处理大小
input_shape = (3, 224, 224)   # 输入数据,改成自己的输入shape

x = torch.randn(batch_size, *input_shape) # 生成张量
x.to(device)
export_onnx_file = "best.onnx"   # 目标ONNX文件名
torch.onnx.export(model,                      # model
                  x,                          # model input
                  export_onnx_file,           # where to save the model
                  opset_version=10,           # the ONNX version to export the model to
                  do_constant_folding=True,   # whether to execute constant folding for optimization
                  input_names=["input"],      # the model's input names
                  output_names=["output"],    # the model's output names
                  dynamic_axes={              # variable Length axes,specifies which dimensions of the input/output tensor are dynamic
                        input_names: {0: 'batch_size', 2 : 'in_width', 3: 'int_height'},
                        output_names: {0: 'batch_size', 2: 'out_width', 3:'out_height'}}))
参数说明:
必选参数:
模型
模型输入
导出的 onnx 文件名
可选参数:
export_params:模型中是否存储模型权重。一般中间表示包含两大类信息:模型结构和模型权重,这两类信息可以在同一个文件里存储,也可以分文件存储。ONNX 用同一个文件表示记录模型的结构和权重。
部署时一般都默认这个参数为 True。如果 onnx 文件是用来在不同框架间传递模型(比如 PyTorch 到 Tensorflow)而不是用于部署,则可以令这个参数为 False。
opset_version:转换时参考哪个 ONNX 算子集版本,默认为 9。
do_constant_folding:是否执行常量折叠优化。
input_names, output_names:设置输入和输出张量的名称。如果不设置的话,会自动分配一些简单的名字(如数字)。ONNX 模型的每个输入和输出张量都有一个名字。很多推理引擎在运行 ONNX 文件时,都需要以“名称-张量值”的数据对来输入数据,并根据输出张量的名称来获取输出数据。在进行跟张量有关的设置(比如添加动态维度)时,也需要知道张量的名字。
在实际的部署流水线中,我们都需要设置输入和输出张量的名称,并保证 ONNX 和推理引擎中使用同一套名称。
dynamic_axes:导出动态维度模型时需要,指定输入输出张量的哪些维度是动态的。用法:"输入输出名:[支持动态的纬度]",如“支持动态的纬度设置为[0, 2, 3]”则表示第0纬,第2纬,第3维支持动态输入输出。
verbose=False:是否输出详细的导出信息。
example_outputs:用于确定导出ONNX模型输出形状的样本输出。
keep_initializers_as_inputs:是否将模型的初始化器作为输入输出。如果为True,模型初始化器将被作为输入的一部分导出。
2.3 check和验证onnx模型
安装onnx和onnxruntime,在命令行运行:
pip install onnx
pip install onnxruntime
2.3.1 check模型:
使用 onnx.checker.check_model() 验证模型的结构并确认模型具有有效的架构。
# check model
onnx_model = onnx.load(export_onnx_file)
check = onnx.checker.check_model(onnx_model)
print('check: ', check)
通过检查模型的版本,图的结构以及节点及其输入和输出来验证 ONNX 图的有效性。如果有效,则输出为None。
2.3.2 验证模型是否匹配:
验证 ONNX 运行时和 PyTorch 正在为网络计算相同的值。
# compare ONNX Runtime and PyTorch results
out = model(im)
preds = decode(out)
resnet_session = onnxruntime.InferenceSession(onnx_path)
inputs = {resnet_session.get_inputs()[0].name: to_numpy(im)}
outs = resnet_session.run(None, inputs)[0]
print('weights predicts: ', out.detach().cpu().numpy())
print('onnx prediction: ', outs)
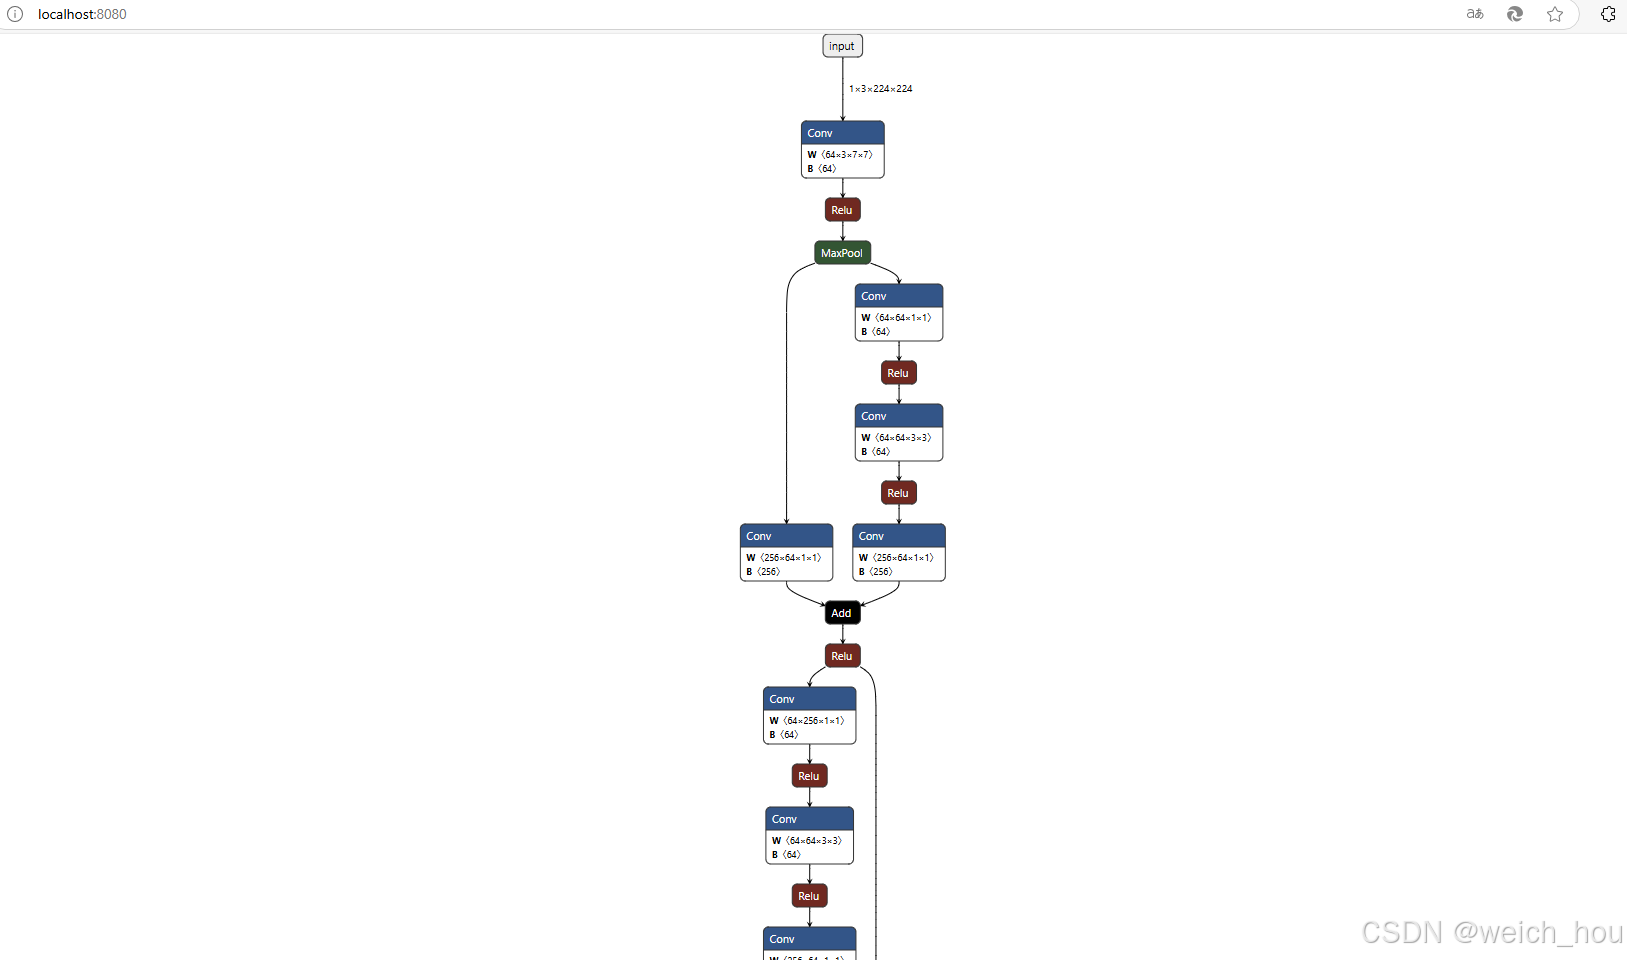
print('\nCorrect!' if (outs.argmax(axis=2)[0] == np.array(preds)).all() else "Error!")(三)onnx模型可视化
if args.vis:
    import netron

    modelData = export_onnx_file
    netron.start(modelData)
onnx结构可视化结果:
(四)模型转换&测试
【代码仅供参考】
import os
...


# 数据预处理
trans = T.Compose([
    T.Resize((224,224)),
    T.ToTensor(),
    T.Normalize(mean=[0.4850, 0.4560, 0.4060], std=[0.2290, 0.2240, 0.2250])
])

def to_numpy(tensor):
    return tensor.detach().cpu().numpy() if tensor.requires_grad else tensor.cpu().numpy()

device = torch.device("cuda" if torch.cuda.is_available() else "cpu")

# 输入数据准备
im = 'data/test/car.jpg'
im = Image.open(im).convert('RGB')
im = trans(im).unsqueeze(0).to(device)

weight_path = 'outputs/resnet50/driver_attr.pth'
onnx_path = 'onnx/resnet50/driver_attr.onnx'

# 模型和权重加载
model = build_model('resnet50', bn_wd=True, export=True)
model = load(model, weight_path)
model.eval()
model.to(device)


out = model(im)
preds = decode(out)

# 加载onnx
resnet_session = onnxruntime.InferenceSession(onnx_path)
inputs = {resnet_session.get_inputs()[0].name: to_numpy(im)}
# 推理
outs = resnet_session.run(None, inputs)[0]

print('weights predicts: ', out.detach().cpu().numpy())
print('onnx prediction: ', outs)
print('\nCorrect!' if (outs.argmax(axis=2)[0] == np.array(preds)).all() else "Error!")
预测结果:
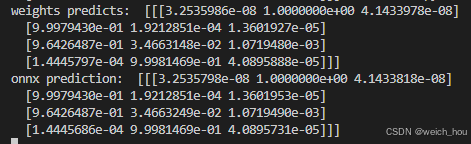
pth在转onnx后有微小的差别,不影响输出结果。
由于yolov5的模型和整个项目相互关联,所以转onnx无法用常规方法,只能用内部的转onnx方法,参考YOLOV5模型转ONNX及测试![]() https://blog.csdn.net/weich_hou/article/details/145328016?sharetype=blogdetail&sharerId=145328016&sharerefer=PC&sharesource=weich_hou&spm=1011.2480.3001.8118
https://blog.csdn.net/weich_hou/article/details/145328016?sharetype=blogdetail&sharerId=145328016&sharerefer=PC&sharesource=weich_hou&spm=1011.2480.3001.8118


 4323
4323

 被折叠的 条评论
为什么被折叠?
被折叠的 条评论
为什么被折叠?
 到【灌水乐园】发言


