


mvp模型
This article talks about the model that was built for multi-class bulb classification.
本文讨论了为多类灯泡分类构建的模型。
What will we look at with this Article?1.Build a multiclass classifier from scratch on Google Collab/Jupyter NotebookAlternatively you could build a model using Google’s Auto ML software as a validation metric or just use the Google model as it is 2.Use the Google Auto ML model for validation of the model.** This step requires you to have a Google cloud account to train your model on the cloud alternatively you can use the model that we train from scratch for deployment.
我们将如何看待本文?1。在Google Collab / Jupyter Notebook上从头开始构建一个多类分类器;或者,您可以使用Google的Auto ML软件作为验证指标来构建模型,或者直接使用现成的Google模型2。 Google Auto ML模型用于模型验证。**此步骤需要您具有Google云帐户才能在云上训练模型,或者您可以使用从头开始训练的模型进行部署。

Our goal is to do Multiclass image classification where the aim is to classify which bulb type the image belongs to among 6.
我们的目标是进行多类图像分类,目的是在6个图像中对图像属于哪种灯泡类型进行分类。
Since the problem is a fresh one and has not been tried upon, I was told to start with a single label classification, we started by determining whether the image was of an MR16 Bulb or not. The picture below denotes the Predicted value and the actual value where 0 is MR16 and 1 is other.
由于问题是一个新问题,并且尚未尝试,因此我被告知从单一标签分类开始,我们首先确定图像是否是MR16灯泡。 下图显示了预测值和实际值,其中0为MR16,1为其他。

I used Google collaboratory because it leverages GPU usage which would help you train your model 10X faster than your local machine. You might want to upgrade your google collab to the pro version to increase its RAM and helps it to not disconnect if your screen switches off.
我之所以与Google合作,是因为它利用了GPU的使用率,可以帮助您训练模型比本地机器快10倍。 您可能需要将google collab升级到专业版,以增加其RAM并帮助它在屏幕关闭时不断开连接。
Train validation and test splitTrain: 6003 imagesValidation:266 imagesTest:383 imagesSince we had a large dataset, we had enough images to validate and test it on and therefor most images were put in the train set.
火车验证和测试拆分火车:6003张图像验证:266张图像测试:383张图像由于我们有一个庞大的数据集,因此我们有足够的图像来对其进行验证和测试,因此大多数图像都放在了火车中。

This is the structure of the train and validation set are both expected to have a similar structure with a folder for every label which would contain images of the same as depicted above.
这是火车的结构,验证集都希望具有相似的结构,每个标签都带有一个文件夹,其中包含与上述图像相同的图像。
As you can see in the above picture, the test folder should also contain a single folder inside which all the test images are present(Think of it as “unlabeled” class, this is there because the flow_from_directory() expects at least one directory under the given directory path).
如上图所示,测试文件夹还应包含一个包含所有测试图像的文件夹(将其视为“未标记”类,这是因为flow_from_directory()期望至少有一个目录位于给定的目录路径)。
The folder names for the classes are important, name(or rename) them with respective label names so that it would be easy for you later.Once you set up the images into the above structure, you are ready to code!
这些类的文件夹名称很重要,用各自的标签名称命名(或重命名)它们,以便以后使用。一旦将图像设置为上述结构,就可以编写代码了!
Visualizing the data:
可视化数据:
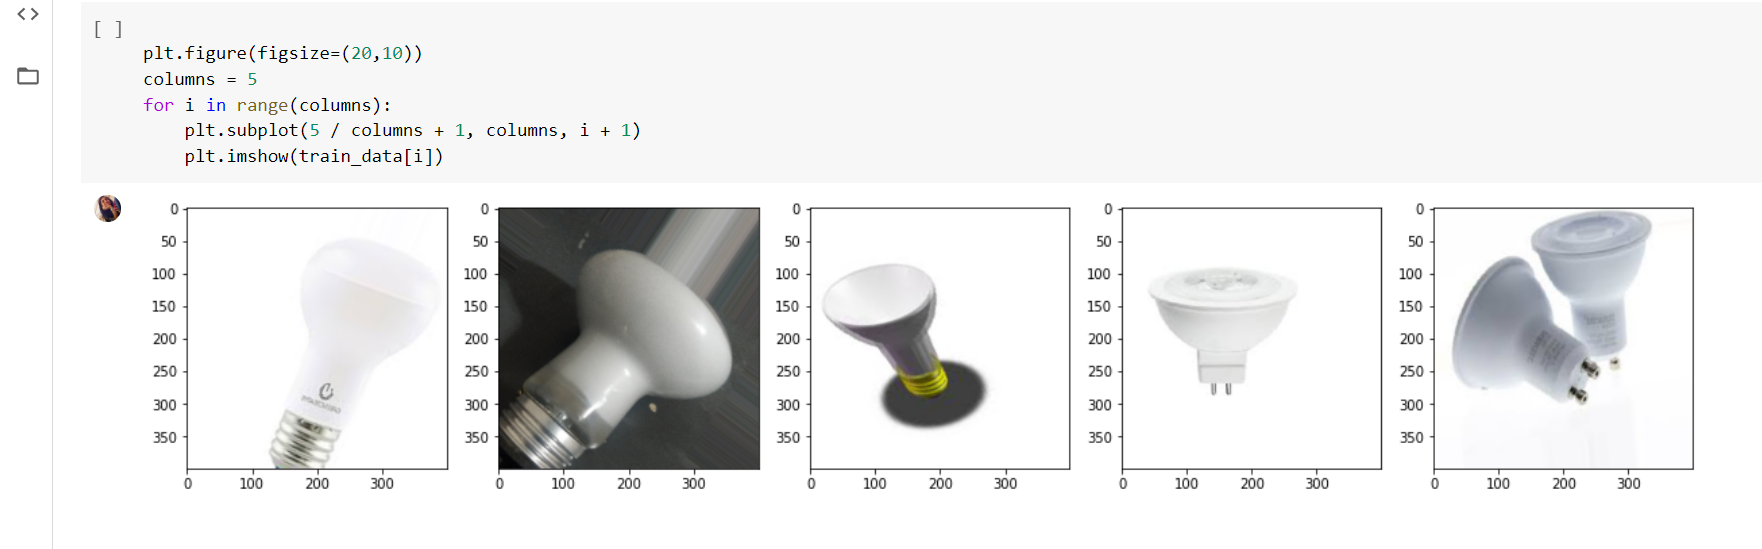
These are the 6 classes of bulbs that I tried to classify at first. I first Checked out how many images I have of each label to make sure my data set is balanced.
这些是我一开始尝试对灯泡进行的6类分类。 首先,我检查了每个标签有多少张图片,以确保数据集平衡。

Check out how many images you have of each label to make sure your data set is balanced.
检查每个标签有多少张图片,以确保数据集平衡。

The class mode=categorical performs one-hot encoding and stores the label.
类mode = categorical执行一键编码并存储标签。
The directory must be set to the path where your ’n’ classes of folders are present.
该目录必须设置为“ n”个文件夹所在的路径。
The target_size is the size of your input images, every image will be resized to this size.
target_size是输入图像的大小,每个图像将被调整为该大小。
batch_size: No. of images to be yielded from the generator per batch.
batch_size:每批生成器生成的图像数。
class_mode: Set “binary” if you have only two classes to predict, if not set to“categorical”, in case if you’re developing an Autoencoder system, both input and the output would probably be the same image, for this case set to “input”.
class_mode:如果只有两个要预测的类,则设置为“ binary”;如果未设置为“ categorical”,则设置为“ binary”,如果正在开发自动编码器系统,则在这种情况下,输入和输出可能是同一张图像进行“输入”。
shuffle: Set True if you want to shuffle the order of the image that is being yielded, else set False.
随机播放:如果要随机播放要生成的图像顺序,则设置为True,否则设置为False。
seed: Random seed for applying random image augmentation and shuffling the order of the image.
种子:用于应用随机图像增强和改组图像顺序的随机种子。
Let’s see what the class_mode= categorical does when it comes out of the generator?
让我们看看class_mode =类别在生成器中的作用是什么?
It took me a while to get to what the generator outputs and how it stores the images and labels, there was no documentation for this, here it goes:
我花了一些时间来了解生成器的输出以及它如何存储图像和标签,没有关于它的文档,在这里:

Know that the way the data is structured is that there are 32 images in each batch. The image is stored with the label displayed in the image as [a][b][c] where:[a]= batch number of the image [b]= b takes values 0 and 1 where [a][1][c] stores the label of the image and [a][0][c] stores the image itself. [c]=image number in that batch.
知道数据的结构方式是每批中有32张图像。 图像以标签显示在图像中,并以[a] [b] [c]的形式存储,其中:[a] =图像的批号[b] = b取值0和1,其中[a] [1] [ c]存储图像的标签,[a] [0] [c]存储图像本身。 [c] =该批次中的图像编号。
I have been asked a couple of times by people new to Computer vision, What does each layer learn in a CNN? The diagram below shows what each layer in the CNN picks and learns from the images.
刚接触计算机视觉的人几次问过我, CNN的每一层学到什么? 下图显示了CNN中每个图层从图像中挑选和学习的内容。

Now we create our model. The first step is to initialize the model with Sequential(). After that, we flatten our data and add our additional 3 (or more) hidden layers. This step is fully customizable to what you want. We made several different models with different dropouts, hidden layers, and activation.
现在我们创建模型。 第一步是使用Sequential()初始化模型。 之后,我们将数据展平,并添加其他3个(或更多)隐藏层。 此步骤完全可以根据您的需要进行自定义。 我们制作了具有不同滤除层,隐藏层和激活的几种不同模型。
For multi-class classification, the last dense layer must have several nodes equal to the number of classes, followed by softmax activation, i.e. the last two layers of your model should be:
对于多类分类,最后一个密集层必须具有多个与类数相等的节点,然后进行softmax激活,即模型的最后两层应为:
model.add(Dense(num_classes))
model.add(Activation('softmax'))
It is also best for loss to be categorical cross-entropy. I tried a variety of Transfer learning models including the ResNet, VGGnet, and Inception since these models are both widely used for transfer learning because of their performance and specific architectural innovations. I tried turning the last few layers of these models but they didn’t seem to give better results, therefore, I would believe that they are not a good fit for distinguishing the kind of images I am using ( i.e different types of bulbs)
损失最好是分类交叉熵。 我尝试了包括ResNet,VGGnet和Inception在内的各种迁移学习模型,因为这些模型由于其性能和特定的体系结构创新而广泛用于迁移学习。 我尝试将这些模型的最后几层旋转,但它们似乎并没有提供更好的结果,因此,我认为它们不适用于区分我正在使用的图像类型(即不同类型的灯泡)

Then after I created and compiled our model, we fit our training and validation data to it with the specifications we mentioned earlier. Finally, we create an evaluation step, to check for the accuracy of our model training set versus the validation set.
然后,在我创建并编译我们的模型之后,我们将我们的训练和验证数据与我们之前提到的规范相匹配。 最后,我们创建一个评估步骤,以检查模型训练集与验证集的准确性。
This is our model now training the data and then validating it. An epoch is how many times the model trains on our whole data set. A batch can be explained as taking in small amounts, train and take some more. Each epoch must finish all batch before moving to the next epoch. Training with too little epoch can lead to underfitting the data and too many will lead to overfitting the data. You also want a loss that is as low as possible. The pictures below will show the accuracy and loss of our data set.
这是我们的模型,现在训练数据然后进行验证。 一个时期是模型在我们整个数据集上训练的次数。 一批可以解释为少量摄入,训练并摄入更多。 每个纪元必须完成所有批处理,然后再移至下一个纪元。 训练时间太短会导致数据拟合不足,而训练太多则会导致数据拟合过度。 您还希望损失尽可能小。 下图将显示我们数据集的准确性和损失。
This picture below shows how well the machine we just made can predict against unseen data. Notice it says that it’s testing on test_data. Accuracy is the second number. However, this is not the only method of checking how well our machines performed.There are two great methods to see how well your machine can predict or classify. One of them is the classification metrics and the other is the confusion matrix.Our classification metrics show that our model has relatively high precision accuracy for all our image categories, letting us know that this is a valid model
下图显示了我们刚刚制造的机器可以针对看不见的数据进行预测的能力。 注意,它说它正在测试test_data。 精度是第二个数字。 但是,这不是检查机器性能的唯一方法。有两种查看机器可预测或分类效果的好方法。 其中一个是分类指标,另一个是混淆矩阵,我们的分类指标表明我们的模型对所有图像类别都具有较高的精度,这让我们知道这是一个有效的模型
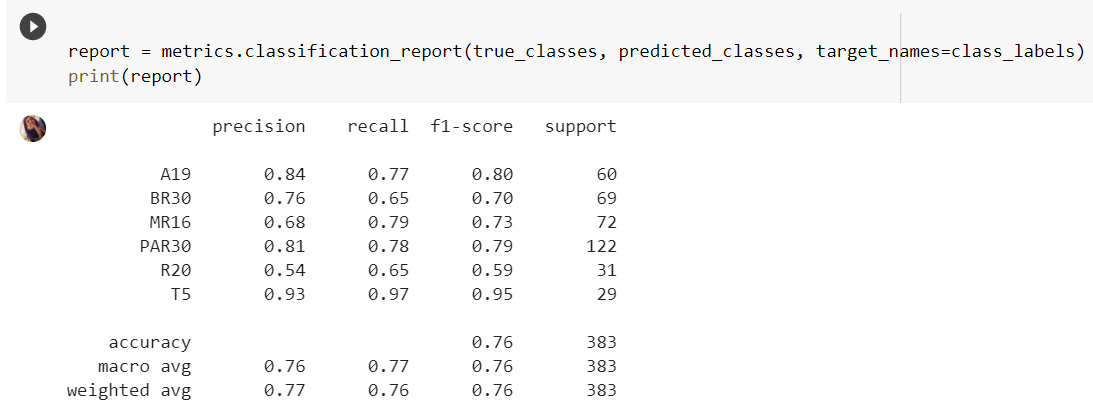
To use classification metrics, we had to convert our testing data into a different NumPy format, NumPy array, to read. That is all the first line of code is doing. The second cell block takes in the converted code and runs it through the built-in classification metrics to give us a neat result. Please note that due to our generator function we didn’t need to manually label our classes here, since we set class= categorical while taking an input. The important factors here are precision and f1-score. The higher the score the better your model is.
要使用分类指标,我们必须将测试数据转换为另一种NumPy格式NumPy数组以进行读取。 这就是第一行代码所做的全部。 第二个单元格块接收转换后的代码,并通过内置的分类指标对其进行运行,从而为我们提供整洁的结果。 请注意,由于我们的生成器功能,我们不需要在此处手动标记类,因为在输入时我们将class =设置为categorical。 此处的重要因素是精度和f1得分。 分数越高,您的模型越好。

As we can see in our standardized data, our machine is pretty good at classifying which bulb is what. MR16’s were misclassified as PAR203038 most likely due to their similar structure. Also, PAR203038 was misclassified as MR16 because of probably the same reason.
从标准化数据中可以看出,我们的机器非常擅长对哪种灯泡进行分类。 MR16的结构相似,很可能被误分类为PAR203038。 同样,由于相同的原因,PAR203038被错误地分类为MR16。
The final phase is testing on images. The cell blocks below will accomplish that:
最后阶段是对图像进行测试。 下面的单元块将完成此任务:
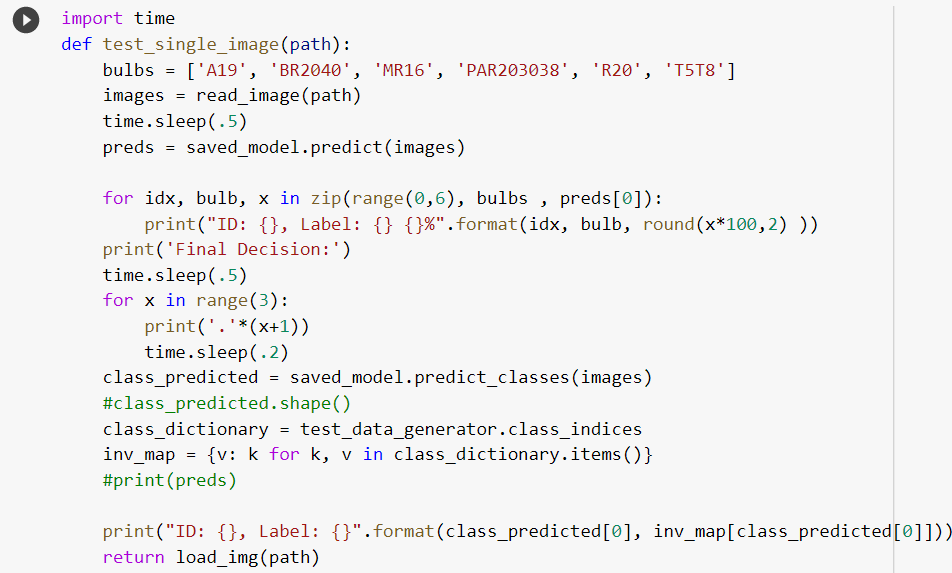
The first def function is letting our machine know that it has to load the image, change the size, and convert it to an array which can be accessed at GitHub. The second def function is using the prediction model and an iterative function to help predict the image properly. The path is where we define the image location and finally, the test_single_image cell block will print out the final result, depending on the prediction from the second cell block.This is the final result that our model gives:
第一个def函数是让我们的机器知道它必须加载图像,更改大小并将其转换为可以在GitHub上访问的数组。 第二个def函数使用预测模型和一个迭代函数来帮助正确预测图像。 路径是我们定义图像位置的位置,最后, test_single_image单元块将打印出最终结果,具体取决于第二个单元块的预测,这是我们模型得出的最终结果:

PRO HACK: You can directly use the Google Auto ML model to train the data and then try to incorporate the model weights and model.json in the app we try to build.
PRO HACK :您可以直接使用Google Auto ML模型来训练数据,然后尝试将模型权重和model.json合并到我们尝试构建的应用中。
While working on this project I came across Google’s Auto ML software, and Since 78% accuracy is what I was able to get, even after trying different transfer models and tuning the hyperparameters, I decided to Validate my model by training my data with an Auto ML model.
在进行此项目时,我遇到了Google的Auto ML软件,由于即使在尝试了不同的传输模型并调整了超参数之后,我仍然能够获得78%的准确性,所以我决定通过使用Auto训练数据来验证模型ML模型。
AutoML is a suite of machine learning products that enables developers with limited machine learning expertise to train high-quality models specific to their business needs. It’s a neural net that can design neural nets.
AutoML是一套机器学习产品,可使拥有有限机器学习专门知识的开发人员能够训练针对其业务需求的高质量模型。 这是一个可以设计神经网络的神经网络。
I will share how I trained a custom machine learning model from scratch using Google Cloud AutoML Vision Edge.
我将分享我如何使用从头开始训练自定义机器学习模型的方法 Google Cloud AutoML Vision Edge 。
You can learn more about google edge computer vision auto ml model at :I don’t want to make the tutorial verbose and document the steps of training your Vision edge model that is done well above!
您可以在以下位置了解有关Google Edge计算机视觉自动毫升模型的更多信息:我不想使本教程冗长,并记录在上面做的训练Vision Edge模型的步骤!
Once we’re ready with a clean dataset, we can get started by setting up our Google Cloud project.
准备好干净的数据集后,就可以开始设置Google Cloud项目。
1. We can follow this guide to create a Google Cloud project:
1.我们可以按照本指南创建Google Cloud项目:
2. The next step is to create our dataset on the AutoML page. Here, as you can see in the snapshot, we will use single-label classification. Single-label classification is used when an image can belong to a single class. In our, bulb identification problem, every image will be labeled as either of the six labels, i.e a single-class label. In multi-label classification, a single image can belong to multiple classes simultaneously.
2.下一步是在AutoML页面上创建我们的数据集。 如您在快照中所见,在这里,我们将使用单标签分类。 当图像可以属于一个类别时,使用单标签分类。 在我们的灯泡识别问题中,每个图像都将被标记为六个标签中的任何一个,即单类标签。 在多标签分类中,单个图像可以同时属于多个类别。
This Video explains well how you upload and train your data in Auto ml and takes your through it step by step.
该视频很好地说明了您如何在Auto ml中上传和训练数据,并逐步进行了介绍。
3.Import all the images
3.导入所有图像
After this initial project setup, we’ll use the “Import” button and import the dog and cat folders with their respective images.
完成此初始项目设置后,我们将使用“导入”按钮,并导入dog和cat文件夹及其各自的图像。
Note: A best practice is to upload all out images to Google Cloud Storage Bucket and then import the bucket from the AutoML dashboard.
注意:最佳做法是将所有图像上传到Google Cloud Storage Bucket,然后从AutoML仪表板导入存储桶。
After the upload, we can see all the images under the “Images” tab. This is how your data looks once it’s uploaded, I suggest you upload zip folders of different classes in your bucket which helps the process be more efficient and convenient.
上传后,我们可以在“图片”标签下看到所有图片。 这就是数据一旦上传后的样子,建议您在存储桶中上传不同类别的zip文件夹,这有助于使过程更加高效和便捷。

4.Start model training
4.开始模型训练
Once you see your images get reflected in the AutoML dashboard, you train your model.
一旦看到图像反映在AutoML仪表板中,就可以训练模型。
Training this model is very easy with AutoML — go to the Train tab and click Train New Model. Once training is completed, we’ll get an email notification.
使用AutoML训练此模型非常容易-转到“ Train选项卡,然后单击“ Train New Model 。 培训完成后,我们将收到一封电子邮件通知。
Before training, you should decide how your model will be consumed — as an API (online prediction) or on an edge device (offline predictions). Online Predictions are the best way to test the results or if you want to consume the model directly through the AutoML API. They are more accurate. Offline models save a lot of costs and can run on-device. They are generally less in size and can run without an internet connection. We use an edge device since I am interested in making an app that can run on any machine.
在训练之前,您应该决定如何使用模型-作为API(在线预测)或在边缘设备(离线预测)上使用。 在线预测是测试结果的最佳方法,或者是您要直接通过AutoML API使用模型的最佳方法。 他们更准确。 离线模型可以节省大量成本,并且可以在设备上运行。 它们通常较小,并且可以在没有互联网连接的情况下运行。 我们使用边缘设备,因为我有兴趣制作可在任何计算机上运行的应用程序。

For the evaluation of the model, we know Precision refers to the percentage of your results that are relevant. On the other hand, recall refers to the percentage of the total relevant results correctly classified by your algorithm.Check out the recall and precision values of our Bulb classifier.
对于模型的评估,我们知道Precision是指您相关结果中所占的百分比。 另一方面,召回率是指您的算法正确分类的所有相关结果中的百分比,请查看我们的Bulb分类器的召回率和精度值。

After training, the model can be consumed in various formats provided by AutoML, such as TF Lite, Core ML , Tensorflow.js, and other container export formats.TensorFlow.js is a library that helps to use ML directly in the browser. AutoML takes very little time to create a model and TensorFlow.js is the easiest and the most efficient way to run models directly inside the browser.
训练后,可以使用AutoML提供的各种格式来使用模型,例如TF Lite , Core ML , Tensorflow.js和其他容器导出格式。 TensorFlow.js是一个有助于直接在浏览器中使用ML的库。 AutoML花费很少的时间来创建模型,而TensorFlow.js是直接在浏览器内部运行模型的最简单,最有效的方法。
It’s an interesting question with various opinions like a browser is widely present in all the devices whether it is desktop, tablets, or mobiles. So, ML in browsers can create a large impact. From the user’s perspective, the ML model can be easily set up in a browser without any drivers, libraries, etc. All the data stays on the user’s device, with no need to send data to servers.
这是一个有趣的问题,有各种各样的观点,例如浏览器广泛应用于所有设备,无论是台式机,平板电脑还是移动设备。 因此,ML在浏览器中会产生很大的影响。 从用户的角度来看,可以在浏览器中轻松建立ML模型,而无需任何驱动程序,库等。所有数据都保留在用户设备上,而无需将数据发送到服务器。
The process of using AutoML’s TensorFlow.js the model format requires two steps: exporting the model and then loading it for inference.
使用AutoML的TensorFlow.js模型格式的过程需要两个步骤:导出模型,然后加载模型以进行推断。

The following step-by-step instructions will help you load any TF.js-based model into the browser.Once you click on the Tensorflow.js box, it downloads bin files like shown and this is how your directory should look once you’re ready to deploy.
以下分步说明将帮助您将任何基于TF.js的模型加载到浏览器中。单击Tensorflow.js框后,它会下载如图所示的bin文件,这是您的目录在您进入重新准备部署。

Once the model is exported, you’ll see a model.json file, which contains the tensor information along with the weight file names and files containing the model weights. Download all the files from the bucket into your local system.
导出模型后,您将看到一个model.json文件,其中包含张量信息以及权重文件名和包含模型权重的文件。 将存储桶中的所有文件下载到本地系统中。
We will walk through the process of creating a web app deployed in Heroku that can be used by anyone on the web however the instructions here are a good starting point to try out.
我们将逐步介绍创建在Heroku中部署的Web应用程序的过程,该应用程序可被Web上的任何人使用,但是此处的说明是尝试的好起点。
The Github link can be found at:https://github.com/aditi310896/Bulbdetection/blob/master/Multiclassmodeltrial1.ipynb
Github链接可以在以下位置找到: https : //github.com/aditi310896/Bulbdetection/blob/master/Multiclassmodeltrial1.ipynb
翻译自: https://towardsdatascience.com/from-a-computer-vision-idea-to-an-mvp-the-model-part-2-acca969ef56b
mvp模型


 1238
1238

 被折叠的 条评论
为什么被折叠?
被折叠的 条评论
为什么被折叠?
 到【灌水乐园】发言


