


机器学习指南
The word “experiment” means different things to different people. For scientists (and hopefully for rigorous data scientists), an experiment is an empirical procedure to determine if an outcome agrees or conflicts with some hypothesis. In a machine learning experiment, your hypothesis could be that a specific algorithm (say gradient boosted trees) is better than alternatives (such as random forests, SVM, linear models). By conducting an experiment and running multiple trials by changing variable values, you can collect data and interpret results to accept or reject your hypothesis. Scientists call this process the scientific method.
“实验”一词对不同的人意味着不同的事物。 对于科学家(并希望对严格的数据科学家而言),实验是确定结果是否与某些假设一致或冲突的经验程序。 在机器学习实验中,您的假设可能是特定算法(例如梯度增强树)比其他算法(例如随机森林,SVM,线性模型)更好。 通过进行实验并通过更改变量值进行多次试验,您可以收集数据并解释结果以接受或拒绝您的假设。 科学家将此过程称为科学方法。
Regardless of whether you follow the scientific method or not, conducting and managing machine learning experiments is hard. It’s challenging because of the sheer number of variables and artifacts to track and manage. Here’s a non-exhaustive list of things you may want to keep track of:
无论您是否遵循科学方法,进行和管理机器学习实验都是很困难的。 由于要跟踪和管理的变量和工件数量众多,因此具有挑战性。 以下是您可能想跟踪的事情的详尽列表:
Parameters: hyperparameters, model architectures, training algorithms
参数 :超参数 ,模型架构,训练算法
Jobs: pre-processing job, training job, post-processing job — these consume other infrastructure resources such as compute, networking and storage
工作 :预处理工作,培训工作,后处理工作-这些工作消耗其他基础结构资源,例如计算,网络和存储
Artifacts: training scripts, dependencies, datasets, checkpoints, trained models
工件 :训练脚本,依赖项,数据集,检查点,训练后的模型
Metrics: training and evaluation accuracy, loss
指标 :培训和评估准确性,损失
Debug data: Weights, biases, gradients, losses, optimizer state
调试数据 :权重,偏差,渐变,损耗,优化器状态
Metadata: experiment, trial and job names, job parameters (CPU, GPU and instance type), artifact locations (e.g. S3 bucket)
元数据 :实验,试验和工作名称,工作参数(CPU,GPU和实例类型),工件位置(例如S3存储桶)
As a developer or data scientist, the last thing you want to do is to spend more time managing spreadsheets or databases to track experiments and the associated entities and their relationships with each other.
作为开发人员或数据科学家,您要做的最后一件事是花更多的时间管理电子表格或数据库,以跟踪实验以及关联的实体及其相互之间的关系。

How often have you struggled to figure out what dataset, training scripts and model hyperparameters were used for a model that you trained a week ago? a month ago? a year ago? You can look through your notes, audit trails, logs and Git commits, and try to piece together the conditions that resulted in that model, but you can never be sure if you didn’t have everything organized in the first place. I’ve had more than one developer tell me something to the effect of “we don’t know how to reproduce our production model, the person who worked on this isn’t around anymore — but it works, and we don’t want to mess with it”.
您有多少次努力找出一周前训练的模型使用了哪些数据集,训练脚本和模型超参数? 一个月前? 一年前? 您可以浏览笔记,审计跟踪,日志和Git提交,并尝试将导致该模型的条件拼凑起来,但是您永远无法确定是否没有一开始就将所有内容组织起来。 我已经有不止一个开发人员告诉我一些事情,其结果是“我们不知道如何重现我们的生产模型,从事此工作的人已经不在了,但是它行得通,而且我们不想搞砸了”。
In this blog post, I’ll discuss how you can define and organize your experiments so that you don’t end up in such a situation. Through a code example, I’ll show how you can run experiments, track experiment data and retrieve it for analysis using Amazon SageMaker Experiments. The data you need about a specific experiment or training job will always be quickly accessible whenever you need it without you having to the bookkeeping.
在此博客文章中,我将讨论如何定义和组织实验,以免出现这种情况。 通过一个代码示例,我将展示如何运行实验,跟踪实验数据以及如何使用Amazon SageMaker Experiments对其进行检索以进行分析。 有关特定实验或培训工作所需的数据将始终可以随时访问,而无需簿记。
A complete example in a Jupyter notebook is available on GitHub: https://github.com/shashankprasanna/sagemaker-experiments-examples.git
可以在GitHub上找到Jupyter笔记本中的完整示例: https : //github.com/shashankprasanna/sagemaker-experiments-examples.git
机器学习实验的剖析 (Anatomy of a machine learning experiment)
The key challenge with tracking machine learning experiments is that there are too many entities to track and complex relationships between them. Entities include parameters, artifacts, jobs and relationships could be one-to-one, one-to-many, many-to-one between experiments, trials and entities. Wouldn’t it be nice if you could track everything automatically? That way you can worry less and become more productive, knowing that your experiments are always self-documenting. This is exactly the approach we’ll take.
跟踪机器学习实验的主要挑战是,实体太多,无法跟踪并且它们之间的关系复杂。 实体包括参数,工件,工作和关系,在实验,试验和实体之间可以是一对一,一对多,多对一的。 如果您可以自动跟踪所有内容,那不是很好吗? 这样一来,您就可以知道自己的实验始终是自我记录的,从而可以减少烦恼并提高工作效率。 这正是我们将采用的方法。
Let’s start off by introducing a few key concepts. I’ll keep coming back to these throughout the article, so this won’t be the last you’ll hear about them. By presenting these key concepts upfront I hope it will give you a better sense of the relationship between experiments, trials, trial components, jobs, artifacts, metrics and metadata as you go through the example.
让我们从介绍一些关键概念开始。 在整篇文章中,我将继续介绍这些内容,因此这不是您最后听到的内容。 通过预先介绍这些关键概念,我希望它能使您更好地理解实验,试验,试验组分,工作,工件,指标和元数据之间的关系。

Machine learning experiment: A systematic procedure to test a hypothesis (e.g. model A is better than model B, Hyperparameters X has a positive effect on response Y)
机器学习实验 :测试假设的系统程序(例如,模型A优于模型B,超参数X对响应Y产生积极影响)
Variables: Controllable factors that you vary and measure response (e.g. model architectures, hyperparameters)
变量 :您可以改变和衡量响应的可控因素(例如模型架构,超参数)
Trial: A training iteration on a specific variable set. A variable set could be sampled from an exhaustive set of variable interactions (e.g. model architecture, optimizer, other hyperparameters).
试用 :针对特定变量集的训练迭代。 可以从详尽的变量交互集(例如模型体系结构,优化器,其他超参数)中采样变量集。
Trial components: Various parameters, jobs, datasets, models, metadata and other artifacts. Trial component can be associated with a Trial (e.g. Training job) or be independent (e.g. metadata)
试用组件 :各种参数,作业,数据集,模型,元数据和其他工件。 试用组件可以与试用(例如培训工作)相关联,也可以独立(例如元数据)
Properties of an experiment, trial and trial component:
实验,试验和试验组件的属性:
- An Experiment is uniquely characterized by its objective or hypothesis 实验的目标或假设具有独特的特征
- An Experiment usually contains more than one Trial, one Trial for each variable set. 实验通常包含多个试验,每个变量集都有一个试验。
- A Trial is uniquely characterized by its variable set, sampled from the variable space defined by you. 试用版的独特之处在于它的变量集,该变量集是从您定义的变量空间中取样的。
- A Trial component is any artifact, parameter or job that is associated with a specific Trial. 试用组件是与特定试用版关联的任何工件,参数或作业。
- A Trial component is usually part of a Trial, but it can exist independent of an experiment or trial. 试用组件通常是试用的一部分,但可以独立于实验或试验而存在。
- A Trial component cannot be directly associated with an Experiment. It has to be associated with a Trial which is associated with an Experiment. 试用组件不能与实验直接关联。 它必须与与实验相关的试验相关。
- A Trial component can be associated with multiple Trials. This is useful to track datasets, parameters and metadata that is common across all Trials in an Experiment. 一个Trial组件可以与多个Trial相关联。 这对于跟踪实验中所有试验中共有的数据集,参数和元数据很有用。
These concepts will become clearer as you go through the example, so don’t worry if you haven’t memorized them. We’ll build out every step starting from creating an experiment.
在阅读示例时,这些概念将变得更加清楚,因此,如果您没有记住它们,请不要担心。 从创建实验开始,我们将逐步扩展每个步骤。
使用Amazon SageMaker管理机器学习实验,试验,作业和元数据 (Managing machine learning experiments, trials, jobs and metadata using Amazon SageMaker)
The best way to internalize the concepts discussed so far is through code examples and illustrations. In this example, I’ll define a problem statement, formulate a hypothesis, create an experiment, create trackers for tracking various artifacts and parameters, run Trials and finally analyze results. I’ll do this using Amazon SageMaker Experiments. I’ve made a full working example available for you in the following Jupyter Notebook on GitHub: sagemaker-experiments-examples.ipynb.
内化到目前为止讨论的概念的最佳方法是通过代码示例和说明。 在此示例中,我将定义问题陈述,提出假设,创建实验,创建用于跟踪各种工件和参数的跟踪器,运行试验并最终分析结果。 我将使用Amazon SageMaker Experiments进行此操作。 我已经在GitHub上的以下Jupyter Notebook中为您提供了完整的工作示例: sagemaker-experiments-examples.ipynb 。
The quickest and easiest way to run this notebook is to run it on Amazon SageMaker Studio. SageMaker Studio Notebooks lets you launch a Jupyter notebook environment with a single click, and it includes an experiment tracking pane and visualization capabilities which makes it easier to track your experiments. You can also run this on your own laptop or desktop with Amazon SageMaker python SDK and Amazon SageMaker Experiments packages installed.
运行此笔记本的最快,最简单的方法是在Amazon SageMaker Studio上运行它。 SageMaker Studio Notebooks允许您单击以启动Jupyter Notebook环境,它包括实验跟踪窗格和可视化功能,可以更轻松地跟踪实验。 您还可以在安装了Amazon SageMaker python SDK和Amazon SageMaker Experiments程序包的笔记本电脑或台式机上运行此程序。
步骤1:制定假设并创建实验 (Step 1: Formulate a hypothesis and create an experiment)
The first step is to define your hypothesis. If you prefer business-speak over academic-speak, you can specify an experiment objective or goal instead. It may be tempting to “just try a bunch of things and pick the best”, but a little effort upfront in defining your problem will give you peace of mind later.
第一步是定义您的假设。 如果您更喜欢商务用语而不是学术用语,则可以指定实验目标。 “只是尝试一堆东西,然后选择最好的东西”可能很诱人,但是预先定义问题的一点努力会使您以后放心。
Let’s define an example hypothesis. Your hypothesis takes into account your domain expertise and any preliminary research or observations you’ve made. For example:
让我们定义一个假设假设。 您的假设考虑了您的领域专业知识以及您进行的任何初步研究或观察。 例如:
Hypothesis: If I use my custom image classification model, it will deliver better accuracy compared to a ResNet50 model on the CIFAR10 dataset
假设 :如果我使用自定义图像分类模型,则与CIFAR10数据集上的ResNet50模型相比,它将提供更好的准确性

An experiment is uniquely defined by its hypothesis. By stating the hypothesis, you now have a clear path to designing an experiment, selecting the right variables and gathering enough data to accept or reject this hypothesis. Using SageMaker experiments SDK, you can define an experiment as follows. In the description, I include my experiment hypothesis.
实验由其假设唯一定义。 通过陈述假设,您现在可以清晰地设计实验,选择正确的变量并收集足够的数据来接受或拒绝该假设。 使用SageMaker实验SDK,您可以定义实验如下。 在说明中,我包括了实验假设。
The following code creates a SageMaker Experiment:
以下代码创建了一个SageMaker实验:
步骤2:定义实验变数 (Step 2: Define experiment variables)
An experiment includes a list of variables that you vary across a number of trials. These variables could be hyperparameters such as batch size, learning rate, optimizers, or model architectures or some other factor that you think can have an effect on the response i.e. accuracy or loss in our example. In the field of experimental design, these are also called controlled factors.
实验包括一系列在多个试验中变化的变量。 这些变量可能是超参数,例如批大小,学习率,优化器或模型体系结构,或者您认为可能会对响应产生影响的其他一些因素,例如本例中的准确性或损失。 在实验设计领域,这些也称为受控因素。

In our example, I want to test the efficacy of our custom neural network architecture, which I believe to be better than off-the-shelf ResNet50. Therefore model architecture is our first variable or controlled factor. I also want to study the effect of other hyperparameters on the response — optimizer (adam, sgd, rmsprop), epochs (high accuracy at fewer epochs). I can define these with the following code.
在我们的示例中,我想测试自定义神经网络体系结构的功效,我认为它比现成的ResNet50更好。 因此,模型架构是我们的第一个变量或受控因素。 我还想研究其他超参数对响应的影响-优化器(adam,sgd,rmsprop),历元(历时较少的高精度)。 我可以用以下代码定义它们。
Output:
输出:

Other hyperparameters that are not part of the experiment can be made static (unchanging across trials), so I’ll call them static hyperparameters.
可以将不属于实验的其他超参数设为静态(在各个试验之间保持不变),因此我将其称为静态超参数。
Note: This does not mean that static hyperparameters have no effect on the response. It just means that it’s not a variable you’re controlling in this experiment. There are other factors you can’t control, for example, software bugs, inefficient resource allocation by the operating system, the weather or your mood when running the experiment. These are referred to as uncontrollable factors in the field of experimental design.
注意 :这并不意味着静态超参数对响应没有影响。 这只是意味着它不是您在此实验中要控制的变量。 还有其他因素您无法控制,例如软件错误,操作系统资源分配效率低下,运行实验时的天气或您的心情。 这些在实验设计领域中被称为不可控制的因素。
第3步:跟踪实验数据集,静态参数,元数据 (Step 3: Tracking experiment datasets, static parameters, metadata)
Before I launch several experiment trials and training jobs for each of the hyperparameter options in Step 2, I have to make sure that I also track artifacts and parameters that are common across trials.
在第2步中为每个超参数选项启动多个实验试验和培训工作之前,必须确保我也跟踪各个试验中常见的工件和参数。

In this example, the following are unchanging across trials:
在此示例中,以下各项在试验中保持不变:
- Static hyperparameters (batch-size, learning-rate, weight-decay, momentum) 静态超参数(批量大小,学习率,重量衰减,动量)
- List of variables (model architectures and variable hyperparameters) 变量列表(模型架构和变量超参数)
- Training, validation and test dataset 培训,验证和测试数据集
- Dataset preprocessing script that generates TFRecord files 生成TFRecord文件的数据集预处理脚本
You can track anything else you want to be associated with this experiment. The following code creates a tracker called “experiment-metadata” with the above information:
您可以跟踪与此实验相关的任何其他内容。 以下代码使用上述信息创建一个名为“ experiment-metadata”的跟踪器:
This tracker is a Trial component that is not currently associated with an experiment. Recall that from “Anatomy of a machine learning experiment” a Trial Component cannot be associated with an Experiment directly. It must be associated with a Trial first. In the next section, I’ll associated this common Trial Component with all the Trial in the Experiment.
该跟踪器是目前不与实验关联的试用组件。 回想一下,在“机器学习实验的解剖学”中,试用组件不能直接与实验关联。 必须先与试用版关联。 在下一节中,我将将此通用试用组件与实验中的所有试用相关联。
步骤4:创建试用版并启动培训工作 (Step 4: Create Trials and launch training jobs)
In Step 2, I created a list of 18 variable sets by varying optimizer, model and epochs. In this step, I’ll loop through these sets and create a Trial and a training job for each set. Here is the approach. For each variable set I will:
在第2步中,我通过更改优化器,模型和纪元创建了18个变量集的列表。 在这一步中,我将循环浏览这些集合,并为每个集合创建一个试用版和一份培训工作。 这是方法。 对于每个变量集,我将:

- Create a Trial and associate it with the Experiment 创建一个试验并将其与实验相关联
- Associate the Tracker in Step 3 with this Trial as a Trial Component 将步骤3中的跟踪器与此试用版作为试用组件相关联
- Create a new Tracker to track Trial specific hyperparameters and associate it with the Trial as a Trial Component 创建一个新的跟踪器以跟踪特定于试验的超参数,并将其与作为试验组件的试验相关联
- Create a training job with the Trial specific hyperparameters and associate it with the Trial as a training job Trial Component 使用Trial特定的超参数创建培训工作,并将其与Trial关联为培训工作Trial Component
The following code excerpt shows how to implement steps a-d above.
以下代码摘录显示了如何实现上述步骤ad。
The excerpt is shown for illustration only, for a complete example, run this notebook on Github: https://github.com/shashankprasanna/sagemaker-experiments-examples/blob/master/sagemaker-experiment-examples.ipynb
摘录仅作为示例显示,有关完整示例,请在Github上运行此笔记本: https : //github.com/shashankprasanna/sagemaker-experiments-examples/blob/master/sagemaker-experiment-examples.ipynb
After you run the above code, you’ll see SageMaker spawn multiple training jobs, each associated with its unique Trial.
运行上面的代码后,您将看到SageMaker产生了多个训练作业,每个训练作业都与其唯一的Trial相关。

In Amazon SageMaker Studio, you can also view the Experiment Trial on the Experiment pane on the left.
在Amazon SageMaker Studio中,您还可以在左侧的“实验”窗格上查看“实验试用版”。

If you double click on one of the Trials and you can see the associated Trial components:
如果双击其中一个试用版,则可以看到相关的试用版组件:

cifar10-training-rmsprop-resnet-120-XXXXX: Trial component for the training job
cifar10-training-rmsprop-resnet-120-XXXXX :培训工作的试用组件
trial-metadata-XXXXX: Trial Component for the Trial specific hyperparameters
trial-metadata-XXXXX :试验专用超参数的试验组件
experiment-metadata: Trial Component for entities common to all Trials (Static hyperparameters, list of variables, training, validation and test dataset, dataset preprocessing script)
实验元数据 :所有试验共有的实体的试验组件(静态超参数,变量列表,训练,验证和测试数据集,数据集预处理脚本)
步骤5:分析实验结果 (Step 5: Analyzing Experiment results)
After the training jobs have finished running, I can now compare all the Trial runs and draw inferences about the Experiment. With a little bit of effort upfront in carefully defining and organizing your experiments and leveraging services like SageMaker Experiments, you won’t have to spend too much time pulling up reports for analysis by combining multiple digital and analog sources. You can take a vacation or work on a different project while your boss thinks you’re hard at work combing through Git commits, audit trails and entering data into spreadsheets.
培训工作完成后,我现在可以比较所有的试用运行并得出有关实验的推论。 通过前期的努力,仔细定义和组织实验并利用SageMaker Experiments等服务,您无需花费太多时间就可以通过组合多个数字和模拟源来提取报告进行分析。 您可以休假或从事其他项目,而老板则认为您很难通过Git提交,审计跟踪以及将数据输入电子表格进行梳理。

In this section, I’ll pull a report on the experiment I just ran. All I need is the name of the experiment, and using the SageMaker Experiments package, I can pull up analytics using the following code:
在本部分中,我将为我刚刚进行的实验提供一份报告。 我需要的只是实验的名称,使用SageMaker Experiments程序包,我可以使用以下代码提取分析数据:
In the output below, you can see that the (1) best accuracy overall (2) best accuracy @ 60 epochs and (3) best accuracy @ 30 epochs all corresponds to my custom model.
在下面的输出中,您可以看到(1)总体上最高的精度(2)60个时代下的最佳精度和(3)30个时代下的最佳精度都与我的自定义模型相对应。
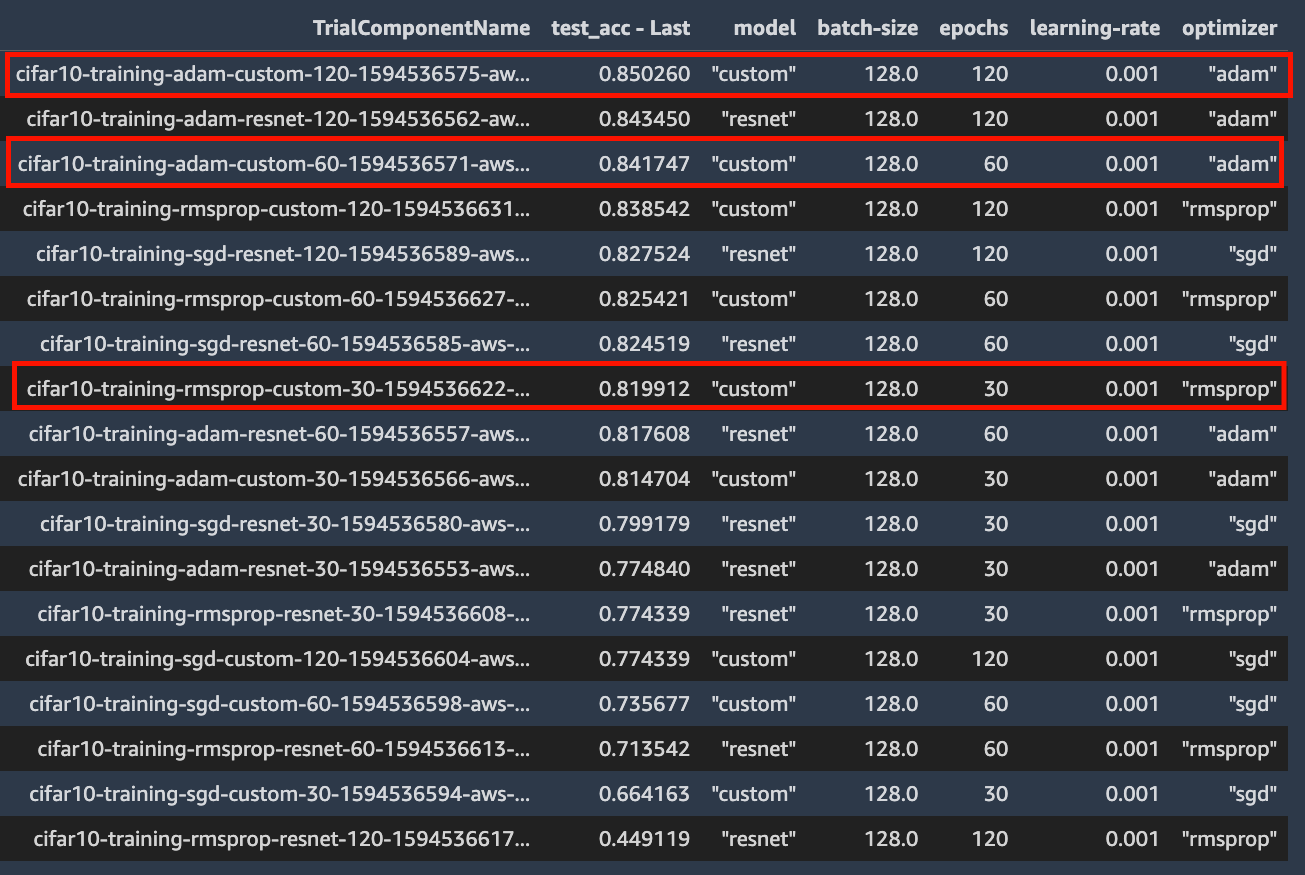
I can use this data to either accept or reject my hypothesis that my custom model delivers better accuracy than ResNet50 for the CIFAR10 dataset. I built this example to illustrate the key concepts of experiment management, and the above data may not be sufficient to draw any conclusions. In which case you can conduct another experiment by updating your hypothesis and variables.
我可以使用这些数据来接受或拒绝这样的假设,即我的自定义模型比CIFAR10数据集的ResNet50精度更高。 我建立了这个示例来说明实验管理的关键概念,以上数据可能不足以得出任何结论。 在这种情况下,您可以通过更新假设和变量来进行另一项实验。
(奖金)第6步:使用SageMaker Debugger可视化性能曲线 ((Bonus) Step 6: Using SageMaker Debugger to visualize performance curves)
If you like to dive deep into each training job and analyze metrics, weights or gradient information, you can use SageMaker Debugger. SageMaker Debugger automatically captures some default debug information from every training job, and you can also customize what data should be emitted for later analysis. If you’re interested in debugging machine learning with SageMaker check out my earlier post that does a deep dive on debugging:
如果您想深入研究每个培训工作并分析指标,权重或渐变信息,则可以使用SageMaker Debugger。 SageMaker Debugger会自动从每个培训作业中捕获一些默认调试信息,并且您还可以自定义应发出哪些数据以供以后分析。 如果您对使用SageMaker调试机器学习感兴趣,请查看我之前的文章,该文章深入探讨了调试:
Blog post: How to debug machine learning models to catch issues early and often
博客文章: 如何调试机器学习模型以及早发现问题
The smdebug open source library lets you read and analyze debug data. The code below will download validation accuracy for all Trials for each step during training, and plot the 3 top models for 30, 60 and 90 epochs. You can also plot intermediate tensors and gradients during training for further debugging. Check out the above blog post for more details.
smdebug开源库使您可以读取和分析调试数据。 下面的代码将下载训练期间每个步骤的所有试验的验证准确性,并绘制30个,60个和90个时期的3个顶级模型。 您还可以在训练期间绘制中间张量和渐变,以进行进一步调试。 查看上面的博客文章以了解更多详细信息。

谢谢阅读 (Thanks for reading)
We’ve come a long way since the early days of machine learning. From high-quality open-source machine learning frameworks to fully-managed services for training and deploying models at scale, and end-to-end experiment management, there are no shortages of tools no matter what your machine learning needs are. In this blog post, I covered how you can alleviate pains associated with managing machine learning experiments, using Amazon SageMaker. I hope you enjoyed reading. All the code and examples are available on GitHub here:
从机器学习的早期开始,我们已经走了很长一段路。 从高质量的开源机器学习框架到全面培训的服务(用于大规模培训和部署模型)以及端到端实验管理,无论您的机器学习需求是什么,都不会缺少工具。 在此博客文章中,我介绍了如何使用Amazon SageMaker减轻与管理机器学习实验相关的麻烦。 希望您喜欢阅读。 所有代码和示例都可以在GitHub上找到:
https://github.com/shashankprasanna/sagemaker-experiments-examples
https://github.com/shashankprasanna/sagemaker-experiments-examples
If you found this article interesting, please check out my other blog posts on machine learning and SageMaker:
如果您发现本文有趣,请查看我有关机器学习和SageMaker的其他博客文章:
How to debug machine learning models to catch issues early and often
A quick guide to distributed training with TensorFlow and Horovod on Amazon SageMaker
A quick guide to using Spot instances with Amazon SageMaker to save on training costs
Kubernetes and Amazon SageMaker for machine learning — best of both worlds
If you have questions about this article, suggestions on how to improve it or ideas for new posts, please reach out to me on twitter (@shshnkp), LinkedIn or leave a comment below. Enjoy!
如果您对本文有疑问,关于如何改进本文的建议或新文章的想法,请在Twitter( @shshnkp ), LinkedIn上与我联系或在下面发表评论。 请享用!
翻译自: https://towardsdatascience.com/a-quick-guide-to-managing-machine-learning-experiments-af84da6b060b
机器学习指南


 5793
5793

 被折叠的 条评论
为什么被折叠?
被折叠的 条评论
为什么被折叠?
 到【灌水乐园】发言


