


gke下载
Managing secrets natively in Kubernetes is not a secure option. Secrets in Kubernetes is just a base64 encoded plain text that can be consumed in a running pod.
在Kubernetes中本地管理机密不是安全的选择。 Kubernetes中的秘密只是base64编码的纯文本,可以在运行的pod中使用。
Disclaimer:This tutorial is designed to give you the understanding of each component on the setup in a step by step fashion. Nothing stopping you from using terraform to create that setup, but going blindly after such an important setup will lead to issues that would be harder to resolve without that deep understanding.
免责声明 : 本教程旨在使您逐步了解设置中的每个组件。 没有什么可以阻止您使用 terraform 来创建该设置的,但是在如此重要的设置之后盲目地操作会导致问题,如果没有那么深入的了解就很难解决。

Sure you can encrypt a secret in Kubernetes, but that secret is only encrypted at rest and when mounted inside the Pod, it is only a file or env vars that can be easily accessed from within the Pod so in case of a breach the data could be compromised if someone has access to the Pod or even to the namespace where the pod is via kubectl.
当然,您可以在Kubernetes中加密一个机密 ,但是该机密仅在静态时加密,并且在挂载到Pod内时,只有文件或env vars可以从Pod内轻松访问,因此在发生数据泄露时可以如果有人可以通过kubectl访问Pod,甚至可以访问Pod所在的名称空间,就会受到损害。
Hasicorp Vault is a secure way to manage secrets as well as audit and revoke access to them. it’s one thing to install and use vault but another to consume those secrets on a Pod.
Hasicorp Vault是管理机密以及审核和撤消对它们的访问的安全方法。 安装和使用保管库是一回事,而在Pod上使用这些机密则是另一回事。
This post is about installing Vault on GKE with Terraform and Helm, for consuming these secrets you can further read my other blog post on consuming secrets from Vault transparently on a Pod.
这篇文章是关于使用Terraform和Helm在GKE上安装Vault的,为了使用这些秘密,您可以进一步阅读我的其他博客文章, 在Pod上透明地从Vault中消费秘密 。
This approach is somewhat easier to manage if you’re only looking for Vault and do not need the advance Consul features such as Consul template with Vault.
如果您只想寻找Vault而不需要高级的Consul功能(例如Vault的 C onsul模板),则这种方法的管理会更容易一些。
In this tutorial, I will go over how to install a high availability vault using Google Storage GCS as Vault backend with TLS end to end.
在本教程中,我将介绍如何使用Google Storage GCS作为具有TLS端到端的保管库后端来安装高可用性保管库。
Note:You should create the Vault setup per environment, to better tests upgrades and separate the environments from each other.
注意: 您应该为每个环境创建保管库设置,以更好地测试升级并将环境彼此分离。
I do not recommend exposing the vault as a service, should you need to access it you can do that via the command:
我不建议将保管库公开为服务,如果需要访问它,可以通过以下命令进行操作:
$ kubectl port-forward vault-0 8200:8200and access the UI via https://127.0.0.1:8200 as detailed below.
并通过https://127.0.0.1:8200访问UI,如下所述。
If you have VM’s that need to access that vault, you should use VPC peering since services and pods are native IP’s — this is not covered here.
如果您有需要访问该保管库的VM,则应使用VPC对等,因为服务和Pod是本机IP -在此不介绍。
教程: (Tutorial:)
Outline:
大纲:
- Create TLS certificates for vault 创建Vault的TLS证书
- Create a GCS Bucket for Vault storage backend 为Vault存储后端创建GCS存储桶
- Create KMS keyring and encryption key for Vault auto-unseal. 为Vault自动解封创建KMS密钥环和加密密钥。
- Create service accounts for Vault to access KMS and GCS storage backend. 为Vault创建服务帐户以访问KMS和GCS存储后端。
- Install Hashicorp vault official Helm chart via helm tillerless. 通过头盔舵柄安装Hashicorp Vault官方头盔表。
为保险柜创建TLS证书: (Creating TLS certificates for Vault:)
One of the Production hardening recommendations is that communications between vault and clients will be encrypted by TLS both for incoming and outgoing traffic.
强化生产的建议之一是,对于入站和出站流量,保管库和客户端之间的通信将通过TLS加密。
We are going to create a certificate that will be used for:
我们将创建一个证书,该证书将用于:
- Kubernetes vault service address. Kubernetes保管库服务地址。
- 127.0.0.1 127.0.0.1
We will use CloudFlare SSL took kit (cfssl and cfssljson) in order to generate these certificates.
我们将使用CloudFlare SSL接受套件( cfssl和cfssljson )来生成这些证书。
Installation requires a working Go 1.12+ installation and a properly set GOPATH.
安装需要可正常运行的Go 1.12+安装和正确设置的GOPATH 。
Important!: make sure the GOPATH bin is in your path:
重要!:确保GOPATH箱位于您的路径中:
export PATH=$GOPATH/bin:$PATHInstalling CloudFlare SSL ToolKit:
安装CloudFlare SSL ToolKit:
go get -u github.com/cloudflare/cfssl/cmd/cfssl
go get -u github.com/cloudflare/cfssl/cmd/cfssljson
Initialize a Certificate Authority (CA):
初始化证书颁发机构(CA):
$ mkdir vault-ca && cd vault-caCreate the CA files:CA config file with the expiration of 5 years
创建CA文件: CA配置文件,有效期为5年
$ cat <<EOF > ca-config.json
{
  "signing": {
    "default": {
      "expiry": "8760h"
    },
    "profiles": {
      "default": {
        "usages": ["signing", "key encipherment", "server auth", "client auth"],
        "expiry": "8760h"
      }
    }
  }
}
EOF
CA Signing Request:
CA签名请求:
$ cat <<EOF > ca-csr.json
{
  "hosts": [
    "cluster.local"
  ],
  "key": {
    "algo": "rsa",
    "size": 2048
  },
  "names": [
    {
      "C": "US",
      "L": "NewYork",
      "O": "Kubernetes",
      "OU": "CA",
      "ST": "NewYork"
    }
  ]
}
EOF
VAULT Certificate Signing Request to be signed by the CA above:note: change the namespace for vault if it's not the default namespace
上面的CA将对VAULT证书签名请求进行签名: 注意:如果不是默认名称空间,请更改Vault的名称空间
$ cat <<EOF > vault-csr.json
{
  "CN": "Vault-GKE",
  "hosts": [
    "127.0.0.1",
    "vault.default.svc.cluster.local"
  ],
  "key": {
    "algo": "rsa",
    "size": 2048
  },
  "names": [
    {
      "C": "US",
      "L": "NewYork",
      "O": "Innovia",
      "OU": "Vault",
      "ST": "NewYork"
    }
  ]
}
EOF
Obviously, you can change the cert info on the bottom under the “names” section to your liking.
显然,您可以根据自己的喜好更改底部“名称”部分下的证书信息。
Run the following command to initialize the CA using the file you’ve just edited:
运行以下命令以使用刚刚编辑的文件初始化CA:
$ cfssl gencert -initca ca-csr.json | cfssljson -bare ca2019/11/12 16:35:01 [INFO] generating a new CA key and certificate from CSR
2019/11/12 16:35:01 [INFO] generate received request
2019/11/12 16:35:01 [INFO] received CSR
2019/11/12 16:35:01 [INFO] generating key: rsa-2048
2019/11/12 16:35:01 [INFO] encoded CSR
2019/11/12 16:35:01 [INFO] signed certificate with serial number 425581644650417483788325060652779897454211028144
Create a private key and sign the TLS certificate:
创建一个私钥并签署TLS证书:
$ cfssl gencert \
  -ca=ca.pem \
  -ca-key=ca-key.pem \
  -config=ca-config.json \
  -profile=default \
  vault-csr.json | cfssljson -bare vault2019/11/12 16:36:33 [INFO] generate received request
2019/11/12 16:36:33 [INFO] received CSR
2019/11/12 16:36:33 [INFO] generating key: rsa-2048
2019/11/12 16:36:34 [INFO] encoded CSR
2019/11/12 16:36:34 [INFO] signed certificate with serial number 311973563616303179057952194819087555625015840298
At this point you should have the following files in the current working directory:
此时,您应该在当前工作目录中具有以下文件:
ca-key.pem
ca.pem
vault-key.pem
vault.pem
keep the CA files secured you will need to use them to resign the cert when its expires (CA is for 5 years, Vault is for 1year)
确保CA文件的安全,您将需要使用它们在证书过期时对证书进行签名(CA为5年,保险柜为1年)
Create a secret for the Vault TLS and CA.pem
为Vault TLS和CA.pem创建机密
kubectl create secret generic vault-tls \
  --from-file=ca.pem \
  --from-file=vault.pem \
  --from-file=vault-key.pem
Set GCP Project for rest of this tutorial:
在本教程的其余部分中设置GCP项目:
$ export GCP_PROJECT=<your_project_id>Enabling GCP APIs required by this tutorial:
启用本教程所需的GCP API:
$ gcloud services enable \
    cloudapis.googleapis.com \
    cloudkms.googleapis.com \
    container.googleapis.com \
    containerregistry.googleapis.com \
    iam.googleapis.com \
    --project ${GCP_PROJECT}Operation "operations/acf.8e126724-bbde-4c0d-b516-5dca5b8443ee" finished successfully.
保管库存储后端 (Vault Storage Backend)

When running in HA mode, Vault servers have two additional states: standby and active. Within a Vault cluster, only a single instance will be active and handles all requests (reads and writes) and all standby nodes redirect requests to the active node.
在高可用性模式下运行时,Vault服务器具有两个附加状态: 待机和活动 。 在Vault群集中,只有一个实例将处于活动状态并处理所有请求(读取和写入),并且所有备用节点都将请求重定向到活动节点。
Let’s create the bucket on gcs using the gsutil command, Bucket names must be globally unique across all of Google Cloud, so choose a unique name
让我们使用gsutil命令在gcs上创建存储桶,存储桶名称在所有Google Cloud中必须是全局唯一的,因此请选择一个唯一的名称
$ export $ gsutil mb gs://$$ gsutil versioning set on gs://Even though the data is encrypted in transit and at rest, be sure to set the appropriate permissions on the bucket to limit exposure. You may want to create a service account that limits Vault’s interactions with Google Cloud to objects in the storage bucket using IAM permissions.
即使数据在传输和静止时都已加密,也请确保在存储桶上设置适当的权限以限制暴露。 您可能想要创建一个服务帐户,以使用IAM权限将保险柜与Google Cloud的交互限制到存储桶中的对象。
保管箱自动开封 (Vault Auto unseal)

when Vault is restarted it starts up sealed and encrypted. in order to use it you must unseal it, there’s a new feature with is auto unseal that can read the master keys and root token from CloudKMS automatically.
重新启动保管库后,它将启动并进行密封和加密。 为了使用它,您必须将其开封,其中有一个具有自动开封功能的新功能,该功能可以自动从CloudKMS读取主密钥和根令牌。
Create KMS Keyring and Crypto Key:
创建KMS密钥环和加密密钥:
In this section we will create the KMS keyring and key for encrypting and decrypting vault master keys and root token:
在本部分中,我们将创建KMS密钥环和密钥,用于对保管库主密钥和根令牌进行加密和解密:
Create the vault-helm-unseal-kr kms keyring:
创建vault-helm-unseal-kr kms密钥环:
$ gcloud kms keyrings create
    --location global \
    --project ${GCP_PROJECT}
Create the encryption key:
创建加密密钥:
$ gcloud kms keys create
    --location global \
    --keyring
    --purpose encryption \
    --project ${GCP_PROJECT}
创建GCP服务帐户和Vault的IAM权限 (Create the GCP service accounts and IAM permissions for vault)
Setup variables:
设置变量:
$ export VAULT_SA_NAME=vault-server;
 export VAULT_SA=iam.gserviceaccount.com
Create the vault server service account:
创建Vault服务器服务帐户:
$ gcloud iam service-accounts create $VAULT_SA_NAME \
    --display-name "Vault server service account" \
    --project ${GCP_PROJECT}
Create the Vault server service account key (credentials JSON file):
创建Vault服务器服务帐户密钥(凭据JSON文件):
$ gcloud iam service-accounts keys create \
      --iam-account $VAULT_SA /tmp/vault_gcs_key.jsoncreated key [be22cfe6e30f3a3fcfc6ebaa23ca3ba905dd60ab] of type [json] as [/tmp/vault_gcs_key.json] for [vault-server@ami-playground.iam.gserviceaccount.com]
Create the secret to store the vault google service account in
创建秘密以将Vault Google服务帐户存储在
$ kubectl create secret generic vault-gcs \
  --from-file=/tmp/vault_gcs_key.jsonsecret/vault-gcs created
Grant access to vault storage GCS Bucket:
授予对保管库存储GCS桶的访问权限:
$
  serviceAccount:
  gs://${GCS_BUCKET_NAME}
Grant access to the vault kms key:
授予对保管库kms密钥的访问权限:
$ gcloud kms keys add-iam-policy-binding \
    --location global \
    --keyring
    --member serviceAccount:${VAULT_SA} \
    --role roles/cloudkms.cryptoKeyEncrypterDecrypter \
    --project ${GCP_PROJECT}Updated IAM policy for key [vault-helm-unseal-key].
bindings:
- members:
  - serviceAccount:vault-server@ami-playground.iam.gserviceaccount.com
  role: roles/cloudkms.cryptoKeyEncrypterDecrypter
etag: BwWZ6sIYovk=
version: 1Note:If for some reason you have deleted the service account and recreated it you must delete the IAM policy on the key, else skip to the Get the vault hashicorp official chart
注意: 如果由于某种原因删除了服务帐户并重新创建了该帐户,则必须删除密钥上的IAM策略,否则请跳至“获取文件库hashicorp官方图表”
$ gcloud kms keys get-iam-policy vault-helm-unseal-key --location global --keyring vault-helm-unseal-kr > kms-policy.yamledit the policy file and remove the members under binding then save the file
编辑策略文件并删除绑定下的成员,然后保存文件
bindings:etag: BwWXQz4HjuI=version: 1re-apply the policy:
重新应用该政策:
$ gcloud kms keys set-iam-policy vault-helm-unseal-key --location global --keyring vault-helm-unseal-kr kms-policy.yamlGet the Vault official Hashicorp chart:
获取保险柜官方Hashicorp图表:

note:
注意:
starting from version 0.3.0 there’s a Kubernetes vault integration that will automatically inject secrets to Pod by rendering the secret as a file on a volume. I highly recommend using my vault secrets webhook because it is a more secure way of injecting a secret to a Pod as well as automating the consumption of the secrets.
从0.3.0版本开始,提供了Kubernetes保管库集成,通过将秘密作为文件呈现在卷上,它将自动将秘密注入Pod。 我强烈建议使用我的保管库秘密Webhook,因为它是将秘密注入Pod以及自动使用秘密的一种更安全的方法。
export CHART_VERSION=0.3.0Get the chart and unpack it:
获取图表并解压缩:
$ wget https://github.com/hashicorp/vault-helm/archive/v$CHART_VERSION.tar.gz && tar zxf v$CHART_VERSION.tar.gz && rm v$CHART_VERSION.tar.gzSetting the values.yaml for the chart:
设置图表的values.yaml:
The following gist has place holders for variables substitution
以下要点具有用于变量替换的占位符
global:
  tlsDisable: false


server:
  # resources:
  #   requests:
  #     memory: 256Mi
  #     cpu: 250m
  #   limits:
  #     memory: 256Mi
  #     cpu: 250m
  extraEnvironmentVars:
    GOOGLE_APPLICATION_CREDENTIALS: /vault/userconfig/vault-gcs/vault_gcs_key.json
  extraVolumes:
  - type: secret
    name: vault-gcs
    path: "/vault/userconfig"
  - type: secret
    name: vault-tls
    path: "/etc/tls"


  authDelegator:
    enabled: true


  ha:
    enabled: true
    # This should be HCL.
    config: |
      ui = true

      listener "tcp" {
        tls_disable = 0
        tls_cert_file = "/etc/tls/vault-tls/vault.pem"
        tls_key_file = "/etc/tls/vault-tls/vault-key.pem"
        tls_client_ca_file =  "/etc/tls/vault-tls/ca.pem"
        tls_min_version = "tls12"
        address = "[::]:8200"
        cluster_address = "[::]:8201"
      }

      storage "gcs" {
        bucket     = "GCS_BUCKET_NAME"
        ha_enabled = "true"
      }

      # Example configuration for using auto-unseal, using Google Cloud KMS. The
      # GKMS keys must already exist, and the cluster must have a service account
      # that is authorized to access GCP KMS.
      seal "gcpckms" {
        project     = "GCP_PROJECT"
        region      = "global"
        key_ring    = "vault-helm-unseal-kr"
        crypto_key  = "vault-helm-unseal-key"
      }

  # Exposing VAULT UI to a GCP loadbalancer WITH IAP Backend config
  # 1. create the backend config https://cloud.google.com/iap/docs/enabling-kubernetes-howto
  # 2. create a Google Managed Certificate https://cloud.google.com/load-balancing/docs/ssl-certificates
  # 3. create static global ip  "gcloud compute addresses create vault-ui --global"
  #    and set the loadBalancerIP below
  # 4. create a DNS entry for that IP - and update the host in the ingress section below
  # 5. uncomment the section below
  # 6. install
  # -------------------------------------
  # readinessProbe:
  #   enabled: true
  #   path: /v1/sys/health?standbyok=true


  # ui:
  #   enabled: true
  #   serviceType: "NodePort"
  #   externalPort: 443
  #   loadBalancerIP: "LOAD_BALANCER_IP"


  # service:
  #   clusterIP: {}
  #   type: NodePort
  #   annotations:
  #     cloud.google.com/app-protocols: '{"http":"HTTPS"}'
  #     beta.cloud.google.com/backend-config: '{"ports": {"http":"config-default"}}'


  # ingress:
  #   enabled: true
  #   labels: {}
  #   # traffic: external
  #   annotations:
  #     # must be global static ip not regional!
  #     kubernetes.io/ingress.global-static-ip-name: "vault-ui"
  #     #the controller will only create rules for port 443 based on the TLS section.
  #     kubernetes.io/ingress.allow-http: "false"
  #     # represents the specific pre-shared SSL certificate for the Ingress controller to use.
  #     networking.gke.io/managed-certificates: "vault-ui-certificate"
  #     # kubernetes.io/tls-acme: "true"
  #   hosts:
  #     - host: vault.domain.com
  #       paths:
  #       - /*
use the command below to create a new values files called vault-gke-values.yaml
使用以下命令创建名为vault-gke-values.yaml的新值文件
$ curl -s https://gist.githubusercontent.com/innovia/53c05bf69312706fc93ffe3bb685b223/raw/adc169605984da8ba82082191c8f631579b1b199/vault-gke-values.yaml | sed "s/GCP_PROJECT/$GCP_PROJECT/g" | sed "s/GCS_BUCKET_NAME/$GCS_BUCKET_NAME/g" > vault-helm-$CHART_VERSION/vault-gke-values.yamlInspect the created file to make sure you have the correct project and GCS bucket.
检查创建的文件,以确保您具有正确的项目和GCS存储桶。
$ cat vault-helm-$CHART_VERSION/vault-gke-values.yaml | grep -E 'bucket|project'bucket     = "<COMPANY>-vault-data"
project    = "ami-playground"
using helm 2.x:
使用头盔2.x:
If you don’t have tiller installed on the cluster you can skip the tiller setup by installing a tillerless plugin for helm, which will bring up local tiller on your computer and point helm to use that, otherwise skip to the install the vault chart section below.
如果群集上未安装耕till机,则可以通过安装舵柄的免耕er插件来跳过耕setup机设置,这将在计算机上调出本地耕er机并指向舵柄以使用该插件,否则请跳至安装库表部分下面。
Install the tillerless helm plugin:
安装免耕舵掌插件:
if you don't have helm already install it via
如果您还没有头盔通过安装
$ brew install helm@2Initialize the client-only so that tiller server is not installed
初始化仅客户端,以便不安装分er服务器
helm init --client-onlyinstall helm-tillerless plugin
安装helm-tillerless插件
helm plugin install https://github.com/rimusz/helm-tillerstart tiller via helm
通过舵手开始分till
$ helm tiller startInstalled Helm version v2.16.1
Copied found /usr/local/bin/tiller to helm-tiller/bin
Helm and Tiller are the same version!
Starting Tiller...
Tiller namespace: kube-system
Using helm 3
使用头盔3
$ brew install helmInstall the Vault chart:
安装保险柜图:
note: if you are using helm 3 the output will not list the resources.
注意:如果使用的是头盔3,则输出将不会列出资源。
$ helm upgrade --install vault -f vault-helm-$CHART_VERSION/vault-gke-values.yaml vault-helm-$CHART_VERSIONrelease "vault" does not exist. Installing it now.
NAME:   vault
LAST DEPLOYED: Wed Nov 13 15:41:55 2019
NAMESPACE: default
STATUS: DEPLOYEDRESOURCES:
==> v1/ConfigMap
NAME          AGE
vault-config  0s==> v1/Service
NAME   AGE
vault  0s==> v1/ServiceAccount
NAME   AGE
vault  0s==> v1/StatefulSet
NAME   AGE
vault  0s==> v1beta1/ClusterRoleBinding
NAME                  AGE
vault-server-binding  0s==> v1beta1/PodDisruptionBudget
NAME   AGE
vault  0sNOTES:Thank you for installing HashiCorp Vault!Now that you have deployed Vault, you should look over the docs on using
Vault with Kubernetes available here:https://www.vaultproject.io/docs/Your release is named vault. To learn more about the release, try:$ helm status vault
  $ helm get vault
Vault should start running and be in an uninitialized state.
保管箱应开始运行,并且处于未初始化状态。
The following warnings are OK since vault is un-initialized yet:
由于尚未初始化保管库,以下警告是可以的 :
=> Vault server started! Log data will stream in below:2019-12-17T19:07:37.937Z [INFO]  proxy environment: http_proxy= https_proxy= no_proxy=
2019-12-17T19:07:38.909Z [INFO]  core: stored unseal keys supported, attempting fetch
2019-12-17T19:07:39.037Z [WARN]  failed to unseal core: error="stored unseal keys are supported, but none were found"
2019-12-17T19:07:44.038Z [INFO]  core: stored unseal keys supported, attempting fetch
2019-12-17T19:07:44.080Z [INFO]  core: autoseal: seal configuration missing, but cannot check old path as core is sealed: seal_type=recovery
2019-12-17T19:07:44.174Z [WARN]  failed to unseal core: error="stored unseal keys are supported, but none were found"---
kubectl describe pod vault-0Events:
  Type     Reason     Age               From               Message
  ----     ------     ----              ----               -------
  ...
  Warning  Unhealthy  3s (x9 over 27s)  kubelet, minikube  Readiness probe failed: Key                      Value
使用KMS自动解封初始化保管库 (Initialize vault with KMS auto unseal)
open up a port-forward to Vault using the command:
使用以下命令打开到Vault的端口转发:
$ kubectl port-forward vault-0 8200:8200 > /dev/null & export PID=$!; echo "vault port-forward pid: $PID"Connect to Vault using the CA.pem cert
使用CA.pem证书连接到保险柜
$ export VAULT_ADDR=https://127.0.0.1:8200;
  export VAULT_CACERT=$PWD/ca.pemmy vault ca.pem for example is at:
VAULT_CACERT: /Users/ami/vault-gke-medium/ca.pem
Install vault client (make sure your client is the same version as the server)
安装Vault客户端(确保您的客户端与服务器版本相同)
$ brew install vaultCheck the status:
检查状态:
$ vault status
Key                      Value
---                      -----
Recovery Seal Type       gcpckms
Initialized              false
Sealed                   true
Total Recovery Shares    0
Threshold                0
Unseal Progress          0/0
Unseal Nonce             n/a
Version                  n/a
HA Enabled               true
now initialize vault:
现在初始化保管库:
vault operator initRecovery Key 1: 33nCanHWgYMR/VPj6bNQdHXJiayL6WeB8Ourx4kHYNaX
Recovery Key 2: IMf7RjptFxtGQUbEWUWehanCBiSY7VhElkM7rRVxczGc
Recovery Key 3: zGuzk/PhNet9OHL4cW2H7d3XypDxfwWXkmajclLPklK4
Recovery Key 4: nCFS0dt0cNGB2LWk0F+3Vmz9TbVNpeIsXbIXDbRarlnT
Recovery Key 5: 9GxXr/6T8OJWJrWqyHQxayR0BAK+WTdbT870AzKEFl2VInitial Root Token: s.1ukhSgycySjZUJRD0bZjSEitSuccess! Vault is initializedRecovery key initialized with 5 key shares and a key threshold of 3. Please
securely distribute the key shares printed above.
Keep these keys safe.
请妥善保管这些钥匙。
Trusting the self-signed certificate authority:
信任自签名证书颁发机构:
Since we have created the ca.pem by ourselves, it will not be trusted since it is not a part of the CA’s bundle that comes with your computer.
由于我们是由我们自己创建的ca.pem,因此它不受信任,因为它不是计算机随附的CA捆绑软件的一部分。
we can add a trust by following the instructions below for your operating system.
我们可以按照以下针对您的操作系统的说明来添加信任。
Mac OS:Setting “always trust” for the CA will allow you to open Vault UI in the browser without any errors:
Mac OS:为CA设置“始终信任”将使您可以在浏览器中打开Vault UI,而不会出现任何错误:
$ sudo security add-trusted-cert -d -k /Library/Keychains/System.keychain $VAULT_CACERTWindows 10:Follow the instructions here to add the cert to the trusted publishers:
Windows 10:按照此处的说明将证书添加到受信任的发布者:
使用Vault设置Kubernetes后端身份验证 (Setting up Kubernetes backend authentication with Vault)
Now that Vault is up and highly available we can move forward and connect Vault with Kubernetes.
现在Vault已启动并具有高度可用性,我们可以继续进行操作并将Vault与Kubernetes连接。
We will use a service account to do the initial login of Vault to Kubernetes,
我们将使用服务帐户对Vault进行首次登录Kubernetes,
This service account token will be configured inside the vault using vault CLI.
将使用Vault CLI在Vault内部配置此服务帐户令牌。
This service account has special permission called “system:auth-delegator” that will allow vault to pass the service account of the pod to Kubernetes for authentication, once authenticated vault returns a vault login token to the client that will talk to Vault and get the secrets it needs.
该服务帐户具有特殊的权限,称为“ system:auth-delegator”,该权限将允许Vault将Pod的服务帐户传递给Kubernetes进行身份验证,一旦经过身份验证的Vault将Vault登录令牌返回给客户端,客户端将与Vault进行对话并获取Vault登录令牌。它需要的秘密。
The client will use the login token and login to Vault to get the secretVault will check a mapping between a vault role, service account, namespace and the policy to allows/deny the access.
客户端将使用登录令牌并登录到Vault,以使secretVault将检查Vault角色,服务帐户,名称空间和允许/拒绝访问策略之间的映射。
let’s create the service account for that vault-reviewer
让我们为该保管库审阅者创建服务帐户
apiVersion: v1
kind: ServiceAccount
metadata:
  name: vault-reviewer
  namespace: default
---
apiVersion: rbac.authorization.k8s.io/v1beta1
kind: ClusterRoleBinding
metadata:
  name: role-tokenreview-binding
  namespace: default
roleRef:
  apiGroup: rbac.authorization.k8s.io
  kind: ClusterRole
  name: system:auth-delegator
subjects:
- kind: ServiceAccount
  name: vault-reviewer
namespace: defaultPlease note; if you have set up Vault on any other namespace, make sure to update this file accordingly.
请注意; 如果您已在任何其他命名空间上设置了Vault,请确保相应地更新此文件。
kubectl apply -f vault-reviewer.yamlenable the Kubernetes auth backend:
启用Kubernetes身份验证后端:
# Make sure you are logged in to vault using the root token$ vault login$ vault auth enable kubernetes
Success! Enabled kubernetes auth method at: kubernetes/
Configure Vault with the vault-reviewer token and ca:
使用Vault-Reviewer令牌和ca配置Vault:
note: if you setup vault on any other namespace set the -n <namespace> flag after each kubectl command
注意:如果您在其他任何命名空间上设置了Vault,则在每个kubectl命令之后设置-n <namespace>标志
$ VAULT_SA_TOKEN_NAME=$(kubectl get sa vault-reviewer -o jsonpath="{.secrets[*]['name']}")$ SA_JWT_TOKEN=$(kubectl get secret "$VAULT_SA_TOKEN_NAME" -o jsonpath="{.data.token}" | base64 --decode; echo)$ SA_CA_CRT=$(kubectl get secret "$VAULT_SA_TOKEN_NAME" -o jsonpath="{.data['ca\.crt']}" | base64 --decode; echo)$ vault write auth/kubernetes/config token_reviewer_jwt="$SA_JWT_TOKEN" kubernetes_host=https://kubernetes.default kubernetes_ca_cert="$SA_CA_CRT"Success! Data written to: auth/kubernetes/configBasic requirements for a pod to access a secret:
吊舱访问机密的基本要求:
- the Pod must have a service account Pod必须有一个服务帐户
- the Vault CA.pem secret must exist on the namespace that the Pod is running on Vault CA.pem机密必须存在于Pod运行所在的名称空间上
- a policy with a minimum read to the secret must exist 必须至少读取机密的策略
path "secret/foo" {
 capabilities = ["read"]
}- a Vault role must be created in Vault: 必须在保险柜中创建保险柜角色:
vault write auth/kubernetes/role/<role_name> \
 bound_service_account_names=<service_account_name> \
 bound_service_account_namespaces=<service_account_namespace> \
 policies=<policy_name>
This concludes the setup for Hashicorp vault on GKE, I highly recommend setting up vault secrets webhooks to seamlessly consume secrets from Vault based only on a few annotations.
这样就结束了在GKE上对Hashicorp Vault的设置,我强烈建议您设置Vault机密Webhooks ,以仅基于一些注释无缝地使用Vault的机密。
如何通过负载平衡器使用身份识别代理(IAP)设置Vault UI (How to setup Vault UI with Identity-Aware Proxy (IAP) via a load-balancer)
Identity-aware proxy is a way to authenticate a user without the need to set up a VPN or SSH Bastion.
身份识别代理是一种无需设置VPN或SSH堡垒即可对用户进行身份验证的方法。
If you want to set up a load balancer for the service with identity-aware proxy you can do that by following the steps below, otherwise, you can access vault UI via kubectl port-forward vault-0 8200
如果要使用身份识别代理为服务设置负载平衡器,请按照以下步骤操作,否则,可以通过kubectl port-forward vault-0 8200访问Vault UI。
The following process does not bind a google user to Vault by any means — it serves as a multi-factor authentication only, there is a way to use JWT for vault authentication but that allows any user from your domain to choose a role which is less secure…
以下过程不会以任何方式将Google用户绑定到保险柜-它仅用作多因素身份验证,可以使用JWT进行保险库身份验证,但允许您域中的任何用户选择角色较少的角色安全…
Note:You still need the self-signed certificate for Vault service itself, the load balancer certificate is required to enable IAP and https.
注意: 您仍需要Vault Service本身的自签名证书,需要负载均衡器证书才能启用IAP和https。
Prerequisites:
先决条件:
A certificate for the load balancer must be created via Google Managed certificate, or created as a Kubernetes secret.
必须通过Google托管证书创建负载平衡器的证书,或者将其创建为Kubernetes机密。
A certificate for the load balancer must be created via Google Managed certificate, or created as a Kubernetes secret.https://cloud.google.com/load-balancing/docs/ssl-certificates
必须通过Google托管证书创建负载平衡器的证书,或者将其创建为Kubernetes机密。 https://cloud.google.com/load-balancing/docs/ssl-certificates
The domain must be verified via Google webmaster tools
该域必须通过Google 网站管理员工具进行验证
A global static IP must be created and a DNS entry needs to be created
必须创建全局静态IP,并且需要创建DNS条目
(if you are using
(如果您使用的是
externalDNS service then you don’t need that)
外部DNS服务,则您不需要)
$ gcloud compute addresses create vault-ui --globalYou can create a certificate using the following YAML
您可以使用以下YAML创建证书
apiVersion: networking.gke.io/v1beta1
kind: ManagedCertificate
metadata:
  name: vault-ui-certificate
spec:
  domains:
    - vault.domain.com
$ kubectl apply -f managed-cert.yamlOnce created, give it 15-20 minutes to change the status from Proviosning to Active
创建完成后,请等待 15-20分钟,将状态从“ 禁止”更改为“ 有效”
Check the status of the cert:
检查证书的状态:
$ kubectl describe ManagedCertificate vault-ui-certificateName:         vault-ui-certificate
Namespace:    default
Labels:       <none>
Annotations:  kubectl.kubernetes.io/last-applied-configuration:
                {"apiVersion":"networking.gke.io/v1beta1","kind":"ManagedCertificate","metadata":{"annotations":{},"name":"vault-ui-certificate","namespac...
API Version:  networking.gke.io/v1beta1
Kind:         ManagedCertificate
Metadata:
  Creation Timestamp:  2020-01-13T23:10:28Z
  Generation:          3
  Resource Version:    7120865
  Self Link:           /apis/networking.gke.io/v1beta1/namespaces/default/managedcertificates/vault-ui-certificate
  UID:                 e35e7a1b-3659-11ea-ae90-42010aa80174
Spec:
  Domains:
    vault.ami-playground.doit-intl.com
Status:
  Certificate Name:    mcrt-9462e1f4-6dd6-4cf2-8769-9693ba29789e
  Certificate Status:  Active
  Domain Status:
    Domain:     vault.ami-playground.doit-intl.com    Status:     Active  Expire Time:  2020-04-12T15:12:29.000-07:00
Events:         <none>
为GKE配置IAP: (Configuring IAP for GKE:)
You may choose to follow the complete instructions instead of the steps summarized below:
您可以选择遵循完整的说明,而不是遵循以下概述的步骤:
Configure the IAP for your domain via Oauth consent screen and create the client credentials.
通过Oauth同意屏幕为您的域配置IAP并创建客户端凭据 。
Once you created the client you need to copy the client ID and add it to the authorized redirect URIs field in the following format:
创建客户端后,您需要复制客户端ID并将其添加到以下格式的授权重定向URI字段中:
https://iap.googleapis.com/v1/oauth/clientIds/<CLIENT_ID>:handleRedirectCreate the secret that will be used by the backend config:
创建将由后端配置使用的密钥:
kubectl create secret generic my-secret --from-literal=client_id=client_id_key \
    --from-literal=client_secret=client_secret_key
Create a backend config for the IAP:
为IAP创建一个后端配置:
apiVersion: cloud.google.com/v1beta1
kind: BackendConfig
metadata:
  name: config-default
spec:
  iap:
    enabled: true
    oauthclientCredentials:
      secretName: my-secret
enable the section on the bottom of the vault-gke.yaml files and make sure the values for the global static IP as well as the DNS for the host are updated
启用vault-gke.yaml文件底部的部分,并确保更新了全局静态IP的值以及主机的DNS
Note:you must delete the vault installation and recreate it with helm since GKE ingress has issues updating existing ingresses.
注意:由于GKE入口在更新现有入口方面存在问题,因此必须删除库安装并使用Helm重新创建。
to summarize the values yaml file:
总结值yaml文件:
- we are enabling the vault UI service on port 443 and exposing it via a NodePort 我们正在端口443上启用Vault UI服务,并通过NodePort将其公开
- we are setting up the vault service with the IAP via a backend config 我们正在通过后端配置通过IAP设置保管库服务
- we are enabling the ingress with a static global IP and the DNS as the host that is mapped to it 我们使用静态全局IP和DNS作为映射到其的主机来启用入口
- we are disabling HTTP on the load balancer 我们正在负载平衡器上禁用HTTP
- we are configuring the communication between the load balancer and the vault pods to be https only 我们正在将负载均衡器与保管箱Pod之间的通信配置为仅https
- we are setting up the managed certificate for the load balancer so that the load balancer will be an HTTPS listener 我们正在为负载均衡器设置托管证书,以便负载均衡器将成为HTTPS侦听器
Once deployed, if you will check the IAP page you will see the following errors and warnings (you might see both backend services with an ERROR if you are using a shared VPC networking. the real test is to check the vault UI URL in the browser)
部署后,如果您将检查IAP页面,则会看到以下错误和警告(如果使用共享VPC网络,则两个后端服务都可能显示ERROR。真正的测试是在浏览器中检查Vault UI URL。 )

The first error is for the default backend (the one that serves 404’s), the error is simply an indication that IAP won’t be active for any 404 page, which is the intended behavior.
第一个错误是针对默认后端(服务于404的后端)的,该错误只是表明IAP对于任何404页都不会处于活动状态,这是预期的行为。
The other is just a warning, if you click on the warning you will see something like this:
另一个只是警告,如果单击警告,您将看到类似以下内容:
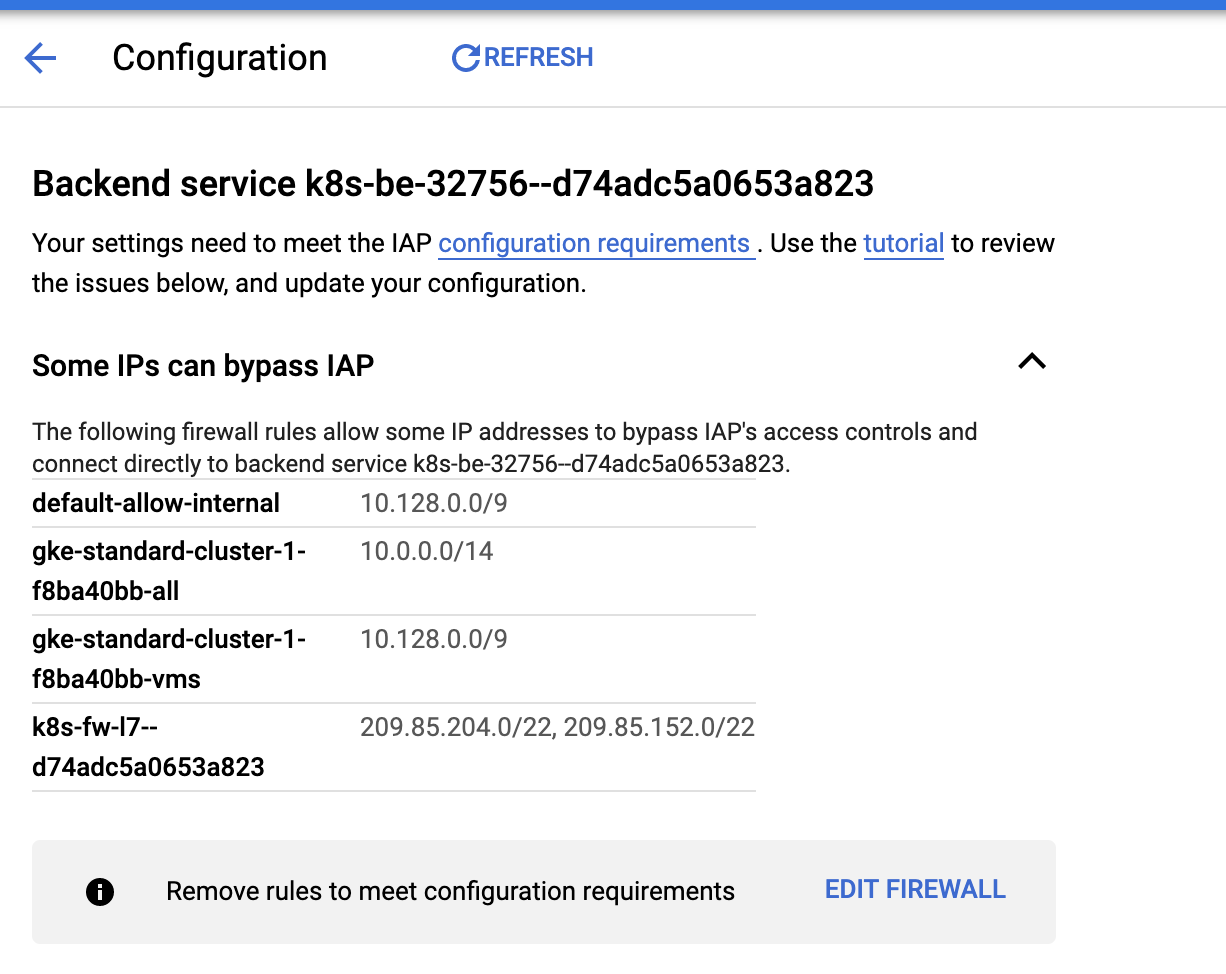
All it means is that GCP detected that some firewall rules will bypass the IAP such as internal networks, and the load balancer talking to vault backend.
这意味着GCP检测到某些防火墙规则将绕过IAP,例如内部网络,以及负载平衡器与保管库后端通信。
select the default/vault on the IAP page and from the info panel on the left add members that will need access to the vault-ui via the load balancer
在IAP页面上选择默认/保险库,然后从左侧的信息面板中添加需要通过负载均衡器访问保险库用户界面的成员
add the member with the “IAP-secured Web App User” permission to allow that user to access vault ui.
添加具有“ IAP安全的Web应用程序用户”权限的成员,以允许该用户访问库ui。
翻译自: https://blog.doit-intl.com/vault-high-availability-on-gke-68ef4fd7ca33
gke下载


 737
737

 被折叠的 条评论
为什么被折叠?
被折叠的 条评论
为什么被折叠?
 到【灌水乐园】发言


