


flutter启动动画
A guide for the Android and iOS platforms
Android和iOS平台指南
This article will guide you through setting up a custom splash screen with a different background color and image for dark and light modes on both iOS and Android. This can be a little tricky for Flutter developers who don’t have native development experience with those platforms, but if you follow the directions below, you’ll be up and running in no time.
本文将指导您设置用于iOS和Android上黑暗和明亮模式的具有不同背景颜色和图像的自定义启动屏幕。 对于那些没有使用这些平台的本机开发经验的Flutter开发人员来说,这可能会有些棘手,但是如果您按照以下说明进行操作,您将很快就可以启动并运行。
If you have your own color scheme and images you can adapt this tutorial to fit your own needs, otherwise follow the steps exactly as written. This tutorial will add a light and dark splash screen to the default counter app that comes with a new Flutter project.
如果您有自己的配色方案和图像,则可以根据自己的需要调整本教程,否则请完全按照编写的步骤进行操作。 本教程将为新Flutter项目随附的默认计数器应用添加明暗启动屏幕。
设定 (Getting set up)
Create a new Flutter project.
创建一个新的Flutter项目 。
在Flutter中启用黑暗模式 (Enable Dark Mode in Flutter)
In main.dart, add the following line to the MaterialApp widget:
在main.dart中 , 将以下行添加到MaterialApp小部件:
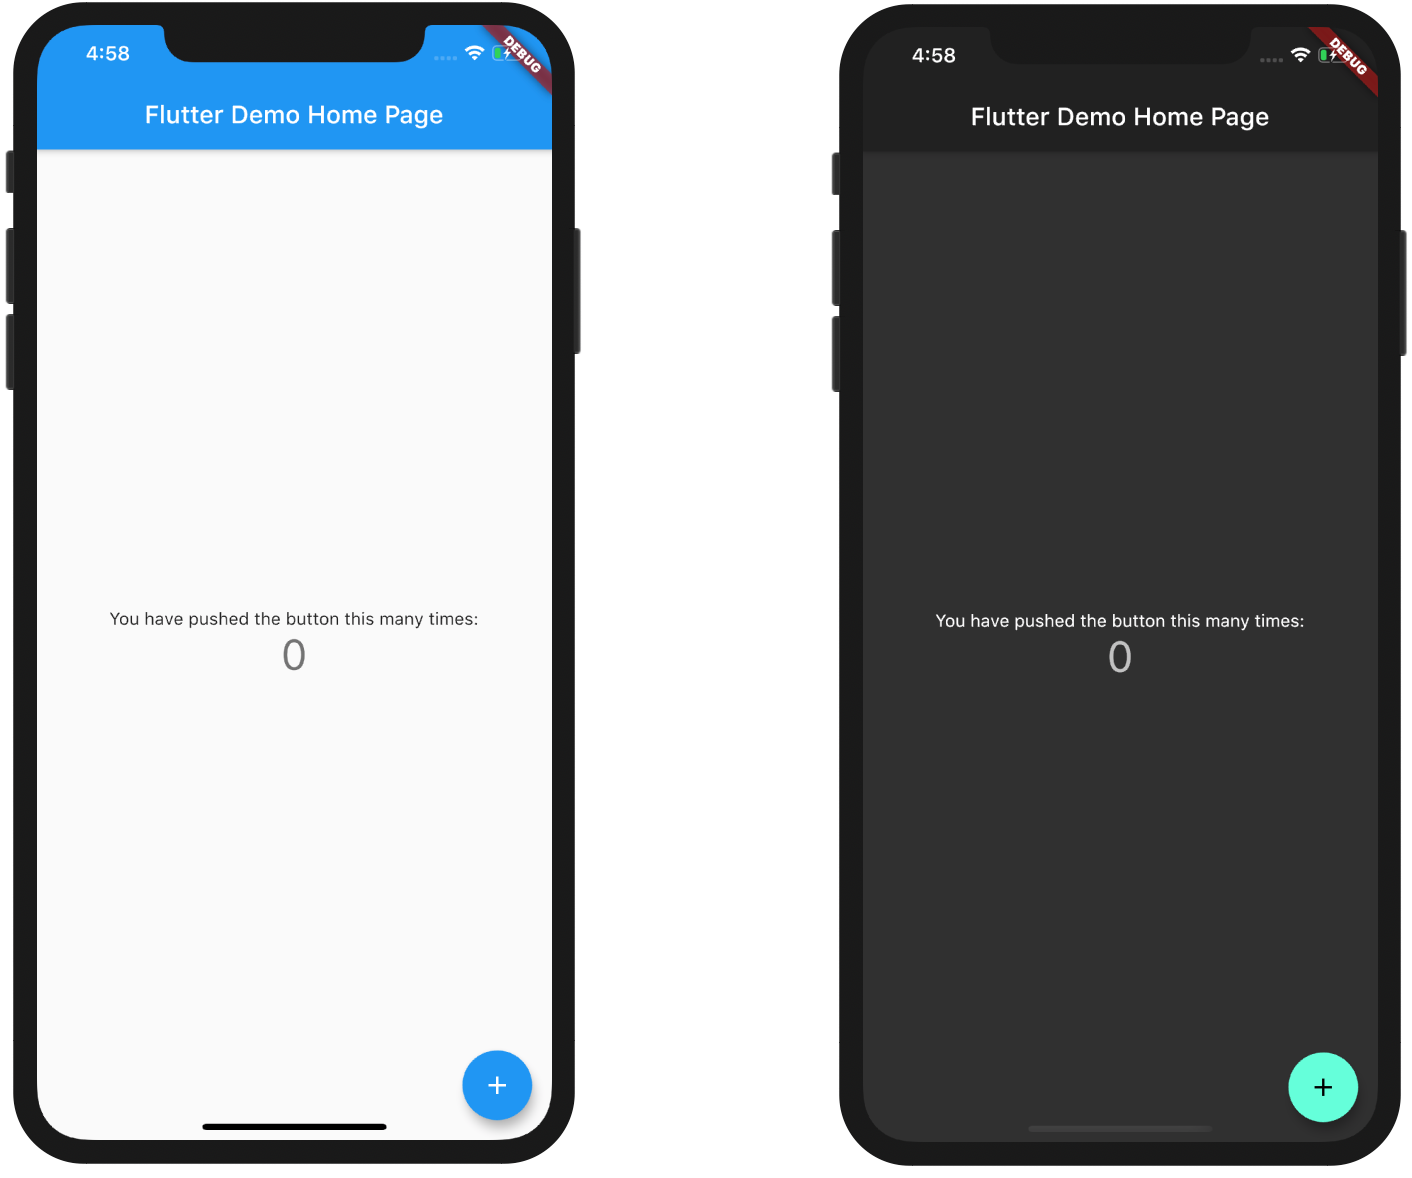
darkTheme: ThemeData.dark(),Changing the light/dark mode in the device Settings should change how the app looks now.
在设备设置中更改亮/暗模式应会更改应用程序的外观。
在iOS中添加启动画面 (Adding the splash screens in iOS)
We’ll start with iOS first.
我们将首先从iOS开始。
获取图像 (Getting the images)
Download the following images:
下载以下图像:
Name them whatever you want.
随便命名 你要。
将图像添加为资产 (Adding the images as assets)
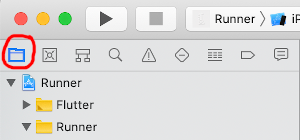
In Xcode, open the ios folder in your Flutter project. Make sure you are showing the Project navigator view:
在Xcode中,打开Flutter项目中的ios文件夹。 确保显示项目导航器视图:
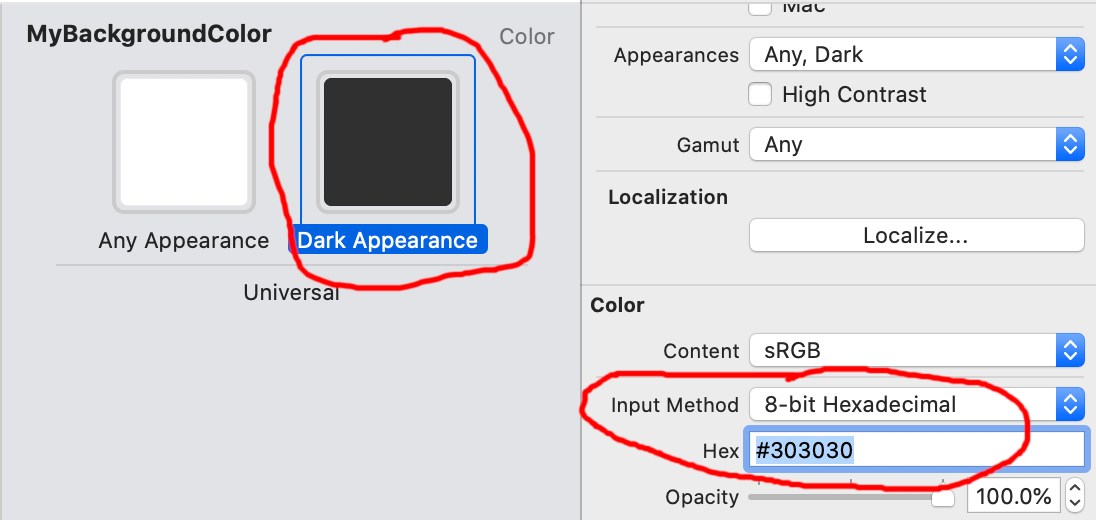
Then go to (1) Assets.xcassets > (2) LaunchImage. In the (3) Attributes inspector on the right (a chisel-like icon), select (4) Appearances and choose Any, Dark.
然后转到(1)Assets.xcassets>(2)LaunchImage 。 在右侧的(3)属性检查器中 (类似凿子的图标),选择(4)Appearances,然后选择Any,Dark 。
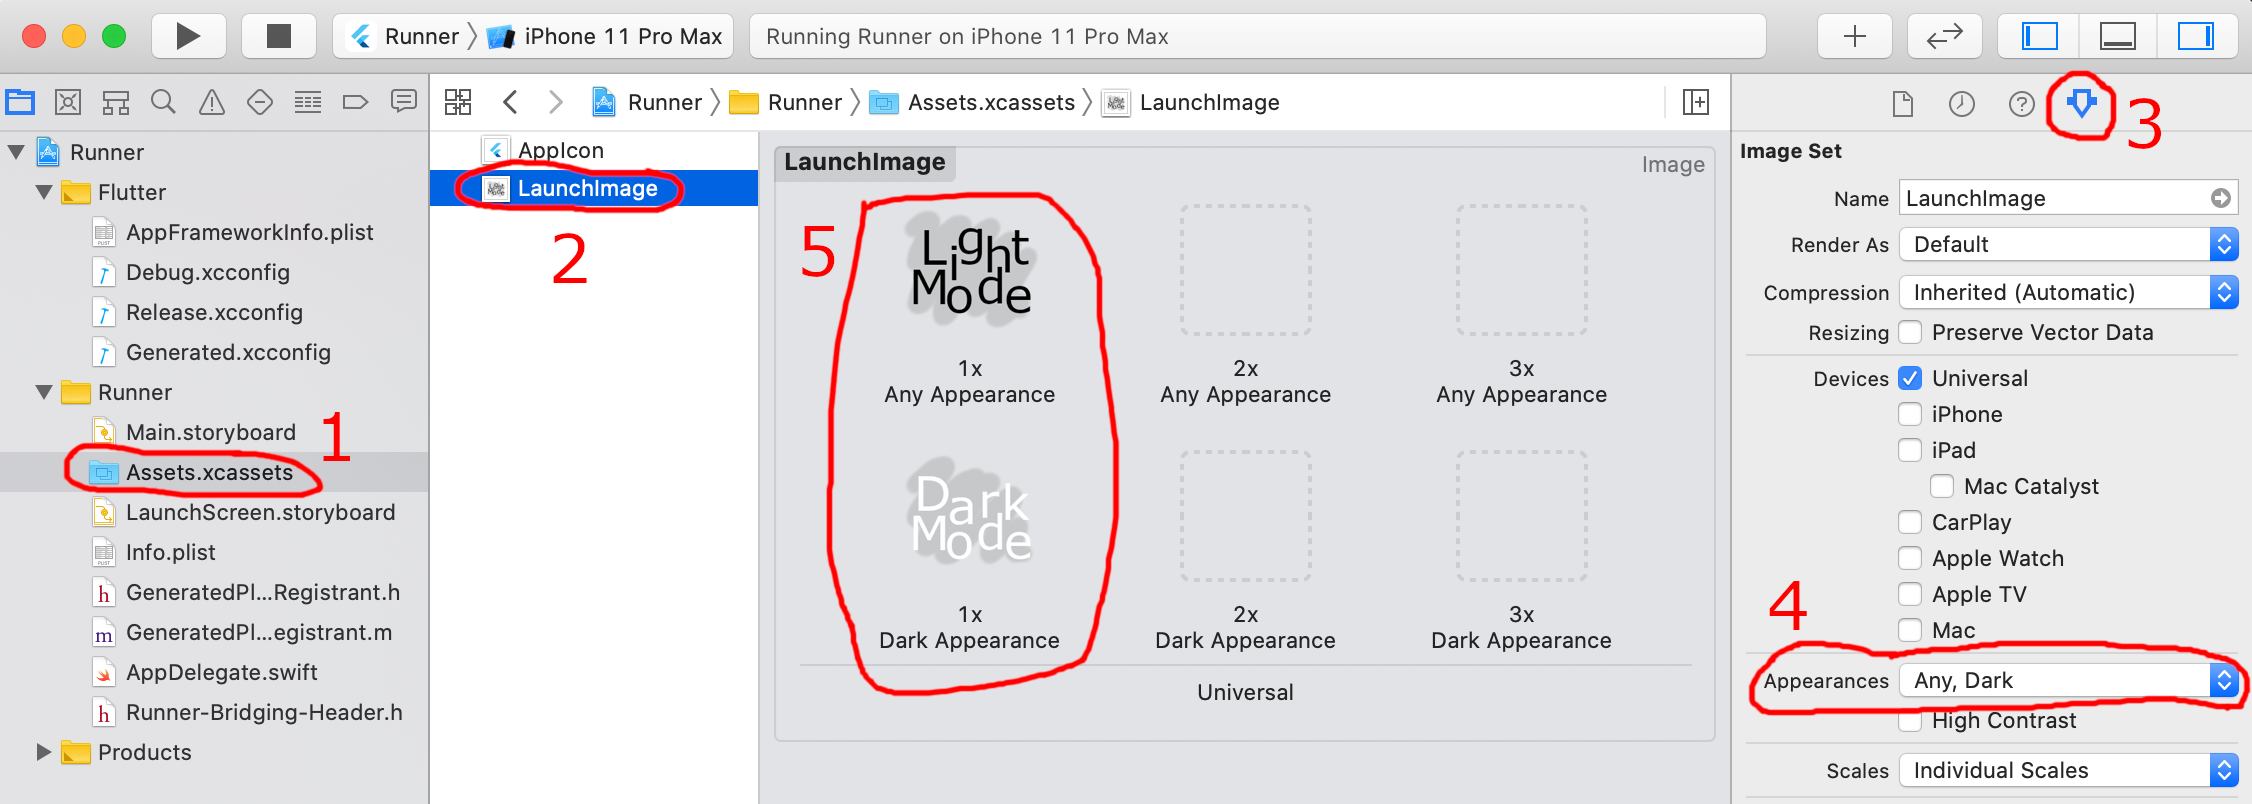
(5) Drag and drop the light mode image into the 1x Any Appearance box. Next drag and drop the dark mode image into the 1x Dark Appearance box.
(5)将灯光模式图像拖放到“ 1x任何外观”框中。 接下来,将深色模式图像拖放到“ 1x深色外观”框中。
Notes:
注意事项 :
If
LaunchImagedoesn’t exist, then right click where the 2 is in the image above and choose New Image Set. Click on it again to change the name toLaunchImage.如果
LaunchImage不存在,请右键单击上方图像中2的位置,然后选择New Image Set 。 再次单击它,将其名称更改为LaunchImage。- You should probably have three different densities for each image file (where the 2x file has twice the density of 1x, and 3x has three times the density of 1x), but I just used a single file each for light and dark in this example. If you put it in the 2x or 3x spot it would look smaller. 每个图像文件可能应该具有三种不同的密度(其中2x文件的密度是1x的两倍,而3x文件的密度是1x的三倍),但是在此示例中,我只使用了一个文件来处理明暗。 如果将其放在2倍或3倍的位置,则看起来会更小。
将图像用于启动屏幕 (Using the images for the launch screen)
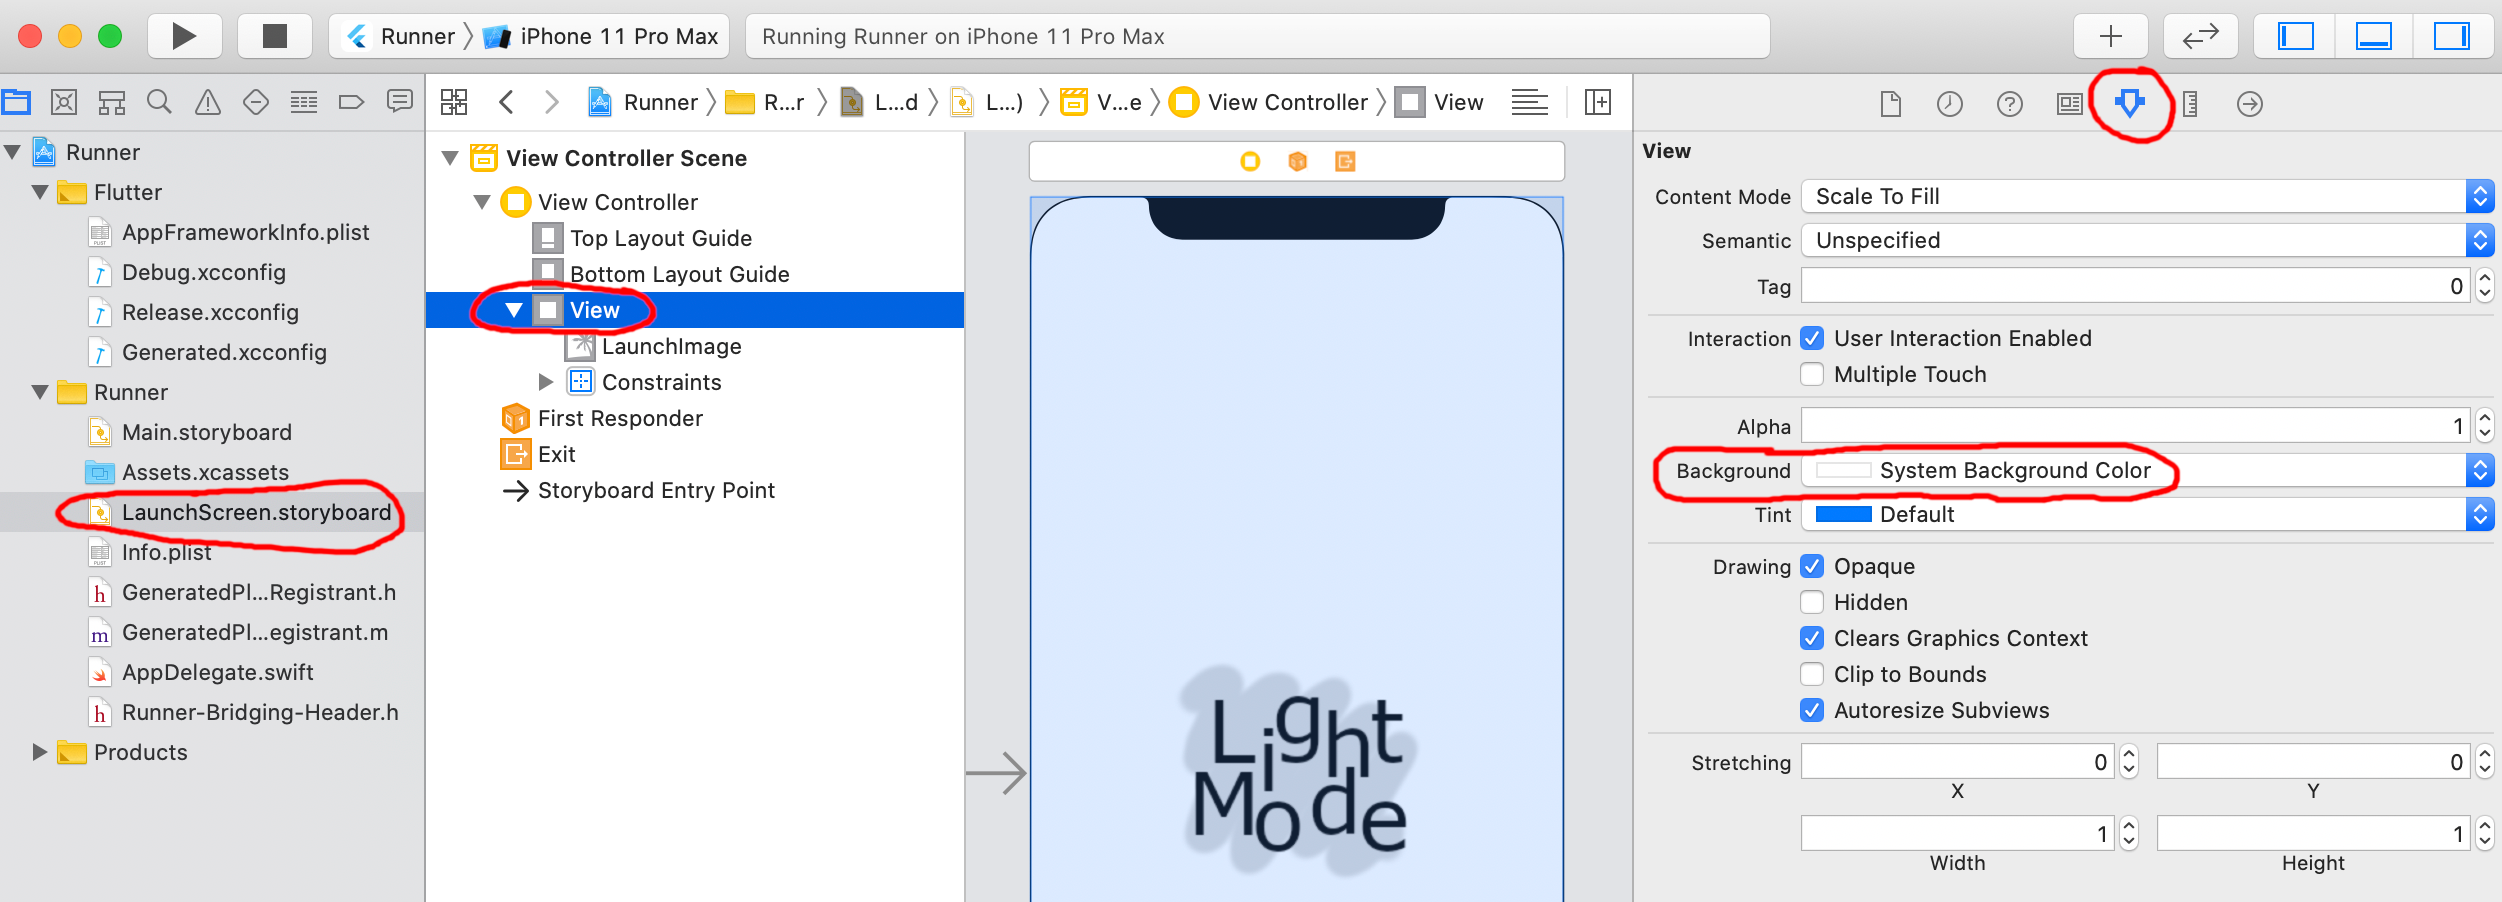
Then go to LaunchScreen.storyboard and click View. In the Attributes inspector on the right, select System Background Color for the Background. This will allow the background color to change according to the dark mode settings.
然后转到LaunchScreen.storyboard并单击查看 。 在右侧的“ 属性”检查器中 ,为“ 背景”选择“ 系统背景色 ”。 这将允许背景颜色根据暗模式设置而改变。
备用背景色(可选) (Alternate background colors (optional))
If you set the color to the system background color, then you’ll get black for dark mode and white for light mode. If you want some other light or dark shade then you need to use a different method.
如果将颜色设置为系统背景色,则在暗模式下将获得黑色,在亮模式下将获得白色。 如果您需要其他浅色或深色调,则需要使用其他方法。
Method 1 (iOS 11+): Color Set
方法1(iOS 11+):颜色设置
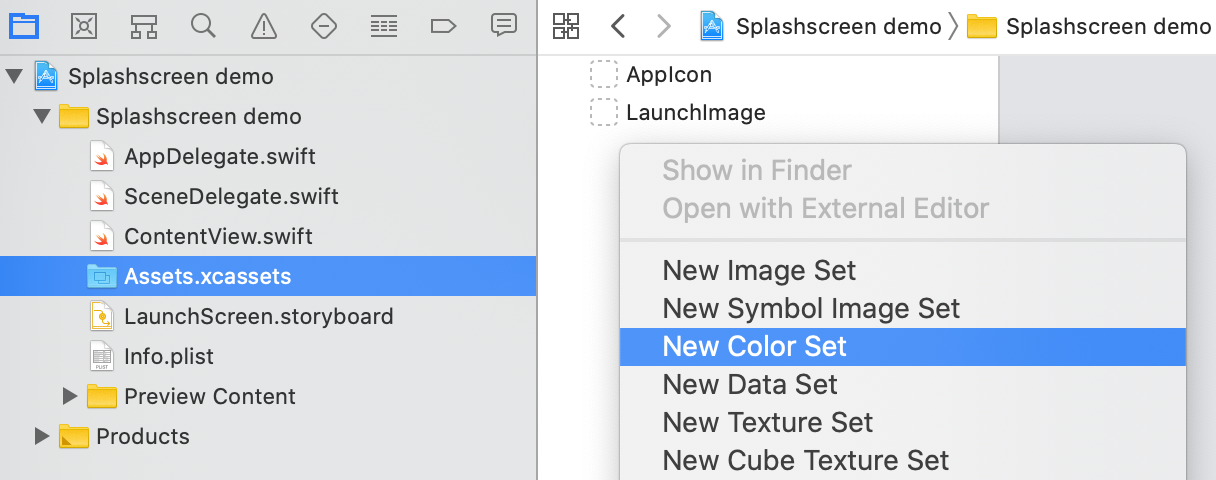
Choose Assets.xcassets and in the empty space below the LaunchImage right-click and choose New Color Set. Rename it to MyBackgroundColor.
选择Assets.xcassets,然后在LaunchImage下方的空白区域中单击鼠标右键,然后选择“新建颜色集”。 将其重命名为MyBackgroundColor 。
For the Appearances choose Any, Dark:
对于外观,选择任意,深色 :
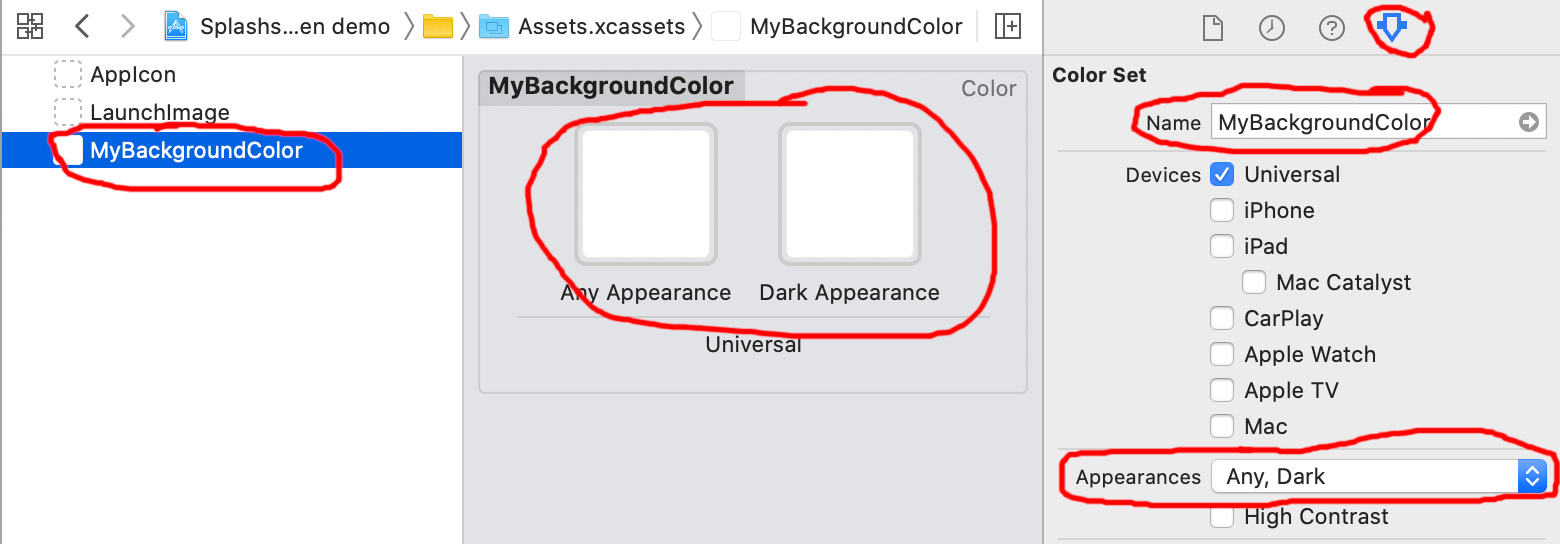
Then choose the Any or Dark Appearance, Hexadecimal for the Input Method, and enter your custom color as hex.
然后为“输入法”选择“任意或深色外观,十六进制”,并以十六进制输入您的自定义颜色。
Method 2 (support pre-iOS 11): Image Set
方法2(支持iOS 11之前的版本):图像集
Another trick you can do to change the background color is to use an image set with a light mono-colored image and a dark mono-colored image. I won’t show all the screenshots here, but these are the basic steps:
更改背景颜色的另一种技巧是使用具有浅单色图像和深色单色图像的图像集。 我不会在这里显示所有屏幕截图,但这是基本步骤:
In Assets.xcassets create a new Image Set and call it
MyBackgroundImage.在Assets.xcassets中创建一个新的图像集,并将其
MyBackgroundImage。Change the Appearances to Any, Dark.
将外观更改为任意,深色 。
- Drag in a light image and a dark image. You’re going to stretch them, so even a one pixel image is ok. 拖入浅色图像和深色图像。 您将拉伸它们,因此即使是一个像素的图像也可以。
In LaunchScreen.storyboard add a new ImageView to the base view.
在LaunchScreen.storyboard中,将一个新的ImageView添加到基本视图中。
In the Attributes Inspector set that image to
MyBackgroundImage. Set the Content Mode to Scale to Fill.在“ 属性”检查器中 ,将该图像设置为
MyBackgroundImage。 将内容模式设置为缩放以填充 。Set the constraints of
MyBackgroundImageto pin to the edges.设置
MyBackgroundImage的约束以固定到边缘。
Anyway, we aren’t doing any of that in this tutorial, so you can go on to test how it looks now.
无论如何,在本教程中我们不会做任何事情,因此您可以继续测试它的外观。
测试iOS启动画面 (Testing out the iOS splash screen)
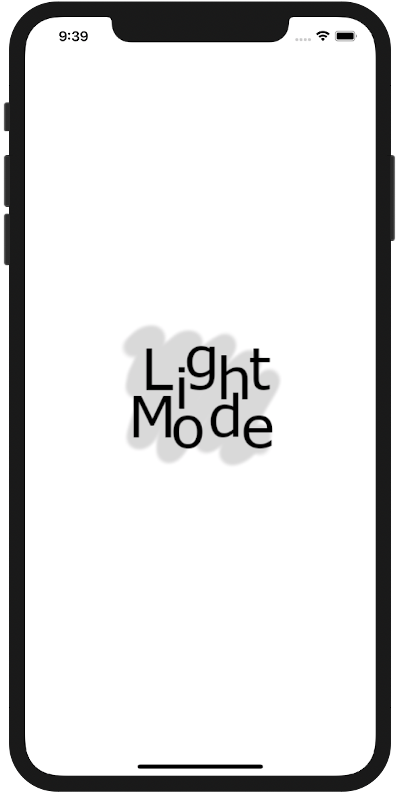
When you run the app now (which you can do directly in Xcode by pressing the triangular play button in the top left), you should* see the splash screen image show up briefly when the app starts for the first time.
现在运行该应用程序(您可以通过按左上角的三角形播放按钮直接在Xcode中执行该操作),您应该*看到该应用程序首次启动时短暂显示了初始屏幕图像。
* The image wouldn’t show up for me on the first few tries. I did a combination of restarting the simulator and Xcode and reinstalling the app. I’m not sure what made it work, but it finally did show up.
*在最初的几次尝试中,图像不会显示给我。 我将重启模拟器和Xcode并重新安装了应用程序。 我不确定是什么使它起作用,但是它最终还是出现了。
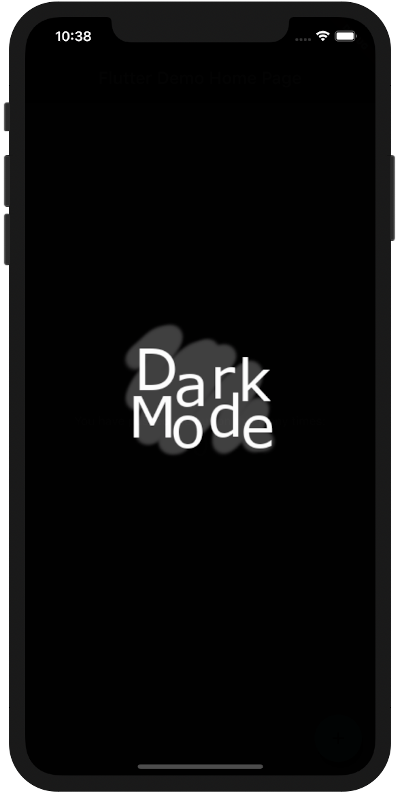
Changing the app to dark mode (Settings > Developer > Dark Appearance on the Simulator), restart the app and you should see the following:
将应用程序更改为黑暗模式(模拟器上的“设置”>“开发人员”>“黑暗外观 ”),重新启动应用程序,您应该看到以下内容:
That’s it for iOS. Now on to Android!
适用于iOS。 现在开始使用Android!
在Android中添加启动画面 (Adding the splash screens in Android)
灯光模式 (Light mode)
Download the following image:
下载以下图片:
Name it launch_image.png.
将其命名为launch_image.png 。
In your Flutter project, save the image in the Android drawable folder. That’s located here:
在Flutter项目中,将图像保存在Android drawable文件夹中。 位于这里:
android/app/src/main/res/drawableIn that same folder, open launch_background.xml. Replace the contents with the following code:
在同一文件夹中,打开launch_background.xml 。 用以下代码替换内容:
<?xml version="1.0" encoding="utf-8"?>
<layer-list xmlns:android="http://schemas.android.com/apk/res/android">
    <item android:drawable="@android:color/white" />
    <item>
        <bitmap
            android:gravity="center"
            android:src="@drawable/launch_image" />
    </item>
</layer-list>
Here are some things to note:
以下是一些注意事项:
- You can choose a different color besides white for the background if you like. 如果愿意,您可以选择白色以外的其他颜色。
Although your file is called launch_image.png, leave off the .png extension here.
尽管您的文件名为launch_image.png ,但此处不要使用.png扩展名。
This launch_background.xml file is referenced in the AndroidManifest.xml file.
在AndroidManifest.xml文件中引用了这个launch_background.xml文件。
If you want to have different resolution images for different devices, then you will put the images in the mipmap folders. That’s beyond the scope of this article, though.
如果要为不同的设备使用不同的分辨率图像,则将图像放置在mipmap文件夹中。 但是,这超出了本文的范围。
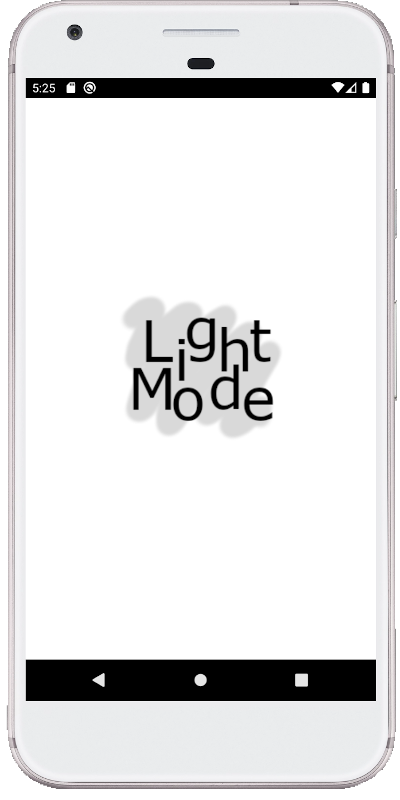
Run the app now any you should see this on startup:
立即运行该应用程序,无论您在启动时看到什么:
暗模式 (Dark mode)
Create a folder called drawable-night in the res folder. Then put the following image in that folder:
在res文件夹中创建一个名为drawable-night的文件夹。 然后将以下图像放入该文件夹:
Name it launch_image.png.
将其命名为launch_image.png 。
Also in the drawable-night folder, create another file called launch_background.xml and paste in the following code:
同样在drawable-night文件夹中,创建另一个名为launch_background.xml的文件,并粘贴以下代码:
<?xml version="1.0" encoding="utf-8"?>
<layer-list xmlns:android="http://schemas.android.com/apk/res/android">
    <item android:drawable="@android:color/black" />
    <item>
        <bitmap
            android:gravity="center"
            android:src="@drawable/launch_image" />
    </item>
</layer-list>
The difference is that the background color is black now. If you want to use your own hex color value, then you can create a colors.xml file in the values folder to define your colors. See this link for help.
区别在于背景颜色现在为黑色 。 如果要使用自己的十六进制颜色值,则可以在values文件夹中创建colors.xml文件来定义颜色。 请参阅此链接以获取帮助。
Your file structure should look like this now:
您的文件结构现在应如下所示:
res/
  /drawable
    launch_background.xml
    launch_image.png
  /drawable-night
    launch_background.xml
    launch_image.png
Android uses the folder names to select which resources to show based on the user’s dark mode settings.
Android使用文件夹名称根据用户的暗模式设置选择要显示的资源。
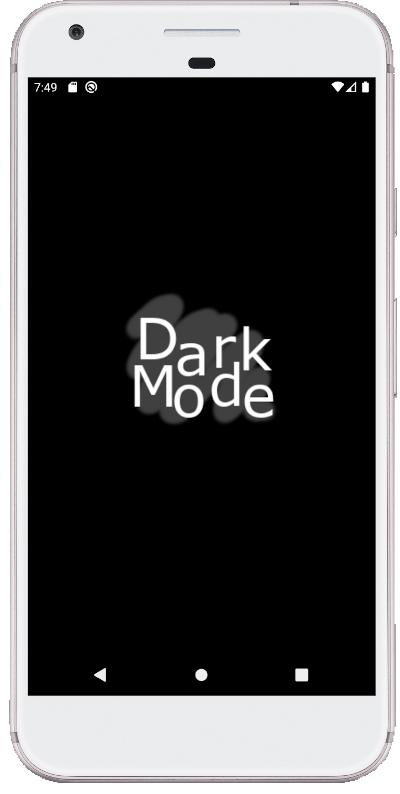
Switch your device or emulator to dart mode (Settings > Display > Dark theme), and run the app again. You should see the dark resources showing on the splash screen:
将您的设备或模拟器切换到Dart模式( “设置”>“显示”>“黑暗主题” ),然后再次运行该应用程序。 您应该看到初始屏幕上显示的黑色资源:
Congratulations! You have your light and dark splash screens working on Android and iOS now.
恭喜你! 您现在可以在Android和iOS上使用明暗启动画面。
翻译自: https://medium.com/flutter-community/splash-screens-for-dark-and-light-mode-in-flutter-eb85f1aa025
flutter启动动画


 898
898


 被折叠的 条评论
为什么被折叠?
被折叠的 条评论
为什么被折叠?
 到【灌水乐园】发言


